

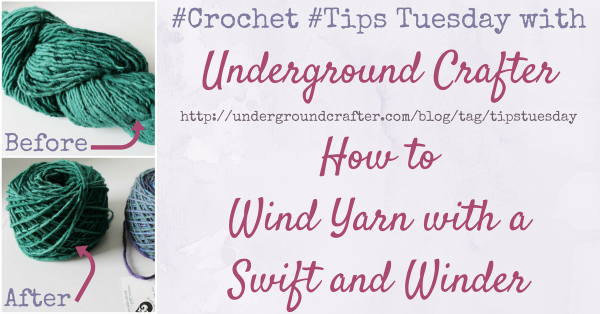
I know I’m not the only crocheter (or knitter) out there who loves to experiment with new and exciting yarns. When I was a kid, yarn was pretty much only available wound into balls and big, center-pull skeins, but now you can find yarn in all sorts of variations. In this tutorial, I show you how to take yarn that is in a hank or skein and wind it into an easy-to-use, center-pull yarn cake.
This post contains affiliate links. I may receive compensation (at no added cost to you) if you make a purchase using these links.
In the last few years, the availability of independent yarns has exploded. We all have more access to hand dyed yarns, hand spun yarns, and yarns imported in small batches — through online shops, at events, and in our local community — than ever before. Have you been worried about buying yarn from an indie company because it’s in a hank or skein? (Or, more likely, has the yarn sat in your stash, unused, because you don’t know how to wind it?)

I’m going to show you how to use a yarn swift and a yarn winder to transform that hank of yarn into a usable “yarn cake.”
But first, let me tell you a bit about my set up
I have an easily collapsible, table top, “Amish-style” yarn swift. It’s a very affordable model by ChiaoGoo which you can get here on Amazon. I kept the box it came in and I can fold it up after each use so the cats don’t go crazy on it (and it doesn’t take over my workspace).
I use a hand-operated yarn winder like this one. Previously, I had a Boye electric yarn winder. It was much easier on the yarns, but too noisy for me to be up winding at all hours (and it drove the cats crazy). Now, I think of each winding session as a mini arm workout.
And now: How to wind yarn with a swift and a winder

Step 1: Start with a yarn swift (at left) and a ball winder (at right).
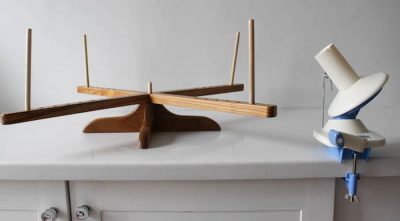
My “Amish-style” yarn swift is made of wood and can be easily assembled and then put away just as quickly (which is perfect for apartment living). Follow the instructions for assembling your swift and winder, and set them up close near each other on a flat surface.
My hand-cranked ball winder is much quieter (and smaller) than the electric versions, and I can control the tension and speed that I’m using to wind the yarn. Be sure that it is tightly clamped onto the surface you are using to wind the yarn.
Step 2: Gently separate the hank of yarn by pulling it out from where it’s folded, being careful not to pull the strands apart.

Step 3: Position the yarn on your swift.

Most swifts have multiple pegs to adjust the size of the yarn hank. Use the size where the fit is snug, but not too stretched out.

After you have the yarn positioned on the swift, cut the ties. Be careful because at least one of the ties is usually formed with yarn from the hank!
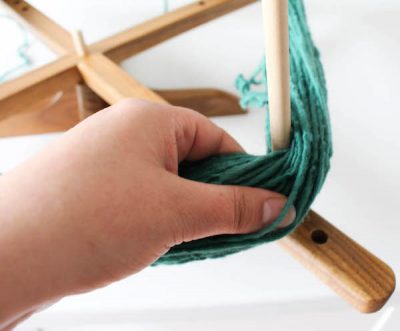
Look over the yarn once more, and adjust it if necessary so that there aren’t any twists in it. You’ll want it to be flowing in the same direction all the way around the swift, preferably with the yarn tail on the outside.
Step 4: Thread the yarn through the stabilizer on the winder.

Step 5: Stretch a small length of yarn over the top of the winder.

This will be the center pull strand once your yarn is wound.
Step 6: Start cranking your yarn winder clockwise.

Once you feel comfortable, you can crank even faster.
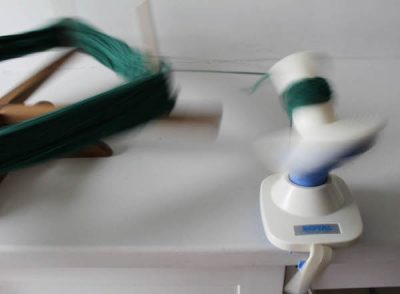
Be sure to slow down periodically, especially as you get to the end of the yarn, to check for tangles.
Step 7: Remove the “yarn cake” from the winder.
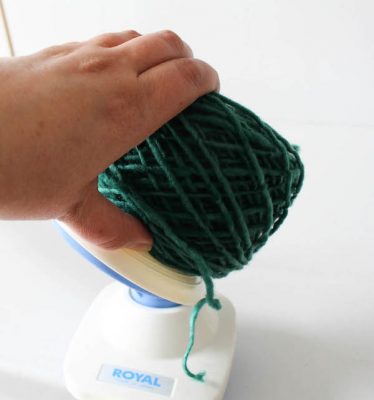
Be gentle to avoid messing up all your hard work! I like to tie the label to the outside strand of yarn so that I can identify it later.

Don’t forget that your “yarn cakes” can pull from the center. The flat bottom makes the “yarn cake” easier to use than a ball of yarn. It sits flat and you don’t have to worry about it rolling away. You might even find yourself winding up scraps and converting other types of yarn into cakes.
By the way, if you’d like to see what this yarn turned into, check out my free crochet pattern for the Puff-y Stripes Scarf.

Now that you know how to wind your own yarn, go shopping for some indie yarn! You can find lots of options in local yarn shops, at regional fiber festivals or farmers markets, or through online marketplaces like Jimmy Beans or LoveCrafts.
Good tutorial! I fold up the yarn label and slide the cake from the winder onto it, so it’s in the middle of the cake.
Great tutorial! It is exactly what I do. I have the amish swift and manual winder. the swift is
amazing and makes the process very easy. Recently I wound a skein of Marble (bulky) yarn and it all fit on the winder, with a little help and finger on the end of the stabilizer.
Great tutorial. Very helpful. Thanks for sharing.
This is a wonderful tip. I will invest in the swifter you have. I love the specialty hand dyed yarns. The hanks were scary, but I muddled along anyway.
Glad it helped!