

 I’m excited to share a Christmas crochet pattern booklet review, along with two excerpted patterns for holiday-themed amigurumi critters, so read on for details!
This post contains affiliate links. I may receive compensation (at no added cost to you) if you make a purchase using these links. A free review copy of Mini Christmas Crochet: 20 On-the-Go Projects (50¢ a pattern) by Val Pierce was provided to me by Search Press North America. Although I accept free products for review, I do not accept additional compensation, nor do I guarantee a positive review. My reviews are based entirely on my honest opinions.
Book Review

Mini Christmas Crochet: 20 On-the-Go Projects (50¢ a pattern) is an updated version of Mini Christmas Crochet (Twenty to Make) by Val Pierce.
Like the other booklets in this series, Mini Christmas Crochet is a book focused on projects, not techniques. The book opens with a biography of Val and a short introduction highlighting Val’s love of Christmas and the joy of handmade gifting and decorating. She notes that all of the patterns in the book “can be made quickly and easily using scraps and oddments of yarn,” which is definitely true. As the title and introduction of the book suggests, it focuses on small “stocking stuffer,” ornament, and decoration projects that can be pieced together quickly by both newbie crocheters and time-strapped pros. After the intro, the book has a short Hints & Tips section. Val notes that most of the patterns are made using cotton threads and a U.S. Sized B-1 (2.25 mm) crochet hook, but larger hooks can be used if you choose to substitute a thicker yarn. She also shares the tip that you should be stuffing projects as you go.
The book continues on to the patterns, which are written in US pattern abbreviations. 9 patterns are for ornaments (which include both stuffed, amigurumi-style ornaments and motif ornaments), 5 are for Christmas characters (including a snowman, animals, and an angel), 2 are for table decorations, and the remaining 4 are for a Christmas cracker, gift wrap, a magnet, and a table-top tree. The patterns don’t indicate a difficulty level, but most use simple stitch combinations so should be within the reach of any beginner crocheter who can crochet in the round. At the same time, a more advanced crocheter could work on these projects while watching streaming shows or during errands.
Each pattern uses a large, styled photo of the project as well as a photo of the project against a white background with easy-to-read text. The booklet is a larger size that the original version but is still slender enough to fit into a project bag for portability. Though it’s a paperback, you can spread the spine easily to read and crochet at the same time. This book is ideal for crocheters who love making handmade holiday gifts, wrap, and decorations, or those who enjoy small, portable projects.
The down sides: Unfortunately, all patterns aren’t listed on Ravelry, but you can see many of the patterns on the book cover. The book uses only pattern abbreviations and no stitch diagrams, so crocheters who prefer visual patterns may not enjoy this book as much.
Overall, this is a fun book for a Christmas pattern collector who would like some projects for crocheting on the go.
You can check out two amigurumi patterns from the book below, for Rudolf the Reindeer and the Christmas Bear ornament!
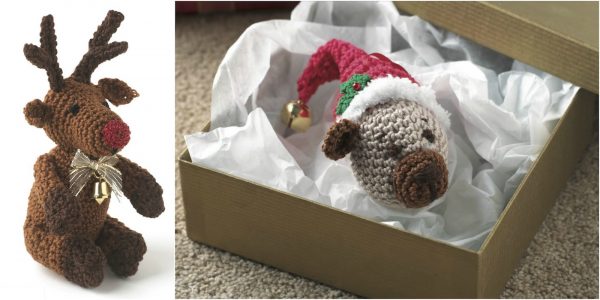
 Rudolf the Reindeer
Crochet Pattern by Val Pierce
 Published in Mini Christmas Crochet: 20 On-the-Go Projects (50¢ a pattern).
Pattern Text © 2011 Val Pierce. Photographs and Design © 2011 Search Press Ltd. Shared with permission from Search Press North America.
Note from Underground Crafter: This pattern uses standard U.S. crochet pattern abbreviations. You can find a master list of abbreviations here.
Materials and equipment:
- Crochet hook size B-1
- No. 5 crochet cotton—1 ball of mid brown and 1 ball of dark brown
- Oddment of red metallic yarn
- Black embroidery floss or oddment of black crochet cotton
- Tiny gold bow and bell embellishment
- Small amount of stuffing
- Sewing needle and threads to match the yarns
Measurements:
- Rudolf is approximately 4in high to the top of his head.
Instructions:
Body
- Using mid brown crochet cotton, make 2 sc.
- Round 1: work 6 sc into 2nd ch from hook then join with a sl st to form a tight circle.
- Round 2: work 2 sc into each st around [12 sts].
- Round 3: *1 sc into next sc, 2 sc into next sc,* repeat from * to * all around [18 sts].
- Round 4: *1 sc into each of next 2 sc, 2 sc into next sc,* repeat from * to * all around [24 sts].
- Round 5: *1 sc into each of next 3 sc, 2 sc into next sc,* repeat from * to * all around [30 sts].
- Rounds 6–16: work in sc all around.
- You will now begin decreasing. Stuff the body as you work.
- Round 17: *1 sc into each of next 3 sc, sc 2 tog,* repeat from * to * all around.
- Round 18: *1 sc into each of next 2 sc, sc 2 tog,* repeat from * to * all around.
- Round 19: work in sc all around.
- Round 20: sc 2 tog all around. Break yarn.
- Finish stuffing the body and then run the yarn through the last row of sts, draw up and fasten off.
Head
- Using mid brown crochet cotton, make 2 sc.
- Round 1: work 6 sc into 2nd ch from hook then join with a sl st to form a tight circle.
- Round 2: work 2 sc into each st around [12 sts].
- Round 3: *1 sc into next sc, 2 sc into next sc,* repeat from * to * all around [18 sts].
- Rounds 4–7: work in sc all around.
- Round 8: *1 sc into each of next 2 sc, 2 sc into next sc,* repeat from * to * all around then join with a sl st.
- Round 9: work in sc all around then join with a sl st.
- Round 10: *1 sc into next sc, 2 sc into next sc,* repeat from * to * all around then join with a sl st as before.
- Rounds 11–15: work 1 sc into each sc all around then join with a sl st as before.
- You will now begin decreasing. Stuff the head as you work.
- Round 16: *1 sc in each of next 2 sc, sc 2 tog,* repeat from * to * all around then join with a sl st as before.
- Round 17: work in sc all around then join with a sl st.
- Round 18: *1 sc into next sc, sc 2 tog,* repeat from * to * all around then join with a sl st.
- Round 19: work in sc all around then join with a sl st.
- Round 20: sc 2 tog all around then join with a sl st. Fasten off.
- Finish stuffing the head, if needed, then run the yarn through the last row of sts and draw up tight. Fasten off.
Front legs (make 2)
- Using mid brown crochet cotton, make 6 ch.
- Row 1: 1 sc into 2nd ch from hook, 1 sc into each ch to end, turn.
- Rows 2–3: work in sc, increasing 1 sc at each end of row.
- Work 4 rows in sc.
- Break mid brown and join in dark brown.
- Work 2 rows in sc.
- Next row: work in sc, increasing 1 sc at each end of row.
- Next row: work in sc. Fasten off.
Back legs (make 2)
- Using mid brown crochet cotton, make 10 ch.
- Row 1: 1 sc into 2nd ch from hook, 1 sc into each ch to end, turn.
- Row 2: 1 ch, 1 sc into each sc to end, turn.
- Rows 3–4: work in sc, increasing 1 sc at each end of row.
- Work 8 rows in sc.
- Change to dark brown and work 4 rows in sc.
- Next row: work in sc, decreasing 1 sc at each end of row.
- Next row: repeat previous row. Fasten off.
Large antlers (make 2)
- Using dark brown crochet cotton, make 12 ch.
- Row 1: 1 sc into 2nd ch from hook, 1 sc into each ch to end, turn.
- Rows 2–4: 1 ch, 1 sc into each sc to end, turn. Fasten off.
Small antlers (make 2)
- Using dark brown crochet cotton, make 6 ch.
- Row 1: 1 sc into 2nd ch from hook, 1 sc into each ch to end, turn.
- Rows 2–4: 1 ch, 1 sc into each sc to end, turn. Fasten off.
Ears (make 2)
- Using mid brown crochet cotton, make 2 ch.
- Row 1: work 1 sc into 2nd ch from hook.
- Row 2: 1 ch, 3 sc into next sc, turn.
- Rows 3–4: 1 ch, 1 sc into each sc to end, turn.
- Row 5: 1 ch, sc 2 tog, 1 sc in last sc, turn.
- Row 6: sc 2 tog. Fasten off.
Nose
- Using red metallic yarn, make 2 ch. Work 14 dc into 2nd ch from hook then join with a sl st to fi rst dc worked. Fasten off.
To make up
- Work in all the ends. Attach the red nose to the head. With black floss or cotton embroider the eyes with French knots and use straight stitches for the mouth. Sew the ears on to each side of the head, using the photograph as a guide. Fold each antler in half lengthways and stitch along the side seam. Sew a short antler on to each long antler at a slight angle, using the photograph as a guide if needed. Now sew the antlers to the head just above the ears. Sew the head on to the body.
- Fold the front legs in half lengthways and sew the side seams. Stuff lightly, adding extra at the hoof (dark brown) end to pad them out a little. Oversew a length of cotton through the center of the hoof end to create the cloven effect. Make up the back legs in the same way. Attach the legs to the body, remembering that Rudolf is sitting down.
Christmas Bear
Crochet Pattern by Val Pierce
 Published in Mini Christmas Crochet: 20 On-the-Go Projects (50¢ a pattern).
Pattern Text © 2011 Val Pierce. Photographs and Design © 2011 Search Press Ltd. Shared with permission from Search Press North America.
Note from Underground Crafter: This pattern uses standard U.S. crochet pattern abbreviations. You can find a master list of abbreviations here.
Materials and equipment:
- Crochet hook sizes B-1 and G-6
- No. 3 crochet cotton—1 ball of beige, 1 ball of red and small amounts of mid-brown, dark brown, and green
- Small amount of white eyelash yarn
- 1 tiny red bead
- Gold jingle bell
- 20in of narrow red ribbon
- Sewing needle and thread to match the yarns
- Small amount of stuffing
Measurements:
- The bear measures approximately 5-1⁄2in from the end of his hat to the tip of his nose
Instructions:
Head
- Using the B-1 hook and beige yarn, make 2 ch. Work 6 sc into 2nd ch from hook then join with a sl st into a circle.
- Round 1: work 2 sc into each sc around then join with a sl st [12 sts].
- Round 2: *1 sc into next sc, 2 sc into next sc,* repeat from * to * all around, join with a sl st as before.
- Round 3: *1 sc into each of next 2 sc, 2 sc into next sc,* repeat from * to * all around, join with a sl st as before.
- Round 4: *1 sc into each of next 3 sc, 2 sc into next sc,* repeat from * to * all around, join with a sl st as before.
- Round 5: 1 sc into each of next 4 sc, 2 sc into next sc,* repeat from * to * all around, join with a sl st as before.
- Work 8 rounds in sc with no increase.
- Now shape the top, stuffing the head as you go.
- Next round: *1 sc into each of next 4 sc, sc 2 tog,* repeat from * to * all around, join with a sl st as before.
- Next round: *1 sc into each of next 3 sc, sc 2 tog,* repeat from * to * all around, join with a sl st as before.
- Next round: *1 sc into each of next 2 sc, sc 2 tog,* repeat from * to * all around, join with a sl st as before.
- Next round: *1 sc into next sc, sc 2 tog,* repeat from * to * all around, join with a sl st as before.
- Next round: sc 2 tog all around. Fasten off and run thread through last row of sts; draw up and fasten off.
Muzzle
- Using the B-1 hook and mid brown yarn, make 2 ch. Work 6 sc into 2nd ch from hook then join with a sl st into a circle.
- Round 1: work 2 sc into each sc to end, join with a sl st [12 sts].
- Round 2: *1 sc into next sc, 2 sc into next sc,* repeat from * to * all around, join with a sl st as before.
- Round 3: *1 sc into next 2 sc, 2 sc into next sc,* repeat from * to * all around, join with a sl st as before. Fasten off.
 Ear (make 1)
- Using the B-1 hook and mid brown yarn make 2 ch. Work 6 sc into 2nd ch from hook then join with a sl st into a circle.
- Round 1: work 2 sc into each sc to end, join with a sl st.
- Round 2: work 1 sc into each sc to end. Fasten off.
Hat
- Using the B-1 hook and red yarn make 32 ch.
- Row 1: 1 hdc into 3rd ch from hook, 1 hdc into each ch to end, turn.
- Row 2: 1 ch, 1 sc into each hdc to end, turn.
- Row 3: 2 ch [counts as first hdc], 1 hdc into each sc to end.
- Row 4: repeat row 2.
- Row 5: 2 ch [counts as first hdc], 1 hdc into each of next 2 sc,* hdc 2 tog, 1 hdc into each of next 3 sc,* repeat from * to * ending last repeat with hdc 2 tog into each of last 2 sc. Turn.
- Row 6: 1 ch, 1 sc into each sc to end.
- Row 7: 2 ch [counts as first hdc], *hdc 2 tog, 1 hdc into next sc,* repeat from * to * ending last repeat with hdc 2 tog, hdc into each of last 2 sc. Turn.
- Row 8: repeat row 6.
- Row 9: 2 ch [counts as first hdc], *hdc 2 tog,* repeat from * to * to last st, hdc into last sc.
- Rows 10–15: work in hdc.
- Row 16: hdc 2 tog to end of row. Fasten off.
- Using the G-6 hook and eyelash yarn, make a chain long enough to wrap around the brim of the hat twice, fasten off.
Holly leaf (make 2)
- Using the B-1 hook and green yarn, make 5 ch. 1 sc into 2nd ch from hook, 2 ch, *sl st into top of sc just worked, 1 sc into next ch, 2 ch, sl st into top of sc just worked,* repeat from * to * once more. Fasten off.
- Sew the leaves together as a pair. Sew a tiny red bead on to one end of the leaf as a berry.
To make up
- Sew in any loose ends. Sew the hat seam and attach the bell to the point at the top. Wrap the eyelash chain twice around the brim of the hat to make a fluffy border and stitch it in place. Attach the holly leaf to one side of the hat.
- Sew the muzzle on to the front of the head, stuffing it lightly to give it shape. Using dark brown, embroider the nose, mouth, eyes and eyebrows. Sew the ear in position. Only one ear is used because the hat sits on the other side of the head. Sew the hat to the head.
- Thread the ribbon through the hat to make a hanging loop. Decide how long you want the ribbon loop to be and trim the ribbon as necessary. Either tie the ends of the ribbon together in a knot or stitch them to form a loop.
You can find more portable holiday projects and crochet patterns from Search Press on Amazon!