

If you enjoy giving quirky gifts, the knitting pattern collection by Vanessa Mooncie that I’m reviewing today will be right up your alley! I’m also sharing an excerpted pattern for the unisex Alien hat from the book, so read on for details!

This post contains affiliate links. I may receive compensation (at no added cost to you) if you make a purchase using these links. A free review copy of Monster Hats: 15 Scary Head Warmers to Knit by Vanessa Mooncie was provided to me by GMC Publications. Although I accept free products for review, I do not accept additional compensation, nor do I guarantee a positive review. My reviews are based entirely on my honest opinions.
Book Review
Monster Hats: 15 Scary Head Warmers to Knit by Vanessa Mooncie is a fun, knitting pattern collection. All of the patterns are available in both child and adult sizes.
The book opens with an introduction from Vanessa, who took her inspiration from comic books and mythology. This is a very visual book, so the next 16 pages are pictures of the hats being worn by kids and teens who look to be having a lot of fun. The first section is Make the Monsters, which includes patterns for all 15 hats. Each pattern includes a detailed materials list, the completed project sizes, and the tension (gauge) used for the pattern. Within each pattern, there is a introduction to the monster, zany illustrations, and several large pictures of the hat being worn. Each pattern starts with “method,” which explains the construction, and ends with “making up,” which explains how to add various pieces to the finished hat.

After the patterns, there is an Other Things You Need to Know chapter that includes:
- Getting Started, with tips on sizing, tension (gauge), needles and notions, substituting yarn, and reading patterns and charts;
- Knitting Basics. with written and illustrated instructions for the slip knot, 3 cast on methods, knit and purl stitches, knitting into the front or back loop, 3 types of increases, making loops (usually used for “hair”), casting off, and 4 seaming methods;
- Finishing Touches, with written and illustrated instructions for twisted and striped cords, tassels, and 4 embroidery stitches;
- Fleece Linings, with instructions and a template for making a fleece lining for your hats;
- Knitted Linings, with detailed instructions for making knitted linings for each hat; and
- Appendices for knitting needle sizes, pattern abbreviations, and a list of materials (yarn suppliers).
The book’s layout is just as unconventional as the patterns and it mixes illustrations, writing, and typed text to great effect. The book doesn’t list difficulty levels, but many of the hats could be successfully made by advanced beginners with patience. Several of the patterns are more suited to intermediate knitters. If you like knitting hats, and if you like making something different from the “typical” hat pattern, try out Monster Hats. I think you’ll like it!
Alien
Knitting Pattern by Vanessa Mooncie
Published in Monster Hats: 15 Scary Head Warmers to Knit
Pattern and Photos © 2016 Vanessa Mooncie and GMC Publications Ltd. Shared with permission from GMC Publications Ltd.
Notes from Underground Crafter:
- This pattern uses Craft Yarn Council knitting abbreviations. A full list of abbreviations is available here.
- Video tutorials the special stitches are linked below.
- One of the yarns used in this pattern has been discontinued. You can find a list of recommended substitutes for Wendy Serenity Chunky here.

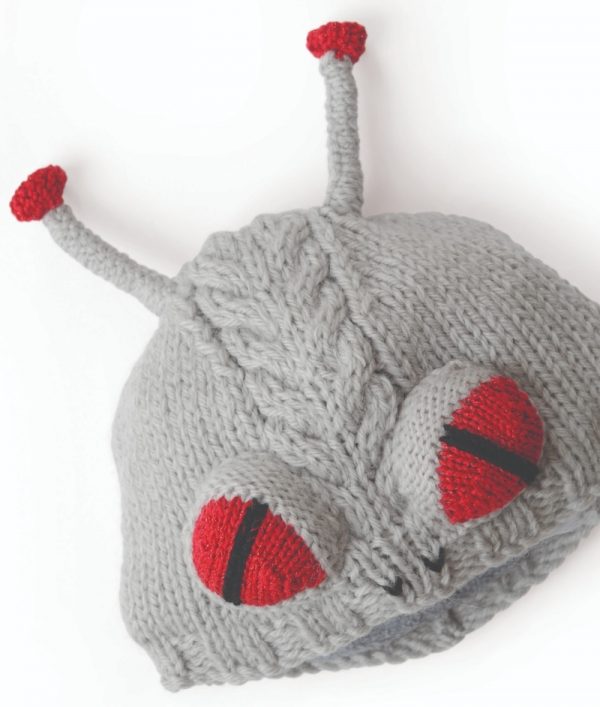
This monster is out of this world, featuring a cable design down the centre of the head, and embroidered details to enhance the glistening gaze of the bug-eyed alien.
Materials
- Wendy Serenity Chunky, 70% acrylic, 20% alpaca, 10% wool (87yd/80m per 100g ball): 1[1] ball in 3205 Oyster (A)
- Wendy Supreme Luxury Cotton DK, 100% cotton (219yd/201m per 100g ball): 1[1] ball in 1949 Poppy Red (B)
- Twilleys of Stamford Goldfingering, 80% viscose, 20% metalized polyester (109yd/100m per 25g ball): 1[1] ball in 38 Red (C)
- Oddment of DK yarn in black (D)
- 1 pair each of 4mm (UK8:US6), 6mm (UK4:US10) and 7mm (UK2:US10.5/11) knitting needles
- Cable needle
- Small amount of toy stuffing
- 2 x 6in (15cm) long pipe cleaners
- Blunt-ended tapestry needle
Sizes
- To fit: child, up to 20in (51cm) head circumference [adult, up to 22in (56cm) head circumference]
Tension (Gauge)
- 13 sts and 18 rows to 4in (10cm) over stocking stitch using 7mm needles and A. Use larger or smaller needles if necessary to obtain correct tension.
Special abbreviations
- C4B: Sl 2 sts onto cable needle and hold at back of work, k2, k2 from cable needle
- C4F: Sl 2 sts onto cable needle and hold at front of work, k2, k2 from cable needle
Method
- The hat is started with a wide rib. A cable design is worked in the centre of the main piece, knitted in stocking stitch. The shaping of the eyes is begun by slipping the first stitch and turning the work before the last stitch of each row, working one less stitch each time. The shaping is finished by knitting into one extra stitch at the end of each row, until all the stitches are back on the same needle. These are stuffed, stitched to the hat and finished with embroidery in duplicate stitch. The antennae are made from knitted strips covering pipe cleaners. These are topped with a knitted button. The lower ends of the antennae are stuffed to help them stand up on the hat. The nostrils are two duplicate stitches embroidered onto the rib of the hat.
Main section
- With 6mm needles and A, cast on 59[63] sts.
Child size only
- Row 1 (RS): K1, (p2, k3) to last 3 sts, p2, k1.
- Row 2 (WS): P1, (k2, p3) to last 3 sts, k2, p1.
- Rows 3–4: As rows 1–2.
Adult size only
- Row 1 (RS): (K3, p2) to last 3 sts, k3.
- Row 2 (WS): (P3, k2) to last 3 sts, p3.
- Rows 3–4: As rows 1–2.
Both sizes
- Change to 7mm needles.
- Next row (RS) (inc): K4[6], (kfb, k9) 5 times, kfb, k4[6] (65[69] sts).
- Next row: Purl.
Adult size only
- Next row: Knit.
- Next row: Purl.
Both sizes
- Work in cable pattern as follows (see chart below):
- Row 1: K27[29], p1, C4B, k1, C4F, p1, k27[29].
- Row 2: P27[29], k1, p9, k1, p27[29].
- Row 3: K27[29], p1, k9, p1, k27[29].
- Row 4: As row 2.
- Rows 5–16: Rep rows 1–4 3 more times.

Shape crown
- Row 1 (RS) (dec): K2tog, k10[11], sl1, k2tog, psso, k10[11], k2tog, p1, C4B, k1, C4F, p1, k2togtbl, k10[11], sl1, k2tog, psso, k10[11], k2togtbl (57[61] sts).
- Row 2 (WS): P23[25], k1, p9, k1, p23[25].
- Row 3 (dec): K2tog, k8[9], sl1, k2tog, psso, k8[9], k2tog, p1, k9, p1, k2togtbl, k8[9], sl1, k2tog, psso, k8[9], k2togtbl (49[53] sts).
- Row 4: P19[21], k1, p9, k1, p19[21].
- Row 5 (dec): K2tog, k6[7], sl1, k2tog, psso, k6[7], k2tog, p1, C4B, k1, C4F, p1, k2togtbl, k6[7], sl1, k2tog, psso, k6[7], k2togtbl (41[45] sts).
- Row 6: P15[17], k1, p9, k1, p15[17].
- Row 7 (dec): K2tog, k4[5], sl1, k2tog, psso, k4[5], k2tog, p1, k9, p1, k2togtbl, k4[5], sl1, k2tog, psso, k4[5], k2togtbl (33[37] sts).
- Row 8: P11[13], k1, p9, k1, p11[13].
- Row 9 (dec): K2tog, k2[3], sl1, k2tog, psso, k2[3], k2tog, p1, C4B, k1, C4F, p1, k2togtbl, k2[3], sl1, k2tog, psso, k2[3], k2togtbl (25[29] sts).
- Row 10: P7[9], k1, p9, k1, p7[9].
- Row 11 (dec): K2tog, k0[1], sl1, k2tog, psso, k0[1], k2tog, p1, k9, p1, k2togtbl, k0[1], sl1, k2tog, psso, k0[1], k2togtbl (17[21] sts).
Adult size only
- Row 12: P5, k1, p9, k1, p5.
- Row 13 (dec): K2tog, k1, k2tog, p1, C4B, k1, C4F, p1, k2togtbl, k1, k2togtbl (17 sts).
Both sizes
- Break yarn and thread through rem sts, draw up tight and fasten off.
Eyes (make 2)
- Slip all stitches p-wise.
Shape eyelid
- With 4mm needles and B, cast on 10[12] sts.
- Row 1 (RS): Purl.
- Row 2 (WS) (inc): Kfb k to last st, kfb (12[14] sts).
- Row 3 (inc): Sl1, p to last st, sl1.
- Row 4 (inc): As row 2 (14[16] sts).
- Row 5: Purl.
Eyeball
- Join and cont in B and C, used together.
- Row 6 (WS): Sl1, p12[14], turn.
- Row 7: Sl1, k11[13], turn.
- Row 8: Sl1, p10[12], turn.
- Row 9: Sl1, k9[11], turn.
- Row 10: Sl1, p8[10], turn.
- Row 11: Sl1, k7[9], turn.
Adult size only
- Row 12: Sl1, p8, turn.
- Row 13: Sl1, k7, turn.
Both sizes
- Next row: Sl1, p7, pick up the horizontal loop before the next st and ptog with the next st to prevent a hole appearing in the work, turn.
- Next row: Sl1, k8, pick up the horizontal loop before the next st and ktog with the next st, turn.
- Next row: Sl1, p9, pick up the horizontal loop before the next st and ptog with the next st, turn.
Adult size only
- Next row: Sl1, k10, pick up the horizontal loop before the next st and ktog with the next st, turn.
- Next row: Sl1, p11, pick up the horizontal loop before the next st and ptog with the next st, turn.
Both sizes
- Shape lower edge of eye
- Next row: Sl1, k10[12], change to yarn A, pick up the horizontal loop before the next st and ktog with the next st, turn.
- Cont with yarn A.
- Next row: Sl1, p11[13], pick up the horizontal loop before the next st and ptog with the next st, turn.
- Next row: Sl1, p12[14], pick up the horizontal loop before the next st and ptog with the next st, turn.
- Cast off k-wise, leaving a long length of yarn A at the end.
Antennae (make 2)
- With 4mm needles and A, cast on 12[15] sts.
- Starting with a k row, work 5 rows in st st.
- Cast off k-wise, leaving a long length of yarn at the end.

Antennae tip
- With 4mm needles and yarns B and C held together, cast on 7 sts.
- Starting with a p row, work 11 rows in rev st st, finishing on a RS row. Cast off k-wise, leaving a long length of yarn B at the end.
Making up
- Join the back seam with mattress stitch (see below for tutorial).
Eyes
- Sew each eye in place at an angle, with the shaped eyelid at the top, positioning them just above the ribbing and overlapping the edges of the cable design. Stitch neatly around the edges, leaving an opening to insert the stuffing before closing. Use the duplicate stitch technique (see below for tutorial) and D to embroider a line up the central knit stitches of the eyes.
Nose
- Embroider the nose in D, working one duplicate stitch for each nostril on the ribbing.
Antennae
- Fold each pipe cleaner in half and twist the two halves together. Turn under the sharp edges and place one twisted pipe cleaner in the centre of the wrong side (purl side) of each knitted strip. Fold the strip around the pipe cleaner, bringing the long edges together. Use the length of yarn left after casting off to sew the edges together, encasing the pipe cleaner. Sew together the cast-on and cast-off edges of the tip of the antennae to form a tube. Gather the open edges at each end and work a few stitches through the centre, from one side to the other, to flatten the piece, forming a button shape. Stitch the knitted buttons to the top of the antennae. Use the end of a knitting needle to push a small amount of stuffing firmly into the first 3/4in (2cm) of the open end of each antenna. This will help them to stand upright when attached to the hat. Sew the antennae in place, halfway between the eyes and the top of the hat. Weave in all the yarn ends.
Lining
Fleece linings
Add a lining to your monster hat to make it even cosier. Choose a fabric with some stretch that feels soft to the touch, in a contrasting or a matching colour.
Fabric lining materials
- 22 x 22in (56 x 56cm) [25 x 25in (63.5 x 63.5cm)] of stretch fabric, such as polar fleece or jersey
- Matching thread
- Needle
- Dressmaking pins
- Squared pattern paper
- Pencil
- Scissors
Method
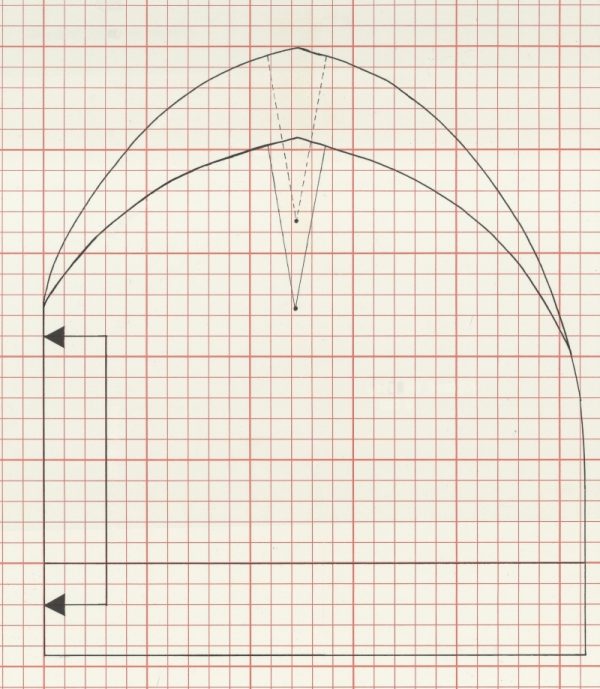
- Scale the pattern template to size, transferring all the markings onto the paper. Cut out the pattern, following the continuous line. Seam allowances of 5⁄8in (1.5cm) are included in the pattern. Place the pattern on the folded fabric, ensuring that the fold indicated on the pattern is placed exactly on the fold of the fabric. Pin the pattern in position and cut out the fabric.
- Stitch the darts indicated on the pattern template. Cut to within 1⁄2in (1.25cm) of the point of the dart and press open. With right sides together, pin and stitch the main seam, allowing for a 5⁄8in (1.5cm) seam. Trim the seam and cut notches in the curve, taking care not to cut into the stitching.
- Turn under the hem and pin the lining to the inside of the hat, just above the knitted edging or the ribbing, with the main seam of the lining at the centre back of the hat. Ease the fabric evenly around the lower edge. Slip stitch in place by hand. Work a few stitches through the top of the crown into the knitted hat to keep the lining in place.
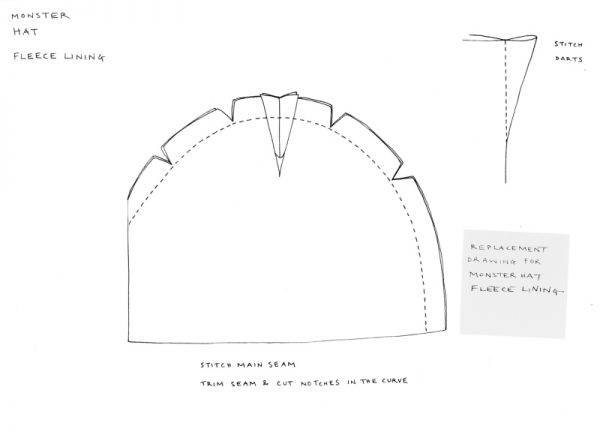
Key for both charts
- 1 square = 3⁄8in (1cm)
- 5⁄8in (2.5cm) seam allowance is included
CHART
- Adult lining cut 1

- Child lining cut 1
- Stitch main seam, trim seam and cut notches in the curve.
- Stitch darts
Knitted linings
A knitted lining is a cosy alternative to the fleece lining. It can be worked in the same shade as the monster hat, or you can choose a contrast colour. As the earflap facings are worked into the knitted lining pattern, omit them where applicable from the pattern when knitting the hat. The lining is stitched in place after the features are added to the main part of the hat. If twisted cords are to be attached to the earflaps, the knitted lining should go in first.
Materials
- Approximately 50g yarn for Pop-eyes; 100g yarn for other monster hats (A)
- See chosen monster hat pattern for required needle sizes
- Stitch holder
- Blunt-ended tapestry needle
Sizes
- To fit: child, up to 20in (51cm) head circumference [adult, up to 22in (56cm) head circumference]
Tension
- See chosen monster hat pattern for required tension.
Method
The knitted lining is worked in the same yarn as the hat you are making: refer to the pattern for the yarn type, needles required and tension. The earflap facings are worked first, where applicable. The main part of the lining is then continued in stocking stitch. The back seam is joined and the lining slipped inside the hat and stitched in place. Then finish with twisted cords and tassels, if using.
Alien, Fluffball, Skull, Slug, Troll and Zombie
- Using A and 8mm needles for Fluffball or 7mm needles for Alien, Skull, Slug, Troll and Zombie, cast on 61[65] sts.
- Starting with a knit row, work in st st for 18[20] rows, ending with a WS row.
Shape crown
- Row 1 (RS) (dec): K2tog, (k12[13], sl1, k2tog, psso) 3 times, k12[13], k2tog (53[57] sts).
- Row 2: Purl.
- Row 3 (dec): K2tog, (k10[11], sl1, k2tog, psso) 3 times, k10[11], k2tog (45[49] sts).
- Row 4: Purl.
- Row 5 (dec): K2tog, (k8[9], sl1, k2tog, psso) 3 times, k8[9], k2tog (37[41] sts).
- Row 6: Purl.
- Row 7 (dec): K2tog, (k6[7], sl1, k2tog, psso) 3 times, k6[7], k2tog (29[33] sts).
- Row 8: Purl.
- Row 9 (dec): K2tog, (k4[5], sl1, k2tog, psso) 3 times, k4[5], k2tog (21[25] sts).
- Row 10: Purl.
- Row 11 (dec): K2tog, (k2[3], sl1, k2tog, psso) 3 times, k2[3], k2tog (13[17] sts).
Adult size only
- Row 12: Purl.
- Row 13 (dec): K2tog, (k1, sl1, k2tog, psso) 3 times, k1, k2tog (9 sts).
Both sizes
- Break yarn and thread through rem sts, draw up tight and fasten off.
Making up
- Join the back seam with mattress stitch (see below). With WS together, pin the lining in place inside the main part of the hat and slip stitch neatly around the lower edges. For the Alien, Blob, Fluffball, Skull, Troll and Zombie, slip stitch the lower edge of the lining to the first row of stocking stitch after the rib on the main part, or after the garter stitch edging if making the Slug. Work a few stitches into the top of the crown to stop the lining slipping.
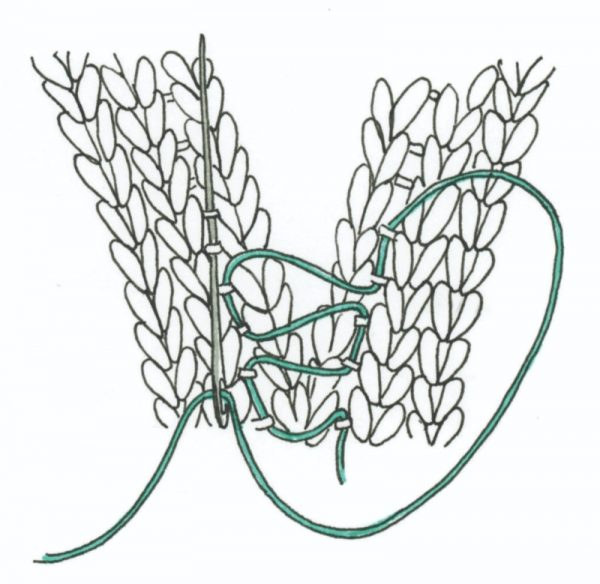
Mattress stitch
- The mattress stitch produces an invisible seam that is suitable for stocking stitch fabric. It produces a neat finish, ideal for joining the seam at the back of the hats.
- Place the two edges to be joined side by side with the right sides of the work facing you. Insert the needle under the horizontal bar between the first two stitches on one side, then under the same bar on the other piece. Continue picking up the stitches and drawing the edges together, every few stitches, to join the seam.
Duplicate stitch
- Insert the needle from the back to the front of the work at the base of the ‘V’ formed by the knitted stitch that you want to embroider over. At the front of the work, insert your needle behind both arms of the stitch above it and pull the yarn through.
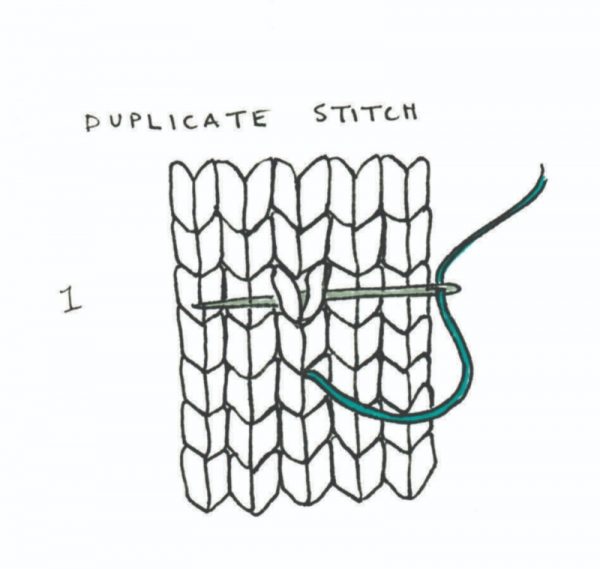
- Insert the needle back through the pointwhere it first emerged to cover the knitted stitch.
