(This post is part of my series for Knit and Crochet Design Week 2012.)
Designing a Simple Knit Beanie: Day 4
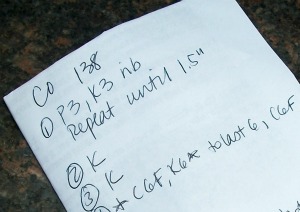
Today’s Design Week theme is design process. When I’m designing something that I might want to replicate in the future (for myself, for a class handout, or for a pattern to share), I usually start by writing out what I expect to do in the pattern.
In this case, since my project is based on a stitch that I haven’t used before, I will actually need to write out the pattern steps. I do this by hand first for a few reasons.
- I’m usually not at the computer when I start a design :).
- I try to prevent confusion on my computer by only typing up patterns when I think they are fairly close to ready to share with the world (or for tech editing or test crocheting/knitting).
- I won’t need to waste precious ink by printing out a copy of the pattern for me to carry around while working on my project.
- I’m lazy at this stage, and don’t want to write out all the details to make the pattern presentable to the world. I just want to write out the basics I’ll need to follow along myself.
I wanted to start this hat out with about an inch or so of ribbing. I’m using ribbing for a few reasons.
- Ribbing is nice and stretchy, so it will allow some extra give around the forehead.
- My beanie is a sample for a “design your own hat” project for my knitting class. None of the students have used circular needles before, and so I’d like them to start the project with a stitch they are comfortable with first. This way, they can get used to circular knitting before attempting any more complex stitch patterns.
- If the hat ends up being too long, the ribbing is reversible so can always be rolled up to reduce the height of the hat. In this way, it allows some room for mistakes for my students, and some flexibility for me since I don’t know who will be the ultimate recipient of this hat.
Since my cable stitch is worked in multiples of 12 stitches plus 6 stitches, I decided to do a 3 x 3 rib, so that the rib will line up nicely once I jump into the cable pattern.
I also had to convert my stitch pattern from what was in the stitch guide, which is written for knitting flat, to something I can use for circular knitting, where I’m always looking at the front side.

When I crochet hats from the brim up to the crown, I like to start with a variation of ribbing, too. I usually alternate between a front post stitch and regular stitches – perhaps one FPdc and then 2-3 dc. This isn’t as reversible as a knitted rib, but it does add a nice vertical look to the brim of the beanie.
Tomorrow, I’ll share my progress with my hat project.
To read other Day 4 posts from Knit and Crochet Design Week, visit FreshStitches.

