

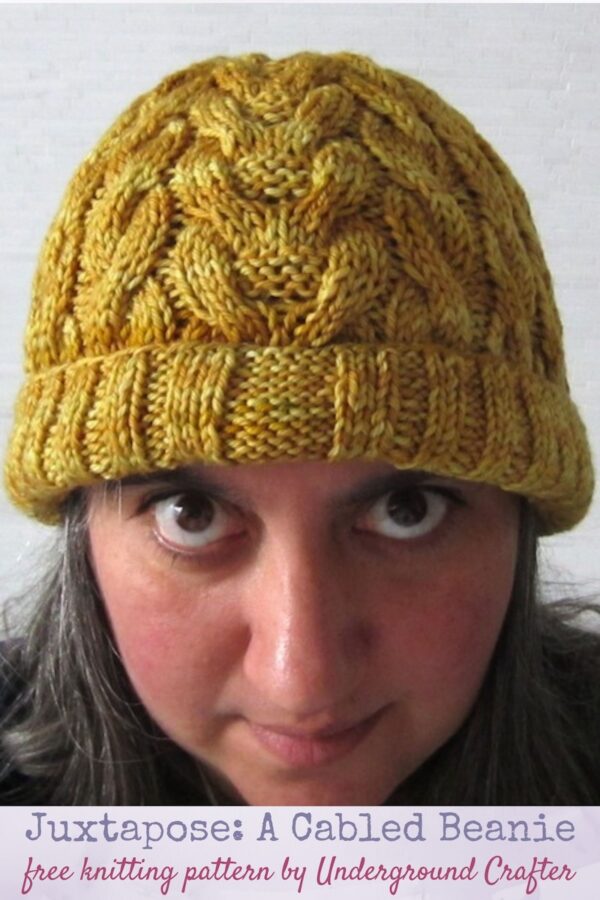
I love to knit cables. There’s something really fun about watching them form beneath my fingers, and the resulting texture is great. This free cabled beanie knitting pattern is a tribute to cables and includes three cable variations.
The yarn for the sample was generously provided by Quaere Fibre.
There’s a large, forked cable in the center, which makes a dramatic centerpiece, and then mirrored cables on each side.

This is knit seamlessly in the round, and looks great from the back, too.
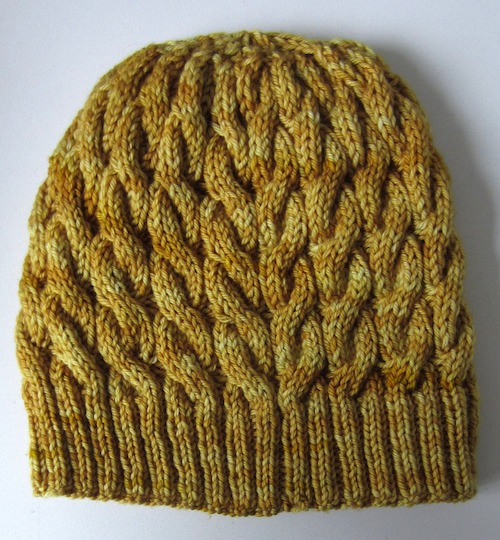
This hat only measures 18.5” (47 cm) in circumference, but it’s super stretchy so it will fit a variety of teen and adult heads. I knit it using some stunning hand dyed yarn by Quaere Fibre. Janel has a beautiful array of colors in amazing bases!
If you make your own Juxtapose: A Cabled Beanie, I’d love to see it! Share your progress and questions by tagging me on Facebook as @Underground Crafter on on Instagram as @ucrafter. You can also share a picture in the Underground Crafters Facebook group. Sign up for my weekly newsletter and get a coupon code for your choice of one of my premium patterns and private access to my vault of subscriber goodies. Plus, you’ll never miss one of my free patterns again!
Add Juxtapose: A Cabled Beanie to your favorites or queue, or buy the ad-free PDF on Ravelry.

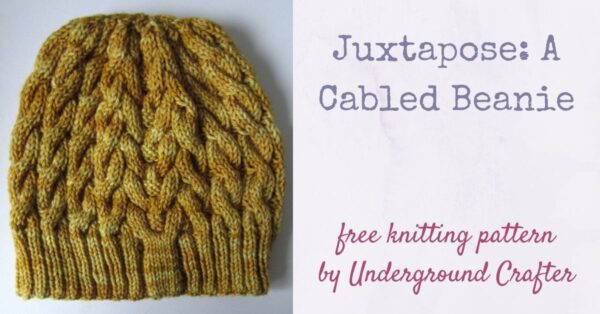
Juxtapose: A Cabled Beanie
Cabled Beanie Knitting Pattern by Underground Crafter


Three styles of cables interact to create an exciting texture for a stretchy cabled beanie knitting pattern.
Finished Size
- Adult: 5” (47 cm) circumference, 9” (23 cm) height/7” (19 cm) height with brim folded up.
Materials
- Quaere Fibre Worsted Weight (100% superwash Merino wool, 5.25 oz/150 g, 327 yd/299 m) – 1 skein in Sun Kissed, or approximately 235 yd (215 m) in any medium weight yarn.
- US Size 8/5 mm 40” (100 cm) knitting needles (or set of DPNs, for small circumference knitting in the round), or any size needed to obtain gauge.
- US Size 6/4 mm circular knitting needles for ribbing, or any size needed to obtain gauge.
- 3 locking stitch markers.
- Cable needle.
- Yarn needle.
Gauge
- 26 sts x 36 rows in pattern = 4” (10 cm) with larger needles in (C6B, p2) pattern, flat but unblocked.
- For best fit, always check your gauge.
- For this pattern, it is most important to get stitch gauge. Row gauge is not critical for this pattern.
Abbreviations Used in This Pattern
- C6B – 6 st right-leaning cable – Sl 3 sts to cn, hold cn at back, k3, k3 from cn.
- C6F – 6 st left-leaning cable – Sl 3 sts to cn, hold cn at front, k3, k3 from cn.
- cn – cable needle
- CO – cast on
- k – knit
- k2tog – knit 2 stitches together (decrease)
- p – purl
- pm 1 – place marker 1
- pm 2 – place marker 2
- pm 3 – place marker 3
- p2tog – purl 2 stitches together (decrease)
- rep – repeat
- Rnd(s) – Round(s)
- RS – right (front) side
- sk2p – slip 1, knit 2 together, pass slipped stitch over
- sl – slip
- st(s) – stitch(es)
- * Rep instructions after asterisk as indicated.
Pattern Notes
- For tips on knitting a gauge swatch in the round, check out this blog post from WEBS.
- This beanie is knit in the round from the brim to the crown.
- Use the smaller knitting needles to work a stretchy ribbed brim, then transition to the larger knitting needles to finish the hat.
- Slip markers each row.
- A centered cabled design is worked between marker 1 and 2, and marker 3 marks the end of the round.
Pattern Instructions
Hat
Ribbed, fold up brim
- With smaller needles, CO 138 sts.
- Set Up Row: (P2, k2) 16 times, pm 1, p3, k6, p3, pm 2, k2, (p2, k2) to end, pm 3, join and begin working in the round, being careful not to twist. (12 sts between markers 1 and 2)
- Rnd 1: (P2, k2) to marker 1, p3, k6, p3, k2 to marker 2, (p2, k2) to end.
- Rep Rnd 1 until brim measures just under 2” (5 cm).
- Rnd 2: Knit.
Brim to crown
- Switch to larger needles.
- Set Up Rnd: (P2, k6) to st before marker, increase with (k1, p1) in st before marker 1. Unlock marker and place before last p, C6B, C6F to marker 2, increase with (p1, k1) in st after marker 2. Unlock marker and place after last p st, k5, (p2, k6) to end. (140 sts – 14 sts between markers 1 and 2)
- Rnd 1: (P2, k6) to marker 1, (p1, k3, p6, k3, p1) to marker 2, k6, (p2, k6) to end.
- Rnds 2 – 3: Rep Rnd 1 twice.
- Rnd 4: (P2, C6F) to marker 1, (p1, k12, p1) to marker 2, C6B, (p2, C6B) to end.
- Rnd 5: (P2, k6) to marker 1, (p1, k12, p1) to marker 2, k6, (p2, k6) to end.
- Rnds 6-7: Rep Rnd 5 twice.
- Rnd 8: (P2, k6) to marker 1, (p1, C6B, C6F, p1) to marker 2, k6, (p2, k6) to end.
- Rep Rnds 1-8 until hat measures approximately 7.5” (19 cm) from cast on edge (approximately 5 times), ending after Rnd 7.
Shape crown
- Rnd 1: (P2tog, k2, k2tog, k2) to marker 1, (p1, C6B, CFB, p1) to marker 2, (k2, k2tog, k2, p2tog) to last 6 sts, k2tog, k2, k2tog. (108 sts)
- Rnd 2: (P2tog, k1, k2tog, k1) to marker 1, (p1, k3, p6, k3, p1) to marker 2, k2tog twice, k1, (p2tog, k1, k2tog, k1) to end. (77 sts)
- Rnd 3: (P2tog, k2tog) to marker 1, (p1, k1, k2tog, p2, p2tog, p2, k2tog, k1, p1) to marker 2, k2tog, k1, (p2tog, k2tog) to end. (43 sts)
- Rnd 4: (P1, k2tog, k1) to marker 1, (p1, k2tog, p2tog, p1, p2tog, k2tog, p1) to marker 2, k2tog, (p1, k2tog, k1) to last 2 sts, p1, k1. (31 sts)
- Rnd 5: K12 to marker 1, (p2tog, k3, p2tog) to marker 2, k12. (29 sts)
- Rnd 6: (K2tog, k2) to marker 1, (p1, sk2p, p1) to marker 2, (k2tog, k2) to end. Remove marker 1 and 2. (21 sts)
- Rnd 7: (K1, k2tog) around. (14 sts)
- Rnd 8: K2tog around. (7 sts) Fasten off with long yarn tail for seaming.
Finishing
- Thread yarn tail through yarn needle. Pull yarn tail firmly through sts several times, drawing tightly to close crown. Remove sts from needle. Finish off by weaving yarn tails inside of hat.
This hat is beautiful! I love all the cables!!! I enjoy crocheting cables as they add a wonderful design element, so much more 3=D and texture. Now I just need to learn how to knit . . . and then, knit cables!!!
I learned to knit just a few years ago, Darlene! I found that some of my crochet skills and understanding of yarn were helpful.
I love this! I wish I could still knit. I can just not without pain!! Knitting was my first fiber art; my Gramma taught me when I was a little kid, 7 or 8 years old. I have been in love with everything yarn ever since.
I’m sorry to hear that, Cheryl! I had the reverse – my grandmother taught me to crochet when I was 9. (She tried to teach me knitting, too, but all I could make were trapezoids!)
Is this pattern available for straight needle knitting? I prefer straight needles 🙂
Thanks, Maria
Maria, the pattern isn’t available for straight needles at this time.