

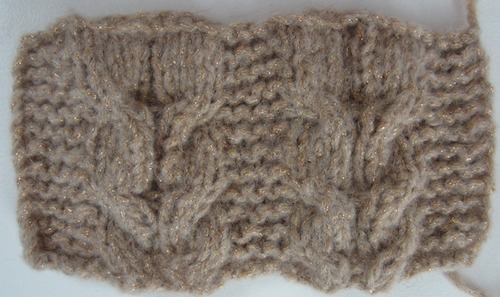
 My favorite projects to knit are hats. And cables. And hats with cables. Oftentimes, cable stitches are worked against reverse stockinette stitches, but for this hat, I decided to try something different – garter stitch.
This post contains affiliate links. The yarn for the sample was generously provided by Schachenmayr.
First, I tested it all out on my gauge swatch to make sure it would looke good. And I liked it!
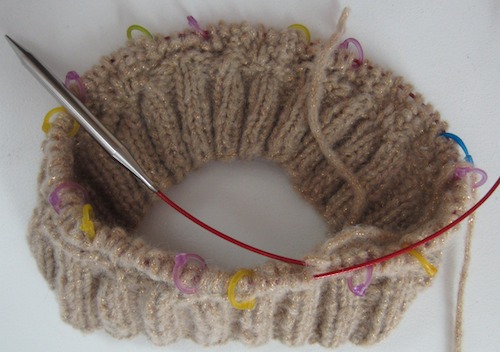
 So then I set to work making the rest of the project. I wanted a little slouch to the hat, too.
I had never used Schachenmayr select Scarlett before this project, and I love the glimmer!
Don’t forget to share a picture on Ravelry or on my Facebook page if you make one!
 You can also buy a printable, ad-free PDF version of this pattern here on Craftsy.

 Slouchy Horseshoe Cable Hat


Knitting Pattern by Underground Crafter
![]()

 Horseshoe cables combine with garter stitch to create a textured, slouchy hat.
Finished Size
- Adult: 20” (51 cm) circumference x 9” (23 cm) height.
Materials
- Schachenmayr select Scarlett (33% wool/22% acrylic/21% polyester/14% polyamide/10% alpaca, 1.75 oz/50 g, 131 yd/120 m) – 2 skeins in 05025 Secret, or approximately 255 yd (233 m) in any bulky weight yarn.
- US Size 5/6.5 mm 40” (100 cm) knitting needles (or set of DPNs, for small circumference knitting in the round), or any size needed to obtain gauge.
- US Size 10/6 mm circular knitting needles for ribbing, or any size needed to obtain gauge.
- Stitch marker.
- Cable needle.
- Yarn needle.
 Gauge
Gauge
- 16 sts x 24 rows in pattern = 4” (10 cm) with larger needles in pattern, flat but unblocked. For best fit, always check your gauge. For this pattern, it is most important to get stitch gauge. Row gauge is not critical for this pattern.
Abbreviations Used in This Pattern
- C4B – 4 st right leaning cable – Sl 2 sts to cn, hold cn at back, k2, k2 from cn.
- C4F – 4 st left-leaning cable – Sl 2 sts to cn, hold cn at front, k2, k2 from cn.
- cn – cable needle
- CO – cast on
- k – knit
- k2tog – knit 2 stitches together
- p – purl
- pm – place st marker
- p2tog – purl 2 stitches together
- rep – repeat
- Rnd(s) – Round(s)
- RS – right (front) side
- sl – slip
- st(s) – stitch(es)
- * Rep instructions after asterisk as indicated.
Pattern Notes
- For tips on knitting a gauge swatch in the round, check out this blog post from WEBS.
- This slouchy hat is knit in the round from the brim to the crown.
- Use the smaller knitting needles to work a stretchy ribbing, then transition to the larger knitting needles to finish the hat.
- Slip marker each row.
 Pattern Instructions
Hat
Ribbing
- With smaller needles, CO 92 sts.
- Set Up Row: *K2, p2; rep from * around, pm, join and begin working in the round, being careful not to twist.
- Rnd 1: *K2, p2; rep from * around.
- Rep Rnd 1 until ribbing measures just under 2” (5 cm).
- Rnd 2: *K2, p2; rep from * around to last 4 sts, k2, p2tog. (91 sts)
Brim to crown
- Switch to larger needles.
- Rnd 1: *K4, C4B, p1, C4F; rep from * around.
- Rnd 2: *P4, k4, p1, k4; rep from * around.
- Rnd 3: *K8, p1, k4; rep from * around.
- Rnd 4: Rep Rnd 2.
- Rnd 5: Rep Rnd 3.
- Rnd 6: Rep Rnd 2.
- Rep Rnds 1-6 until hat measures approximately 8” (20.5 cm) from cast on edge, ending after Rnd 6.
Shape crown
- Rnd 7: *K2tog twice, C4B, p1, C4F; rep from * around. (77 sts)
- Rnd 8: *P2, k2, k2tog, p1, k2tog, k2; rep from * around. (63 sts)
- Rnd 9: *K2tog, k3, p1, k1, k2tog; rep from * around. (49 sts)
- Rnd 10: *P1, k2tog, k1, p1, k2tog; rep from * around. (35 sts)
- Rnd 11: *K2tog, k1, p2tog; rep from * around. (21 sts)
- Rnd 12: K2tog, p1, k2tog, *p2tog, k2tog; rep from * around, remove marker. (11 sts) Fasten off with long yarn tail for seaming.
Finishing
- Thread yarn tail through yarn needle. Pull yarn tail firmly through sts several times, drawing tightly to close crown. Remove sts from needle. Finish off by weaving yarn tails inside of hat.
© 2015 by Marie Segares (Underground Crafter). This pattern is for personal use only. You may use the pattern to make unlimited items for yourself, for charity, or to give as gifts. You may sell items you personally make by hand from this pattern. Do not violate Marie’s copyright by distributing this pattern or the photos in any form, including but not limited to scanning, photocopying, emailing, or posting on a website or internet discussion group. If you want to share the pattern, point your friends to this link: http://undergroundcrafter.com/2015/09/10/free-knitting-pattern-slouchy-horseshoe-cable-hat. Thanks for supporting indie designers!
Don’t forget to share a picture on Ravelry or on my Facebook page if you make one!
You can also buy a printable, ad-free PDF version of this pattern here on Craftsy.

I’ve never done cables in the round, so am glad I came across this lovely pattern. Will be trying this… doesn’t really look much different from knitting cables on straight needles.
Thanks for sharing!!
Thanks, Coe! I’d love to see your version when you finish.