The Raised Bunchberry Square is my second contribution to the Mystery Lapghan Crochet-a-long, a crochet event featuring thirty-six 6″ (15 cm) squares by thirty crochet designers. This is a 3d granny square. The pattern includes your choice of written instructions, a photo tutorial, short videos for special stitches, and a complete video tutorial by Nadia Fuad from YARNutopia.
This post contains affiliate links. I may receive compensation (at no added cost to you) if you make a purchase using these links.Yarn for the sample was generously provided by Red Heart.
You can read more about the CAL here, or join the Facebook group to chat with participating crocheters. You can find my first pattern for this CAL, the Diagonal Box Stitch Square, here.
I wanted each of my square designs for this crochet-a-long to be a little different. Since the last one was crocheted in rows, this one is crocheted in rounds. The last one used two colors, so this one uses three colors. The last one was easy, and this one is a bit more… interesting.
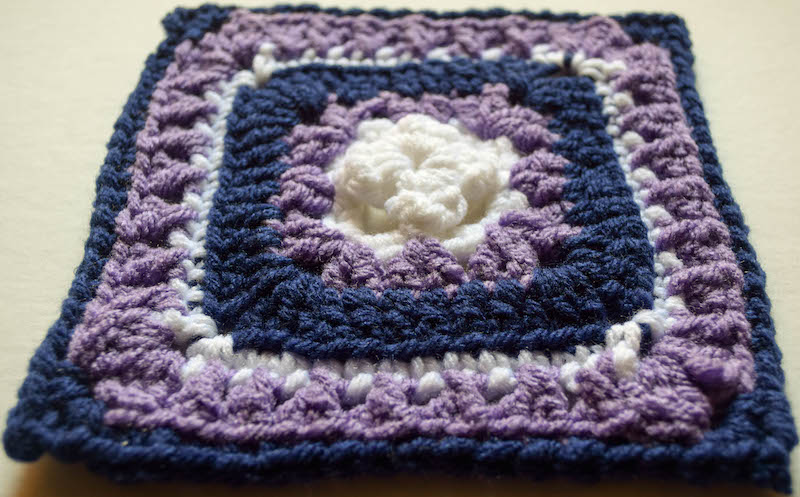
You see, the Raised Bunchberry Square is a 3D granny square.
It also features several special stitches. Since I want crochet-a-long to be fun for crocheters at all different skill levels, I included photo and video tutorials for the special stitches. And, my friend Nadia from YARNutopia made a video tutorial after
I also asked three fellow designers to check out the pattern. They used some great colors in their versions!
American Crochet’s version.The Stitchin’ Mommy’s version.Same DiNamics Crochet’s version.
If you make your own Raised Bunchberry Square, I’d love to see it! Share your progress and questions by tagging me on Bluesky as @UndergroundCrafter, Facebook as @UndergroundCrafter, or on Instagram as @ucrafter. You can also share a picture in the Underground Crafters Facebook group. Sign up for my weekly newsletter and get a coupon code for your choice of one of my premium patterns and private access to my vault of subscriber goodies. Plus, you’ll never miss one of my free patterns again!
A raised center makes this floral 3D granny square stand out.
Finished Size
6” (15 cm) square.
Materials
Red Heart With Love (100% acrylic, 7 oz/198 g/270 yds/338 m) – 1 skein ea in 1001 White (CA), 1538 Lilac (CB), and 1801 Navy (CC), or approximately 32 yds (29 m) in ea of 3 colors in any medium weight yarn.
US Size I-9 (5.5 mm) crochet hook or any size needed to obtain gauge.
Yarn needle.
Gauge
Finished square in pattern = 6” (15 cm). Exact gauge is not critical for this project.
Abbreviations Used in This Pattern
beg-cl – beginning cluster – Ch 3 in sp, [yo, insert hook in same sp, yo and draw up a loop, yo and draw through 2 loops] twice, yo and draw through all 3 loops on hook.
BL – back loop only – A photo tutorial is available within the pattern below.
ch – chain
CA – Color A
CB – Color B
CC – Color C
cdc – crossed double crochet – Sk st, dc in next st, dc in skipped st. A helpful video tutorial for this stitch is available below.
If you can’t see the video above for the cdc, click HERE to watch it on YouTube.
cl – cluster – [Yo, insert hook in sp, yo and draw up a loop, yo and draw through 2 loops] 3 times, yo and draw through all 4 loops on hook. A helpful video tutorial for this stitch (called a bobble in the video) is available below.
If you can’t see the video above for the cl, click HERE to watch it on YouTube.
dc – double crochet
ea – each
FPsc – front post single crochet – Insert hook from front around back to front of cl in previous round, yo and draw up a loop, yo and draw through 2 loops, sk st behind FPsc. A helpful video tutorial for this stitch is available below.
If you can’t see the video above for the FPsc, click HERE to watch it on YouTube.
rep – repeat
Rnd(s) – Round(s)
RS – right (front) side
sc – single crochet
sk – skip
sl st – slip stitch
sp – space
st(s) – stitch(es)
WS – wrong (back) side
yo – yarn over
* Repeat instructions after asterisks as indicated.
[] Repeat instructions between brackets as indicated.
Pattern Notes
First Round of pattern is worked on the wrong side. Turn to right side for Round 2. For all future Rounds, join to right side.
Nadia at YARNutopia made a complete video tutorial for this square which is available at the end of the written pattern.
Pattern Instructions
Square
With CA, ch 4, sk 3 ch, join with sl st to first ch to form ring.
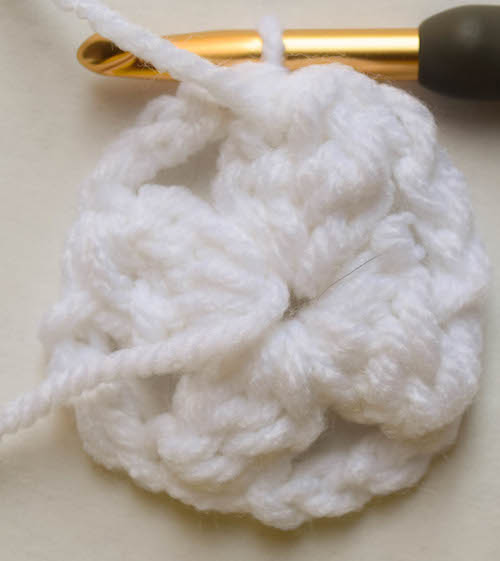
Rnd 1: (WS) Ch 1, (cl, ch 4) in ring 4 times, join with sl st to first cl. (4 sts + 4 ch-4 sp)
Photo tutorial for cluster
Yarn over, insert hook into ring (or space), yarn over, draw up a loop.
Yarn over, draw through 2 loops, yarn over, insert hook into same ring (or space).
Yarn over, draw up a loop, yarn over, draw through 2 loops.
Yarn over, insert hook into same ring (or space), yarn over, draw up a loop.
Yarn over, draw through 2 loops, yarn over, draw through all 4 loops on hook. Cluster made.
Rnd 2: Turn to RS, [(2 sc, ch 1, 2 sc) in ch-4 sp, FPsc around cl] 4 times, join with sl st to first sc. Fasten off CA. (20 sts + 4 ch-1 sp)
Turn to right side. Yarn tail will be facing you.
Photo tutorial for FPsc
Insert hook from front around back to front of cl in previous round, yarn over, draw up a loop, yarn over, draw through 2 loops. FPsc made. Skip stitch behind FPsc.
Rnd 3: Join CB with sl st to any ch-1 sp, ch 3 (counts as dc, here and throughout), (dc, ch 2, 2dc) in same ch-1 sp, *sk 2 sts, 2 dc in next st, sk 2 sts,** (2 dc, ch 2, 2 dc) in ch-1 sp; rep from * around, ending last rep at **, join with sl st to top of first ch 3. Fasten off CB. (24 sts + 4 ch-2 sp)
Rnd 4: Join CC with sl st to any ch-2 sp, (ch 3, 2 dc) in same ch-2 sp, *dc in next 6 sts,** (3 dc, ch 2, 3 dc) in next ch-2 sp; rep from * around, ending last rep at **, (3 dc, ch 2) in first ch-2 sp, join with sl st to top of first ch 3. Fasten off CC. (48 sts + 4 ch-2 sp)
Rnd 5: Join CA with sl st to any ch-2 sp, ch 1, sc in same ch-2 sp, *scBL in next 12 sts,** (sc, ch 3, sc) in ch-2 sp; rep from * around, ending last rep at **, (sc, ch 3) in first ch-2 sp, join with sl st to top of first sc. Fasten off CA. (56 sts + 4 ch-3 sp)
Photo tutorial for back loop only
Identify back loop, insert hook in back loop of next stitch, yarn over and draw up a loop, yarn over and draw through 2 loops.
Since the front loops are unworked, scBL adds texture to the right side.
Rnd 6: Join CB with sl st to any ch-3 sp, beg-cl in same ch-3 sp, *cdc in next 14 sts (makes 7 cdc),** (cl, ch 2, cl) in ch-3 sp; rep from * around, ending last rep at **, (cl, ch 2) in first ch-3 sp, join with sl st to top of first cl. Fasten off CB. (64 sts + 4 ch-2 sp)
Photo tutorial for beginning cluster
Ch 3 in space, yarn over, insert hook in same space, yarn over, draw up a loop.
Yarn over, draw through 2 loops, yarn over, insert hook in same space, yarn over.
Draw up a loop, yarn over, draw through 2 loops, yarn over, draw through all 3 loops on hook. Beginning cluster made.
Photo tutorial for crossed double crochet
Skip stitch, double crochet in the next stitch [working in front of your stitches, yarn over and insert hook in skipped stitch, yarn over and draw up a loop, (yarn over and draw through 2 loops) twice].
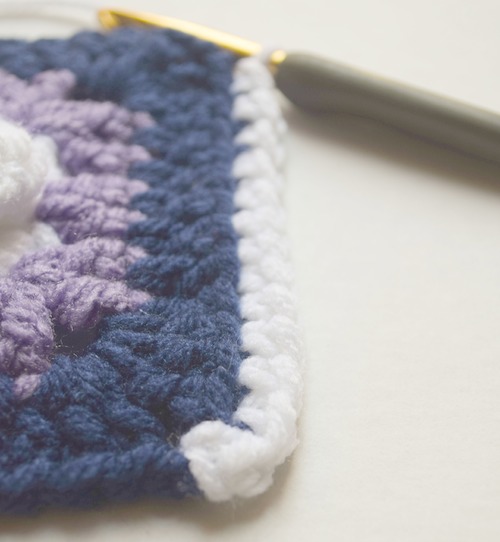
Rnd 7: Join CC with sl st to any ch-2 sp, ch 1, 2 sc in ch-2 sp, *scBL in next 16 sts,** (2 sc, ch 2, 2 sc) in ch-2 sp; rep from * around, ending last rep at **, (2 sc, ch 2) in first ch-2 sp, join with sl st to top of first sc. Fasten off CC. (80 sts + 4 ch-2 sp)
Finishing
With yarn needle, weave in yarn tails. Spray block if necessary.


 Raised Bunchberry Square
 Raised Bunchberry Square


so pretty!
Thanks, Irma! Do share a picture if you make one.
Love it! Thank you so much for sharing 🙂
Joanita @ Snickerdoodle Sunday
Thanks for stopping by, Joanita, and for hosting such a fun link party!