


I’m excited to share a guest post today from Rebeckah Ferger, the crochet designer and blogger behind Rebeckah’s Treasures.
This post contains affiliate links.
About Rebeckah
 Rebeckah Ferger is a Canadian-Norwegian who lives in Panama. She loves to explore new ideas, create unique projects, and make people happy with her crochet creations. Rebeckah specializes in fashion doll ensembles, amigurumi toys, and accessories. You can find her on her website, Rebeckah’s Treasures, as well as on Craftsy | Facebook | G+ | Instagram | Pinterest | Ravelry | Twitter | YouTube. You can also get to know Rebeckah through this interview I did with her, which includes a pattern roundup.
Favourite this design on Ravelry!
Visit Rebeckah’s Treasures for more free crochet patterns and more Mini Turtle Friend designs, including a pencil topper and a finger puppet!

Mini Amigurumi Turtle Friend
Crochet Pattern by Rebeckah’s Treasures
 This minutes-to-make pattern includes instructions for crocheting mini amigurumi turtle toy friends in any yarn weight. These make great birthday party favours and stocking stuffers!
You’ll Need:
For a Thread Toy:
- crochet cotton thread size 10 (I use Circulo Clea), in three choice colours:
- about 27y (25m/5 grams / 0.125 oz) – turtle body → a bold, moss or fern green is recommended!
- less than 11y (10m/2 grams / scraps) – turtle shell → a variegated or self-striping green is recommended!
- less than 11y (10m/2 grams / scraps) – turtle belly → a mint or spring green is recommended!
- 05mm hook
For a Sport Toy:
- sport (2:fine / 5ply UK) yarn, in three choice colours:
- about 27y (25m/5 grams / 0.125 oz) – turtle body → a bold, moss or fern green is recommended!
- less than 11y (10m/2 grams / scraps) – turtle shell → a variegated or self-striping green is recommended!
- less than 11y (10m/2 grams / scraps) – turtle belly → a mint or spring green is recommended!
- 75mm hook
OR for other Toy Sizes:
- yarn (three colours) and hook of choosing for alternate-sized toys.
AND
- stitch markers
- tapestry yarn needle
- scissors
- polyester fiberfil
- 6mm safety eyes / mini googly eyes / black embroidery thread, or whatever eyes you’d like.
Gauge:
Toy: No gauge required for this amigurumi toy. Simply use a hook that produces tight stitches with whichever yarn you choose to use.
Sizing:
Thread Toy: 1.75” (4.5 cm) long; 2” (5 cm) wide.
Sport Yarn Toy: 3.5” (9 cm) long; 4” (10 cm) wide.
Note: These sizes are approximates only. Your choice of thread/yarn, hook and tension affect the size. Adjust these variables to achieve the size you want.
Abbreviations: ~US Terminology~
- *…** – repeat instructions between the two asterisks as directed
- (…) – work the stitches between the parentheses into the space as directed
- […] – work stitches between the brackets however many times called for
- BL – back loop
- ch – chain
- dc – double crochet
- f/o – fasten off
- hdc – half double crochet
- rem – remaining
- rep – repeat
- rnd – round
- RS – right side
- sc – single crochet
- sc2tog – single crochet 2 stitches together *See pattern notes for further directions…
- sk – skip
- sl st – slip stitch
- sp(s) – space(s)
- st(s) – stitch(es)
- tog – together
- WS – wrong side
Pattern Notes:
- You should be familiar with basic crochet stitches (chs, sl sts, sc, hdc, dc), working in rows, rounds, back loops, posts, surface crochet, and how to do increases and decreases.
- A few additional techniques you should be familiar with include crocheting directly onto another crochet piece by means of sc-attaching, crocheting thru 2 or more sts at a time and crochet joining pieces together.
- Decreases or sc2tog sts are best worked by using the invisible decrease technique, where you only work in the front or back loops of a stitch. *If you are unfamiliar with this technique, see Rebeckah’s video tutorial here.
- Turtle body instructions are for right-handed crocheters. Left-handed crocheters should keep pieces to their left.
- Additional notes are included below as needed…
- *If you have any questions, or need help with this pattern, feel free to contact Rebeckah. She is always happy to help you!

Turtle Toy Instructions:
- IMPORTANT – Work all turtle piece in order as they appear here!
Turtle’s Head Instructions:
Make 1
The turtle’s head is worked continuously in rnds from front to back. Do NOT turn at the end of rnds unless directed otherwise to do so. *Side facing you = WS.
Starting with turtle body colour…
- rnd 1: sc 6 into a magic circle (6 sts).
- rnd 2: sc 2 into each st around (12 sts).
- rnd 3-5: sc 12 – 3 rnds (12 sts).
Using Safety Eyes? Attach to stitches #3 and #9 of either rnd 3 or 4!
- rnd 6: sc 2, sc2tog, sc 4, sc2tog, sc 2 (10 sts).
- rnd 7: [sc 2, sc2tog] x 2, sc 2 (8 sts).
- rnd 8-9: sc 8 – 2 rnds, sl st join & f/o at the end of the last rnd (8 sts).
Stuff head… Set aside for now.
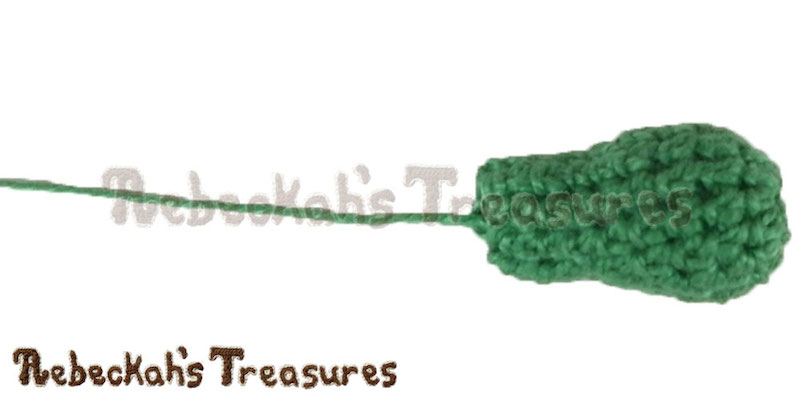
Turtle’s Leg Instructions:

Make 4
The turtle’s legs are worked continuously in rnds from the toe-tip. Do NOT turn at the end of rnds unless directed otherwise to do so. *Side facing you = WS.
Starting with turtle body colour…
- rnd 1: sc 3 into a magic circle (3 sts).
- rnd 2: sc 1, sc 2 into the next st, sc 1 (4 sts).
- rnd 3: sc 1, sc 2 into each of the next 2 sts, sc 1 (6 sts).
- rnd 4: sc 2, hdc 2, sc 2 (6 sts).
- rnd 5: sc 6 (6 sts).
- rnd 6: sc 2, hdc 2, sc 2 (6 sts).
- rnd 7: sc 1, sk 1 st, sc 2, sk 1 st, sc 1 (4 sts).
- rnd 8: sc 4, sl st join to first st of rnd, f/o (4 sts).
Have the head and legs ready before starting the body.
Turtle’s Body Instructions:

Make 1
The turtle’s body is worked in two parts.
The first part is worked in rows to create the turtle’s belly – where the first row is created directly onto the front legs and head, and the final row joins the back legs. For this part, ODD rows = Bottom or Turtle Belly.
The second part switches the last row of the first part into a rnd and works the top or the turtle’s back – where the first rnd is worked directly into the top-surface of the body’s belly. For this part, side facing you = WS.
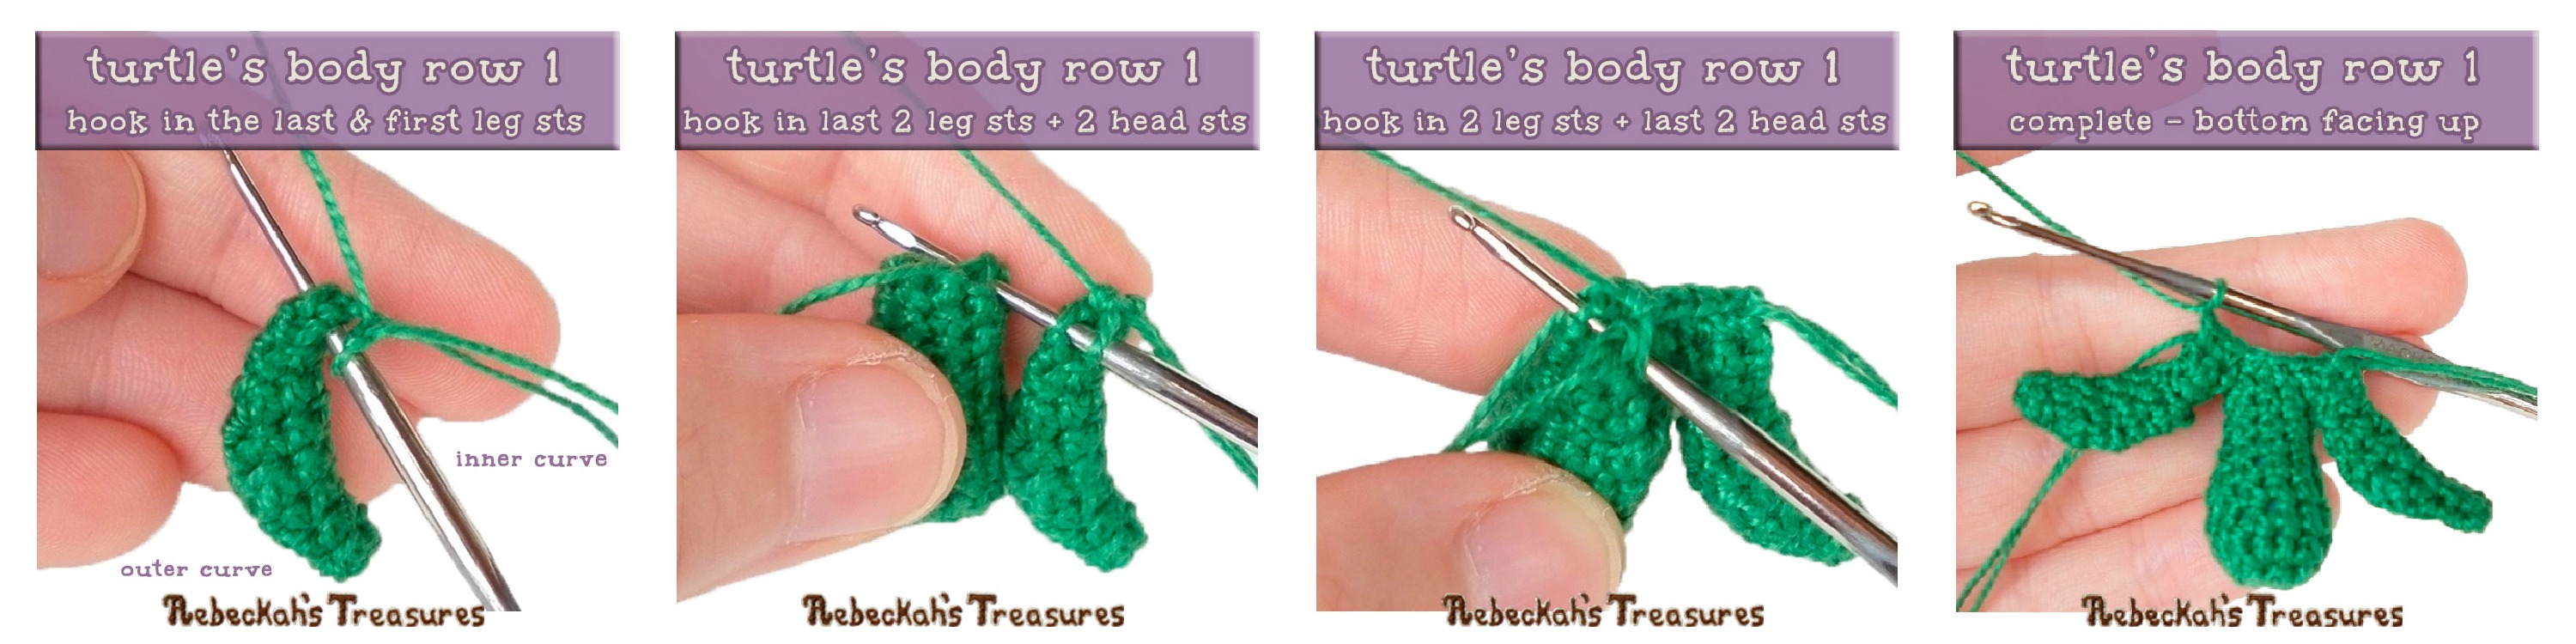
- row 1: make a slip knot in turtle body colour… press opening of the first (right-front) leg flat → sc attach to the last + first sts so the inner curve of the leg is to your right and so you work thru 2 sts at the same time; insert hook into the rem 2 leg sts AND into the 2nd + 3rd head sts too (4 sts on hook) → work a sc here – first leg closed & joined; pressing the rem head sts tog in the same fashion → sc 2 as you join the next 2 sets of head sts tog (work thru 2 sts at the same time); press opening of the second (left-front) leg flat → insert hook into the 2nd + 3rd leg sts so the outer curve is to your right, now insert the hook into the rem 2 head sts too (4 sts on hook) → work a sc here – head closed & joined; sc 1 as you join the rem 2 leg sts tog (work thru 2 sts at the same time) – second leg closed & joined, ch 1, turn (6 sts).
- row 2: sc 1, sk 1 st, sc 2, sk 1 st, sc 1, ch 1, turn (4 sts).
- row 3: sc 4, ch 1, turn (4 sts).
Completing the turtle’s belly as you join the back legs to the turtle’s body…
- rnd 4 – Step 1: press opening of the third (left-back) leg flat, hold to the back of work so the inner curve is to your right and the outer curve is in the center → insert hook into the first body st AND into the last + first leg sts (3 sts on hook) → work a sc here; insert hook into the next body st AND into the rem 2 leg sts (3 sts on hook) → work a sc here – third leg closed & joined; press opening of the fourth (right-back) leg flat, hold to the back of work so the outer curve is to your right → insert hook into the next body st AND into the 2nd + 3rd leg sts (3 sts on hook) → work a sc here; insert hook into the last body st AND into the rem 2 leg sts (3 sts on hook) → work a sc here – fourth leg closed & joined (4 sts up to here);

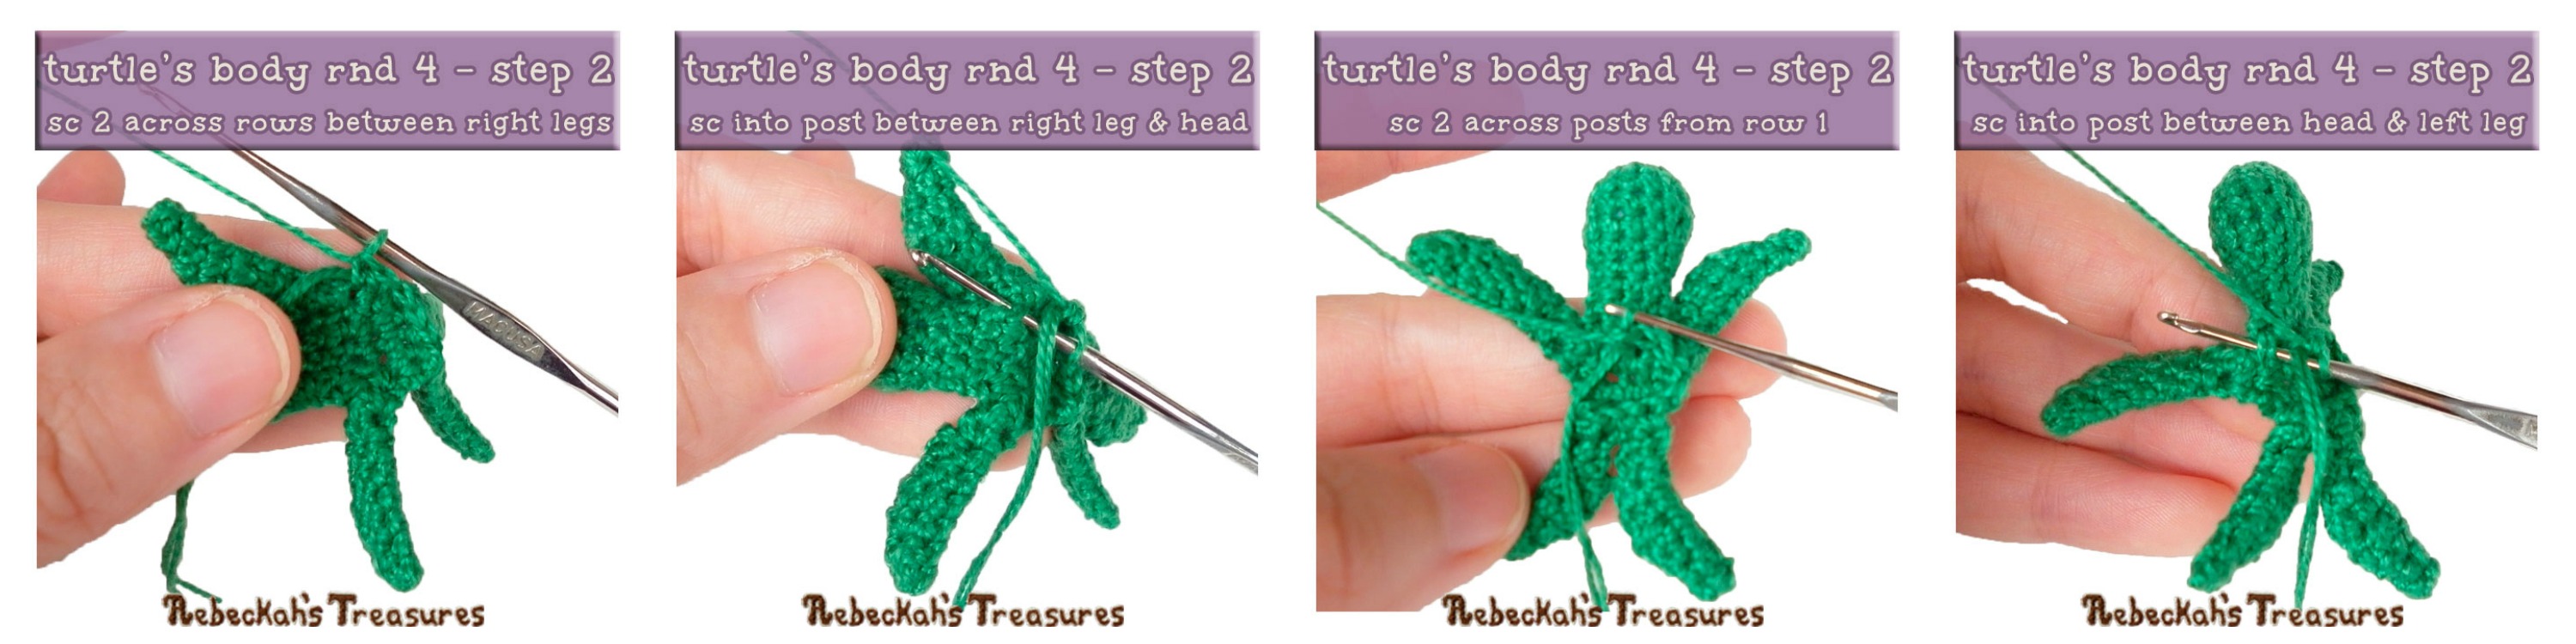
Continuing rnd 4 as you switch from rows to rnds… From here, work in continuous rnds and do NOT turn at the end of rnds unless directed otherwise to do so. *Side facing you = WS.
- rnd 4 – Step 2: working in a counterclockwise direction → sc 2 across the body rows between the right legs, sc 1 into the body post between the right-front leg and the head, sc 2 across the body posts from row 1, sc 1 into the body post between the head and the left-front leg, sc 2 across the body rows between the left legs (12 sts).
- rnd 5-6: sc 12 – 2 rnds (12 sts).
Stuff body…
- rnd 7: sc2tog in BL x 6, sl st join to first st of rnd, f/o with a small tail to close opening (6 sts).
Use the small ending tail to close the opening of the turtle body.
Weave in all ends or tuck them into the turtle’s body. Set aside for now.
Turtle’s Shell Instructions:

Make 1
The turtle’s shell is worked in continuous rnds from the center-outwards, where the final rnd wraps the shell onto the turtle’s body. Do NOT turn at the end of rnds unless directed otherwise to do so. *Side facing you = WS.
Starting with turtle top shell colour…
- rnd 1: sc 5 into a magic circle (5 sts).
- rnd 2: (sc 1, dc 1, sc 1) into each st around (15 sts).
- rnd 3: sc 1, [*(dc 1, sc 1, dc 1) into the next st,** sc 2] x 4, rep * to **, sc 1 (25 sts).
- rnd 4: [sc 1, dc 1] x 2, [sc 2, dc 1, sc 1, dc 1] x 4, sc 1 (25 sts).
This final rnd will wrap outer-shell around turtle’s body and create a base for the final part of the toy…
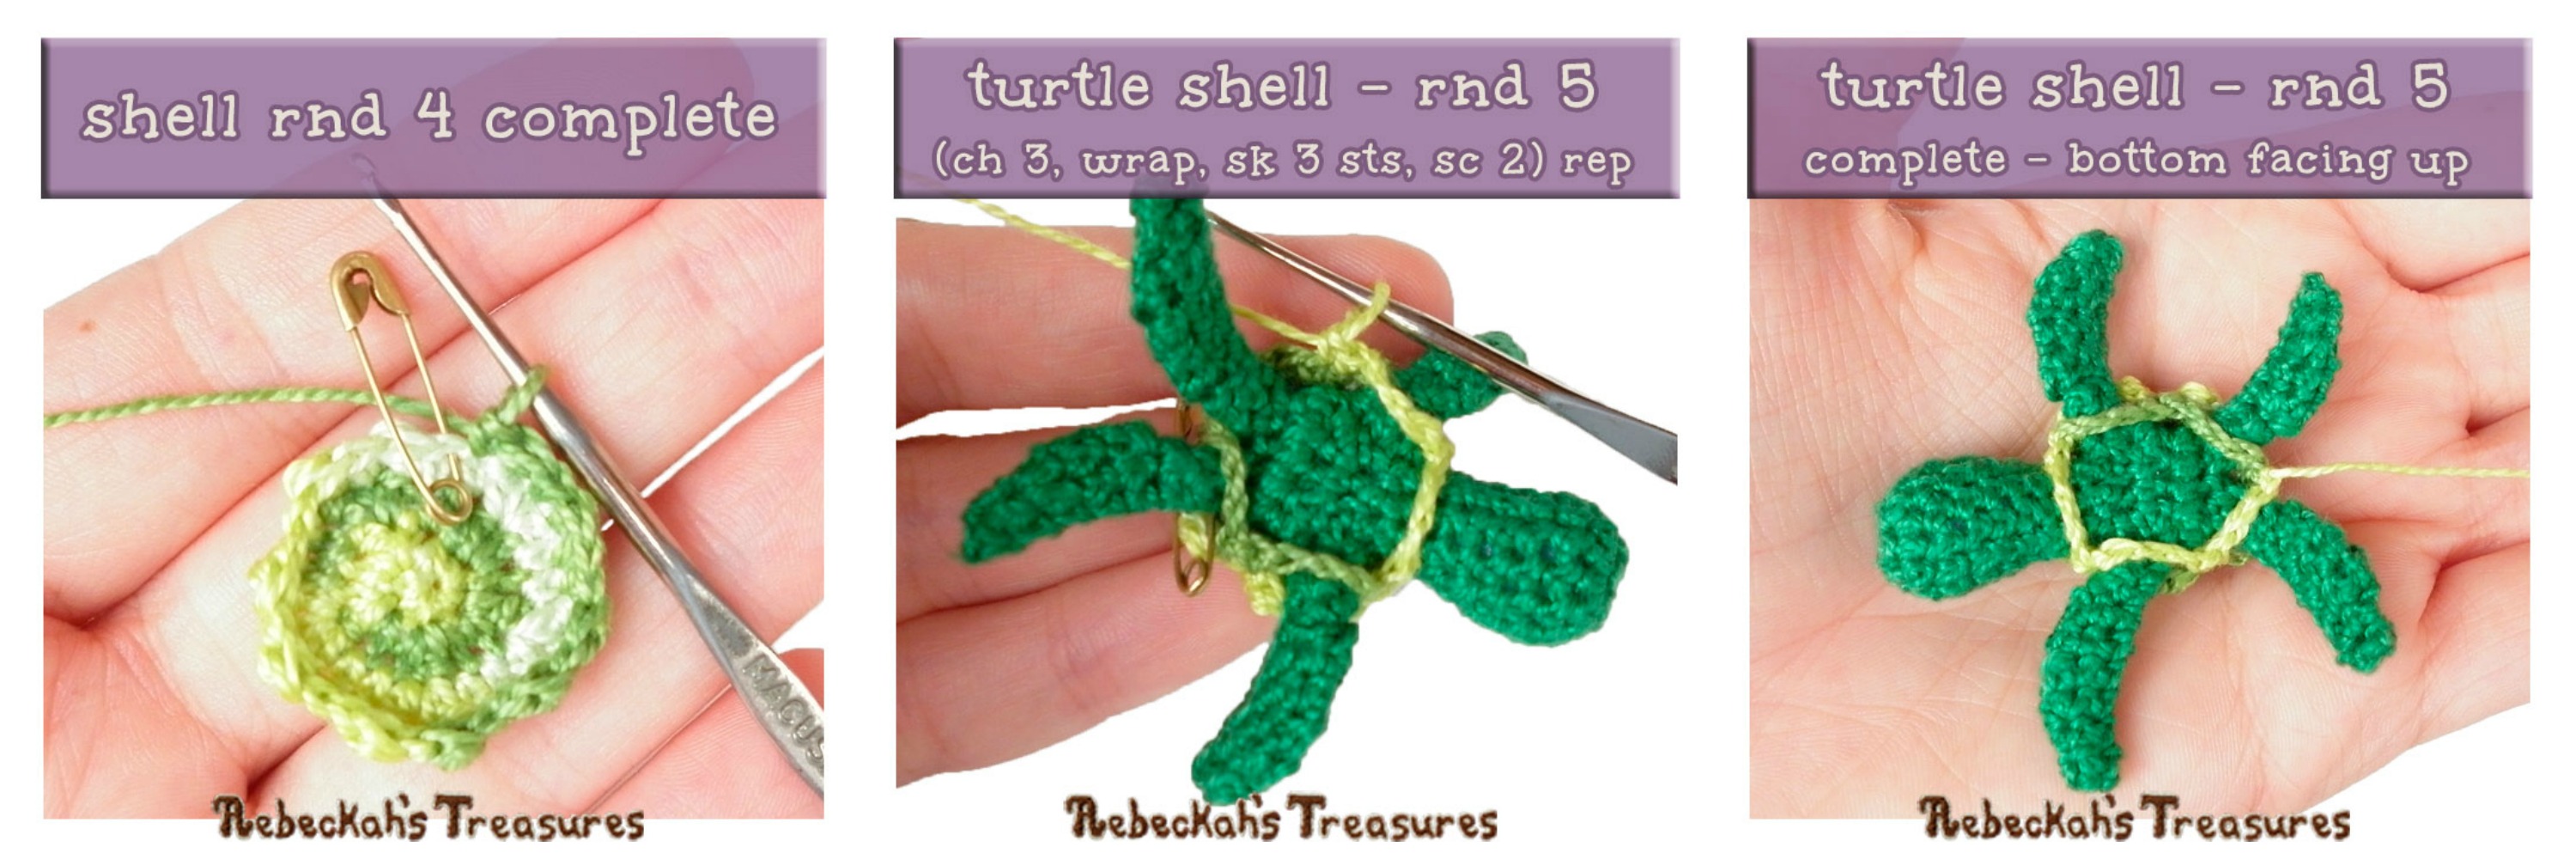
- rnd 5: sc 1, ch 3, place shell on top of body so the first st is in between the back legs and the turtle’s belly faces you → wrap the ch-3 over belly & across back-left leg, sk 3 sts of the shell, sc 2; ch 3, wrap the ch-3 over belly & across front-left leg, sk 3 sts of the shell, sc 2; ch 3, wrap the ch-3 across the head, sk 3 sts of the shell, sc 2; ch 3, wrap the ch-3 over belly & across front-right leg, sk 3 sts of the shell, sc 2; ch 3, wrap the ch-3 over belly & across back-right leg, sk 3 sts of the shell, sc 1, sl st join to the first st of rnd, f/o (5 ch-sps).
Weave in all ends or tuck them into the turtle’s body.
Turtle’s Eye Instructions:
Make 2
Take a strand of black embroidery thread (or yarn) and thread it onto a tapestry yarn needle. Do not knot the ends tog. Instead leave a short tail on one side of the needle’s eye and a longer one on the other side.
Insert needle into one stitch and up the next stitch on the first side of the turtle’s head, where you’d like the first eye to go. Wrap around stitches a few times until the eye looks just right.
On the last wrap around for the first eye, cross over to the same position on the other side of the turtle’s head. Rep the same wrapping around of stitches.
On the last wrap around for the second eye, cross back over to the stitch with the starting tail. Knot the ends tog, trim and tuck the ends into the turtle’s head.
Alternatively, attach miniature goggly eyes to each side of the head instead. Or use your preferred mini eyes.
Turtle’s Shell Belly Instructions:
Make 1
The turtle’s shell belly is worked in continuous rnds, starting from the ch-sps of the shell and working inwards. Do NOT turn at the end of rnds unless directed otherwise to do so. *Side facing you = RS.
- rnd 1: make a slip knot in chosen shell belly colour & with the turtle’s belly facing up → sc attach to any ch-3-sp from rnd 5 of the shell, sc 2 more into the same sp, sc 3 in each rem ch-3-sp around (15 sts).
- rnd 2: [sc 1, sc2tog in BL] x 5 (10 sts).
- rnd 3: sc2tog in BL x 5, sl st join to the first st of rnd, f/o with a small tail (5 sts).

Use the small ending tail to close the opening of the shell belly. Weave in all ends or tuck them into the turtle’s body. Mini Amigurumi Turtle Toy Friend is complete!
This pattern and the photos are copyrighted to Rebeckah Ferger of www.rebeckahstreasures.com and are published with permission by Underground Crafter. It is for your own personal use only. No part of this pattern may be copied or distributed in any way. If you sell what you make from this pattern, please credit “Rebeckah Ferger of Rebeckah’s Treasures” as the designer, and be sure to link to the above website if you sell online. For pattern support, please contact Rebeckah at www.rebeckahstreasures.com/contact-me.html with questions. All rights reserved, 2016.
Favourite this design on Ravelry!
Visit Rebeckah’s Treasures for more free crochet patterns and more Mini Turtle Friend designs, including a pencil topper and a finger puppet!