

 It can be difficult to make my apartment look festive during the holidays with two, shall we say, “behaviorally challenged” cats. Just the other day, we came home to a toppled miniature artificial tree with ornaments strewn on the ground. Both cats looked suspiciously at the other as if to say, “It was definitely not me, but him.”
This post contains affiliate links. Supplies for this project were generously provided by Oriental Trading, Kreinik, Cricut, and Minwax.
So, when I came across these DIY unfinished wooden Christmas trees at Oriental Trading, I knew they would make great (translation: safe from cats) desktop decorations. A personalized wooden tree could also double as a gift tag. And, if you’ll have more than the typical amount of children around during the holidays, these would also make a fun kids craft to keep little hands busy while the grown folks are chattering on about something or other.
There are obviously many ways to decorate these, but I’ll share what I did!
DIY Wooden Christmas Tree Decorations
Tutorial by Underground Crafter
Materials
- Unfinished wooden Christmas trees.
- Paint and/or wood finishing cloths. I used:
- 1 Minwax Wood Finishing Cloth in Walnut for the trunks and bases of 4 trees, and
- Deco Art Americana acrylic paint in Forest Green for the trees.
- Craft paint brush and container with water to wash your brush.
- Newspaper or plastic to cover your painting space. (If crafting with children, aprons or old t-shirts may also be in order!)
- Lots of embellishments! I used:
- A small amount of Kreinik Twist in 102 for the garland.
- Crochet hook (size doesn’t matter).
- Cricut Explore Air with Cricut Design Space, a 12″ (30.5 cm) x 4″ (10 cm) piece of Cricut Adhesive Foil in Foil Gold, Cricut Strong Grip Mat, and Cricut Tools Weeder. (I also used the trimmer, weeder, and micro-tip scissors from my Cricut Gold Tools and Trimmer Set.) If you don’t have an electronic cutting machine, you could use a star hole punch with the foil.
- Other embellishment ideas: small buttons, felt and scissors, and glue.

Instructions
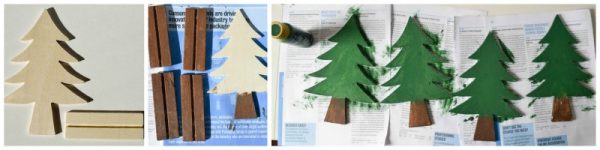
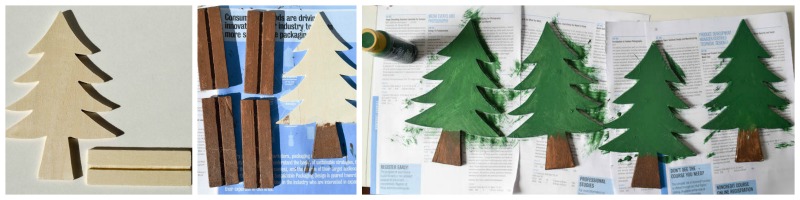
- Start by painting or staining the wood. I used the Minwax Wood Finishing Cloth in Walnut for the trunks and bases of the trees. If you use paint, be sure that you wipe any excess from the groove in the base or the tree won’t fit in after the paint dries.
- After the trunks dry, apply the paint for the trees. I recommend painting one flat side and the little nooks between the branches first, because you may end up with excess paint dripped on the back while that side dries. You can cover these drips over when you paint the back.
- While the paint is drying, prep your embellishments.
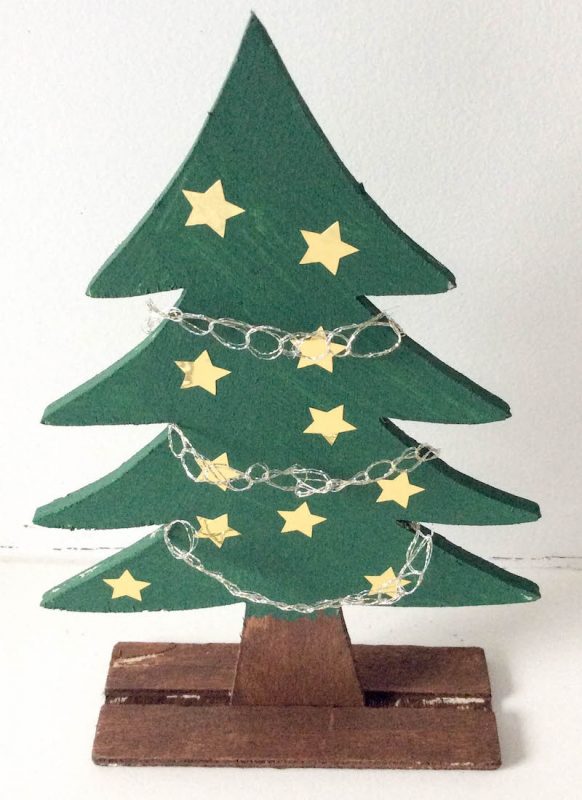
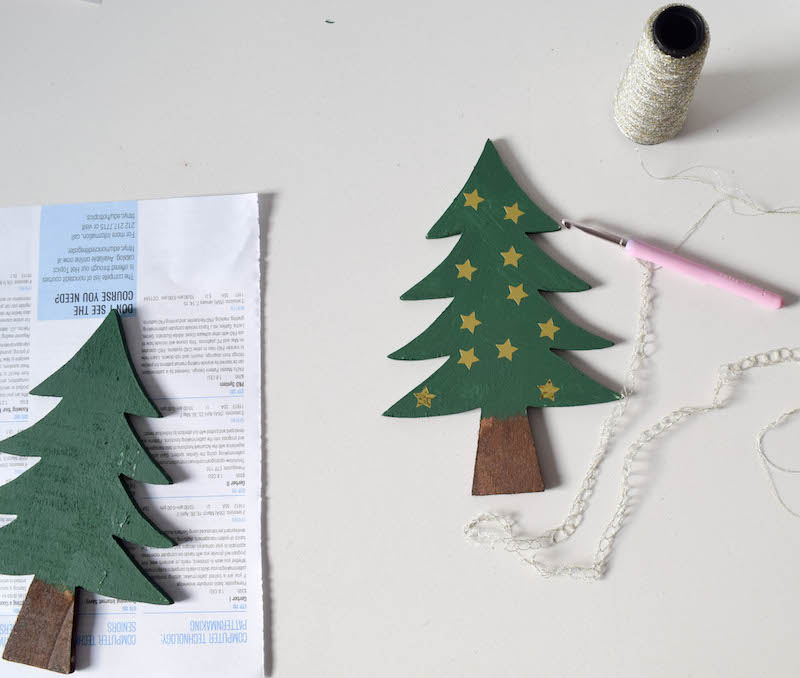
- I trimmed a piece of Cricut Adhesive Foil to 12″ (30.5 cm) x 4″ (10 cm) with the trimmer. Then I inserted the star shape in Cricut Design Space, which I sized to 0.5″ (1 cm) height. I ended up making about 30 stars, but you could make more or less.
- To cut the Adhesive Foil, use a Cricut Strong Grip Mat and set your machine’s materials dial to Custom. Select “Adhesive Foil-0.25mm (Cricut)” from the drop down menu.
- I trimmed the piece down a little further with the micro-tip scissors to make it easier to work with and then used the Cricut Tools Weeder to remove the space around the stars.

- I also used a crochet hook to make a 30″ (76 cm) chain with the Kreinik Twist.
- Once the paint was dry, I applied the stars at random.

- Then I wrapped the garland chain around a few times. You could tie it on the back, or connect with a slip stitch.
As you can see, this is a pretty easy project, and, with the exception of drying time, it won’t take too long. If you wanted to do the project with young children, you could prep the adhesive foil, chains, and other embellishments ahead of time. The children can paint the trees with washable paint and then decorate with a child-safe glue.
You can find more Christmas crafts ideas here on Oriental Trading, or shop for deals on their coupon page.


Those trees are really cute, they will also make a great project to keep the kids busy for a couple of hours.
If you can, come and share them at the Holidays Celebration Link Party that is live here: http://keepingitrreal.blogspot.com.es/2016/12/holidays-celebration-link-party-3.html
Thank you and have a wonderful weekend!