
Apparently, Honey Nutbrown’s whole temperature scarf concept has really taken off. Even some of the larger North American yarn companies have jumped on board with their own year long KAL/CAL. I’ve gotten quite a few questions about the stitch pattern I’m using for my crochet version, so I thought I’d share the pattern.
This post contains affiliate links. I may receive compensation (at no added cost to you) if you make a purchase using these links.
I wanted the number of stitches (38) to match my age this year, so I combined elements of two different stitch patterns I liked in Margaret Hubert’s The Complete Photo Guide to Crochet![]() . If you’d like more information about temperature scarves and conceptual crochet, check out How To Plan a Year-Long Crochet Temperature Project.
. If you’d like more information about temperature scarves and conceptual crochet, check out How To Plan a Year-Long Crochet Temperature Project.
If you make your own Temperature Scarf, I’d love to see it! Share your progress and questions by tagging me on Bluesky as @UndergroundCrafter, Facebook as @UndergroundCrafter, or on Instagram as @ucrafter. You can also share a picture in the Underground Crafters Facebook group. Sign up for my weekly newsletter and get a coupon code for your choice of one of my premium patterns and private access to my vault of subscriber goodies. Plus, you’ll never miss one of my free patterns again!
Add the Temperature Scarf to your favorites or queue, or buy the ad-free PDF on Ravelry.

Crochet Temperature Scarf
A recipe pattern by Underground Crafter


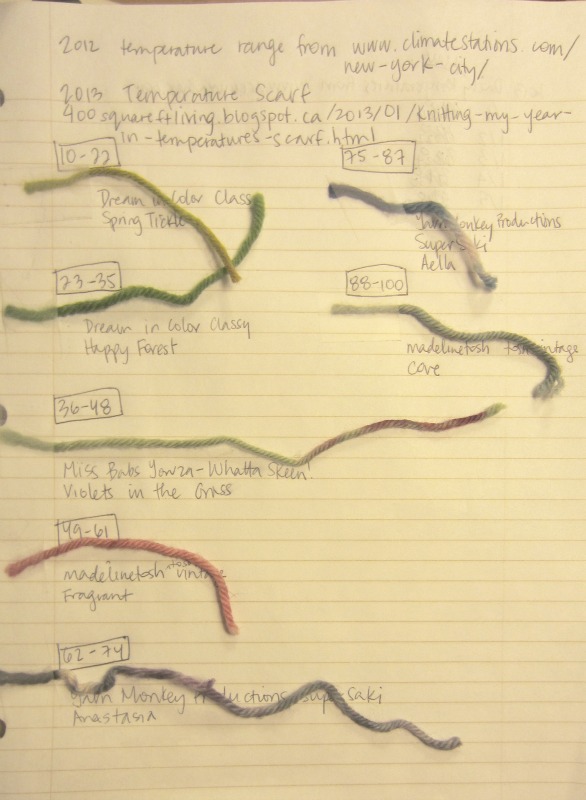
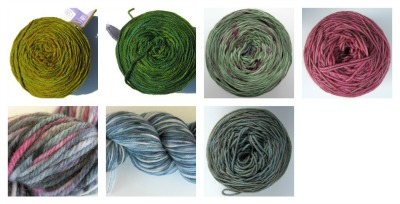
First, choose a group of yarns and assign a set of temperature values to each yarn. This will vary based on how many yarns you want to use as well as how dramatic annual temperature highs and lows are in your area. Here’s my chart as an example.
Use the same yarn for the foundation chain and Row 1. For the rest of the project, change colors at the end of every row (or as often as dictated by the change in temperatures) by pulling the new color through the last slip stitch. (Tip: Don’t fasten off at the end of the row until you know the next day’s temperature. You may end up using the same yarn again, and you’ll have fewer ends to weave in!)
Abbreviations Used in This Pattern
- blo – back loop only
- ch – chain
- dc – double crochet
- ea – each
- hdc – half double crochet
- rep – repeat
- sc – single crochet
- sk – skip
- sl st – slip stitch
- st(s) – stitch(es)
Pattern Instructions
- Ch 39 (or any multiple of 4 sts, + 7 sts).
- Row 1: Turn, sk first ch, sl st in ea of next 2 chs, *ch 2, sk 2 chs, sc in ea of next 2 chs; rep from * across to last 4 sts, ch 2, sk 2 chs, sl st in ea of last 2 chs. (38 sts)
- Row 2: Turn, ch 1, sl st in blo of ea of first 2 sts, *sc in ea of next 2 skipped chs from foundation ch, ch 2, sk 2 sts; rep from * across to last 4 sts, sc in ea of next 2 skipped chs from foundation ch, sl st in blo of ea of last 2 sts.
- Row 3: Turn, ch 1, sl st in blo of ea of first 2 sts, *ch 2, sk 2 sts, sc in ea of next 2 skipped sts from 2 rows below; repeat from * across to last 4 sts, ch 2, sk 2 sts, sl st in blo of ea of last 2 sts.
- Row 4: Turn, ch 1, sl st in blo of ea of first 2 sts, *sc in ea of next 2 skipped sts from 2 rows below, ch 2, sk 2 sts; rep from * across to last 4 sts, sc in ea of next 2 skipped sts from 2 rows below, sl st in blo of ea of last 2 sts.
- Rep Rows 3 & 4.
I also changed the stitch length for each season. Since I live in New York and we start the year in the winter, I used the single crochet to represent the short length of the day. The length of the stitches will increase as the hours of darkness in the day decreases.

Spring and Fall hdc stitch pattern variation
- Row 5: Turn, ch 1, sc in ea of first 2 sts, *ch 2, sk 2 sts, hdc in ea of next 2 skipped sts from 2 rows below; rep from * across to last 4 sts, ch 2, sk 2 sts, sc in ea of last 2 sts.
- Row 6: Turn, ch 1, sc in ea of first 2 sts, *hdc in ea of next 2 skipped sts from 2 rows below, ch 2, sk 2 sts; rep from * across to last 4 sts, hdc in ea of next 2 skipped sts from 2 rows below, sc in ea of last 2 sts.
- Repeat Rows 5 & 6.

Summer dc stitch pattern variation:
- Row 7: Turn, ch 2 (counts as hdc), sk first st, hdc in 2nd st, *ch 2, sk 2 sts, dc in ea of next 2 skipped sts from 2 rows below; rep from * across to last 4 sts, ch 2, sk 2 sts, hdc in ea of last 2 sts.
- Row 8: Turn, ch 2 (counts as hdc), sk first st, hdc in 2nd st, *dc in ea of next 2 skipped sts from 2 rows below, ch 2, sk 2 sts; rep from * across to last 4 sts, dc in ea of next 2 skipped sts from 2 rows below, hdc in ea of last 2 sts.
- Repeat Rows 7 & 8.
If you’re working on a temperature scarf, too, I’m looking forward to seeing how all of our projects turn out next year!
New ideas are always a warm welcome.
I am wanting to make this scarf as it sounds very fun. My question is, Do I only crochet one row a day ?
Thanks for stopping by, Carla. Some people who make temperature scarves only crochet one row a day. What I did was crochet a few months at a time. So I would collect the temperatures and then sit down and crochet a bunch of rows at once. You can do whichever works best for you!
Thank you… I bought my yarn last night. I plan to start my scarf the first day of winter.
Thanks for the update, Carla. I’d love to see pictures when you’re done!
I’m confused…how do you change the color on your scarf? Or I should say how do you know when to change it? Are you going by hours in the day and monitoring the temp? Or is it by row? I just don’t see how you are getting different colors in the row. Please explain.. Thanks, the scarf looks nice! 😉
Thanks for your kind words, Alexis. I’m using variegated (multicolor) yarns, and the stitch pattern makes you “dip” down one row, so that is how I’m getting different colors within a row. I change colors each row based on the temperature for that particular day, but I don’t change colors within one row. Hopefully, this helps!
Sorry about my english it’s so poor, I only speak spanish, could you translate this instructions, please? because I don’t understnd very well. kisses from Buenos Aires,
Elida
Thanks for writing, Elida. I’m not able to translate my instructions into Spanish at this time.
but can she copy it into a google translate?
I love this idea, but I live in San Diego and I’m afraid my temperature’s don’t change enough for the scarf to vary much. I think I will have to monitor relative’s weather in Texas and Maryland and make one for each of them instead.
Elida, if you just type in the google search bar… English to Spanish Translation… a translator will come right up on the page. Just copy and paste the English into the first box and it will automatically translate for you. I tried it and it works but there it too much text to do it all at once. You’ll have to do it in sections.
Julie, you can set the temperature ranges, so perhaps for your climate, each yarn might be one or two degrees instead of 7 or 10. Thanks for sharing your tips with Elida!
Hi. I love the scarf. I’m mother really sure what a temperature scarf is. Would you mind explaining the concept please?
Sorry, *I’m really unsure*
typo
Thanks for writing, Kimberly. The concept of the temperature scarf is that you crochet or knit a row for each day. You also assign different yarns to certain temperature ranges. Based on the day’s temperature, you choose the corresponding color for that day’s row. Hope this helps!
Just love your scarf. And am starting my January 1. So if I understand correctly and I crochet a row a day I will have 365 rows in my scarf? I will probably do mine at the end of each month. I love seeing a new project coming to life. Thank you for the lovely pattern and challenge.
Thanks for the kind words, Laurie! Yes, you will end up with 365 rows. I also did mine at the end of each month rather than daily. I found my tension was also more consistent that way. I’d love to see pictures when you finish!
My confusion on the temperature scarf is…are you plotting/using the high, low or both temps daily? You mentioned fluctuations, where does that come in to play? I love the idea and told my husband. He’s going to help me keep up with the daily temps. Thanks!
Cathy, I used the high daily, but you could just as easily use lows or averages. I’ve also seen people who do 3 rows a day (high, low, AND average), but I think that would make the scarf too long.
This is new to me. What a fun idea. Plan to start Jan first 2015. I am assuming you pick a particular time of day’d temp to be consistent since it changes during the course of the day? Or the high or the low? Can’t wait to start.
Sandy
Thanks for stopping by, Ms. Sandra! I actually used the high temperature as posted on Accuweather for each day, but you could also pick an average, low, or, as you mention, temperature at a certain time of day.
Hi! I love this idea!!! Do you know any any kits made with the colors for different regions, I like to buy all my yarn for a project at one time so I have all the same brand etc (yes, I am a little ocd) thank you again!!
Thanks so much, Lisa! I don’t know of any one selling kits for a temperature scarf, but I’ve seen people buy a rainbow of colors from one brand for the same reasons you mention!
What a novel idea! Going to begin this scarf on my mother’s birthday and give it to her next year. Here in Maryland the temperature is usually quite varied, so I am thinking of using 7 shades of yellows (her favorite color) and greens – one shade for every 15 degrees from 0 to 105.
That sounds lovely, Suzie Q! I did something similar for my mom. She only wanted to use temperatures from my sister’s birthday to my birthday to her birthday, which is about 60 days. So I just repeated that group of temperatures several times until the scarf was long enough.
I like this idea. Couple of questions – how do I know how much yarn I will need for each of the different temperature ranges?
You had 7 ranges of 12 degrees ea., and 3 stitch lengths. I figure they are for – sc, winter – hdc, spring & fall – dc, summer. At each season change there are a lot of days that the temp. will change from one range to another and back again the next few days. This would mean yarn changes according to temp., right? Then when the temp. change spans around the season change how would you determine which stitch length to use?
I don’t mean to nit- pick, but I am trying to work this in my mind and find my snags before I get there. Also about yarn amounts so I can be ready when Jan. pops up suddenly. Thank you. Sorry to be so long winded.
Thanks for stopping by, Jheri. In response to your questions, yes, you got that right about the stitch lengths. I changed stitch heights based on the date of the solstices and equinoxes, not based on the temperature. I changed yarn according to temperature.
Unfortunately, you can’t accurately predict how much yarn you will need for each skein before the year begins :(. In this scarf, I had one color that was only used for 1 row, and another color that ran out. I would guess that 2 skeins of each color will be sufficient, if you’ve divided up the temperatures well based on historical weather patterns in your area. Good luck!
Thank you so much. You gave me prompt, direct, good answers to my questions. Now I have a few days to plan it all out by the first of Jan. Thanks again and I give you five stars.
My sister and I are doing this together. She’s in Oklahoma and I’m on the Georgia coast. We can’t wait to see how different our scarves turn out! Thanks so much for sharing the pattern!
Sounds fun, Brenda! Please do share pictures when you both finish.
I love this idea. I think I am going to look up the temps of the year, each of my kids were born, and create an afghan for them. Can’t wait to do the research and pick the colors.
That sounds like a fabulous idea, Wendy. I was able to find some older weather data online for my area, so hopefully your research is successful.
In my faith, we observe the seasons by the Hebrew calendar, so my/our year begins in the spring, when things are coming back to life. I like that better than man’s idea of starting a year in the dead of winter, and as cold as it’s been here the last few days (Northern Lower Michigan), I surely do not want to start and end a scarf by crocheting icicles into it!!
Joyce, you can definitely start a temperature scarf, or any conceptual crochet or knitting project, at the time of year that works best for you.
What size hook did you use??
Thanks for stopping by, Julie. I used an I hook for most of the yarns, but of course you could adjust hook size based on the yarn you use.
Is there a tutorial showing the stitch pattern? I’m pretty good at crocheting, but for some reason I’m not understanding the dipping down to the 2 rows down and skipping the next to scs. It’s not working out for me. I end up with the row on the bottom instead of top.
Darla, I’m not aware of a tutorial for this particular stitch. Insert your hook into the single crochet stitches below the chain 2 space and crochet around the chain. I hope this helps.
For Darla, YouTube has video tutorials for pretty much every stitch out there. Just go to YouTube and do a search for that particular stitch, and watch away.
Debra
How long and how wide is your finished scarf?
Thanks for writing, Karen. My finished scarf 8.5″ (21.5 cm) by 79″ (200.5 cm), but yours would vary based on your gauge. There’s a link at the end of the pattern to my post about my finished scarf with more detail.
I love this idea so much!! I have lots of ideas running around in my head for different ways to do this. One of the first things that crossed my mind, was that if someone is in a hurry to get one done and doesn’t want to wait a year to do it, they could pick a date and use a weather almanac to go backwards a year and it could be done in no time at all. I also like the idea of making it as a birthday gift for someone and starting on their birthday in say 2015, and giving it to them for their birthday in 2016. Ohhhh boy! So many ideas……I need to go make a list. Thank you so much for your creative inspiration! ?
And… I would love to see what a quilter or two could do with this idea.
I agree, Debra, this would make a great quilting project. I’d love to see the way it would be presented.
Definitely true, Debra. I’ve made other temperature projects by using historical weather data.
I started one of these this year and have enjoyed seeing the temperature changes in the scarf. I’ve decided, next year I want to use this concept for a throw. Since a row a day makes for a very long scarf I thought it would make a good size throw.
Linda, I agree, a throw is a great temperature project.
HELP! I am so going to make this scarf! I had never heard of this before and it is just awesome as are your instructions! Thank you! Now for the “help” part. How in the world do I go about picking colors? Like for instance, temperatures in the spring and fall could fall in the same range so I guess I need a color that complements both, right? Or don’t you let the seasons influence color choice? As you can tell I was left out of the imagination pool. Any help would be soooooo appreciated. Thanks again…
Sue, thanks for writing and for your kind words. I didn’t base my own colors on temperatures. I just chose a bunch of yarns that had personal significance and which were in the same weight and looked harmonious together. I have seen people who use rainbow colors (usually using blues for cold weather, red for hot weather, etc.) and people who use shades or tints of the same colors (let’s say with winter in lights and summer in darks). Really, it is up to you! If you’re making this for yourself, choose colors you would want to wear, even if they don’t appear in the order you imagined.
Замечательный шарф! Очень красивый.
Поздравления из Украины!
Thank you, CrochetByEllej!
I love this idea an I’m in Melbourne Australia. Melbourne can have 4 seasons in one day. It’s October now so I have time to plan. Unfortunately starting with summer it will be 2018 before I can wear it . I wonder if i can use the last years weather charts. Mmm.. time to go looking. Thanks for the idea.
Using historic weather charts usually works, Julie. And remember, it doesn’t have to cover a calendar year. It can also cover any time period you want to commemorate. Enjoy!