

Since I live in New York City, I tend to think about heavier winterwear for holiday gifts. For the past few years, my sister has been living in the South (first in New Orleans and now in Houston), so I’ve had to think about gifts that might be a little lighter, like today’s summer slouchy hat crochet pattern.

This post contains affiliate links. I may receive compensation (at no added cost to you) if you make a purchase using these links. Yarn for the sample was generously provided by Cascade Yarns.

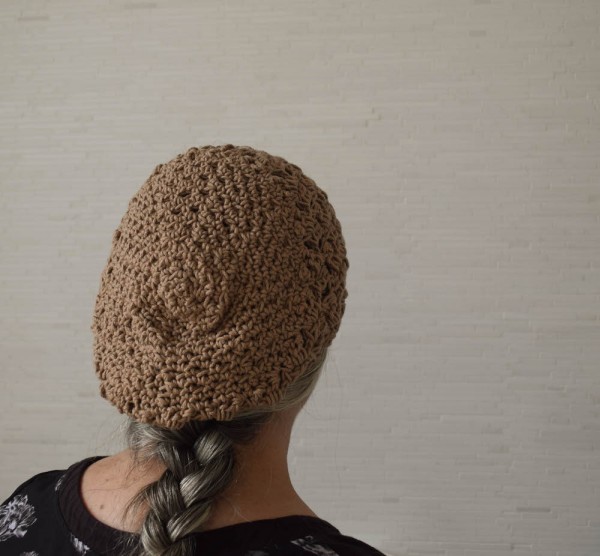
This airy slouchy hat is perfect for transitional weather, or as a gift for a loved one living in a warmer clime.
It combines a slightly open stitch pattern with a cotton blend yarn. The construction is also a bit unusual, but I think you’ll enjoy it!
If you make your own Airy Avalon Slouchy Hat, I’d love to see it! Share your progress and questions by tagging me on Facebook as @Underground Crafter on on Instagram as @ucrafter. You can also share a picture in the Underground Crafters Facebook group. Sign up for my weekly newsletter and get a coupon code for your choice of one of my premium patterns and private access to my vault of subscriber goodies. Plus, you’ll never miss one of my free patterns again!
Add the Airy Avalon Slouchy Hat to your favorites or queue, or buy the ad-free PDF on Ravelry.

Airy Avalon Slouchy Hat
Summer Slouchy Hat Crochet Pattern by Underground Crafter


This airy hat is perfect for transitional weather.
Finished Size
- Adult: 19.5” (49.5 cm) circumference.
Materials
- Cascade Yarns Avalon (50% cotton/50% acrylic, 3 oz/100 g, 175 yd/160 m) – 1 skein in 06 Tannin, or approximately 175 yd (160 m) in any cotton blend medium weight yarn. NOTE: This yarn has been discontinued. You can find appropriate substitutes here at YarnSub.
- US Size I-9/5.5 mm crochet hook, or any size needed to obtain gauge.
- Locking stitch marker.
- Yarn needle.
Gauge
- 15 sts x 12 rows in pattern = 4” (10 cm). For best fit, always check your gauge.
Abbreviations Used in This Pattern
- ch – chain
- cl – cluster – [Yo, insert hook in st, yo and draw up a loop, yo and draw through 2 loops] twice in same st or sp, yo and draw through all 3 loops on hook. A helpful video tutorial for this stitch is available below.
- If you can’t see the video tutorial above for the cluster, watch it on YouTube.
- ea – each
- pm – place st marker
- rep – repeat
- Rnd(s) – Round(s)
- RS – right (front) side
- sc – single crochet
- sc2tog – single crochet 2 stitches together -[Insert hook in next st, yo and draw up a loop] twice, yo and draw through all 3 loops on hook. A helpful video tutorial for this decrease is available below.
- If you can’t see the sc2tog video tutorial above, watch it on YouTube.
- sk – skip
- sl st – slip stitch
- sp – space
- st(s) – stitch(es)
- t-ch – turning chain
- WS – wrong (back) side
- yo – yarn over
- * Rep instructions after asterisk as indicated.
Pattern Notes
- Hat pattern stitch is worked flat in rows and joined.
- Slouchy crown of hat is crocheted in the round.
Pattern Instructions
Hat
- Starting at brim and leaving a long yarn tail (approximately 18”/46 cm) for seaming, ch 74.
- Row 1: Turn, sk 1 ch, *(sc, ch 3, cl, ch) in next ch, sk 3; rep from * across to last ch, sc. (73 sts)
- Row 2: Turn, ch 4, cl in same st, ch 1, *(sc, ch 3, cl, ch 1) in ch-3 sp; rep from * across to last ch-3 sp, (sc, ch 2, cl, ch 1) in last ch-3 sp, dc in last st.
- Row 3: Turn, ch 1, sc in first st, (ch 3, cl, ch 1) in ch-2 sp, *(sc, ch 3, cl, ch 1) in ch-3 sp; rep from * across, sc to top of t-ch.
- Row 4: Rep Row 2.
- Rep Rows 3 & 4 until piece measures approximately 5.5” (14 cm). Do not fasten off.

Seam hat base
- Pm in loop of last st (to hold st) and remove hook.
- Working on the WS and using long yarn tail from foundation chain, seam short edges together by working sl sts through both layers (see video below).
- If you can’t see the slip stitch seam tutorial above, watch it on YouTube.
- Turn RS out and return hook to loop with marker. Remove marker.
Shape crown
- Begin working in Rnds.
- Rnd 1: Sc in ea sc, cl, ch-1 sp, and ch-3 sp around. Pm to mark last st. Move up marker ea Rnd.
- Rnd 2: *Sc2tog, sc in next 7 sts; rep from * around to last st, sc. (65 sts)
- Rnd 3: *Sc in next st, ch 1, sk 1; rep from * around to last st, sc.
- Rnd 4: *Sc2tog in next sc and ch-1 sp, sc in next 6 sts; rep from * around to last st, sc. (57 sts)
- Rnd 5: Rep Rnd 3.
- Rnd 6: *Sc2tog in next sc and ch-1 sp, sc in next 5 sts; rep from * around to last st, sc. (49 sts)
- Rnd 7: Rep Rnd 3.
- Rnd 8: *Sc2tog in next sc and ch-1 sp, sc in next 4 sts; rep from * around to last st, sc. (41 sts)
- Rnd 9: Rep Rnd 3.
- Rnd 10: *Sc2tog in next sc and ch-1 sp, sc in next 3 sts; rep from * around to last st, sc. (33 sts)
- Rnd 11: Rep Rnd 3.
- Rnd 12: *Sc2tog in next sc and ch-1 sp, sc in next 2 sts; rep from * around to last st, sc. (25 sts)
- Rnd 13: Rep Rnd 3.
- Rnd 14: *Sc2tog in next sc and ch-1 sp, sc in next st; rep from * around to last st, sc. (17 sts)
- Rnd 15: Rep Rnd 3.
- Rnd 16: *Sc2tog in next sc and ch-1 sp; rep from * around to last st, sc. (9 sts)
- Rnd 17: Rep Rnd 3.
- Rnd 18: Rep Rnd 16. (5 sts) Fasten off with long yarn tail (approximately 12”/30.5 cm) for seaming.
Finishing
- With yarn needle and long yarn tail, seam crown closed. Weave in ends on WS of hat. Spray block if necessary.
This is so pretty. I love the stitch pattern and drape!
Thank you, Darlene! The yarn is lovely to work with.