

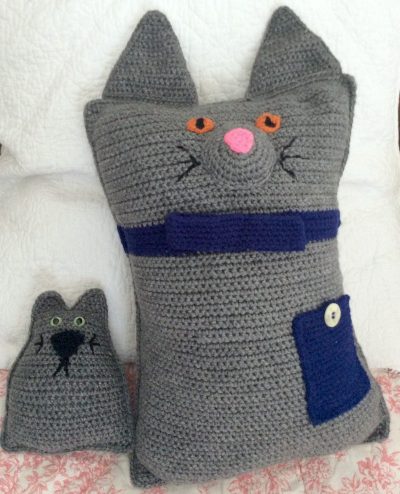
 I’m kicking off the 2018 Christmas in July Crochet Along with Mr. Putty Cat, Sr., a rag doll inspired pillow pal. This cuddly character makes a great gift, and he comes ready with a buttoned pocket for a gift card and a back pocket that’s large enough to fit a book, tablet, or other large, flat gift.
This post contains affiliate links. I may receive compensation (at no added cost to you) if you make a purchase using these links. Supplies for the sample was generously provided by Red Heart, Fairfield World, and Clover USA.
This pattern is part of the Christmas in July Crochet Along. Find out more about joining and entering the giveaways here.
 This week’s CAL theme is gifts for babies, kids, and teens. Mr. Putty Cat, Sr. makes a great gift for a younger child (though be sure to leave off the button for children under 3 or those who still enjoy putting small things in their mouths).
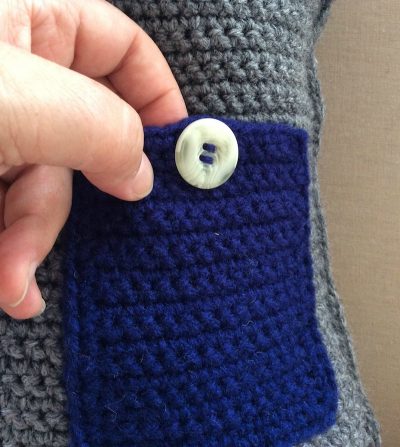 His front pocket is the right size for a gift card or some little stocking stuffers.
 His back pocket is about 10″ (25.5 cm), so you can fit a book, a tablet, or many other flat gifts inside.
 His face has a lot of character, and who doesn’t love a gentleman in a bow tie? Mr. Putty Cat, Sr. is made in an old fashioned rag doll style, but you can substitute safety eyes if you’d like.
Get the companion project, Putty Cat, Jr.
 If you make your own Mr. Putty Cat, Sr., I’d love to see it! Share your progress and questions by tagging me on Facebook as @Underground Crafter, Instragram as @ucrafter, or Twitter as @ucrafter. You can also share a picture in the Underground Crafters Facebook group. Sign up for my weekly newsletter and get a coupon code for your choice of one of my premium patterns and other subscriber goodies. Plus, you’ll never miss one of my free patterns again!
Add Mr. Putty Cat, Sr. to your Ravelry favorites or queue.

Buy the ad-free PDF on Craftsy.


Mr. Putty Cat, Sr.
Crochet Pattern by Underground Crafter
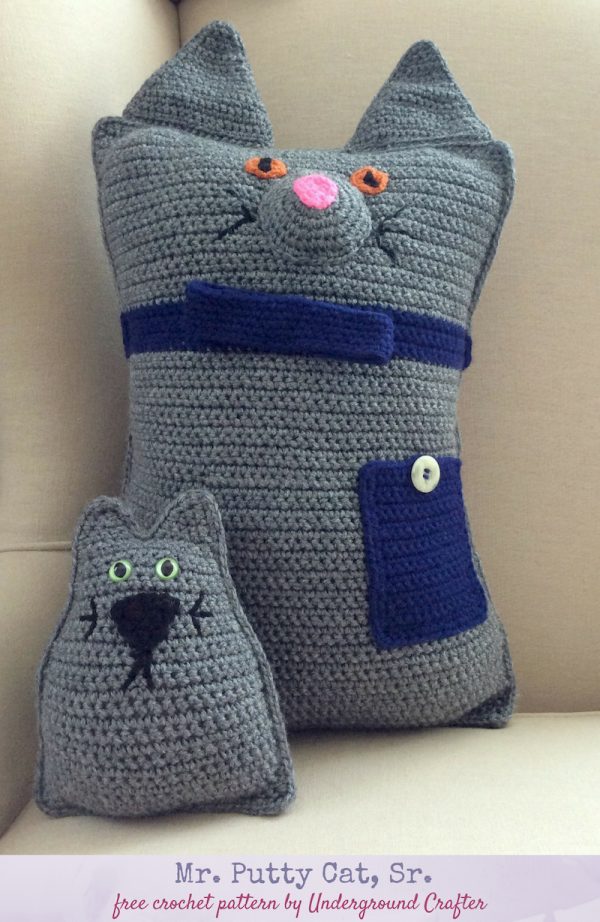


 This rag doll style pillow pal proudly wears his bow tie. His buttoned front pocket fits a gift card snugly inside, while his back pocket is large enough to hold a book, a tablet, or another gift. He is totally huggable and makes a great gift. This is the companion pattern to Putty Cat, Jr.
Finished Size
- Front and Back Panel measure approximately 11” (28 cm) wide x 16” (40.5 cm) tall before joining and stuffing.
Materials
- Red Heart Super Saver yarn (100% acrylic, 5 oz/141 g, 236 yd/216 m) – 3 skeins in 400 Heather Gray (CA), or approximately 615 yd (562 m) in CA in any medium weight yarn.
- Red Heart Super Saver yarn (100% acrylic, 7 oz/198 g, 364 yd/333 m) – 1 skein each in 387 Soft Navy (CB), 722 Pretty N Pink (CC), 256 Carrot (CD), and 312 Black (CE), or approximately 75 yd (68.5 m) in CB, 20 yd (18 m) in CC, 20 yd (18 m) in CD, and 20 yd (18 m) in CE in any medium weight yarn.
- US F-5/3.75 mm crochet hook, or any size needed to obtain correct gauge.
- Yarn needle with eye small enough to fit through button eyes.
- Clover Quick Locking Stitch Marker Set (for marking position when working in the round and for holding pieces together when seaming).
- Fairfield Poly-Fil Royal Silk Fiber Fill, 12 ounce bag.
- 0.75” (2 cm) sew through button.
Gauge
- 18 sc x 20 rows = 4” (10 cm). Exact gauge is not critical for this project.
Abbreviations Used in This Pattern
- CA – Color A
- CB – Color B
- CC – Color C
- CD – Color D
- CE – Color E
- ch – chain
- rep – repeat
- Rnd – Round
- sc – single crochet
- sk – skip
- st(s) – stitch(es)
- yo – yarn over
- *Repeat instructions after asterisk as indicated.
- [] Repeat instructions between brackets as indicated.
Pattern Notes
- When choosing colors, note that CA is the main color of the cat’s body, CB is the color of the bow tie and pocket, CC is the color of the nose, CD is the color of the iris, and CE is the color of the pupil and the whiskers.
- The Eyes and Muzzle are worked in spirals in the Round without joining.
- When making Muzzle, place stitch marker in last stitch of Round. Move up every Round to mark position.
- Oombawka Design has a helpful magic ring tutorial here.
- Fiber Flux has helpful back stitch tutorials. The photo tutorial is here and the video tutorial is here.
- A helpful tutorial for seaming with single crochet is available here.
Pattern Instructions
Ears (Make 4)
- With CA, ch 2.
- Row 1: Turn, sk 1 ch, 2 sc in next ch. (2 sts)
- Row 2: Turn, ch 1, sc in first st, 2 sc in next st. (3 sts)
- Row 3: Turn, ch 1, sc in first st, sc in each st across to last st, 2 sc in last st. (Increases by 1 st with each rep)
- Rows 4-19: Rep Row 3, 16 times. Fasten off CA with long yarn tail (approximately 12”/30.5 cm) for seaming.
Muzzle
- With CA, start with magic adjustable ring (see Pattern Notes).
- Rnd 1: Ch 1, 6 sc in ring, pull yarn tightly to close ring, place marker in last st to mark position (see Pattern Notes). (6 sts)
- Rnd 2:. 2 sc in each st around. (12 sts)
- Rnd 3: *2 sc in next st, sc in next st; rep from * around. (18 sts)
- Rnd 4: *2 sc in next st, sc in next 2 sts; rep from * around. (24 sts)
- Rnd 5: *2 sc in next st, sc in next 3 sts; rep from * around. (30 sts)
- Rnd 6: *2 sc in next st, sc in next 4 sts; rep from * around. (36 sts)
- Rnd 7: *2 sc in next st, sc in next 5 sts; rep from * around. (42 sts)
- Fasten off CA with long yarn tail (approximately 18”/46 cm) for seaming.
Back Panel
- With CA, ch 51.
- Row 1: Turn, sk 1 ch, sc in next ch and in each ch across. (50 sts)
- Row 2: Turn, ch 1, sc in first st and in each st across.
- Rows 3-48: Rep Row 2, 46 times, or until panel measures approximately 10” (25.5 cm) tall, changing to CB in final yo of last sc. Fasten off CA.
- Rows 49-53: Rep Row 2, 5 times, changing to CA in final yo of last sc. Fasten off CB with long yarn tail (approximately 18”/46 cm) for seaming.
- Rows 54-78: Rep Row 2, 25 times. Fasten off CA.
Pocket Panel
- Rep Back Panel through Row 48. Do not change to CB. Fasten off CA.
Front Panel
- Rep Back Panel, but do not fasten off CA after Row 78.
Bow Tie
- With CB, ch 41.
- Set Up Row: Turn, sk 1 ch, sc in next ch and in each ch across, being careful not to twist, join with sl st to top of first sc and begin working in the round. (40 sts)
- Rnd 1: Ch 1, sc in same st and in each st around, join with slip st to first sc.
- Rnds 2-4: Rep Rnd 1, 3 times. Fasten off CB with long yarn tail (approximately 60”/152 cm) for finishing and seaming.
- With CB, ch 14.
- Row 1: Turn, sk 1 ch, sc in next ch and in each ch across. (13 sts).
- Row 2: Turn, ch 1, sc in first st and in each st across.
- Rep Row 2 until Pocket measures approximately 3.5” (9 cm).
Shape buttonhole
- Row 3: Turn, ch 1, sc in first st and in next 4 sts, ch 3, sk 3 sts, sc in next 5 sts. (10 sts + ch-3 sp)
- Row 4: Turn, ch 1, sc in first st and in next 4 sts, 3 sc in ch-3 sp, sc in next 5 sts. (13 sts)
Work pocket edging
- Edging Rnd 1: Turn to work along long edges of pocket, ch 1, sc in side of each row across, turn, ch 1, sc across unworked side of next 13 sts from foundation chain, turn, ch 1, sc in side of each row across long edge, join with slip st to first sc. Fasten off CB with long yarn tail (approximately 18”/46 cm) for seaming.
Nose
- With CC, rep instructions for Ear through Row 4. (5 sts)
- Fasten off CC with long yarn tail (approximately 12”/30.5 cm) for seaming.
Eyes (Make 2)
- With CD, start with magic adjustable ring (see Pattern Notes).
- Rnd 1: Ch 1, 6 sc in ring, pull yarn tightly to close ring. (6 sts)
- Rnd 2: 3 sc in first st, [2 sc in next st] twice, 3 sc in next st, sc in next 2 sts, join with sl st to first sc. (12 sts)
- Fasten off CC with long yarn tail (approximately 12”/30.5 cm) for seaming.
Assembly
- Thread yarn needle with yarn tail from Bow Tie. With both layers of long edge of Bow Tie pressed together, use yarn needle to seam through 4 stitches across top of Bow Tie. Weave yarn needle through each Round until your needle is at the bottom edge of the Bow Tie. Use yarn needle to seam through 4 stitches across bottom of Bow Tie. Weave yarn needle through each Round until your needle is back at the top edge of the Bow Tie.
- Use stitch markers to pin Bow Tie to Front Panel at the center front of the colored stripe. With yarn needle, sew Bow Tie to Front Panel securely. With yarn needle, weave in ends on wrong side of Front Panel.
- Use stitch markers to pin Pocket to Front Panel below Bow Tie using pictures as guide. Thread yarn needle with yarn tail from Pocket. Sew pocket to Front Panel along long edge, bottom, and along other long edge. Do not seam short edge with buttonhole. With yarn needle, weave in ends on wrong side of Front Panel.
- Thread yarn needle with CB. Sew button to Front Panel so that it lines up below buttonhole on Pocket. With yarn needle, weave in ends on wrong side of Front Panel.
- Thread yarn needle with yarn tail from Nose. Sew Nose to Muzzle. With yarn needle, weave in ends on wrong side of Muzzle.
- Use stitch markers to pin Muzzle to Front Panel above Bow Tie using pictures as guide. Thread yarn needle with yarn tail from Muzzle. Sew Muzzle to Front Panel, stuffing firmly as you go. With yarn needle, weave in ends on wrong side of Front Panel.
- Thread yarn needle with CE. With yarn needle, back stitch (see Pattern Notes) pupils onto the Eyes. Back stitch whiskers at edges of Muzzle. With yarn needle, weave in ends on wrong side of Front Panel.
- Use stitch markers to pin Eyes to Front Panel above Muzzle using pictures as guide. Thread yarn needle with tail from first Eye. Sew Eye to Front Panel. Repeat for second Eye. With yarn needle, weave in ends on wrong side of Front Panel.
- Use stitch markers to pin two Ears together. Thread yarn with tail from first Ears. Seam across long last row. Repeat for second set of Ears. Use stitch markers to pin Ears to Front Panel. Seam Ears to Front Panel.
- Stack the Panels as a sandwich. Place Pillow Panel on the bottom, then Back Panel, then Front Panel with facial features facing up. With CA and crochet hook, beginning at top row of Front Panel, join with single crochet seam (see Pattern Notes), working one single crochet through each stitch or side of Row through both layers of Panels and Ears, until you reach the color change for Bow Tie, drop CA but do not fasten off.
- Change to CB yarn tail in last yo of final single crochet in CA. Single crochet in CB across next 5 rows, changing back to CA in last yo of final single crochet in CB. Fasten off CB. Continue working single crochet seam in CA until next color change.
- Stuff pillow firmly. Change to CB yarn tail in last yo of final single crochet in CA. Single crochet in CB across next 5 rows, changing back to CA in last yo of final single crochet in CB. Add more stuffing. Continue working single crochet seam in CA until you reach first single crochet. Join with slip stitch. Fasten off.
- With yarn needle, weave in remaining ends on inside of pillow.
© 2018 by Marie Segares (Underground Crafter). This pattern is for personal use only. You may use the pattern to make unlimited items for yourself, for charity, or to give as gifts. You may sell items you personally make by hand from this pattern. Do not violate Marie’s copyright by distributing this pattern or the photos in any form, including but not limited to scanning, photocopying, emailing, or posting on a website or internet discussion group. If you want to share the pattern, point your friends to this link: https://undergroundcrafter.com/2018/07/02/crochet-pattern-mr-putty-cat-sr/. Thanks for supporting indie designers!
If you make your own Mr. Putty Cat, Sr., I’d love to see it! Share your progress and questions by tagging me on Facebook as @Underground Crafter, Instragram as @ucrafter, or Twitter as @ucrafter. You can also share a picture in the Underground Crafters Facebook group. Sign up for my weekly newsletter and get a coupon code for your choice of one of my premium patterns and other subscriber goodies. Plus, you’ll never miss one of my free patterns again!
Add Mr. Putty Cat, Sr. to your Ravelry favorites or queue.
Buy the ad-free PDF on Craftsy.
Believe it or not, our cat is named “Putty”. We named him this because of the way he adjusts his body to fit the shape of the arms of the person who is holding him. He’s gray and white with long hair. He’s really a “people cat”. Right now he’s very ill, so I’d appreciate it if everyone prays for him. Thanks for making the pattern!