


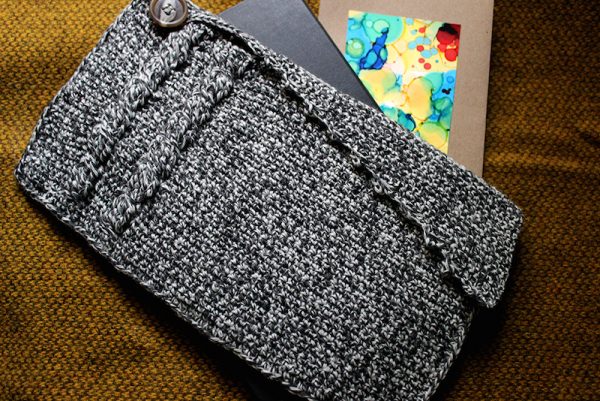
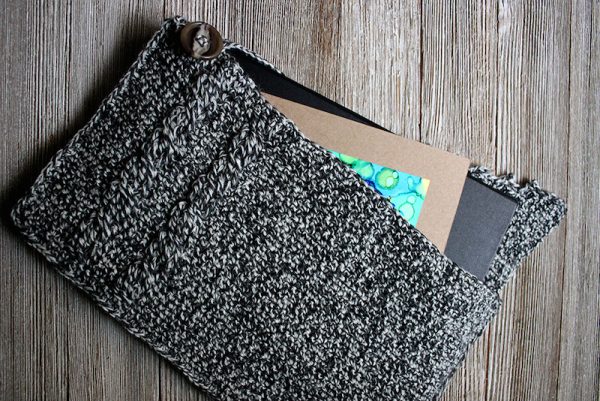
The Cabled Clutch crochet pattern makes a small bag with an asymmetrical flap, picot edges, and a beautiful twisted crochet cable. This clutch is perfect for toting around your crochet notions, a small sketchbook, or using as your statement bag for a night out.
This post contains affiliate links. I may receive compensation (at no added cost to you) if you make a purchase using these links. Yarn for the sample was generously provided by KnitCrate. Photos © KnitCrate and used with permission.
Earlier this year, I designed the Cabled Clutch for a KnitCrate‘s Membership Crate. If you’re new to KnitCrate, it’s a subscription service for yarn lovers with several different “crates” available each month.
The yarn I used for this project, La Brebis Marled Sock, was an exclusive for members that month, so you can’t buy it anymore. Not to worry, though, because you can substitute any sock yarn to make this pattern! This project would look great in a solid color yarn, or it’s also perfect for that special hand dyed yarn that you want to show off (but only have one skein of).
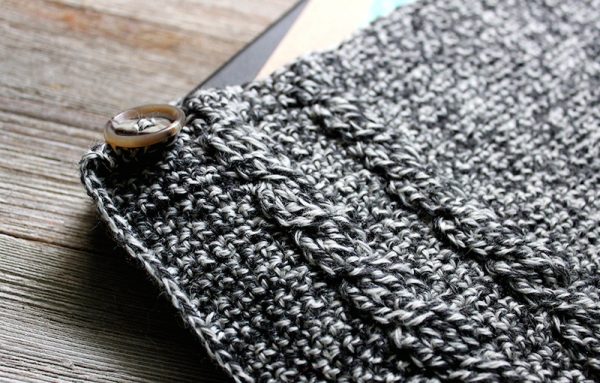
Choose a button from your collection to add the perfect finishing touch to your version.
If you make your own Cabled Clutch, I’d love to see it! Share your progress and questions by tagging me on Facebook as @Underground Crafter, Instragram as @ucrafter, or Twitter as @ucrafter. You can also share a picture in the Underground Crafters Facebook group. Sign up for my weekly newsletter and get a coupon code for your choice of one of my premium patterns and other subscriber goodies. Plus, you’ll never miss one of my free patterns again!
Add the Cabled Clutch to your Ravelry favorites or queue.

Cabled Clutch
Crochet Pattern by Underground Crafter

![]()

 Work up one of these adorable pouches, featuring an asymmetrical flap, picot edges, and a twisted crochet cable, for a delightful notions pouch, artist’s sketchbook cover, or casual clutch.
Finished Size
- 10.5” (26.5 cm) wide x 6” (15 cm) tall with flap closed after blocking.
Materials
- KnitCrate La Brebis Marled Sock (80% wool/20% nylon, 3.5 oz/100 g/440 yd/402 m) – 1 skein, or approximately 220 yd (201 m) in any super fine weight yarn.
- US Size F-5 (3.75 mm) crochet hook, or size needed to obtain gauge.
- 7/8″ (22 mm) sew through or shank button.
- Yarn needle that fits through button eyes.
- Clover Quick Locking Stitch Marker Set.
Gauge
- 25 sc = 4” (10 cm) unblocked. Exact gauge is not critical for this project.
Abbreviations Used in This Pattern
- BL – back loop only – Moogly has helpful a video for identifying the front and back loops here.
- ch – chain
- ea – each
- FPdc – front post double crochet – Yo, insert hook from front to back to front of st in previous round, yo and draw up a loop, [yo and draw through 2 loops] twice. Skip st behind FPdc. A helpful video tutorial for this stitch is available here.
- picot – picot stitch – Ch 3, turn, sk 2 ch, sc in next ch.
- pm – place stitch marker
- rep – repeat
- sc – single crochet
- sk – skip
- sl st – slip stitch
- st(s) – stitch(es)
- yo – yarn over
- *Repeat instructions after asterisk as indicated.
- [] Repeat instructions between brackets as indicated.
Pattern Notes
- A tutorial for the single crochet seam is available here.
- This clutch is crocheted in two pieces, which are then seamed. After blocking, attach a button and fold over the flap to close.
- The photographed sample is unlined. There are several options for lining.
- No-sew duct tape liners are very sturdy, removable (and cleanable), and add a stiff shape to the clutch. A tutorial is available here.
- Another option is a single crochet liner. For this clutch, repeat the instructions for the Back Panel through Row 2 until the liner measures approximately 11” (28 cm) long. Fold the liner in half so that the short sides are together. Then insert the liner in between the Front and Back Panel before joining. Work through all 4 layers (Front Panel + 2 layers of folded single crochet liner + Back Panel) as you seam the Panels together with the single crochet seam.
- A third option is to sew in a fabric liner.
Pattern Instructions
Front Panel
- Ch 61.
- Row 1: Turn, skip 1 ch, sc in next ch and ea ch across. (60 sts)
- Row 2: Turn, ch 1, sc in first st and in ea st across.
- Row 3: (Right Side) Turn, ch 1, sc in first st and in next 39 sts, pm, [sk 2 sts, FPdc around next 2 sts, working in front of FPdc, FPdc around each of 2 skipped sts, sc in next 4 sts] twice, sc in next 4 sts. From this point forward, move stitch marker up each row to mark position of cabled section.
- Row 4: Turn, ch 1, sc in first st and next 7 sts, *to close gap (insert hook through next skipped sc and FPdc and sc in next 4 sts),** sc in next 4 sts, rep from * to **, sc in next 40 sts.
- Row 5: Turn, ch 1, sc in first st and in ea st across through marked st, [FPdc around next 4 sts, sc in next 4 sts] twice, sc in next 4 sts.
- Row 6: Rep Row 4.
- Row 7: Rep Row 5.
- Row 8: Rep Row 4.
- Row 9: Turn, ch 1, sc in first st and in each st across through marked st, [sk 2 sts, FPdc around next 2 FPdc, working in front of FPdc, FPdc around each of 2 skipped FPdc, sc in next 4 sts] twice, sc in next 4 sts.
- Row 10: Rep Row 4.
- Rep Rows 5-10 until Front Panel measures approximately 5.5” (14 cm) tall, ending after Row 8. Fasten off.
Back Panel
- Ch 61.
- Row 1: Turn, sk 1 ch, sc in next ch and ea ch across. (60 sts)
- Row 2: Turn, ch 1, sc in first st and in ea st across.
- Rep Row 2 until Back Panel is the same length as Front Panel. Pm in first and last st of final rep of Row 2 to mark for joining. Do not fasten off.
Shape Flap
- Row 3: Turn, ch 1, scBL in first st and ea st across.
- Row 4: (Right Side) Turn, ch 1, sc in first st and next 39 sts, sk next 20 sts. (40 sts)
- Row 5: Turn, sl st in first 2 sts, sc in next 38 sts. (38 sts)
- Row 6: Turn, ch 1, sc in first st and next 35 sts, sk next 2 sts. (36 sts)
- Row 7: Turn, sl st in first 2 sts, sc in next 34 sts. (34 sts)
- Row 8: Turn, ch 1, sc in first st and next 31 sts, sk next 2 sts. (32 sts)
- Row 9: Turn, sl st in first 2 sts, sc in next 30 sts. (30 sts)
- Row 10: Turn, ch 1, sc in first st and next 27 sts, sk next 2 sts. (28 sts)
- Row 11: Turn, sl st in first 2 sts, sc in next 26 sts. (26 sts)
- Row 12: Turn, ch 1, sc in first st and next 23 sts, sk next 2 sts. (24 sts)
- Row 13: Turn, sl st in first 2 sts, sc in next 22 sts. (22 sts)
- Row 14: Turn, ch 1, sc in first st and next 19 sts, sk next 2 sts. (20 sts)
- Row 15: Turn, sl st in first 2 sts, sc in next 18 sts. (18 sts)
- Row 16: Turn, ch 1, sc in first st and next 15 sts, sk next 2 sts. (16 sts)
- Row 17: Turn, sl st in first 2 sts, sc in next 14 sts. (14 sts)
- Row 18: Turn, ch 1, sc in first st and next 11 sts, sk next 2 sts. (12 sts)
- Row 19: Turn, sl st in first 2 sts, sc in next 10 sts. (10 sts)
- Row 20: Turn, ch 1, sc in first st and next 7 sts, sk next 2 sts. (8 sts)
- Row 21: Turn, sl st in first 2 sts, sc in next 6 sts. (6 sts)
- Row 22: Turn, ch 1, sc in first st and next 3 sts, sk next 2 sts. (4 sts)
- Row 23: Turn, sl st in first 2 sts, sc in next 2 sts. Do not fasten off. (2 sts)
Form Buttonhole
- Row 24: Turn, ch 1, sc in first 2 sts, picot, *sk next 2 sl sts on previous row, sc in next 2 sts on previous row, picot; rep from * across to last 20 sts on Flap, sc in next 14 sts, ch 4, sk 4 sts, sc in last 2 sts.
- Row 25: Turn, ch 1, sc in first 2 sts, sc in next 4 ch, sc in next 14 sts, sl st into space below next picot to join. Fasten off.
Assembly
- Line up top of Front Panel with right side facing you and wrong side lined up to marked row on Back Panel. Join with single crochet seam (see Pattern Notes), working 1 sc into side of ea row to foundation chain, 3 sc in the corner, 1 sc in ea st to last st of foundation ch, 3 sc in the corner, and 1 sc into side of ea row to marked row.
Finishing
- Fasten off. With yarn needle, weave in yarn tails onto inside of clutch. Spray block to measurements, leaving Front Flap open to shape picot trim. When dry, use yarn and yarn needle to sew button on to front of clutch to align with buttonhole on Front Flap. Weave in ends securely on inside of clutch. Fold over Front Flap at Row 3.
1 thought on “Crochet Pattern: Cabled Clutch”