
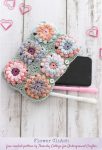
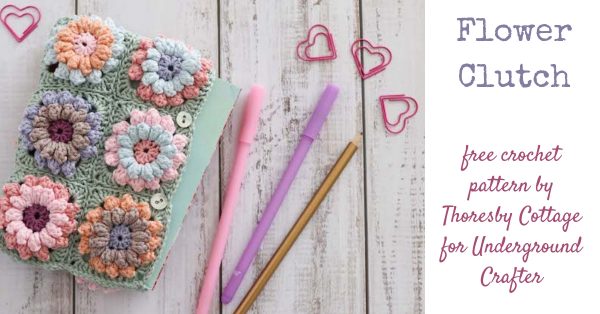
I’m thrilled to share this beautiful crochet flower clutch pattern by Thoresby Cottage today. If you love pretty pastels,, portable projects, or granny squares, then get your hook ready for the Flower Clutch!
This post contains affiliate links. I may receive compensation (at no added cost to you) if you make a purchase using these links. Photos in this post are © Caitie Moore/Thoresby Cottage and are used with permission.
About Thoresby Cottage
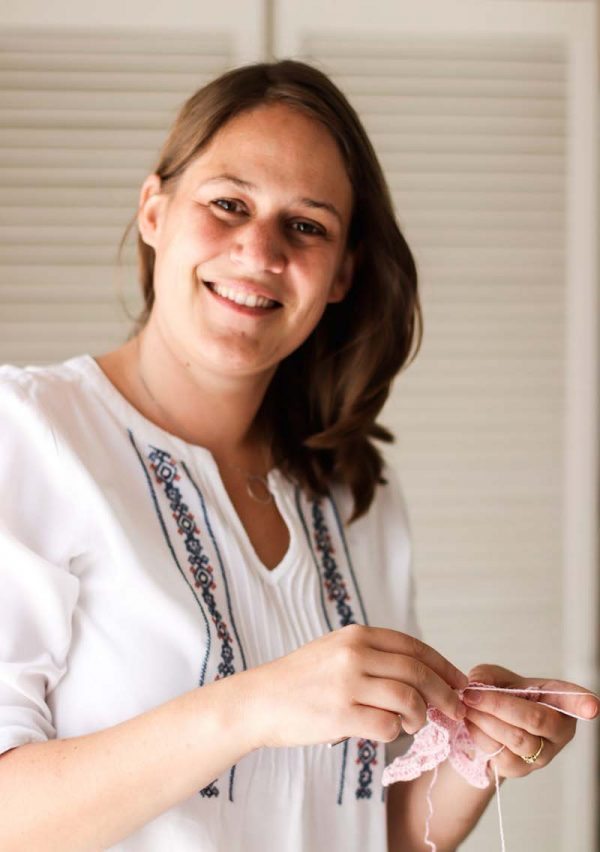
Caitie is the busy mum, designer, and maker behind the blog and online shop Thoresby Cottage. She is based in the vibrant city of Cape Town, South Africa, where she lives with her husband (live-in tech support), toddler (official toy tester), and fur-friend Lily. She draws much of her crochet inspiration from nature and loves creating whimsical and cheerful amigurumi and home décor. She is fuelled by faith and does most of her designing and making armed with a cup of tea.
Show your support by following Caitie on Thoresby Cottage | Etsy | Facebook | Instagram | LoveCrochet | Pinterest | Ravelry
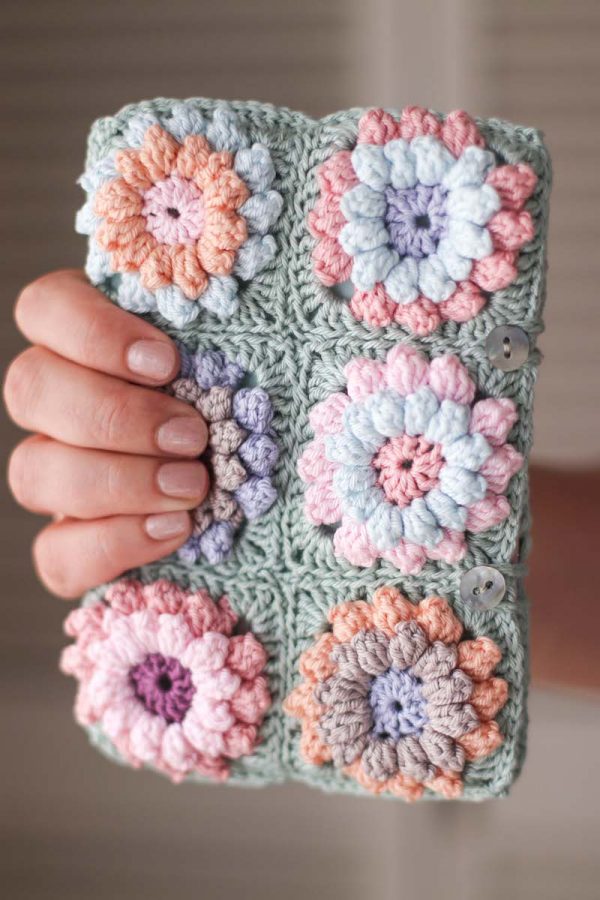
Flower Clutch
Crochet Flower Clutch Pattern by Thoresby Cottage

Hi! I’m Caitie from the blog and online store, Thoresby Cottage. I’m so excited to share this pattern with you. I don’t know about you, but a girl can never have too many pouches. Even better is one that is handmade. This little pouch is the perfect size for my phone and some change, which is great when I just need to pop out and I don’t want to take my big mom bag with me.
I love working with cotton and the gorgeous natural colors of Scheepjes Catona are perfect for this floral project (although you can use any yarn you have on hand).
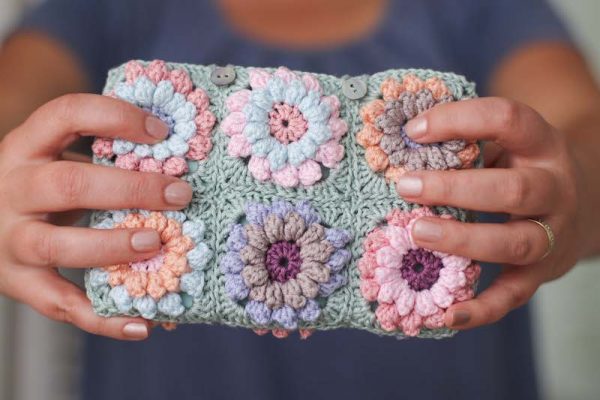
This pouch is made using a repeat motif (small flower square) that is then sewn together to form the pouch. The stitches used fit quite snugly together, which means that you don’t have to line the pouch if you plan to use this for slightly larger things like your phone or wallet. It’s the perfect project to use up all those colorful scraps!
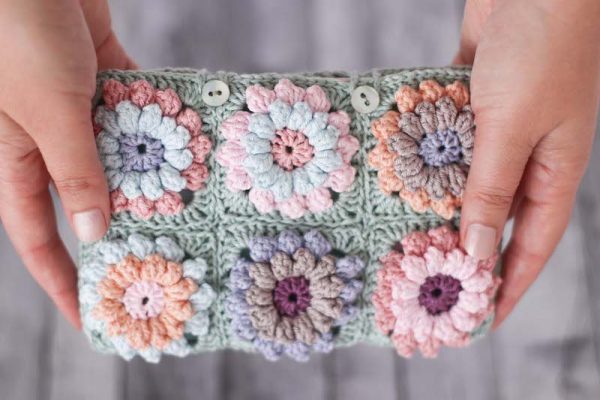
The finished pouch measures 12 cm x 10 cm (5″ x 4″), but you could very easily make your pouch bigger or smaller by simply adjusting the number of motif squares that you use. I think a tiny pouch for small change would be fantastic, and a big beach bag would be gorgeous too! I love seeing all your finished makes, so please tag @thoresbycottage on Instagram, share the picture on Facebook, or send me an email.
Requirements
- 2.75mm hook
- Yarn needle
- 2 x buttons (1 cm/ diameter)
- Scheepjes Catona in the following colors:
- 238: Powder Pink
- 240: Amethyst
- 393: Charcoal
- 399: Lilac Mist
- 402: Silver Green
- 408: Old Rose
- 406: Soft Beige
- 414: Vintage Peach
- 509: Baby Blue

US Terminology
- Ch – chain
- ch-sp – chain space
- Dc – double crochet
- Popcorn: work 5 dc into the same stitch. Remove your hook from the last dc and insert it, from front to back, into the top of the first dc of the popcorn stitch. Insert the hook into the loop from the last dc and pull it through to make the popcorn stitch puff. Change to the next color by doing a chain st. Moogly has a helpful video tutorial for this stitch here.
- R – round(s)
- Sc – single crochet
- St – stitch
- Slst – slip stitch
Pattern Notes
- Oombawka Design has a helpful video tutorial for the magic ring here.
- Moogly has a helpful video tutorial for standing dc here.
Instructions
- R1. Start with Color A. Into a magic ring; ch 3 (counts as dc), 11 dc. Invisible join or slst to 3rd ch of initial ch 3 to close. Cut yarn and weave in ends (12 dc)
- R2. Join Color B with a standing dc (or ch 3, counts as first dc of popcorn st) into any st. Continue to *work a popcorn st, ch 1. Repeat from * around. Slst or invisible join into the back of the first popcorn to close the rnd. Cut yarn and weave in ends. (12 popcorns, 12 ch)
- R3. Join Color C with a standing dc (or ch 3, counts as first dc of popcorn st) into any ch-1-sp. Continue to *work a popcorn st + ch 1, work a popcorn + ch 1 into the next two ch-1-sp, ch 3. Repeat from * around. Slst or invisible join into the first popcorn st to close the round. Cut yarn and weave in ends (12 popcorns, 4 x ch-3-sp)
- R4. Join Color D with a standing dc (or ch 3, counts as a dc) into any ch-3-sp. Into the same ch-3-space, work another 2 dc, ch 2, 3 dc. Dc into each of the next 6 st (i.e. into the back of the popcorn and into the ch-1-sp). *Into the ch-3-sp [3dc, 2 ch, 3 dc) Dc into each of the next 6 st. Repeat from * around. Invisible join into the initial dc to close the round. Cut yarn and weave in ends (48 dc, 4 x ch-2-sp)
- Make 12 flower square motifs.
- Arrange your squares into a 3 x 4 rectangle (i.e., a rectangle that is 3 squares wide and 4 squares long). I like to have the colors fairly random, but you can mix and match as you please. Join the squares together using the invisible join (i.e., whip stitching together the back loops of the squares you wish to join). You should now have a panel of flower squares. Fold the panel in half, with 6 squares on one side and 6 on the other, wrong sides together and right side facing outwards.
- With the opening of the pouch pointing upwards / away from you, join the background yarn color (in this case, green) at the bottom left hand ch-2-sp. Slst in each st (through both layers of squares) to close up the left side. When you reach the top left hand corner, begin to slst across the top of the work, but only through the front layer of stitches. (If you go through both layers you will stitch your pouch closed!). When you reach the ch-2-sp on the far right hand side of the pouch, continue to slst through both layers down the right hand side of the pouch. The basic construction of the pouch is complete, now to add the loops.
- Flip the pouch over and join the yarn on the top right hand ch-2-sp. Slst across the top of the pouch, until you reach the next ch-2-sp. Ch 14 (check that your buttons will fit through the loop and adjust the chain length accordingly) and slst back into same ch-sp to make the first loop. Slst right across the top of the next square and into the first ch-2-sp of the last square. Ch 14 and slst back into same ch-sp to make the second loop. Slst to the end of the row, fasten off and weave in any ends.
- Sew buttons onto the front of the bag.
would like to make this for my daughter
Thank you so much for this gorgeous purse.! It is so pretty. I will make one!
This is absolutely gorgeous!! What a wonderful pattern!
Thank you so much for your help with the pattern. I’m looking forward to making me some pillows after Christmas. Got so much going on I’ve had to pick & choose what can wait a few days & what can’t. Will post you a picture when I get finished. Lillian Williams
It’s absolutely beautiful.. I’m going to make one and turn it into a cover for my Bible! ☺
This rekindled my love for crocheting!
Thank you for this pattern. I just finished mine. Used dollar store cotton yarn I was gifted. It turned out better than what I thought. Thanks again. Will be making more!