

I recently took a class to up my machine appliqué skills and I’m sharing a quick project you can make to learn how to machine appliqué. You can use machine appliqué for all types of sewing projects, including quilts and embellishment on clothing, gifts, and more.
This post contains affiliate links. I may receive compensation (at no added cost to you) if you make a purchase using these links. My sewing machine sponsor is Baby Lock and this post is part of our ongoing collaboration. Additional materials for this post were generously provided by Fairfield World and Fiskars. Camera and vinyl backdrop were generously provided by B&H Photo Video and Pro Audio.
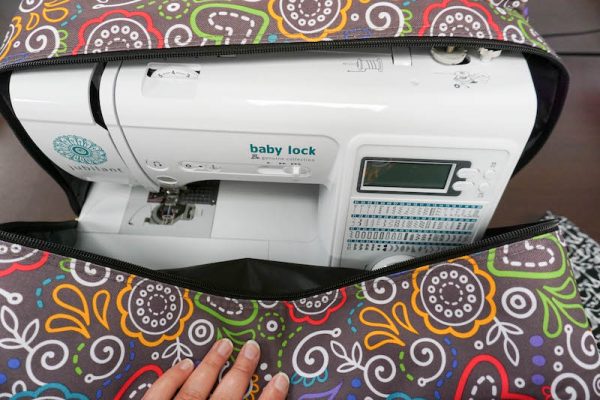
One of the reasons I was so attracted to the Baby Lock Jubilant is because it is a very portable machine. (You can read my full review and watch my unboxing of the Jubilant here.) At under 15 pounds (under 7 kg), I can carry it around with me during my adventures around New York City. A few weeks ago, I had the day off and saw that my local quilt shop, Gotham Quilts, was offering a machine appliqué workshop taught by Justin from Keaton Quilts.

Though Gotham Quilts has its own machines, I prefer to bring my own machine to classes so I can focus on learning the technique, rather than on trying to figure out a new-to-me machine. Justin’s sample project was this pretty little heart quilt.

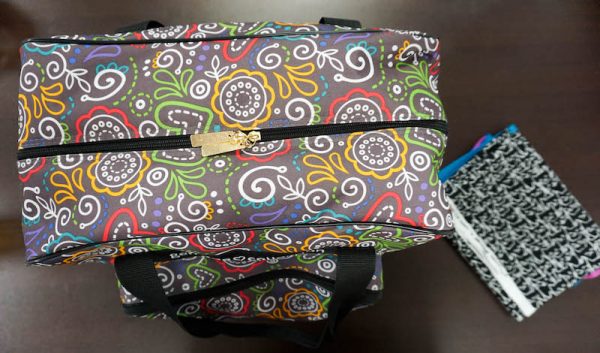
Although it’s pretty easy to carry around my Baby Lock Jubilant using just the handle, I brought it down to the shop with my Genuine Collection Machine Tote. It was actually raining fairly heavily on the day I took the class, so I stored all my class supplies in the Machine Tote and I didn’t have to carry an extra bag.
Since I have a history of not finishing class projects, I picked some bright fabrics to go with my background fabric to make a pillow instead.

With my fabric selected, I went upstairs to the classroom and unpacked my machine…
…popped in the Invisible Thread…

…and (fast-forward through the ironing and cutting), I was ready to machine applique!

And, in case you are wondering… no, the pillow top isn’t finished. But I do have all the appliques sewn on to one side, so that counts for something, right?

This is the eleventh pattern in the Little Gifts Sew Along. Are you just hearing about the Little Gifts Sew Along? Get all the details here.
- You can join in by sewing the projects as you have time.
- Share your progress and post pictures of your finished projects. Tag your projects and posts #sewlittlegifts and #stockingstuffersal on all social media.
- If you’d like to chat with other sewists, join the Underground Crafters Facebook group.
- By the end of the SAL, you’ll have up to 25 handmade gifts.
- Use the button below on social media. Right click (on desktop) or tap and hold (on mobile) to save.
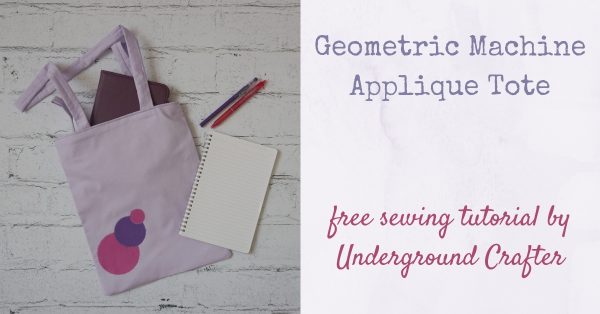
Geometric Machine Appliqué Tote
Sewing Pattern by Underground Crafter

The Geometric Machine Appliqué Tote is a great project for learning or practicing your machine appliqué skills. It folds up easily so it makes a great everyday market bag. You can also use appliqué to add letters or other customization to make it special for the recipient. It makes a great project bag for your favorite crafter, or a simple folding tote for any eco-friendly shopper avoiding plastic bags. You can also use it as gift wrap! This is the eleventh of 25 free sewing projects by 12 bloggers in the Little Gifts Sew Along.
Finished Size
- Tote: 13.5” (34 cm) x 10” (25.5 cm).
Tools
- Baby Lock Jubilant, or sewing machine with free arm, zig zag stitch, and zig zag foot. (I used the J foot and stitch #7 for the heart pillow and stitch #6 for the geometric tote.)
- Fiskars 45 mm Easy Change Ergo Control Rotary Cutter, Folding Cutting Mat, and Folding Ruler, or fabric scissors, ruler, and fabric marker.
- Iron and ironing board.
- Pins.
- Sizzix Big Shot with Framelits 8 Piece Circles Die Set (optional), or 3 small circular objects (such as a mug, bowl, or masking tape) to use to cut out circles.
- Goddess Pressing Sheet (optional, but protects your iron!).
- Tweezers (optional, but make working with the straps much easier).
Materials
- 100% cotton fabric.
- I used about half a yard for my version, along with two small scraps of contrasting fabric. You could use 3-4 fat quarters instead.
- Cotton thread in a neutral color for the bobbin.
- Dritz Invisible Thread.
- Fairfield World Stick double-sided fusible interfacing.
Instructions
Prepare fabric and interfacing
- Iron your fabric.
- If using yardage, cut one 14″ (35.5 cm) piece across the length of the fabric.

- Trim the selvedge and cut the fabric in half across the full length. Each piece should measure approximately 14″ (35.5 cm) by 21″ (53.5 cm). Fold each of these pieces in half along the long edge. One piece will be the front of the bag and the other will be the lining.

- If you are using fat quarters, cut one 14″ (35.5 cm) by 21″ (53.5 cm) piece from each of two fat quarters. Fold each piece in half along the long edge. One piece will be the front of the bag and the other will be the lining.
- Cut two strips of fabric for the handles. I cut mine to 2.5″ (6.5 cm) wide and trimmed them to about 26″ (66 cm) each. If using fat quarters, you may need to piece 2.5″ (6.5 cm) strips together to get the right length for your handles.
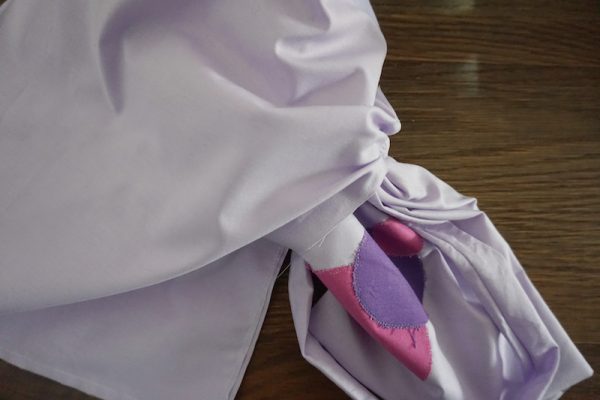
- Cut your two scrap pieces for the appliqués so they are large enough for the circle shapes to fit inside.
- Cut your pieces of Fairfield World Stick double-sided fusible interfacing to the same size as your fabric scrap pieces.

- Follow the instructions on your fusible interfacing to iron it to the wrong side of your fabric. I sandwiched the fabric and fusible interfacing between Goddess Pressing Sheet to keep my iron clean.

- If you’re using a Sizzix, follow instructions to cut your circles. If you’re using circular objects, trace an outline of each shape with a fabric marker and then cut out with fabric shears.

Machine appliqué the fabric
- Position your appliqués as desired on the front side of the fabric for the front of your bag. Be sure to leave at least 1/2″ (1.5 cm) clearance on all sides for seams. The fusible interfacing side should be pressed against the right side of the fabric.

- Follow the instructions on your fusible interfacing to iron it to the front side of your bag. I sandwiched the fabric and fusible interfacing between Goddess Pressing Sheet to keep my iron clean.
- Using a neutral, 100% cotton thread in your bobbin and Dritz Invisible Thread, select a zig zag stitch on your machine and change your presser foot if necessary. (I used the J foot on my Baby Lock Jubilant with stitch #7 for the heart pillow and stitch #6 for the geometric tote.)
- Tip: Try out different stitch widths and lengths on the zig zag stitch on a scrap piece of fabric to find what you like best.
- Secure the first stitch on the line of the circle. Then, working slowly, zig zag around the circle. When turning, keep your needle down and lift your presser foot to make it easier to control the direction of your applique stitches.
Finish bag
- With the right sides facing and using a 1/4″ seam, sew two sides closed on the front piece of your bag. Turn right side out.
- With the right sides facing and using a 1/4″ seam, sew one side closed on the lining of your bag. Continue to sew on additional side, leaving a 4” (10 cm) opening on one of the side seams.
- Fold the straps along the long edge with the right sides together and press down the length with your iron. With a 1/4″ seam, sew each strap closed.
- Using the tweezers, turn each strap right side out. Press gently with iron to remove wrinkles. Trim straps to the same length.
- Pin the short edges of the straps to the right side of the front piece of the bag as pictured below. With the first strap, pin one short edge to the top of the front and the second short edge to the top of the front of the bag. Repeat with the other strap on the back of the bag, being sure to line up the straps.

- Using your machine’s free arm and with the right side of the bag facing up, sew a 1/4″ seam allowance along the top edge of the bag, sewing the straps in place. Remove pins as you work.
- Place the front of the bag with the right side out inside of the lining. The lining should still have the right sides together/wrong sides out. Pin in place.

- Using your machine’s free arm, sew a 1/2″ seam allowance along the top of the lining, sewing the front of the bag with the straps in place to the lining. Remove pins as you work.
- Turn the bag right side out, pulling through the 4” (10 cm) opening in the lining.
- Sew the opening in the lining closed.
- Put the lining back in the bag.
- Working on the right side of the bag and using your machine’s free arm, sew a top stitch around the edge, working over front, lining, and straps.
- Trim threads and enjoy your tote.
The Geometric Appliqué Tote is also featured on AllFreeSewing.com. Sign up for their free newsletter to get free patterns sent to you daily!
1 thought on “Sewing Pattern: Geometric Appliqué Tote”