

Do you love to golf or do you have a beloved golfer in your life? Then you’ll want to check out my review of a knitting pattern book that includes 25 patterns for knitted golf club covers. My review also includes an excerpted knitting pattern for the Tiger Cover, and a giveaway for your chance to win a copy of the book, so read on for details!

This post contains affiliate links. I may receive compensation (at no added cost to you) if you make a purchase using these links. Search Press North America provided me with a free review copy of Knitted Golf Club Covers by Susie Johns. Although I accept free products for review, I do not accept additional compensation, nor do I guarantee a positive review. My reviews are based entirely on my honest opinions.
Book Review
As the title suggests, Knitted Golf Club Covers by Susie Johns is a collection of knitting patterns for golf club covers. The book opens with a table of contents featuring small images of each pattern so it is easy to find your favorites.
In the Introduction, Susie explains have golf and knitting both combine creativity and skill into a relaxing hobby. She also shares that covers actually improve your golf game by preventing nicks and scratches on the heads. By knitting different variations, it’s easy to identify the right club directly out of the bag. Since I don’t know anything about golf, this was helpful information!
The next section is Before You Tee Off. It explains that all but 3 of the patterns would be considered easy. Those 3 use colorwork at the intermediate level. This section includes written information about blocking, 3 embroidery stitches (satin stitch, chain stitch, and Swiss darning), pattern abbreviations, materials, tension, how to make I-cord, safety eyes, and pom poms. Although this section does include pictures, there are no illustrations or step-by-step/progress pictures. While the patterns are mostly easy, a very new knitter would probably need an additional resource such as a knitting reference book or video tutorials to learn the techniques described in this section.
The final section is the pattern collection. There are 25 patterns in total. Each pattern includes a brief introduction which explains which club size(s) it fits. Measurements are provided in centimeters and inches. Materials are listed with UK yarn weights first, then US and Australian weights in parenthesis. Tension (gauge) is measured in both cm and inches. The instructions are written with pattern abbreviations; 2 patterns also include color charts.
The patterns start with the Basic Covers, which are simple, one color covers with instructions for fitting 5-wood, 3-wood, and drivers. There are 6 patterns in the book that are some kind of variation of the Basic Covers. The patterns include colorwork designs, animals and characters, and others. In total, there are 14 patterns sized for fitting 5-wood, 3-wood, and drivers; 6 patterns sized for fitting drivers; 2 patterns sized for fitting 3-wood; and 1 pattern each sized for fitting drivers or oversized drivers, a range of different clubs, and golf ball holders (4-ball and 6-ball holders). Each pattern includes large photos of the covers on golf clubs and many detailed pictures.
Some of my favorite things about this book…
- It’s a hard cover yet it’s small, so it combines the best of both worlds (sturdy and portable).
- There are patterns to suit many different golfer personalities, from the more formal to the more whimsical.
- Yarn is listed by weight and color, rather than brand, so it is easy to substitute.
As I mentioned, because the technique section is written, this book is best suited for a confident beginner or an intermediate knitter. Even if you are clueless about golf, like me, you can see a lot of gift possibilities and the sizing information ensures that you can make the different sizes required for a range of clubs.
If you are an intermediate knitter that loves to golf or has a beloved golfer in your life, then give Knitted Golf Club Covers by Susie Johns a try!
Tiger Cover
Knitted Golf Club Cover Pattern by Susie Johns
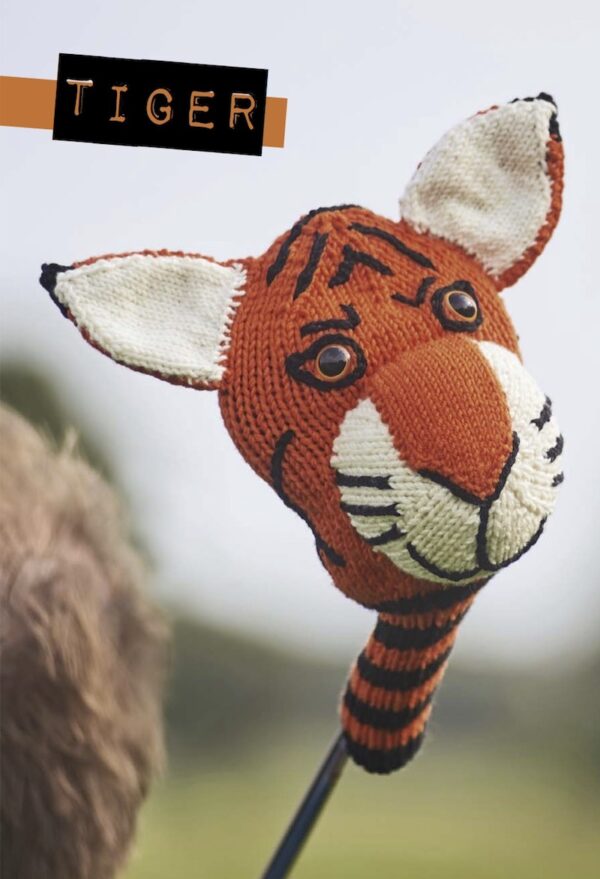
Published in Knitted Golf Club Covers
Text © Susie Johns, 2018. Photographs by Roddy Paine Photographic Studios. Photos and Design © 2018 Search Press Ltd. Shared with permission from Search Press North America.
Notes from Underground Crafter
- This pattern uses standard knitting pattern abbreviations. You can find a list of these abbreviations here.
- The Basic Pattern is below the pattern for the Tiger Cover.
- This pattern uses 4 special stitches: k2tog, kfb, M1, and skpo.
- A helpful video tutorial for the k2tog decrease is available below.
- If you can’t see the video for the k2tog above, click HERE to watch it on YouTube.
- Studio Knit has a helpful kfb video tutorial here.
- Very Pink Knits has 2 helpful M1 videos. Regular speed is here and slow motion is here.
- We Are Knitters has a helpful skpo video tutorial here.
Adapted from the pattern for the largest of the three head covers in the basic pattern, this cover is longer, so it is a good choice for an oversized driver. The padding in the muzzle adds extra layers of protection for your club – and perhaps as importantly, look great! I can’t guarantee that this tiger cover will make you play like his namesake, but the bold styling and colour will certainly raise a smile.
Measurements and sizes
- To fit a driver or oversized driver. This cover measures 11in long; 12in in circumference at widest part.
You will need
- 50g of DK (light worsted/8-ply) yarn in black (A) and ivory (C), and 100g in orange (B). Choose a double knitting yarn that knits to a standard DK (light worsted/8-ply) tension.
- Needles: 3.25mm (UK 10; US 3) and 4mm (UK 8; US 6)
- Tapestry needle
- Toy stuffing
- Two 24mm (1in) amber-coloured toy safety eyes
Tension
- 20 sts and 26 rows to 10cm (4in), measured over stocking stitch using 4mm (UK 8; US 6) needles, with two strands of yarn.
Knitting the Cover
- Using 3.25mm (UK 10; US 3) needles and yarn A, cast on 36 sts. Following the basic pattern for the largest size (see below for Basic Pattern), work the ribbed section, changing to yarn B after four rows, then alternating colours every four rows to create stripes. Fasten off yarn A, change to 4mm (UK 8; US 6) needles and use yarn B held double, and continue following the pattern to the end, working an additional 15 rows after the 21 rows in the centre section to create a longer cover.
Muzzle
- Using 4mm (UK 8; US 6) needles and two strands of yarn C, cast on 6 sts.
- Row 1 and every WS row: p to end.
- Row 2: kfb to end (12 sts).
- Row 4: (kfb to end (24 sts).
- Row 6: (k3, kfb) to end (30 sts).
- Row 8: (k4, kfb) to end (36 sts).
- Row 10: (k5, kfb) to end (42 sts).
- Row 12: (k6, kfb) to end (48 sts).
- Row 14: (k7, kfb) to end (54 sts).
- Next rows: Beg with a p row, work 5 rows in st st.
- Cast off.
Nose Strip
- Using 3.25mm (UK 10; US 3) needles and a single strand of yarn B, cast on 2 sts.
- Row 1 (WS): p to end.
- Row 2 (RS): k1, M1, k1 (3 sts).
- Row 3: p to end.
- Row 4: (k1, M1) twice, k1 (5 sts).
- Row 5: p to end.
- Row 6: k1, M1, k to last st, M1, k1 (2 sts inc).
- Next rows: Rep rows 5 and 6 three times more (13 sts).
- Next rows: Beg with a p row, work 15 rows in st st.
- Cast off.
Ear (make 2)
- Using 3.25mm (UK 10; US 3) needles and a single strand of yarn B, cast on 18 sts.
- Row 1: p to end.
- Row 2: k1, skpo, k5, M1, k2, M1, k5, k2tog, k1.
- Row 3: p to end.
- Next rows: Rep rows 2 and 3 five times more.
- Row 14: k1, skpo, k to last 3 sts, k2tog, k1 (2 sts dec).
- Row 15: p to end
- Next rows: Rep rows 14 and 15 three times more (10 sts).
- Fasten off yarn B and join in yarn A.
- Row 22: k1, skpo, k to last 3 sts, k2tog, k1 (2 sts dec).
- Row 23: p to end.
- Next rows: Rep rows 22 and 23 once more (6 sts).
- Row 26: k1, skpo, k2tog, k1 (4 sts).
- Row 27: p to end.
- Row 28: skpo, k2tog (2 sts).
- Cut yarn and thread tail through rem sts.
Ear Lining (make 2)
- Using 3.25mm (UK 10; US 3) needles and a single strand of yarn C, cast on 16 sts.
- Beg with a p row, work 13 rows in st st.
- Row 14: k2tog, k to last 2 sts, k2tog (2 sts dec).
- Row 15: p to end.
- Next rows: Rep rows 14 and 15 until 4 sts rem.
- Cast off.
To make up
- Pull up tail of yarn to gather stitches at top of cover. Fold cover in half with right sides together and stitch side edges together with a backstitch seam (alternatively, stitch seam from right side using mattress stitch). Turn right side out.
- Stitch an Ear Lining to each Ear and stitch Ears to Head.
- For the Muzzle, stitch the side seam, then pin the cast-off edge in place on the front of the head, with the lower edge two rows above the top of the ribbed section and the seam on the underside. Stitch in place, adding stuffing as you go.
- Stitch the Nose Strip in place on the top part of the Muzzle. Insert the toy safety eyes and fix in place, then thread the tapestry needle with a length of black yarn and, in chain stitch, embroider around eyes, embroider a mouth, and create a few stripes on the face, the Muzzle and the backs of the Ears.
Basic Pattern
Knitting the Covers
- Note that a single strand of yarn is used for the ribbed part of the cover, and two strands for the top part.
- Using 3.25mm (UK 10; US 3) needles and yarn A (B, C), cast on 24 (30, 36) sts.
- Row 1 (RS): *k1, p1; rep from * to end.
- Next rows: Rep row 1 27 (31, 35) times more. Change to 4mm (UK 8; US 6) needles and begin using the yarn held double.
- Row 1 (RS): k to end.
- Row 2 (WS): p to end.
- Row 3: (k5, kfb) 4 (5, 6) times. 28 (35, 42) sts.
- Row 4: p to end.
- Row 5: (k6, kfb) 4 (5, 6) times. 32 (40, 48) sts.
- Next rows: Beg with a WS row, work 13 (17, 21) rows in st st.
Shaping
- Shape top as follows:
- Row 1 (RS): (k6, k2tog) to end. 28 (35, 42) sts
- Row 2 (and every WS row): p to end.
- Row 3: (k5, k2tog) to end. 24 (30, 36) sts
- Row 5: (k4, k2tog) to end. 20 (35, 30) sts
- Row 7: (k3, k2tog) to end. 16 (20, 24) sts
- Row 9: (k2, k2tog) to end. 12 (15, 18) sts
- Row 11: (k1, k2tog) to end. 8 (10, 12) sts
- Row 12: (p2tog) to end. 4 (5, 6) sts
- Cut yarn, leaving a long tail, and thread tail through rem sts.
To make up
- Pull up the tail of the yarn to gather stitches at the top of the cover.
- Fold the cover in half with right sides together and stitch the side edges together with a backstitch seam (alternatively, stitch seam from right side using mattress stitch).
- Turn right side out to finish.
Giveaway

Now that you’ve read my review of Knitted Golf Club Covers by Susie Johns and tried the Tiger cover pattern, I’m guessing you’re ready to get your hands on the book. Well, the nice folks at Search Press North America have set aside a copy for one lucky winner!
This giveaway is open to readers with mailing addresses in the United States, Canada, United Kingdom, or other parts of Europe, except where prohibited by law. Enter by 11:59 p.m. Eastern on Friday, January 3, 2020. One winner will be chosen at random from the entries submitted via the Rafflecopter widget. The winner will receive 1 copy of Knitted Golf Club Covers, courtesy of Search Press North America. Good luck!
And I was the lucky winner of this wonderful book! I was surprised and a bit shocked (as I never win anything) when Marie notified me. But when it arrived it was my husband that was over joyed as well. He is the golfer and has already picked out his favorite and pegged a few others for family and his buddies that join him on the course each week……..I feel my Christmas knitting is just beginning!!! Thank you so much for the chance to win……..I know I will be using it over and over and over…….
Almost worth taking up golfing! Great patterns.