

Today, I’m sharing the pattern for Nelson, a crochet sock monkey who has been on my mind for practically a decade! I made my first crochet sock monkey back in the late aughts and have been hooked on these guys ever since. This is a simple, beginner-friendly pattern in the style of the kitschy American classic sock monkeys.
This post contains affiliate links. I may receive compensation (at no added cost to you) if you make a purchase using these links.
At some point back in the mid-aughts, after I started quilting, I learned to sew a sock monkey. It was kind of a big deal, especially because at the same time, really fun knee socks were available everywhere. I went on a sock monkey tear, sewing them all the time as gifts and even to sell at craft fairs.
So, of course, you know I had to design a crochet version. I modeled it after the construction of a sewn sock monkey, including all the unusual proportions that aren’t all that accurate to a monkey, and added the red bottom in the style of the classic socks first popularized by the Nelson Knitting Company in Rockford, Illinois. These socks were sometimes called Rockford socks, and that’s why I’ve given this crochet sock monkey the name Nelson. Fun fact: The Nelson Knitting Company was founded in 1880, but didn’t start making red-heeled socks until 1932. It continued making these socks until closing in 1992.
If you make your own Nelson the Sock Monkey, I’d love to see it! Share your progress and questions by tagging me on Facebook as @Underground Crafter, Instragram as @ucrafter, or Twitter as @ucrafter. You can also share a picture in the Underground Crafters Facebook group. Sign up for my weekly newsletter and get a coupon code for your choice of one of my premium patterns and private access to my vault of subscriber goodies. Plus, you’ll never miss one of my free patterns again!
Add Nelson the Sock Monkey to your favorites or queue, or buy the ad-free PDF on Ravelry.

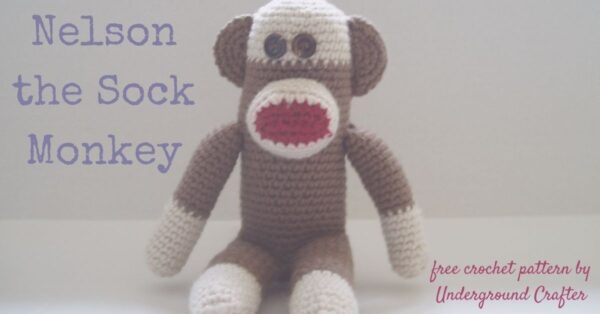
Nelson the Sock Monkey
Crochet Sock Monkey Pattern by Underground Crafter


Nelson is designed in the style of the classic Americana sock monkey made from red-heeled socks from the Nelson Knitting Company in Rockford, Illinois.
Finished Size
- Approximately 11” (28 cm) tall, or 7” (18 cm) when seated.
Materials
- Approximately 150 yd (137 m) in brown (CA) in any medium weight yarn.
- Approximately 80 yd (73 m) in off-white (CB) in any medium weight yarn.
- Approximately 50 yd (46 m) in red (CC) in any medium weight yarn.
- Nelsonwood Black Cat US Size F-5/3.75 mm crochet hook, or any size needed to obtain correct gauge.
- Fairfield Poly-Fil Crafter’s Choice Dry Packing Fiber Fill, 10 ounce bag.
- Clover Chibi yarn needles.
- Clover Quick Locking Stitch Marker Set.
- 2 sew-in buttons or embroidery floss in contrasting or coordinating color for eyes.
Abbreviations Used in This Pattern
- CA – Color A
- CB – Color B
- CC – Color C
- ch – chain
- invdec – invisible decrease – Insert hook in front loop only of each of next 2 sts, yo and draw up a loop, yo and draw through 2 loops. Planet June has helpful photo and video tutorials here.
- pm# – place stitch marker #
- rep – repeat
- Rnd(s) – Round(s)
- sc – single crochet
- sl st – slip stitch
- st(s) – stitch(es)
- yo – yarn over
- * Repeat instructions after asterisk as indicated.
- [] Repeat instructions between brackets as indicated.
Pattern Notes
- Exact gauge for this pattern isn’t critical. Choose a hook size and tension so stitches are tight and fiber filling doesn’t show through stitches.
- Unless otherwise noted, work stitches into both loops.
- This pattern is worked in continuous rounds or spirals. Do not join or turn unless otherwise noted.
- Stitch markers are numbered. Some are used to mark end of round and should be moved as each round is completed unless otherwise noted. Other stitch markers are used to mark position and should not be moved unless indicated.
- Stacey Trock has a helpful video tutorial for changing colors in single crochet here.
- A helpful tutorial for seaming with the mattress stitch is available here.
- A helpful tutorial for seaming with the whipstitch is available here.
Pattern Instructions
Body
- With CB, ch 2.
- Rnd 1: (Right Side) Skip 1 ch, 6 sc in next ch, pm#1. Begin working in unjoined spirals, moving marker#1 up each Rnd (see Pattern Notes). (6 sts)
- Rnd 2: 2 sc in each st around. (12 sts)
- Rnd 3: [2 sc in next st, sc in next st] around. (18 sts)
- Rnd 4: [Sc in next 2 sts, 2 sc in next st] around. (24 sts)
- Rnd 5: [2 sc in next st, sc in next 3 sts] around, changing to CA in final sc of Rnd (see Pattern Notes), pm#2. (30 sts)
- Rnd 6: Sc in each st around.
- Rep Rnd 6 until Body measures approximately 4” (10 cm) from marker #2 (in Rnd 5), remove marker #2.
- Rnd 7: Sc in next 15 sts, pm#3, ch 17, skip 15 sts, join with sl st to next sc. (15 sts + ch-17 sp)
- Rnd 8: Sc in each st and ch. (32 sts)
- Rnd 9: Sc in each st around. Do not fasten off CA.
First Leg
- Rnd 1: Sc in next 15 sts. (15 sts)
- Begin working in Rows.
- Row 1: Turn, ch 1, sc in first st and in next 14 sts.
- Rep Row 1 until First Leg measures approximately 2” (5 cm) long (approximately 11 rows), ending on Right Side. Join to first sc of same row with sl st, pm#4.
- Begin working in the round again, moving marker#4 up each Rnd (see Pattern Notes).
- Rnd 2: Sc in each st around, changing to CB in final sc of Round (see Pattern Notes). Fasten off CA with long yarn tail (approximately 18”/45.5 cm long) for seaming.
- Thread yarn needle with CA from end of First Leg. Seam First Leg closed along long edge with mattress stitch (see Pattern Notes). Attach First Leg firmly to Body by seaming into sc next to start of Leg on Rnd 9 of Body. Weave in yarn tail on inside of First Leg.
- Rnd 3: With CB, sc in each st around. (15 sts)
- Rnds 4-8: Rep Rnd 3, 5 times.
- Rnd 9: [Invdec, sc in next 3 sts] around. (12 sts)
- Rnd 10: Sc in each st around.
- Rnd 11: [Invdec, sc in next 2 sts] around. (9 sts)
- Rnd 12: Sc in each st around. Fasten off CB with long yarn tail (approximately 12”/30.5 cm) for seaming. Remove marker#4.
- Thread yarn needle with CB from end of First Leg. Seam bottom of Rnd 12 (“foot”) of First Leg closed with whipstitch (see Pattern Notes). Weave in yarn tail on inside of First Leg.
Second Leg
- Join CA with sl st to Body in second sc next to First Leg, ch 1, rep as for First Leg through seaming Leg closed after Rnd 2.
- Use yarn tail to sew 2 unworked sc from final Rnd of Body closed.
- Continue to work as for First Leg from Rnd 3 until completed.
- Stuff Body and both Legs firmly with fiber filling.
Sock Heel/Monkey’s Bottom
- Join CB with sl st to st marked by marker#3 in Rnd 7 of Body.
- Rnd 1: Ch 1, sc in same st and next 14 sts, pm#5, sc in next 15 sts, pm#6. (30 sts)
- Rnd 2: *Invdec, sc in each st across to 2 sts before marker, invdec,** sc in marked st, move up marker (see Pattern Notes), rep from * to ** once. (26 sts)
- Rnd 3: Rep Rnd 2 (22 sts)
- Rnd 4: Rep Rnd 2, changing to CC in last invdec. Fasten off CB. (18 sts)
- Rnd 5: Rep Rnd 2. (14 sts)
- Rnd 6: Rep Rnd 2. (10 sts) Fasten off CC with long yarn tail (approximately 12”/30.5 cm) for seaming. Remove marker#5 and marker#6.
- Stuff Monkey’s Bottom firmly with fiber filling.
- Thread yarn needle with CC from end of Monkey’s Bottom. Seam bottom of Rnd 6 closed with whipstitch (see Pattern Notes). Weave in yarn tail on inside of Monkey’s Bottom.
Tail
- With CB, ch 2.
- Rnd 1: Skip 1 ch, 5 sc in next ch, pm#7. Begin working in unjoined spirals, moving marker#7 up each Rnd (see Pattern Notes). (6 sts)
- Rnd 2: 2 sc in each st around. (10 sts)
- Rnd 3: [2 sc in next st, sc in next st] around. (15 sts)
- Rnd 4: Sc in each st around.
- Rnds 5-10: Rep Rnd 4, 6 times.
- Rnd 11: Rep Rnd 4, changing to CA in final yo of last sc. Fasten off CB.
- Rnds 12-26: Rep Rnd 4, 15 times.
- Fasten off CA with long yarn tail (approximately 12”/30.5 cm) for seaming. Remove marker#7.
- Stuff Tail firmly with fiber filling.
- Thread yarn needle with CA from end of Tail. Seam Tail closed with whipstitch (see Pattern Notes). Using yarn needle and yarn tail, sew Tail to Body above Monkey’s Bottom, using photo below as positioning guide.

Arms (Make 2)
- With CB, ch 2.
- Rnd 1: (Right Side) Skip 1 ch, 6 sc in next ch, pm#8. Begin working in unjoined spirals, moving marker#8 up each Rnd (see Pattern Notes). (6 sts)
- Rnd 2: 2 sc in each st around. (12 sts)
- Rnd 3: Sc in each st around.
- Rnds 4-9: Rep Rnd 3, 6 times.
- Rnd 10: Rep Rnd 3, changing to CA in final yo of last sc. Fasten off CB.
- Rnds 11-22: Rep Rnd 4, 12 times.
- Fasten off CA with long yarn tail (approximately 12”/30.5 cm) for seaming. Remove marker#8.
- Stuff Arm firmly with fiber filling.
- Thread yarn needle with CA from end of Arm. Seam Arm closed with whipstitch (see Pattern Notes). Using yarn needle and yarn tail, sew Arm to Body about halfway between top of Body (“head”) and start of Legs.
Mouth
- With CC, ch 7.
- Rnd 1: Sc in second ch from hook and in next 4 ch, 2 sc in last ch, pm#9 in sixth st (first of 2 sc worked in previous ch), turn to work on underside of foundation ch, sc in next 6 st, 2 sc in first ch, pm#10 in thirteenth st (first of 2 sc worked in first ch), moving markers up each Rnd (see Pattern Notes). (14 sts)
- Rnd 2: 2 sc in next st, sc in each st until st before marker#9, 2 sc in next st, sc into marked st, remove marker#9, 2 sc in next st, sc in each st until st before marker#10, 2 sc in next st, sc into marked st, changing to CB in final yo, fasten off CC, move up marker#10 to mark last st of Rnd. (18 sts)
- Rnd 3: Sc in each st around.
- Rnds 4-6: Rep Rnd 3, 3 times.
- Rnd 7: [2 sc in next st, sc in next 2 sts] around. (24 sts)
- Rnds 8-10: Rep Rnd 3, 3 times.
- Fasten off CB with long yarn tail (approximately 18”/45.5 cm long) for seaming. Remove marker#10.
- Stuff Mouth firmly with fiber filling.
- Thread yarn needle with CB from end of Mouth. Using yarn needle and yarn tail, seam Mouth to Body using whipstitch join (see Pattern Notes) above Arms, using photo below as guide and adding more fiber filling as needed. Weave in yarn tail on inside of Mouth.

Ears (Make 2)
- With CA, ch 2.
- Rnd 1: (Right Side) Skip 1 ch, 6 sc in next ch, pm#11. Begin working in unjoined spirals, moving marker#11 up each Rnd (see Pattern Notes). (6 sts)
- Rnd 2: 2 sc in each st around. (12 sts)
- Rnd 3: [2 sc in next st, sc in next st] around. (18 sts)
- Fasten off CA with long yarn tail (approximately 18”/45.5 cm long) for seaming. Remove marker#11.
- Fold circle of Ear in half. Thread yarn needle with CA from end of Ear. Seam rounded end of folded circle with whipstitch join (see Pattern Notes). Join flat edge of half circle of Ear to the side of Body, overlapping CB and CA sections, using photo below for placement guide.

Eyes
- Thread yarn needle with a strand of yarn. Sew buttons to Body in CB portion above Mouth.
- Alternatively, use yarn or embroidery floss to create French Knots. You can find a French Knot video tutorial in this blog post.
Finishing
- With yarn needle, weave in any remaining yarn tails on inside of Body.