

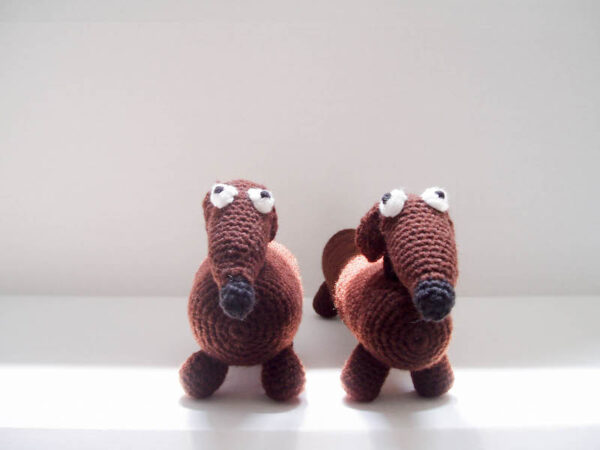
I have always been intrigued by little dogs, so I decided to crochet dachshunds in two different sizes. Use my pattern for the Big and Little Dachshunds to make your little doggie in your preferred size: long and lean or short and stocky!

This post contains affiliate links. I may receive compensation (at no added cost to you) if you make a purchase using these links.
Although I’m definitely a cat person, I love other people’s dogs. I’ve always been intrigued by dachshunds, also known as wiener dogs or sausage dogs.

I’ve seen quite a variety of these little characters in my day, so when crocheting up my version, I couldn’t decide if I should make one that was on the portly side or one that was more streamlined, so I decided to make both. Choose your favorite to crochet, or make one of each! These puppies stand on their own because their feet are weighted with Fairfield Poly-Pellets.

If you make your own Big and Little Dachshunds, I’d love to see them! Share your progress and questions by tagging me on Bluesky as @UndergroundCrafter, Facebook as @UndergroundCrafter, or on Instagram as @ucrafter. You can also share a picture in the Underground Crafters Facebook group. Sign up for my weekly newsletter and get a coupon code for your choice of one of my premium patterns and private access to my vault of subscriber goodies. Plus, you’ll never miss one of my free patterns again!
Add Big and Little Dachshunds to your favorites or queue, or buy the ad-free PDF on Ravelry.

Big and Little Dachshunds
Crochet Dachshund Pattern by Underground Crafter
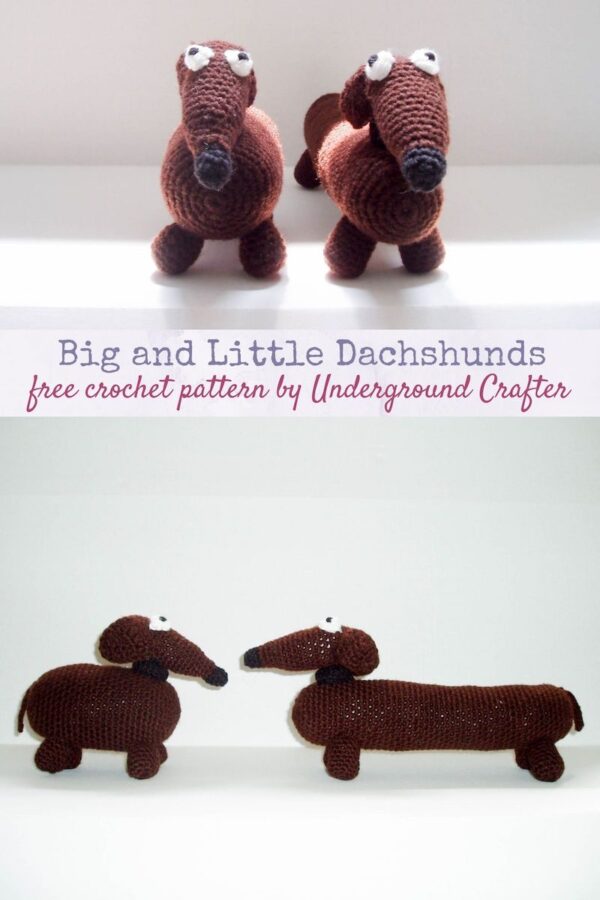


Make a long and thin dachshund, or a short and rotund one, or both! These patterns use crocheted parts for eyes and noses.
Finished Sizes
- Short and Long.
Materials
- Approximately 210 yd (192 m) in brown (CA) in any medium weight yarn.
- Approximately 15 yd (14 m) each in black (CB) and white (CC) in any medium weight yarn.
- US Size G-6/4 mm crochet hook, or any size needed to obtain correct gauge.
- US Size H-8/5 mm crochet hook, or any size needed to obtain correct gauge.
- Fairfield Poly-Fil Crafter’s Choice Dry Packing Fiber Fill, 10 ounce bag.
- Clover Chibi yarn needles.
- Clover Quick Locking Stitch Marker Set.
- Fairfield Poly-Fil Poly-Pellets and an old pair of stockings or a small amount of fabric, needle, and thread.
Abbreviations Used in This Pattern
- bob – 8-repeat bobble – [Yo, insert hook into st, yo and draw up a loop, yo and draw through 2 loops] 8 times in the same st, yo and draw through all 9 loops on hook. A video tutorial for the 5-repeat version of this stitch pattern is available below.
- If you can’t see the tutorial for the bob above, click here to watch it on YouTube.
- CA – Color A
- CB – Color B
- CC – Color C
- ch – chain
- dc – double crochet
- dc2tog – double crochet 2 stitches together (decrease) – [Yo, insert hook in next st, yo and draw up a loop, yo and draw through 2 loops] twice, yo and draw through all 3 loops on hook. A helpful video tutorial for this stitch is available below.
- If you can’t see the video above demonstrating the dc2tog, click HERE to watch it on YouTube.
- invdec – invisible decrease – Insert hook in front loop only of each of next 2 sts, yo and draw up a loop, yo and draw through 2 loops. A helpful video tutorial for this stitch is available below.
- If you can’t see the video above for the invdec, click HERE to watch it on YouTube.
- pm# – place stitch marker #
- rep – repeat
- Rnd(s) – Round(s)
- sc – single crochet
- sl st – slip stitch
- st(s) – stitch(es)
- yo – yarn over
- * Repeat instructions after asterisk as indicated.
- [] Repeat instructions between brackets as indicated.
Pattern Notes
- Exact gauge for this pattern isn’t critical. Choose a hook size and tension so stitches are tight and fiber filling doesn’t show through stitches.Exact gauge for this pattern isn’t critical. In my version, through Rnd 2 on Body = 0.75” (2 cm) diameter with smaller hook.
- Unless otherwise noted, work stitches into both loops.
- Stitch markers are numbered. Some are used to mark end of round and should be moved as each round is completed unless otherwise noted. Other stitch markers are used to mark position and should not be moved unless indicated.
- A helpful tutorial for seaming with the whipstitch is available below.
- If you can’t see the video for seaming with the whipstitch above, click HERE to watch it on YouTube.
- A helpful video tutorial showing how to change colors in single crochet is available below.
- If you can’t see the video tutorial above demonstrating how to change colors in single crochet, click HERE to watch it on YouTube.
- 5 Little Monsters has a helpful video tutorial for making a weighted base using Poly-Pellets here.
Pattern Instructions
Body (Short Version)
- With smaller hook and CA, ch 4, skip 3 ch, join with sl st to next ch to form ring.
- Rnd 1: Ch 1, 6 sc into ring, pm#1. Begin working in unjoined spirals, moving marker#1 up each Round (see Pattern Notes). (6 sts)
- Rnd 2: 2 sc in each st around. (12 sts)
- Rnd 3: [2 sc in next st, sc in next st] around. (18 sts)
- Rnd 4: [2 sc in next st, sc in next 2 sts] around. (24 sts)
- Rnd 5: [2 sc in next st, sc in next 3 sts] around. (30 sts)
- Rnd 6: [2 sc in next st, sc in next 4 sts] around. (36 sts)
- Rnd 7: Sc in each st around, pm#2 to mark position.
- Rep Rnd 7 until body measure 5” (13 cm) from marker #2, remove marker #2.
- Rnd 8: [Invdec, sc in next 4 sts] around. (30 sts)
- Rnd 9: [Invdec, sc in next 3 sts] around. (24 sts)
- Rnd 10: [Invdec, sc in next 2 sts] around. (18 sts)
- Rnd 11: [Sc in next st, invdec] around. (12 sts)
- Stuff Body firmly with fiber filling.
- Rnd 12: Invdec around. (6 sts)
- Rnd 13: Rep Rnd 12. (3 sts)
- Fasten off with long yarn tail (approximately 12”/30.5 cm) for seaming. Thread yarn needle with CA from end of Body. Seam Rnd 13 closed with whipstitch (see Pattern Notes), adding more fiber filling as necessary. Weave in yarn tail on inside of Body.

Body (Long Version)
- Follow instructions for Short Version through Rnd 5. Skip Rnd 6. Work Rnd 7 until 8” (20.5 cm) from marker. Skip Rnd 8. Follow instructions for Short Version from Rnd 9 through finish.

Head
- Starting at nose with smaller hook and CB, ch 2.
- Rnd 1: Skip next ch, 4 sc into next ch, join with sl st to first sc, pm#3. Begin working in unjoined spirals, moving marker#3 up each Round (see Pattern Notes). (4 sts)
- Rnd 2: 2 sc in each st around, join with sl st to first sc. (8 sts)
- Turn work inside out and weave in yarn tail from start of head with yarn needle, patching any holes created by ring.
- Rnd 3: Ch 1, sc in each st around, join with sl st to first sc.
- Rnd 4: Rep Rnd 3, changing to CA when joining with sl st to first sc. Fasten off CB.
- Rnd 5: Ch 1, sc in each st around, join with sl st to first sc.
- Stuff nose tightly with fiber filling.
- Rnd 6: Ch 1, [sc in next st, 2 sc in next st] around, do not join with sl st, pm#3. Begin working in unjoined spirals, moving marker#3 up each Round (see Pattern Notes). (12 sts)
- Rnd 7: Sc in each st around.
- Rnd 8: Rep Rnd 7.
- Rnd 9: [2 sc in next st, sc in next st] around. (18 sts)
- Rnd 10: Sc in each st around.
- Rep Rnd 10 until head measures 3” (7.5 cm) from start of nose.
Form Bobble Eyes
- Rnd 11: Turn to wrong side, sc in next 2 sts, carrying unworked yarn across front of work *change to CC when joining with sl st to next st, bob in same st changing to CB in last yo of bob,** sc in next 3 sts, rep from * to ** once, fasten off CC, sc in next 11 sts. (18 sts)
- Rnd 12: Turn, Rep Rnd 10, pushing bob from previous Rnd to right side.
- Rnds 13-14: Rep Rnd 10 twice.
- Rnd 15: [Invdec, sc in next 4 sts] around. (15 sts)
- Rnd 16: Rep Rnd 10.
- Rnd 17: [Invdec, sc in next 3 sts] around. (12 sts)
- Stuff Head firmly with fiber filling.
- Rnd 18: Invdec around. (6 sts)
- Fasten off with long yarn tail (approximately 12”/30.5 cm) for seaming. Thread yarn needle with CA from end of Head. Seam Rnd 18 closed with whipstitch (see Pattern Notes), adding more fiber filling as necessary. Weave in yarn tail on inside of Head.
Collar
- With CB and smaller hook, and starting with long yarn tail (approximately 12”/30.5 cm) for seaming, ch 16, skip 15 ch, being careful not to twist, join with sl st to first ch and begin working in the round.
- Rnd 1: Ch 3 (counts as first dc), dc in each ch around, join with sl st to top of ch 3.
- Fasten offCB with long yarn tail (approximately 18”/46 cm) for seaming. Thread yarn needle with CB from start of Collar, use whipstitch seam (see Pattern Notes) to attach foundation chain of Collar to Body, using photos as guide. Weave in starting yarn tail on inside of Collar.
- Stuff neck (inside of Collar) firmly with fiber filling. Thread yarn needle with CB from end of Rnd 1 of Collar, join Collar to Head with whipstitch seam (see Pattern Notes), adding more fiber filling as necessary. Do not weave in yarn tails.
Form Pupils
- Insert yarn needle through Head, exiting through center of first bobble eye (in CC from Rnd 11 of Head). Draw the yarn over part of the bobble, then insert yarn needle back into Head, leaving a small loop in CB to form the pupil. Exit through center of second bobble eye. Draw the yarn over part of the bobble, then insert yarn needle back into Collar, leaving a small loop in CB to form the pupil. Weave in yarn tails on inside of Collar.
Ears (Make 2)
- With CA and larger hook, and starting with long yarn tail (approximately 12”/30.5 cm) for seaming, ch 6.
- Row 1: Turn, skip 2 ch, dc in next 4 ch. (4 sts)
- Row 2: Turn, ch 2, dc in each st across.
- Row 3: Turn, ch 2, dc2tog twice. (2 sts)
- Row 4: Turn, dc in each st across.
- Edging: (Right Side) Turn to work along edge, sc in side of next 3 rows, 3 sc in side of first row, turn to work along next edge, sc in underside of next 4 ch, turn to work along next edge, 3 sc in side of first row, turn to work along next edge, sc in side of next 3 rows, turn to work along Row 4, sc in next 2 sts, join with sl st to first sc. (18 sts)
- Fasten offCA. Thread yarn needle with CA from end of Ear, weave in yarn tail on back of Ear. Thread yarn needle with longer CA yarn tail from start of Ear, attach Ear to side of Head with whipstitch join (see Pattern Notes) and working through front loops of first row. Bring yarn around the back, and weave tail through the back of the Car, strengthening attachment to the Head. Weave in yarn tails on inside of Head.
Feet (Make 4)
- With smaller hook and CA, ch 2.
- Rnd 1: Skip first ch, 6 sc in next ch, pm#4, begin working in unjoined spirals, moving marker#4 up each Round (see Pattern Notes).
- Rnd 2: 2 sc in each st around. (12 sts)
- Rnd 3: Sc in each st around, pm#5 to mark position.
- Rep Rnd 3 until Foot measures 1” (2.5 cm) from marker#5, remove marker#5.
- Make a weighted base for your Poly-Pellets following the tutorial by 5 Little Monsters (see Pattern Notes). Insert base into Foot, then stuff Foot firmly with fiber filling.
- Fasten off CA with long yarn tail (approximately 12”/30.5 cm) for seaming. Thread yarn needl with CA from end of Foot, attach Foot to underside of Body using a whipstitch seam (see Pattern Notes). Weave in yarn tail on inside of Body.
Tail
- With CA and smaller hook, ch 11.
- Row 1: Turn, skip first ch, sc in next 10 ch. (10 sts)
- Fasten off CA with long yarn tail (approximately 12”/30.5 cm) for seaming. Thread yarn needle with CA from end of Tail, join Tail to Body with whipstitch (see Pattern Notes). Weave in yarn tails on inside of Body.
Finishing
- With yarn needle, weave in any remaining yarn tails on inside of Body.
Thanks so much for the funny dachsies!