

Rose from Yarn Craftee is joining us today to share a beautiful crochet vest pattern with us. The Billows Vest is an easy crochet vest pattern that may just become your favorite accessory to wear! This pattern has been updated to include a video tutorial, too.

This post contains affiliate links. I may receive compensation (at no added cost to you) if you make a purchase using these links. Photos in this post are © Rose Obom/Yarn Craftee and are used with permission.
About Yarn Craftee

Rose is an avid crafter who enjoys using her hands to create. She is also a d.i.y dabbler, gardening pro wannabe, natural wellness enthusiast and food adventurer (more on the tasting side). You may know her from her blog, Craft-Her. Rose is also building an inclusive community on her new site, Yarn Craftee. She and her husband are blessed with 2 sons. When she is not crocheting, tending to family or her plants, she is dreaming up her next project or working on her blog.
Show your support by following Rose on Yarn Craftee | Etsy | Facebook | Instagram | LoveCrafts | Pinterest | Ravelry | YouTube
Billows Vest
Crochet Vest Pattern by Yarn Craftee
Updated 11/14/21 and 2/28/22

Hi Craftee, this is Rose again with a contributor pattern for the Underground Crafter. Before I dive in further, I wanna say thanks to Marie for another opportunity to guest post, it is such a wonderful gesture.
I do not suppose you are familiar with me, but earlier in 2020 I designed the Cover Me Ruana for the Underground Crafter. You can find the pattern right here on Marie’s blog, and I bet you will love it.
I also know you will love the Billows Crochet Vest for Women. Why ‘billows’ though? When I wear this vest, it feels like a cloud that is moving softly around me (not that I would know what a cloud actually feels like; it is just how I can describe it as I imagine clouds to be very soft). Of course, this largely depends on the yarn you use for yours. The yarn I have used for this crochet vest is a very soft baby yarn.

The Billows vest is very easy to make. It is made from top to bottom in a decreasing order further down the pattern. The frilly edging makes it a very stylish and unique design.

You can style it with accessories; necklaces, even wear a belt around it. Wear it on a gown, pants and top, a turtleneck and pants or skirt. I mean, just have fun styling the Billows Vest.

I hope you enjoy making the Billows Crochet Vest pattern as much as I did.
PATTERN
Finished Sizes (approximate after blocking)
- S/M- 38” (96.5 cm) wide (just below the armhole)/31.5” (80 cm) tall
- L/1XL- 40” (101.5 cm) wide/31.5” (80 cm) tall
- 2XL/3XL- 42” (106.5 cm) wide/32” tall
Sizing
The sizing of this vest is taken from shoulder width using the CYC (Craft Yarn Council) measurement guide for women.
- S/M- 15-16″ (38-40.5 cm)
- L/1XL- 17-17.5″ (43-44.5 cm)
- 2XL/3XL- 18″ (45.5 cm)
Gauge
- 11 Puff sts x 16 rows (SC+Puff st)= 4 inches/10 cm
Materials
- DK weight, medium 3 cotton yarn. The pattern uses Hayfield Baby Changes DK 1,320, (1,650, 1,650) mtrs- meters is written from smallest to largest size
- 4mm hook
- Tapestry Needle
- Stitch markers
Stitches/Abbreviation
- CH- chain
- HDC- half double crochet
- Puff Stitch- 2HDC Puff Stitch- yarn over, go into chain space, yarn over pull out a loop (3 loops on hook), yarn over, go into same space, yarn over pull out a loop (5 loops on hook), yarn over, pull through all loops.
- SC- single crochet
- SC2tog- single crochet 2 stitches together- Fiber Flux has a video tutorial for this stitch here.
- SL ST- slip stitch
- ST- stitch
- * Repeat instructions after asterisk as indicated.
Notes
- The pattern uses U.S terms
- Ch 2 at the beginning of row counts as a stitch
- The pattern is written for smallest size, larger sizes are in ( )
- There are 3 sizes, written for S/M, L/1XL, 2XL/3XL
- Each solid stitch (SC and Puff st.) is worked into the chain 1 space. You automatically skip the stitches as the pattern will not be mentioning the word ‘skip’ throughout.
- This pattern now includes a video tutorial. Scroll to the bottom to watch!
Vest
- Row 1: Ch 220 (230,240) skip first ch, SC in next, *ch 1, skip 1 ch, SC in next. Repeat from * across, turn
- Row 2: Ch 2 (counts as 1 HDC here and throughout), *Puff st in ch 1 space, ch 1. Repeat from * across. HDC in last st. Ch 1, turn
- Row 3: SC in first st (ch 1 space, here and throughout), *ch 1, SC in next ch 1. Repeat from * across last SC in top of Ch 2, turn
- Rows 4-21: Repeat Rows 2 and 3
- Row 22: Ch 2, *Puff st in ch 1 space, ch 1. Repeat from * across. HDC in last st. Ch 1, turn Do Not snip yarn
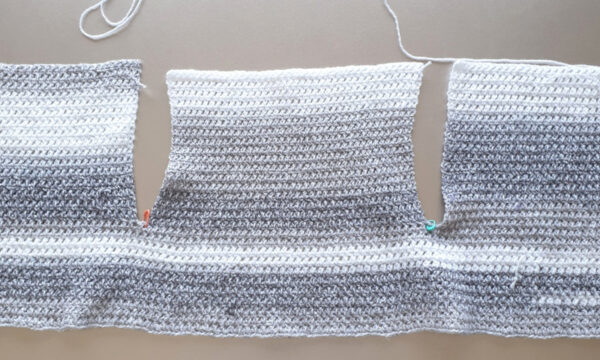
- Lay your piece flat and mark out armholes (see photo below for reference)
- we will do this by dividing the number of Puff sts. to right side, armhole, middle(back), armhole and left side
- Size S/M: 33-1-41-1-33 (what this means is 33 Puff sts, on left, 1 Puff st. at armhole, 41 Puff sts. in the middle, 1 Puff st. at armhole and 33 Puff sts on right)
- Size L/1XL: 34-1-44-1-34
- Size 2XL/3XL: 35-1-47-1-35
Right Armhole
- Row 23: SC in first st, *ch 1, SC in next ch 1. Repeat from * till ch 1 beside the armhole Puff st, turn
- Row 24: Ch 2, *Puff st in ch 1 space, ch 1. Repeat from * across. HDC in last st. Ch 1, turn
- Row 25: SC in 1st st, *ch 1, SC in next ch 1. Repeat from * across, making last SC in top of Ch 2, turn
- Row 26: Ch 2, *Puff st in ch 1 space, ch 1. Repeat from * across. HDC in last st. Ch 1, turn
- Rows 27- 54 (56, 58): Repeat Rows 25 and 26. Do Not snip yarn
Middle
- Starting on the right side of single crochets, join yarn in Chain 1 beside the armhole Puff st
- Row 23: Ch 1, SC in same space, *ch 1, SC in next ch 1. Repeat from * till ch 1 beside the armhole Puff st, turn
- Row 24: Ch 2, *Puff st in ch 1 space, ch 1. Repeat from * across. HDC in last st. Ch 1, turn
- Row 25: SC in first st, *ch 1, SC in next ch 1. Repeat from * across, turn
- Row 26: Ch 2, *Puff st in ch 1 space, ch 1. Repeat from * across. HDC in last st. Ch 1, turn
- Rows 27- 54 (56, 58): repeat Rows 25 and 26. Snip yarn
Left Armhole
- Starting with the right side of single crochets facing up, join yarn in Chain 1 beside the armhole Puff st
- Row 23: Ch 1, SC in same space, *ch 1, SC in next ch 1. Repeat from * across, last SC in top of Ch 2, turn
- Row 24: Ch 2, *Puff st in ch 1 space, ch 1. Repeat from * across. HDC in last st. Ch 1, turn
- Row 25: SC in 1st st, *ch 1, SC in next ch 1. Repeat from * across, last SC in top of Ch 2, turn
- Row 26: Ch 2, *Puff st in ch 1 space, ch 1. Repeat from * across. HDC in last st. Ch 1, turn
- Rows 27- 54 (56, 58): repeat Rows 25 and 26. Snip yarn
- Continue from the Right Armhole at Row 54 (56,58). Turn, chain 1. Turn, chain 1
- Row 55 (57,59): ch 1, SC in 1st st., ch 1, SC in next ch 1 space. *SC across, last SC in top of Ch 2, chain 1, connect to the middle panel with SC in 1st st. SC in ch 1 space, ch 1. SC across. Repeat from * across, last st in top of ch 2, turn
- Row 56 (58,60): Ch 2, *Puff st in ch 1 space, ch 1. Repeat from * across. HDC in last st. Ch 1, turn. Be sure to make a Puff st. in the middle Ch 1 of the armhole.
- Row 57 (59,61): SC in 1st st, *ch 1, SC in next ch 1. Repeat from * across, last SC in top of Ch 2, turn
- Rows 58 (60,62): Ch 2, *Puff st in ch 1 space, ch 1. Repeat from * across. HDC in last st. Ch 1, turn
- Row 59 (61,63) – 88 (88,90): Repeat Rows 59 and 60, as well as for larger sizes
- Row 89 (89,91): SC in 1st st, *ch 1, SC in next ch 1. Repeat from * across, last SC in top of Ch 2, turn
Decrease Rows
- Row 90 (90, 92): Ch 2, skip 1 ch1 space, *Puff st in next ch 1 space, ch 1. Repeat from * across till the last 3 sts (SC, ch 1, SC), skip SC and ch 1, HDC in last st, ch 1, turn
- Row 91 (91,93): SC in first st, *ch 1, SC in next ch 1. Repeat from * across, last SC in top of Ch 2, turn
- Row 92 (92,94) – 121 (121,123): repeat rows 90 and 91, as well as for larger sizes. Snip yarn, weave in tails
Trimming

Armhole
- Lay piece with right side of Puff sts facing up. Starting from the bottom, join yarn in ch 1 (beside the puff st in center- as in photo above), ch 1, SC2tog in same space and next space. *Ch 1, 2SC in Puff st. row. Repeat from * till center Puff st at the top (as in photo 2 above), ch 1, SC2tog in the two ch 1 spaces, *ch 1, 2SC in Puff st. row. Repeat from * around. Join to first, snip yarn.
Edges
- Lay piece flat with right side of Single crochet facing up.
- Row 1:
- Side 1- join yarn in first st on row 1, *ch 2, SC in Puff st row. Repeat from * down the row
- Bottom- *SC in ch 1 space. Repeat from * across
- Opposite side- *ch 2, SC in Puff st row. Repeat from * up the row, after last SC in Puff st row, Ch 2, sl st to last st on row, turn
- Row 2:
- Side 1- (SC, ch 19, SC) in each ch 2 space down the row,
- Bottom- (SL ST, ch 19, SL ST) in ch 1 space across the row,
- Opposite side- *(SC, ch 19, SC) up the row
- Snip yarn, weave in all tails.
Block
- Blocking is HIGHLY recommended for this shrug, otherwise you won’t get that drape and the piece might appear stiff.
- You can block by dipping the piece in water (add a little conditioner; hair conditioner works fine), let it soak a few minutes, take it out and then squeeze water out bit by bit by twisting in a semi-round, not scrunching. Lay it flat, stretch it out while simultaneously pinning it down. Leave to dry completely. (Note from Underground Crafter: If you’re new to blocking, you can find helpful video tutorials here.)
Enjoy!
