
I love making simple crochet shawls. You can usually crochet them while watching streaming or waiting for an appointment, as just the border has complexity. These make great gifts or you can even donate them as prayer shawls. The Isabel Shawl is a simple crochet shawl pattern I designed as a winter holiday gift for my aunt last year, and I’m excited to share the pattern today.

This post contains affiliate links. I may receive compensation (at no added cost to you) if you make a purchase using these links. I am a King Cole Brand Ambassador and this post is part of our ongoing collaboration. Additional supplies for the sample were provided by Clover.
When I first saw King Cole Autumn Chunky, I thought it would make a great shawl. Autumn Chunky is a super soft, roving-type yarn with colors marled together. It has a great look as colors change subtly while you crochet. Autumn Chunky has been discontinued but you can find a proper substitute on YarnSub.

I wanted to make this a long shawl that could also be worn as a scarf or as a bigger wrap in the colder weather. Because the yarn is thick and cozy, I added a textured border that would really pop. This pattern uses a few special stitches, but I’ve included or linked tutorials for all of them, so even a determined beginner can make the Isabel Shawl.

Scroll down to get the free pattern for the Isabel Shawl pattern.
If you make your own Isabel Shawl, I’d love to see it! Share your progress and questions by tagging me on Bluesky as @UndergroundCrafter, Facebook as @UndergroundCrafter, or on Instagram as @ucrafter. You can also share a picture in the Underground Crafters Facebook group. Sign up for my weekly newsletter and get a coupon code for your choice of one of my premium patterns and private access to my vault of subscriber goodies. Plus, you’ll never miss one of my free patterns again!
Add the Isabel Shawl to your favorites or queue, or buy the ad-free PDF on Ravelry.

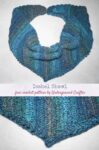
Isabel Shawl
Simple Crochet Shawl Pattern by Underground Crafter


This simple crochet shawl pattern works up quickly in bulky yarn. The triangular shawl is wide enough to wrap yourself in warmth!
Finished Size
- Adult: 60” (152.5 cm) wingspan x 18” (45.5 cm) spine.
Materials
- King Cole Autumn Chunky yarn (80% acrylic/20% wool, 3.5 oz/100 g, 153 yd/140 m) – 4 skeins in 5255 Frozen, or approximately 525 yd (480 m) in any acrylic/wool blend bulky weight yarn. NOTE: This yarn is now discontinued. Find a substitute at YarnSub.
- US Size K-10.5/6.50 mm crochet hook, or size needed to obtain gauge.
- Clover Quick Locking Stitch Markers.
- Clover bent-tip yarn needle.
Gauge
- 14 sts = 4” (10 cm) across in patterns for Rows 3-4. Exact gauge is not critical for this pattern.
Abbreviations Used in This Pattern
- bl – back loop only – Fiber Flux has a helpful video tutorial for identifying the back loop here.
- bob – 3-repeat bobble – [Yo, insert hook into st, yo and draw up a loop, yo and draw through 2 loops] 3 times in the same st, yo and draw through all 4 loops on hook. A video tutorial for this stitch is available below.
- If you can’t see the video tutorial for the bob above, watch it on YouTube.
- ch – chain
- dc – double crochet
- dc2tog – double crochet 2 stitches together (decrease) – [Yo, insert hook in next st, yo and draw up a loop, yo and draw through 2 loops] twice, yo and draw through all 3 loops on hook. A helpful video tutorial for this stitch is available below.
- If you can’t see the video for the dc2tog above, watch it on YouTube.
- dc3tog – double crochet 3 stitches together (decrease) – [Yo, insert hook in next st, yo and draw up a loop, yo and draw through 2 loops] 3 times, yo and draw through all 4 loops on hook. A helpful video tutorial for this stitch is available below.
- If you can’t see the video for the dc3tog above, watch it on YouTube.
- FPsc – front post single crochet – Insert hook from front around back to front of st in previous round, yo and draw up a loop, yo and draw through 2 loops. A video tutorial for this stitch is available below.
- If you can’t see the video tutorial for the FPsc above, watch it on YouTube.
- pm# – place stitch marker #
- rep – repeat
- sc – single crochet
- sc2tog – single crochet 2 stitches together (decrease) – [Insert hook in next st, yo and draw up a loop] twice, yo and draw through all 3 loops on hook. A helpful video tutorial for this stitch is available below.
- If you can’t see the video for the sc2tog above, watch it on YouTube.
- sl st – slip stitch
- sp – space
- st(s) – stitch(es)
- yo – yarn over
- * Repeat instructions after asterisk as indicated.
- () Work stitches between parentheses into same stitch or space.
- [] Repeat instructions between brackets as indicated.
Pattern Notes
- Ch 1 and ch 2 at beginning of rows do not count as stitches.
- All decreases (dc2tog, dc3tog, and sc2tog) are worked in back loops for this pattern.
Pattern Instructions
Shawl
Increase to midpoint
- Ch 3.
- Row 1: Turn, skip 2 ch, 3 dc in next ch, pm#1 in same chain to mark end. (3 sts)
- Row 2: Turn, ch 2, dcBL in first 2 sts, 2 dcBL in next st. (4 sts)
- Row 3: Turn, ch 1, 2 scBL in first st, scBL in next st and in each st across. (Increases by 1 st)
- Row 4: Turn, ch 2, dcBL in first st and in each st across to last st, 2 dcBL in last st. (Increases by 1 st)
- Rep Rows 3-4 until shawl measures approximately 30” (76 cm) across, ending after a repeat of Row 3.
Decrease towards end
- Row 5: Turn, ch 1, scBL in first st and each st across, pm#2 into last st to mark center.
- Row 6: Turn, ch 1, scBL2tog in first 2 sts (see Pattern Notes), scBL in next st and in each st across. (Decreases by 1 st)
- Row 7: Turn, ch 2, dcBL in first st and in each st across to last 2 sts, dcBL2tog in next 2 sts. (Decreases by 1 st)
- Rep Rows 6-7 until 3 sts remain.
- Row 8: Turn, ch 2, dcBL3tog into first 3 sts, pm#3 to mark end.
Edging and Border Rows
- Row 1: (Right Side) Turn, ch 1, sc in first st, move up marker#3, turn along angled edge, begin to crochet in side of rows as follows (see video below): 2 sc in side of each of next 2 rows, [sc in side of next row, 2 sc in side of next row] across to row before marker#2, sc in side of next row, (sc, ch 3, sc) in side of marked row, pm#2 in ch-3 sp, [sc in side of next row, 2 sc in side of next row] across to final row, 2 sc in side of next row, sc in marked ch, move up marker#1. Continue working along angled edge between markers 1 and 3.
- If you can’t see the video tutorial for working single crochet around the side of rows above, watch it on YouTube.
- Row 2: Turn, ch 1, sc in first st, move up marker #1, [bob in next st, sc in next st] across to st before marker, sc in next st, (sc, ch 3, sc) in ch-3 sp, move up marker#2 to ch-3 sp, sc in next st, [sc in next st, bob in next st] across to last st, sc in next st, move up marker#3.
- Row 3: Turn, ch 1, sc in first st, remove marker, *[FPsc around next bob, sc in next st]** across to 2 sts before marker, sc in next 2 sts, 5 sc in ch-3 sp, remove marker, sc in next 3 sts, rep from * to ** across to last st, remove marker. Fasten off.
Finishing
- With yarn needle, weave in ends on Wrong Side.