


This is the second post in my series about the Cricut Maker Rotary Blade. The Rotary Blade makes using your Cricut Maker for quilting, sewing, and other fabric crafts super easy. It can cut fabric very precisely and without wear and tear on you and your back and joints. In today’s post, I’ll be sharing a project for a Modern Quilt Pillow that I made with the Rotary Blade.
This post contains affiliate links. I may receive compensation (at no added cost to you) if you make a purchase using these links. This post is sponsored by Cricut, but all opinions and thoughts are my own. My sewing machine sponsor is Baby Lock. Additional materials for this post were generously provided by Fairfield World.
If you missed the first post in this series, don’t forget to read Get To Know the Cricut Maker Rotary Blade (Part 1).

I’ve been doing much more sewing since I got my Cricut Maker, and the Rotary Blade is the main reason why! It’s one of the tools that can be used in the Maker’s Adaptive Tool System, and it allows you to use your Cricut to cut fabric without a stabilizer. You’ll also need the FabricGrip Cutting Mat. Both the FabricGrip Cutting Mat and the Rotary Blade are included in the box with your Maker, so as soon as you take it out of the box, you’ll just need some fabric and you are ready to go!

I used to do a lot of strip quilting back in the day, but in my current apartment, I don’t have lots of space to set up a cutting table, or a large, unused surface that I can use for cutting. And, let’s be honest, my back is not as it once was, so the idea of bending over cutting fabric for hours is not really something that makes me excited! Today’s project is a Modern Quilt Pillow. It’s a simple project that doesn’t require a large amount of cutting, but with the Maker and the Rotary Blade, it definitely works up faster and with less back and wrist strain than cutting by hand.
I’m sharing a link to this project in Cricut Design Space. You can use my pillow design or create your own! (If you do create your own, be sure to add 1/2″ to each side of each piece for a 1/4″ seam allowance.) And, if you just want to try out the Rotary Blade without doing any math (which is fine by me), you can use my project or any one of the great sewing projects that are included with your Cricut Access Standard subscription.

Modern Quilted Pillow
Tutorial by Underground Crafter

I used a simple, geometric design and the “quilt-as-you-go” method to add some depth and softness to this pillow. Use colors that coordinate or contrast with your room for different looks. This pillow would add some brightness to your home decor. It also makes a great gift for a housewarming, wedding, or baby shower.
Tools
- Cricut Maker with Cricut Design Space and Cricut Access Standard subscription,
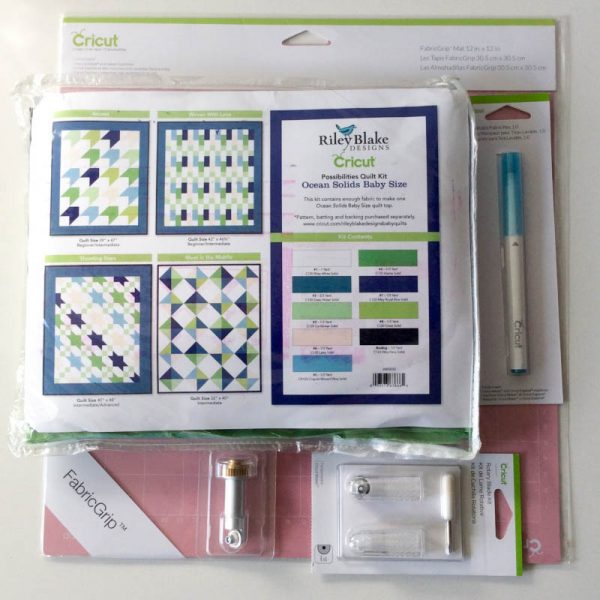
- Rotary Blade and FabricGrip Cutting Mat,
- EasyPress 2 with EasyPress Mat, or iron with other heat-safe surface, and
- Sewing machine and basic sewing supplies – I used my Baby Lock Jubilant with Madeira Cotona Thread.
- Fabric scissor or rotary cutter with cutting mat.
Materials
- Your choice of cut files in Design Space,
- Fabric in 7 coordinating colors — I used the Riley Blake Designs Baby Size Quilt Kit in Ocean Solids,
- Small amount of batting – I used a 20” square cut from Fairfield Poly-Fil Project Fleece Small (45” x 60”), and
- Fairfield Decorator’s Choice 18” Square Pillow.

Instructions
Prepare Your Fabric
- Prewash and press your fabric to remove wrinkles using your EasyPress 2 with EasyPress Mat, or an iron with ironing board.
Cut Your Fabric and Batting
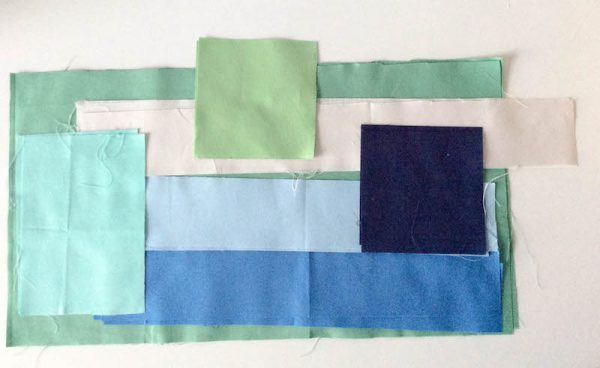
- Use the Modern Quilt Pillow in Design Space to cut your fabric strips. You’ll need your Cricut Maker machine with the Rotary Blade in Clamp “B” with a FabricGrip Cutting Mat.

- Using your fabric scissor or rotary cutter and cutting mat, cut a 20” square of the fabric you will use to back the inside of your pillow. This will not be seen, so it can be made with orphaned quilt blocks, muslin, or scraps. Cut a 20” square of batting. Neither needs to be perfectly square because you will trim both pieces down to 18.5” later.
Sew Your Pillow
- Start by sewing the 2 sets of 3 short rectangles into strips using a 1/4″ seam allowance.
- Once you have 2 strips of short rectangles, set aside the 2 large rectangles (for the pillow back) and the 2 long, narrow strips (for the sides of the pillow front) and arrange your remaining fabric strips in the order you will sew them together.
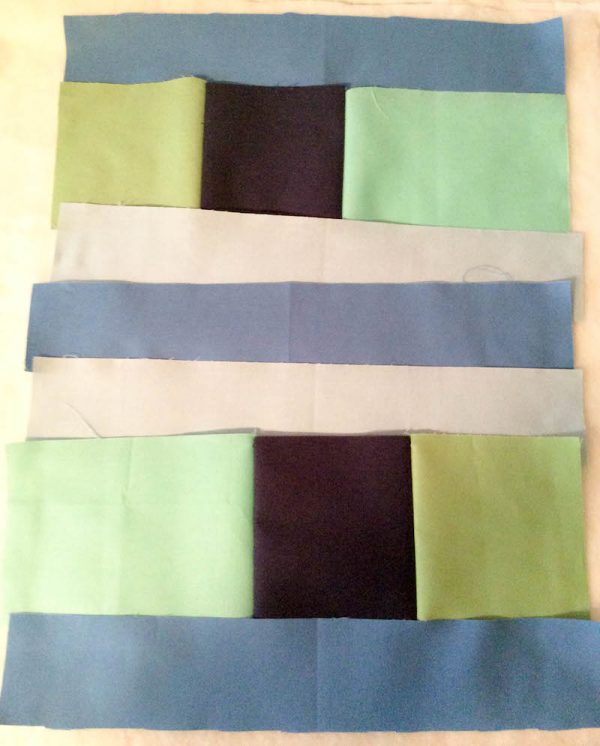
- Create a “quilt sandwich” for the front of the pillow. The 20” square of fabric will go on the bottom, the 20” square of batting will go in the middle, and your first 2 strips of rectangles will go on the top layer. Align your rectangle strips with the top of your quilt sandwich with the first strip facing right side up and the second strip on top of it, facing right side down. Both strips should be centered relative to the sides of the quilt sandwich.

- Using a 1/4″ seam allowance, sew the rectangles together along the long edge, working through all layers.

- Finger press the rectangles flat. Place the next rectangle in your series face down over the last rectangle you sewed. Continue adding rectangles in this fashion.
- One you have the main set of strips sewn, position the first of the long, narrow strips. It should be face down, perpendicular to the rest of your strips. Sew into position using a 1/4″ seam allowance. Position the second of the long, narrow strips face down on the opposite side of the pillow and sew into position.
- Press or iron the front of the pillow with all the sewn strips using your EasyPress 2 with EasyPress Mat, or an iron with ironing board. Trim the front of the pillow to 18.5” square.

- Press or iron an approximately 1/2″ strip down on the wrong side of the long edge of each of the larger rectangles for the pillow back with your EasyPress 2 with EasyPress Mat, or an iron with ironing board. Using a 1/4″ seam allowance, sew down these strips to create a hem.
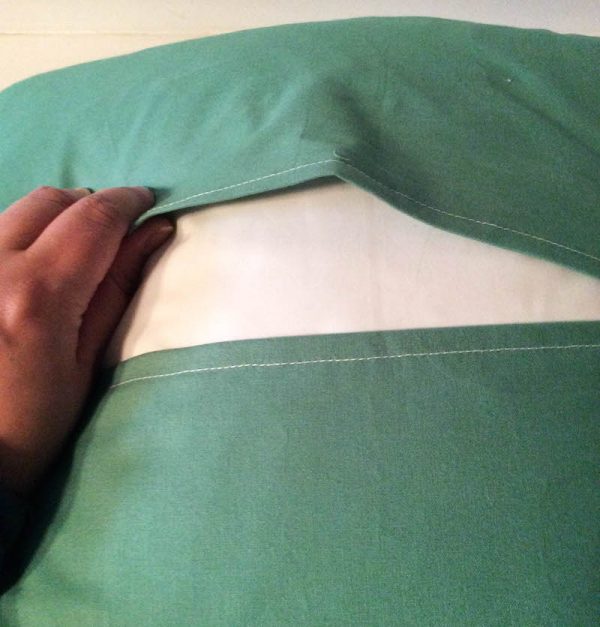
- Create another sandwich. Place the pillow front right side up. Place the 2 hemmed rectangles over the pillow front, with right sides facing (wrong side up).

- Sew a 1/4″ seam around the entire pillow case.
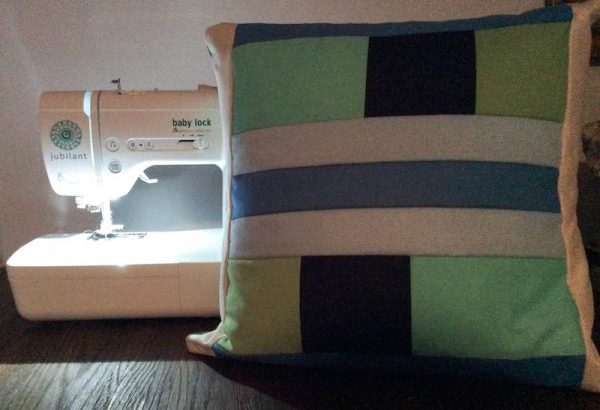
- Pull the pillow case right side out and insert pillow form.
Enjoy your pillow!

This is a sponsored conversation written by me on behalf of Cricut. The opinions and text are all mine.
The Modern Quilted Pillow is also featured on AllFreeSewing.com. Sign up for their free newsletter to get free patterns sent to you daily!
1 thought on “Cricut Basics: Modern Quilted Pillow with Cricut Maker Rotary Blade”