

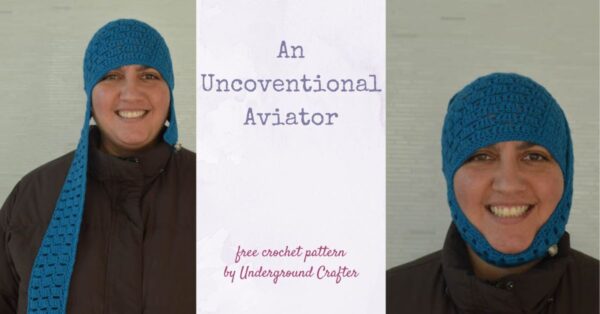
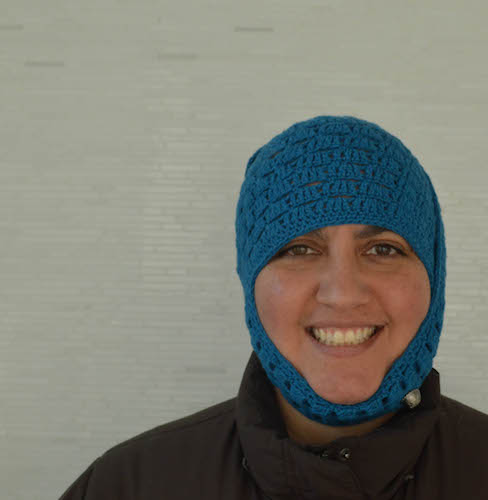
An Unconventional Aviator is a crochet aviator hat with a twist on the classic aviator design. The asymmetrical earflap hat was inspired by an iconic image of pioneering aviatrix, Amelia Earhart, used in Apple’s Think Different poster series.
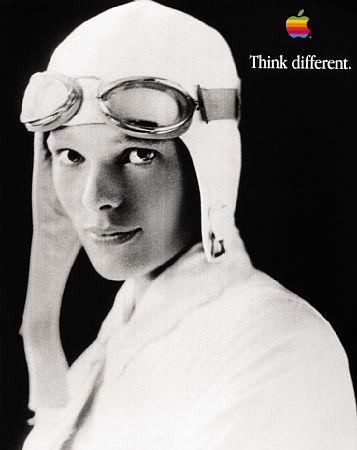
I love the mischievous look in her eyes!
The yarn for the sample was generously provided by SHOKAY.
I wanted to design a crochet aviator hat that emphasized Amelia’s creative spirit (did you know she briefly had her own clothing line?), so I steered away from the typical neutral colors you would see in an aviator pattern and choose bright cerulean yarn.

I included a stitch pattern with eyelet details that add a touch of femininity (and also work as adjustable button holes).

I finished the hat off with two amazing gunmetal buttons I picked up at M & J Trimming.
I hope you have as much fun making this crochet aviator hat as I did!

If you make your own An Unconventional Aviator, I’d love to see it! Share your progress and questions by tagging me on Facebook as @Underground Crafter on on Instagram as @ucrafter. You can also share a picture in the Underground Crafters Facebook group. Sign up for my weekly newsletter and get a coupon code for your choice of one of my premium patterns and private access to my vault of subscriber goodies. Plus, you’ll never miss one of my free patterns again!
Add An Unconventional Aviator to your favorites or queue, or buy the ad-free PDF on Ravelry.

An Unconventional Aviator
Crochet Aviator Hat Pattern by Underground Crafter
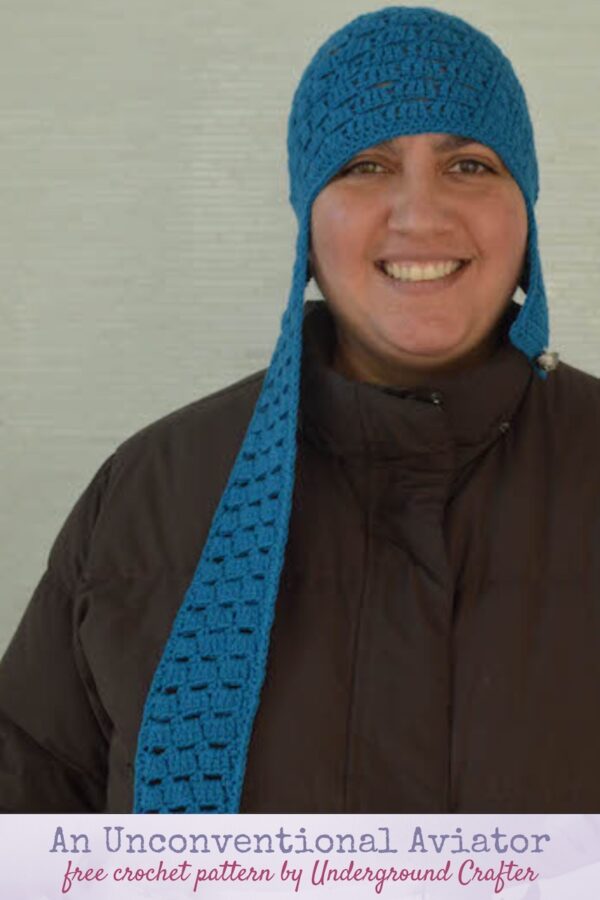


This unconventional twist on the classic crochet aviator hat has an asymmetrical earflap, inspired by an iconic photo of Amelia Earhart.
Finished Size
- Teen/Adult: 20” (51 cm) hat circumference.
Materials
- SHOKAY Orient (75% yak/25% bamboo, 3.5 oz/100 g, 245 yd/224 m) – 2 skeins in Cerulean, or approximately 290 yd (265 m) in any light weight yarn.
- US G-6/4 mm crochet hook, or any size needed to obtain gauge.
- Yarn needle.
- 3 locking stitch markers or pieces of scrap yarn.
- 2 sew-through or shank buttons. (I used 2 gunmetal gray buttons from M&J Trimming.)
Gauge
- Through Rnd 7 in pattern = 4” (10 cm) diameter. For best results, always check your gauge.
Abbreviations Used in This Pattern
- ch – chain
- dc – double crochet
- pm# – place stitch marker #
- rep – repeat
- Rnd(s) – Round(s)
- RS – right (front) side
- sc – single crochet
- sc2tog – single crochet 2 sts together (decrease) – [Insert hook in next st, yo and draw up a loop] twice, yo and draw through all 3 loops on hook. Fiber Flux has a helpful video tutorial for this stitch here.
- sl st – slip stitch
- sp – space
- st(s) – stitch(es)
- yo – yarn over
- * Repeat instructions after asterisk as indicated.
- [] Repeat instructions between brackets as indicated.

Pattern Notes
- Hat is worked in the round.
- Earflaps are worked flat in rows.
- Oombawka Design Crochet has helpful magic adjustable ring photo and video tutorials here.
Pattern Instructions
Hat
- Beginning at crown, start with magic adjustable ring (see Pattern Notes).
- Rnd 1: Ch 3 (counts as dc, here and throughout), 7 dc in ring, pull the yarn tail tightly to close ring, join with sl st top of first ch 3. (8 sts)
- Rnd 2: Ch 1, 2 sc in first st and in each st around, join with sl st to top of first sc. (16 sts)
- Rnd 3: Ch 3, dc in same st, dc in next st, *2 dc in next st, dc; rep from * around, join with sl st to top of first ch 3. (24 sts)
- Rnd 4: Ch 1, starting in first st *2 sc in next st, sc in next 2 sts; rep from * around, join with sl st to top of first sc. (32 sts)
- Rnd 5: Ch 3, dc in same st, dc in next 3 sts, *2 dc in next st, dc in next 3 sts; rep from * around, join with sl st to top of ch 3. (40 sts)
- Rnd 6: Ch 1, starting in first st *sc in next 4 sts, 2 sc in next st; rep from * around, join with sl st to top of first sc. (48 sts)
- Rnd 7: Ch 3, dc in same st, dc in next 5 sts, *2 dc in next st, dc in next 5 sts; rep from * around, join with sl st to top of first ch 3. (56 sts)
- Rnd 8: Ch 1, starting in first st *sc in next 6 sts, 2 sc in next st; rep from * around, join with sl st to top of first sc. (64 sts)
- Rnd 9: Ch 3, dc in same st, dc in next 7 sts, *2 dc in next st, dc in next 7 sts; rep from * around, join with sl st to top of first ch 3. (72 sts)
- Rnd 10: Ch 1, starting in first st *2 sc in next st, sc in next 8 sts; rep from * around, join with sl st to top of first sc. (80 sts)
- Rnd 11: Ch 3, dc in same st, dc in next 9 sts, *2 dc in next st, dc in next 9 sts; rep from * around, join with sl st to top of first ch 3. (88 sts)
- Rnd 12: Ch 1, sc in same st, *ch 3, skip 3 sts, sc in next st; rep from * around to last 3 sts, ch 3, skip 3, join with sl st to top of first sc.
- Rnd 13: Ch 3, *3 dc in ch-3 sp, dc in next st; rep from * around to last ch-3 sp, 3 dc in ch-3 sp, join with sl st to top of first ch 3.
- Rep Rnds 12-13, 7 more times, or until hat measures 7.5” (19 cm) or desired length from crown.
- Rnd 14: Ch 1, sc in same st and in next 15 sts, pm1 in last st worked (16th st), sc in next 45 sts, pm2 in last st worked (61st st), sc in next 27 sts, pm3 in last st (88th st), join with sl st to top of first sc, fasten off.
Short earflap with button band
- With RS facing, join with sl st to marker 2.
- Row 1: Ch 1, sc in same st and next 10 sts, 2 sc in next st. (13 sts)
- Row 2: Turn, ch 1, sc in same st, *ch 3, skip 3 sts, sc in next st; rep from * across.
- Row 3: Turn, ch 3, *3 dc in next ch-3 sp, dc in next st; rep from * across.
- Rows 4-13: Rep Rows 2-3 5 more times.
- Row 14: Turn, ch 1, sc in same st and in each st across.
- Rows 15-18: Rep Row 14. Fasten off.
Long earflap
- With RS facing, join with sl st to marker 1.
- Rep Rows 1-3 as for short earflap.
- Rep Rows 2-3, 30 times or until 21” (53 cm) from edge of hat, or until desired length. Fasten off.
Edging
- With RS facing, join with sl st at marker 3, ch 1, sc in same st and in next 14 sts, sc2tog (in next st and along side of earflap). Working along earflap, sc in side of next 2 rows (see video below), *2 sc in side of next row, sc in side of next row;** rep from * across to last row of earflap, 2 sc in side of last row, turn to work around short edge of earflap, 2 sc in next st, sc in each st across to last st, rep from * to ** across long edge to last 2 rows, 2 sc in side of next row, sc2tog (in side of earflap and on next st on hat), sc in each of next 30 sts, sc2tog (in next st and along side of earflap), sc in side of next 2 rows, rep from * to ** across to last row of 4 rows of earflap, sc in side of next 3 rows, 2 sc in next row, working along the short edge of earflap, 2 sc in next st, sc in next 11 sts, 2 sc in next st, working along long edge of earflap sc in side of next 5 rows, rep from * to **, along to last row of earflap, sc2tog (in side of earflap and next st on hat), sc in next 13 sts, join with sl st to top of first sc, fasten off.
- If you can’t see the video tutorial above demonstrating how to crochet along the side of your project, click HERE to watch it on YouTube.
Finishing
- Position button on shorter earflap on RS of Rows 14-18. Thread yarn needle with piece of yarn and sew button in place. Sew other button to top of crown. With yarn needle, weave in ends on inside of hat.

I love it. So fun and I like the asymmetry and historical connection!!
This is such an interesting idea! Very neat. Would love if you shared this at our Yarn Fanatic Party – http://eyeloveknots.blogspot.com/2015/04/yarn-fanatic-linky-party-34.html.
Thanks for the invite, Alexandra!
what a great idea – beautiful hat- thank you for sharing!
I love this pattern. It’s cute & clever. Thank you for sharing Marie.