
I love crocheting bags because you can put them to use right away, no matter what the weather. Confession time: I don’t love sewing in liners. Without a liner, there are limits to what can be carried inside of a crocheted bag. In yesterday’s post, I shared a photo tutorial for making a no-sew liner for any crochet or knit bag, and today I’m sharing the pattern for the bag that originally inspired the need for a removable, easy clean liner!

A version of this post originally appeared on Crafts Unleashed. Yarn for this project was generously provided by Consumer Crafts.
If you make your own Striped Bag with No-Sew Liner, I’d love to see it! Share your progress and questions by tagging me on Bluesky as @UndergroundCrafter, Facebook as @UndergroundCrafter, or on Instagram as @ucrafter. You can also share a picture in the Underground Crafters Facebook group. Sign up for my weekly newsletter and get a coupon code for your choice of one of my premium patterns and private access to my vault of subscriber goodies. Plus, you’ll never miss one of my free patterns again!
Add the Striped Bag with No-Sew Liner to your Ravelry favorites or queue.

Striped Bag with No-Sew Liner
Crochet Pattern by Underground Crafter
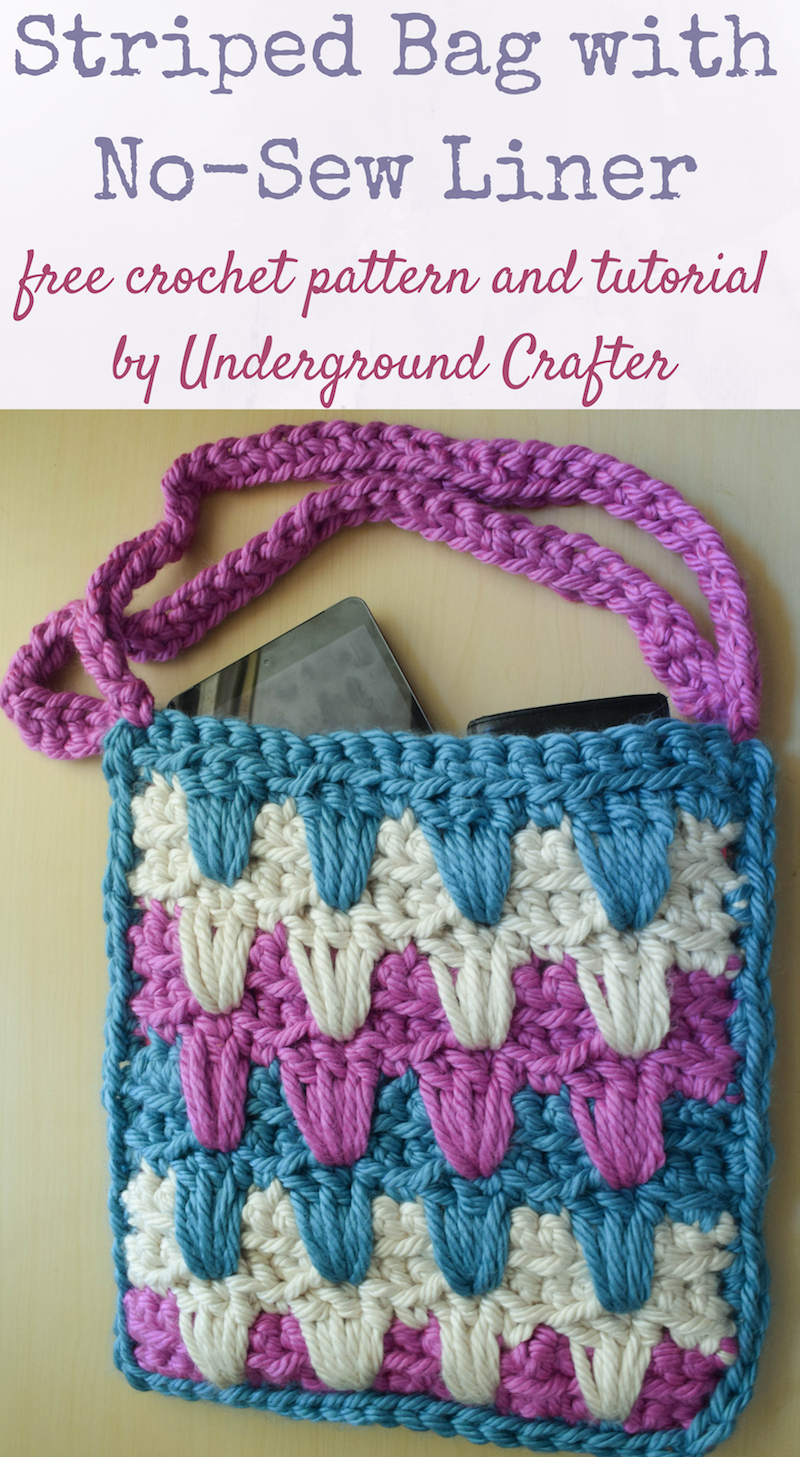


Crochet bags are great projects to make and use any time of year. A removable no-sew liner makes this bag sturdy and easy to clean.
Finished Size
- Each Panel: 14” (35.5 cm) long x 12.5” (32 cm) wide.
Materials
- Bernat Mega Bulky yarn (100% acyrlic, 10.5 oz/300 g/64 yd/58 m) – 2 skeins ea 88314 Radiant Orchid (CA), 88008 Aran (CB), and 88206 Teal (CC), or approximately 80 yd (73 m) in ea of 3 colors in any jumbo weight yarn.
- US Size S/19 mm crochet hook, or size needed to obtain gauge.
- Yarn needle.
Gauge
- 16 sts = 4” (10 cm) in pattern. Exact gauge is not critical for this pattern.
Abbreviations Used in This Pattern
- CA – Color A
- CB – Color B
- CC – Color C
- ch – chain
- dc – double crochet
- ea – each
- rep – repeat
- sc – single crochet
- sk – skip
- sp – space
- st(s) – stitch(es)
- yo – yarn over
- * Repeat instructions after asterisk as indicated.
Pattern Note
- A photo tutorial for the no-sew liner for this bag is available here.
Pattern Instructions
Striped Bag Panels (Make 2)

- With CA, ch 20.
- Row 1: Turn, sk 1, sc in next ch, *sc in ea of next 2 ch, ch 1, sk 1 ch, sc in next ch; rep from * across to last 2 ch, sc in ea of next 2 ch. (19 sts including ch-1 sp)
- Row 2: Turn, ch 1, sc in same st and next st, *sc in next st, ch 1, sk 1 st, sc in ea of next 2 sts; rep from * across to last st, sc in last st.
- Row 3: Turn, ch 1, sc in same st, *sc in ea of next 2 sts, ch 1, sk 1 st, sc in next st; rep from * across to last 2 sts, sc in next st, sc in last st changing to CB with final yo. Fasten off CA.

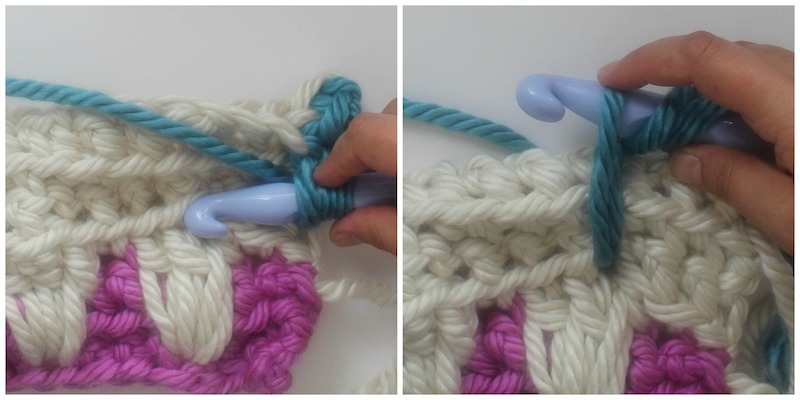
- Row 4: Turn, ch 1, sc in same st and next st, *3 dc in skipped st 3 rows below, sk 3 sts, sc in next st; rep from * across to last st, sc in next st.

- Row 5: Turn, ch 1, sc in same st, *sc in ea of next 2 sts, ch 1, sk 1 st, sc in next st; rep from * across to last 2 sts, sc in ea of next 2 sts.
- Row 6: Rep Row 2.
- Row 7: Turn, ch 1, sc in same st, *sc in ea of next 2 sts, ch 1, sk 1 st, sc in next st; rep from * across to last 2 sts, sc in next st, sc in last st changing to CC with final yo. Fasten off CB.
- Row 8: Turn, ch 1, sc in same st and next st, *3 dc in center dc 4 rows below, sk 3 sts, sc in next st; rep from * across to last st, sc in next st.
- Rows 9-10: Rep Rows 5-6.
- Row 11: Turn, ch 1, sc in same st, *sc in ea of next 2 sts, ch 1, sk 1 st, sc in next st; rep from * across to last 2 sts, sc in next st, sc in last st changing to CA with final yo. Fasten off CC.
- Row 12: Rep Row 8.
- Rows 13-14: Rep Rows 5-6.
- Row 15: Rep Row 3.
- Row 16: Rep Row 8.
- Rows 17-18: Rep Rows 5-6.
- Row 19: Rep Row 7.
- Row 20: Rep Row 8.
- Row 21: Turn, ch 1, sc in same st and in ea st and ch-1 sp across. Fasten off CC.
- With yarn needle, weave in yarn tails.
Assemble Bag
- Place your crochet striped bag panels on top of each other. Pick your least favorite side of each panel and place those facing together as the inside of the bag. You will seam 3 sides closed using the single crochet stitch. For best results, line up stitches and colors on each panel and work through both panels.
Seam
- Starting on long edge near Row 21 and working through both panels throughout, join CC with slip st, ch 1, turn to work along long edge, sc in side of ea row to first row, 2 sc in side of first row, turn to work along short edge, sc in ea st across first row, turn to work along long edge, 2 sc in side of first row, sc in side of ea row across to last row, fasten off CC.
- Once the bag is seamed together, add straps along the short edge.
First Strap
- Join CA to Row 21 just at the side of the seam with slip st, ch 1, sc in same st, ch 35. *Being careful not to twist strap, join with sc in last st of Row 21 on same panel. Turn, ch 1, sc in each ch across, join with slip st to first sc in CA.
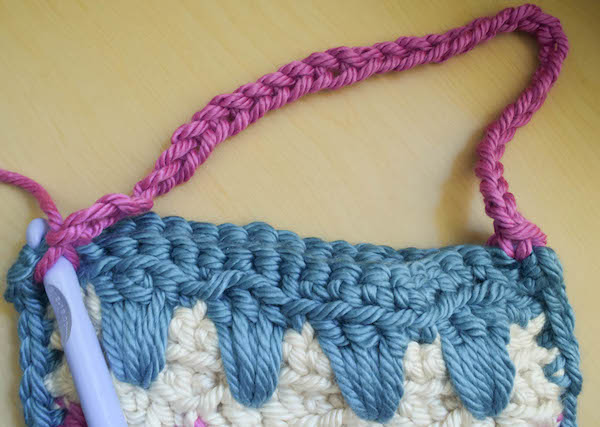
Second Strap
- Sc in Row 21 on other panel, ch 35. Rep from * as for First Strap. Fasten off.
- With yarn needle, weave in yarn tails for seam and straps.
- Insert the liner into the bag, trimming and adjusting if necessary. A photo tutorial for making the no-sew liner is available here.

Thank You, great Christmas gift for my pre-teen Granddaughter. She will absolutely ❤️This little purse/bag.
This is so cute! I will make this for my granddaughter for Christmas! I found you via the Hookin’ on Humpday post on Petals to Picots blog.
Thanks for information. This is so cute. I love it 🙂