

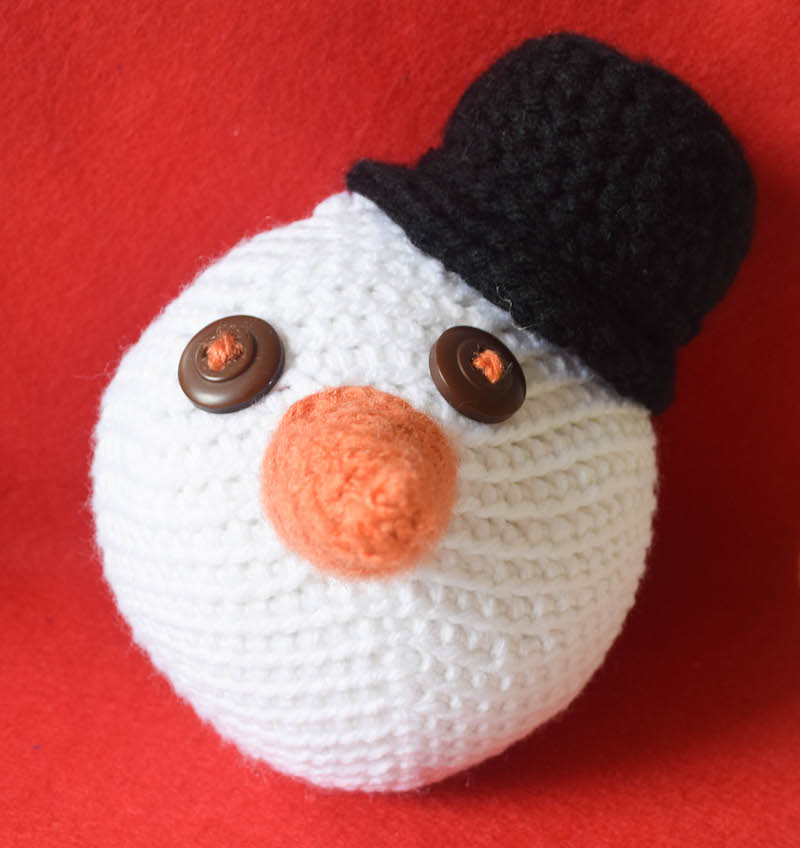
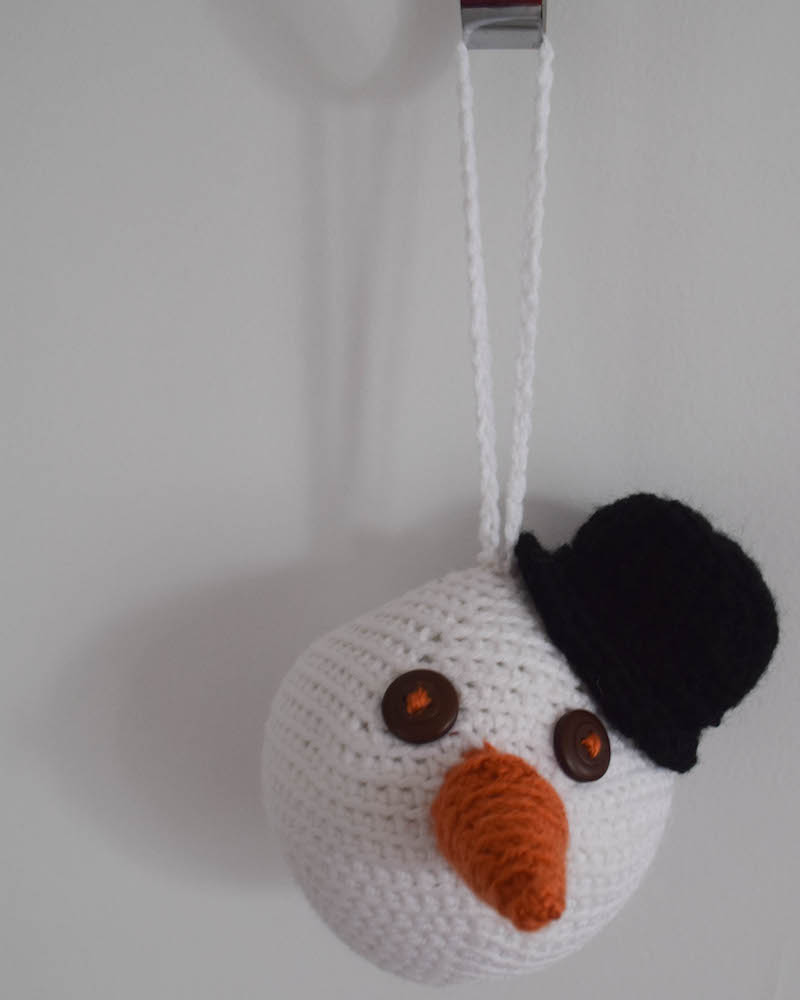
The weather has definitely started to feel chilly this week, and that has me thinking about the winter holidays. I thought a little snowman amigurumi (who I named Snowdude) would brighten my mood, and I was right. This fun project can be used as a stress ball (just squeeze from the back with your thumb and forefinger grasping where the ears would be) or you can add a hanging loop to use it as an ornament.

This post contains affiliate links. I may receive compensation (at no added cost to you) if you make a purchase using these links. Supplies for this project generously provided by Fairfield World and Red Heart.
The Snowdude would also make a great project to send to Operation Gratitude, an organization that distributes care packages to veterans, first responders, active duty military, and wounded heroes and caregivers. This post is part of my monthly charity spotlight series, where I spotlight a charity that distributes crochet projects and share a free pattern suitable for donation. It’s also part of the 2017 Holiday Blog Hop.

November’s Featured Charity: Operation Gratitude
Operation Gratitude is a 501(c)(3) non-profit organization dedicating to boosting the spirits and meeting the needs of U.S. military and first responder communities. As of December 2025, Operation Gratitude no longer accepts handmade. Find an alternative organization to donate your handmade scarves to in my Ultimate Guide to Crocheting for Charity.
About The Snowdude
I originally planned to make a hat for Operation Gratitude Charity Spotlight, but when I discovered the stuffed toy option, I was on a mission to create something cute and fun.

I decided to make a combination stress ball/ornament pattern with a spherical shape.
To get this little Snowdude in a care package, you’ll probably need to tuck the Carrot Nose inwards for shipping. Be sure to wrap up your handmade donations in a plastic zipper bag so they will stay dry.
If you make your own Snowdude, I’d love to see it! Share your progress and questions by tagging me on Bluesky as @UndergroundCrafter, Facebook as @UndergroundCrafter, or on Instagram as @ucrafter. You can also share a picture in the Underground Crafters Facebook group. Sign up for my weekly newsletter and get a coupon code for your choice of one of my premium patterns and private access to my vault of subscriber goodies. Plus, you’ll never miss one of my free patterns again!
Add the Snowdude to your Ravelry favorites or queue.

Snowdude Stress Ball or Ornament
Snowman Amigurumi Crochet Pattern by Underground Crafter


Make a snowdude’s head as an ornament or stress ball.
Finished Size
- Approximately 6” (15 cm) tall with hat.
Materials
- Red Heart Super Saver (7 oz/198 g/364 yds/333 m/100 % acrylic) – 1 skein each in 311 White (CA), 312 Black (CB), and 256 Carrot (CC), or approximately 60 yd (55 m) each in CA and CB, and 30 yd (27.5 m) in CC in any medium weight yarn.
- US Size F-5/3.75 mm crochet hook, or size needed to obtain gauge.
- Fairfield Poly-Fil Crafter’s Choice Dry Polyester Packing Fiber Fill – 10 ounce bag.
- Yarn needle.
- Locking stitch marker.
- 2 matched sew-through buttons. (I used 2 – 0.75″ (2 cm) buttons from a Buttons Galore Apothecary Button Jar.)
Gauge
- Through Rnd 11 in pattern for head = 4” (10 cm) diameter. Exact gauge is not critical for this project but stitches should be small so that fiber filling doesn’t show.
Abbreviations Used in This Pattern
- BL – back loop only
- CA – Color A
- CB – Color B
- CC – Color C
- ch – chain
- FL – front loop only
- invdec – invisible decrease – Insert hook in back loop only of each of next 2 sts, yarn over and draw up a loop, yarn over and draw through 2 loops. A helpful video for this decrease is available below.
- If you can’t see the invdec video above, watch it on YouTube.
- pm – place marker
- rep – repeat
- Rnd(s) – Round(s)
- RS – right (front) side
- sc – single crochet
- sl st – slip stitch
- st(s) – stitch(es)
- WS – wrong (back) side
- * Repeat instructions after asterisk as indicated.
Pattern Notes
- This pattern is worked in continuous rounds or spirals. Do not join or turn unless otherwise noted.
- Move stitch marker up as each round is completed to mark position unless otherwise noted.
- When choosing colors, note that CA is the head color, CB is the top hat color, and CC is the carrot nose color.
Pattern Instructions
Head
- With CA, start with magic adjustable ring. (Oombawka Design has a great magic ring tutorial here.)
- Rnd 1: (RS) Ch 1, 6 sc in ring, pull yarn tightly to close ring, pm in last st to mark position. (6 sts)
- Rnd 2: 2 scBL in ea st around. (12 sts)
- Rnd 3: *2 scBL in next st, scBL in next st; rep from * around. (18 sts)
- Rnd 4: *2 scBL in next st, scBL in next 2 sts; rep from * around. (24 sts)
- Rnd 5: *2 scBL in next st, scBL in next 3 sts; rep from * around. (30 sts)
- Rnd 6: *2 scBL in next st, scBL in next 4 sts; rep from * around. (36 sts)
- Rnd 7: *2 scBL in next st, scBL in next 5 sts; rep from * around. (42 sts)
- Rnd 8: *2 scBL in next st, scBL in next 6 sts; rep from * around. (48 sts)
- Rnd 9: *2 scBL in next st, scBL in next 7 sts; rep from * around. (54 sts)
- Rnd 10: *2 scBL in next st, scBL in next 8 sts; rep from * around. (60 sts)
- Rnd 11: *2 scBL in next st, scBL in next 9 sts; rep from * around. (66 sts)
- Rnd 12: ScBL in ea st around.
- Rnds 13-17: Rep Rnd 12 – 5 times.
- Rnd 18: *Invdec, scBL in next 9 sts; rep from * around. (60 sts)
- Rnd 19: *Invdec, scBL in next 8 sts; rep from * around. (54 sts)
- Rnd 20: *Invdec, scBL in next 7 sts; rep from * around. (48 sts)
- Rnd 21: *Invdec, ScBL in next 6 sts; rep from * around. (42 sts)
- Rnd 22: *Invdec, scBL in next 5 sts; rep from * around. (36 sts)
- Rnd 23: *Invdec, scBL in next 4 sts; rep from * around. (30 sts)
- Rnd 24: *Invdec, scBL in next 3 sts; rep from * around. (24 sts)
- Rnd 25: *Invdec, scBL in next 2 sts; rep from * around. (18 sts) Pm in loop of last st to prevent unraveling. Stuff body tightly with Poly-Fil. Remove stitch marker and replace in last st to mark.
- Rnd 26: *Invdec, scBL in next st; rep from * around. (12 sts)
- Rnd 27: Invdec around. (6 sts)
- Fasten off with a long yarn tail. Thread yarn tail through yarn needle, sew closed, and weave in ends on inside of Head.
Carrot Nose
- With CC, start with long yarn tail for seaming, ch 12, join with sl st to first ch.
- Rnd 1: (RS) Ch 1, scBL in each st around, pm in last st to mark position. (12 sts)
- Rnd 2: ScBL in each st around.
- Rnd 3: *Invdec, scBL in next 4 sts; rep from * around. (10 sts)
- Rnd 4: Rep Rnd 2.
- Rnd 5: *Invdec, scBL in next 3 sts; rep from * around. (8 sts)
- Rnd 6: Rep Rnd 2.
- Rnd 7: *Invdec, scBL in next 2 sts; rep from * around. (6 sts)
- Rnd 8: Rep Rnd 2.
- Rnd 9: Invdec around. (3 sts)
- Fasten off with long yarn tail. Thread yarn tail through yarn needle, sew closed, and weave in ends on inside of Carrot Nose. Stuff Carrot Nose tightly with Poly-Fil. Position Carrot Nose at center of head, near Rnds 12-17. Thread yarn needle with yarn tail from starting chain, sew Carrot Nose to Head, and weave in ends on inside of Head.
Eyes
- Thread yarn needle with CC, sew buttons to Head above Carrot Nose, and weave in ends on inside of head.
Top Hat – Bottom Bottom Base
- With CB, follow instructions for Head through Rnd 7.
- Fasten off, weave in ends on WS of Bottom Base.
Top Hat – Top Piece
- With CB, follow instructions for Head through Rnd 4.
- Fasten off.
Top Hat – Side Piece
- Turn Top Piece to WS, join CB with sl st to any st.
- Rnd 1: Ch 1, scFL in same st and each st around, pm in last st to mark position. (24 sts)
- Rnd 2: ScFL in each st around.
- Rnds 3-6: Rep Rnd 2 – 4 times. Pm in loop of last st to prevent unraveling. Stuff tightly with Poly-Fil. Remove stitch marker.
- Join stuffed Side Piece to RS of Bottom Base with sl st to unworked front loops in Rnd 4. Fasten off with long yarn tail. Position Top Hat slightly askew on top of Head. Thread yarn tail through yarn needle, draw yarn through to WS of Bottom Base, sew Bottom Base to Head, and weave in ends on inside of Head or Hat.
Optional: Ornament Hanging Loop
- Join CA with sl st to any st in center top of Head after assembly, ch 40, sl st to next st, fasten off, with yarn needle, weave in ends securely on inside of Head.
2 thoughts on “Crochet Pattern: Snowdude”