
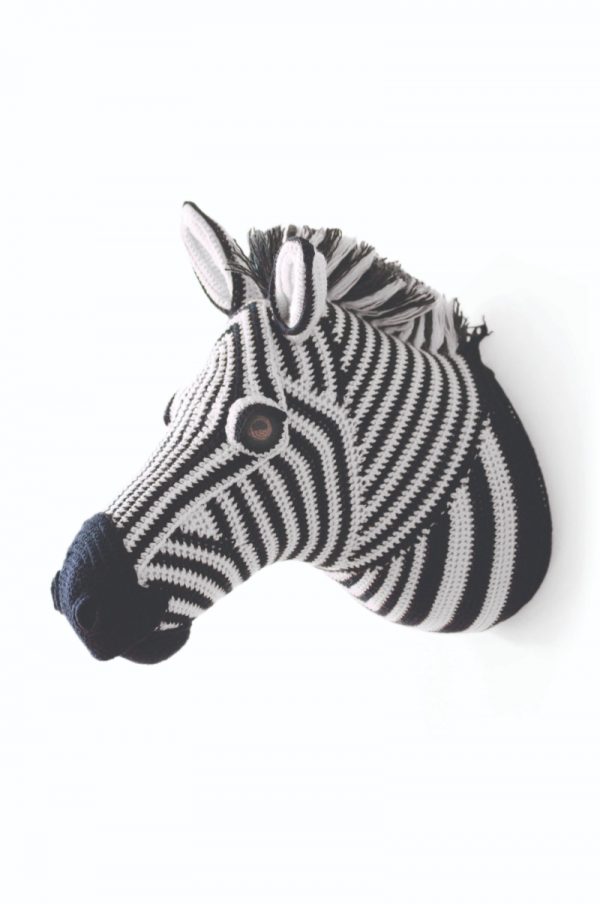
If you love to crochet quirky home decor projects, then you’re going to want to check out my review of a fun crochet pattern collection by Vanessa Mooncie. My review also includes an excerpted crochet pattern for a Zebra amigurumi faux taxidermy trophy head, so read on for details!
This post contains affiliate links. I may receive compensation (at no added cost to you) if you make a purchase using these links. A free review copy of Animal Heads: Trophy Heads to Crochet by Vanessa Mooncie was provided to me by GMC Publications. Although I accept free products for review, I do not accept additional compensation, nor do I guarantee a positive review. My reviews are based entirely on my honest opinions.
Book Review
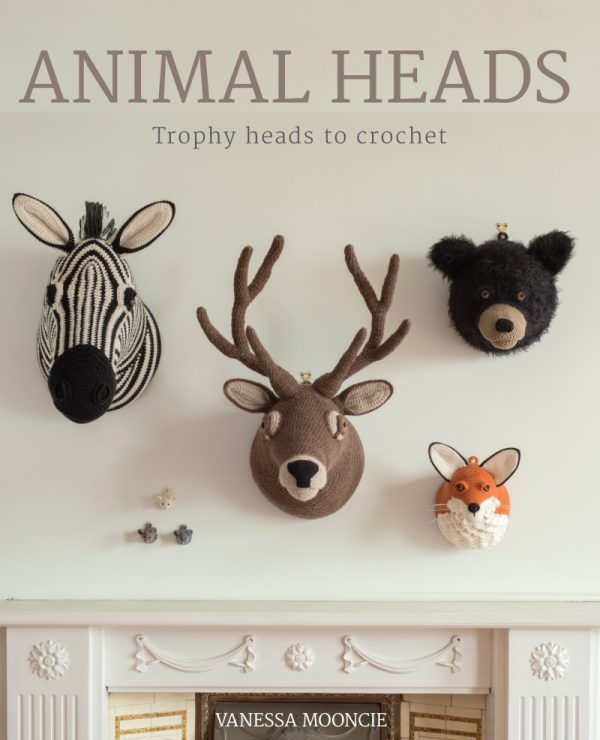
Animal Heads: Trophy Heads to Crochet by Vanessa Mooncie is a crochet book including ten life-sized patterns for amigurumi faux taxidermy heads.
The book opens with an introduction by Vanessa and then includes a gallery with a full page picture of each project mounted on a wall. The book then moves on to the patterns. Each pattern includes:
- A materials list with yarn, hooks, and notions required;
- The size (final measurements;
- The tension (gauge);
- A key to all international stitch symbols used in the pattern;
- The method, which explains the construction process;
- A written pattern using U.K. pattern abbreviations;
- A charted pattern using international stitch symbols;
- Instructions for making up (assembly) of the finished trophy head; and
- Multiple pictures of the finished trophy head.
Patterns are included for a mouse, a hare, a fox, a ram, a swan, a lion, a stag, a bull, a black bear, and a zebra.
After the patterns, Getting Started includes information about hooks, notions, yarn substitutions, reading charts, and measuring gauge. Crochet Stitches includes written and illustrated instructions for making a slip knot, holding the crochet hook, forming a magic ring, seven basic stitches (UK chain, slip stitch, double crochet, half treble crochet, treble crochet, double treble, triple treble), increasing and decreasing, crocheting in the front and back loop, and changing colors. Finishing Touches provide instructions for stuffing, seaming, embellishing with basic embroidery stitches, using nylon thread for whiskers, and mounting. Caring for Your Animal Heads gives helpful tips for keeping these clean as they can’t be machine washed like other crochet projects (because of the mounting). The book ends with a glossary of crochet abbreviations, including a UK/US conversion chart, and a list of suppliers for yarn, glue, embroidery thread and needles, stuffing (wadding), wire, cutting equipment, and mounting boards.
Animal Heads doesn’t list pattern difficulty levels, but the patterns use beginner-friendly stitches. The instructions are detailed as each trophy head looks relatively realistic, so there are multiple color changes, increases, and decreases for each project. In other words, a dedicated or patient beginner can tackle every project in the book, but a more experienced pattern reader may feel more confident. The designs are whimsical and would be great projects for the home or fun gifts to give. The book is a paperback but it has both front and back flaps which allow you to mark you place so you won’t get lost when working on a multi-part pattern. I loved the pattern in this book and also the design, which makes the projects inviting and shows off each project beautifully. If you like to crochet unique gifts, or make quirky home decor projects, you’ll love Animal Heads!
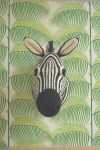
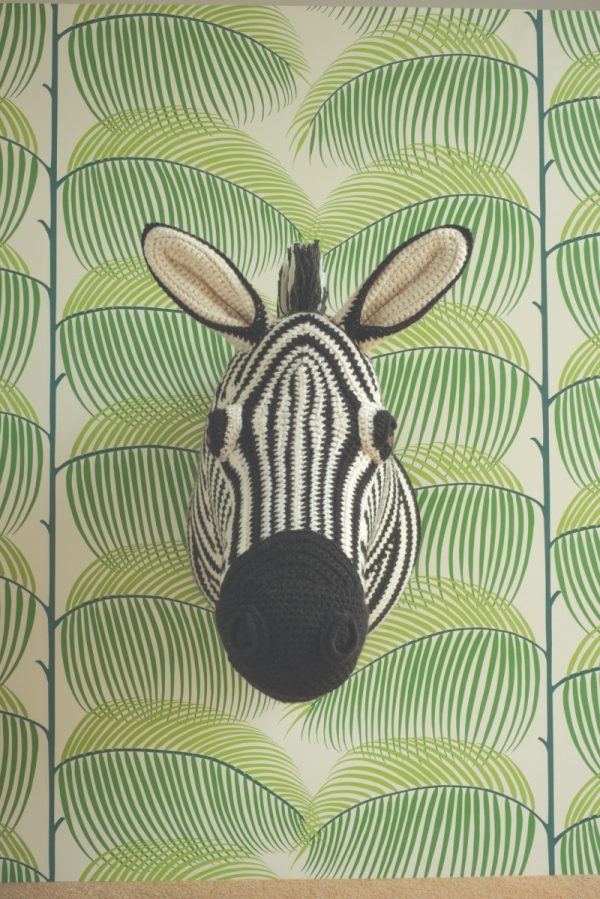
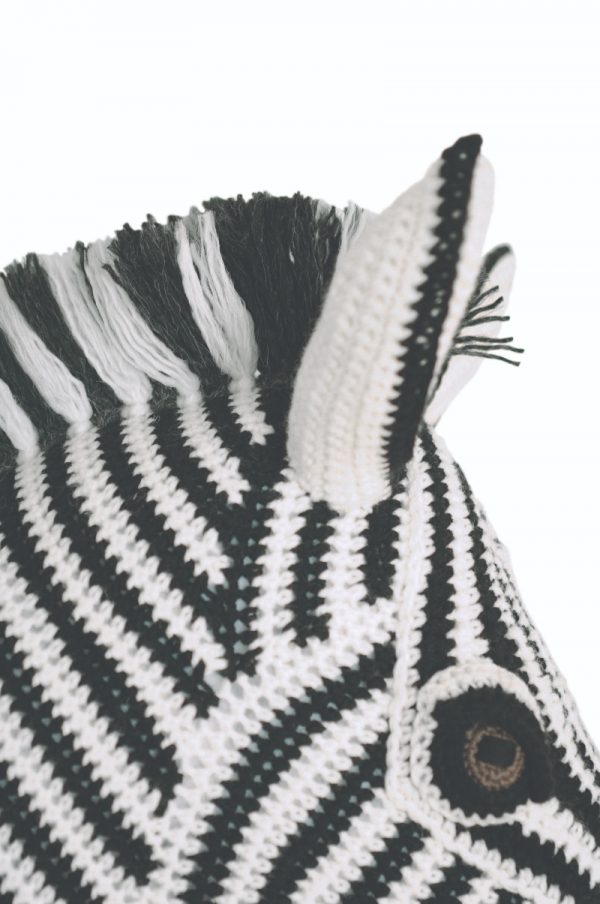
Zebra
Crochet Pattern by Vanessa Mooncie
Published in Animal Heads: Trophy Heads to Crochet
Pattern, Charts, and Photos © 2015 GMC Publications, Ltd. Shared with permission from GMC Publications, Ltd.
Notes from Underground Crafter:
- This pattern uses U.K. pattern abbreviations. The Craft Yarn Council has a full list of abbreviations, including the differences between U.S. and U.K. terms, here.
- New Stitch a Day has a helpful video tutorial for the dc2dec stitch used in this pattern (a decrease that is also known as sc2tog in U.S. abbreviations). You can find the tutorial here.
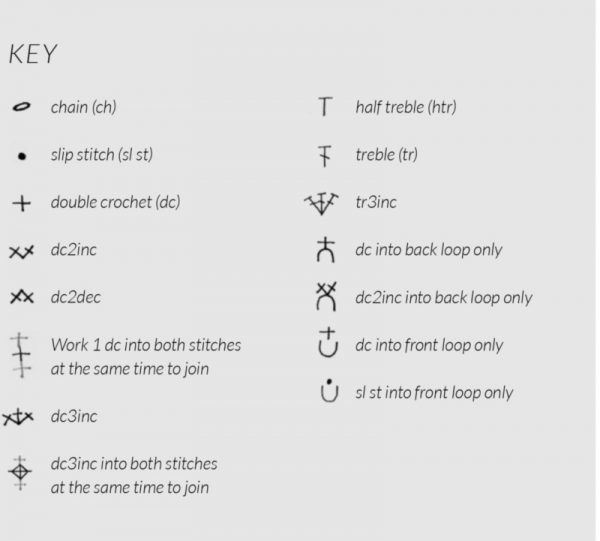
- This pattern also uses international stitch symbol charts. You can find a key to those symbols from the book below.
The direction of the zebra’s stripes is determined by the shaping of the head, crocheted in rounds and short rows. The mane is made by attaching tassels to the stitches and brushing through the yarn to tangle the fibres and help it stand on end.
Materials
- Wendy Mode Chunky, 50% wool, 50% acrylic (153yd/140m per 100g ball), or any chunky yarn:
- 3 x 100g balls in 202 Vanilla (A)
- 4 x 100g balls in 220 Coal (B)
- Wendy Serenity Super Chunky, 10% alpaca, 20% wool, 70% acrylic (87yd/80m per 100g ball):
- 1 x 100g ball in 1712 Jet (C)
- 1 x 100g ball in 1701 Chalk (D)
- Oddments of DK yarn in brown (E) and black (F)
- 3mm (UK11:US-) and 4.5mm (UK7:US7) crochet hooks
- Blunt-ended tapestry needle
- Toy stuffing
- 2 circles of mount board, measuring 12 1⁄4in (31cm) in diameter, for the base
- 2 pieces of mount board, measuring 23⁄8 x 63⁄4in (6 x 17cm), for the ears, with one short end of each cut to form a pointed arch shape
- Stranded embroidery thread in black
- Embroidery needle
- 0.75in (2cm) brass curtain or roman blind ring
- Hairbrush and watered-down PVA glue in a trigger-spray bottle (optional)
Size
- Approximately 23in (58cm) from the tip of the nose to the base
Tension (Gauge)
- 14 sts and 15 rows to 4in (10cm) over double crochet using 4.5mm hook
Method
- The head is started in rounds of double crochet, beginning at the nose end. The curved stripes at the front of the face are formed by working short rows, starting with a small number of stitches and working into an extra stitch at each end of every row. The stitches are increased in the centre of each row to keep the shape of the face straight, up to the centre of the head. The gap left between the rows, at the top of the face, is filled with short rows and then the head is continued in rounds. The top and back of the head and the front of the neck shaping are formed by crocheting short rows. This also changes the direction of the stripes. The base is made with two crocheted circles, joined together to form a pocket. Two circular pieces of mount board are slipped inside to keep the base rigid, before joining it to the stuffed head by crocheting into each stitch on both pieces at the same time. The vertical striped piece, going down the front of the face, is crocheted separately. It is worked in rows and shaped by increasing the stitches as well as working half treble and treble stitches. The ears are also worked in rows, increasing the stitches at the top to form the pointed shape. They are each made in two pieces, joined and stuffed lightly, with the addition of a folded mount board inserted inside to provide extra shaping, and to keep them firm. The eyes are worked in rounds and the eyelids made by crocheting short rows. The horizontal pupils are embroidered on. The mouth is made in rounds of double crochet. The top of the top lip is shaped by crocheting short rows. Nostrils, made in two pieces joined together, are stitched on to the top lip. The vertical striped piece and the rest of the zebra’s features are sewn to the head. A brass ring is crocheted around to cover it and then it is stitched to the back of the head so it can be mounted on the wall. Finally, the mane, consisting of three rows of tassels, is made by hooking lengths of yarn to the stitches down the centre back of the head. The fibres of the yarn are matted together by brushing the tassels to help them stand upright. Diluted PVA glue can be sprayed over the mane to help keep it in shape.
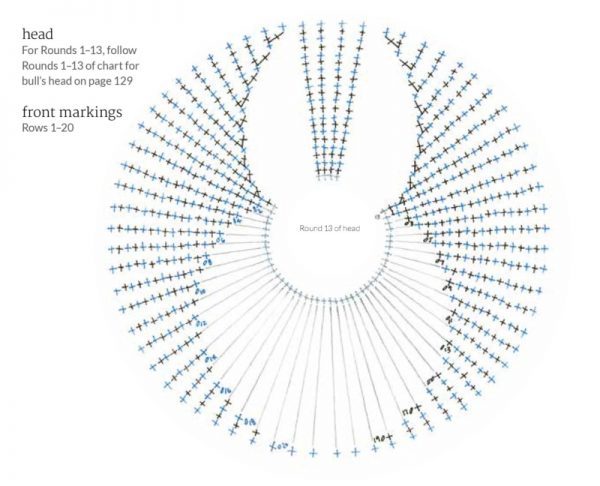
Head
- Starting at the front of the face, with 4.5mm hook and A, wind yarn around finger a couple of times to form a ring, insert hook into ring, catch yarn and draw through.
- Round 1: 1 ch (does not count as a st), work 6 dc into ring (6 sts).
- Round 2 (inc): (Dc2inc) 6 times (12 sts). Pull tight on the short end of the yarn to close the ring.
- Round 3 (inc): (Dc2inc, 1 dc) 6 times (18 sts).
- Round 4 (inc): (Dc2inc, 2 dc) 6 times (24 sts).
- Round 5 (inc): (Dc2inc, 3 dc) 6 times (30 sts).
- Round 6 (inc): (Dc2inc, 4 dc) 6 times (36 sts).
- Round 7 (inc): (Dc2inc, 5 dc) 6 times (42 sts).
- Rounds 8-12: 1 dc in each dc
- Round 13 (inc): (Dc2inc, 6 dc) 6 times (48 sts).
Front markings
- Carry the unused yarn up the wrong side of the work.
- The following is worked in rows:
- Row 1 (RS): Work 1 dc into the next 6 dc, turn.
- Row 2 (WS): 1 ch (does not count as a st), work 1 dc into the dc in front of the first dc, 1 dc in the next 7 dc, turn.
- Row 3 (inc): 1 ch (does not count as a st), work 1 dc into the dc in front of the first dc, 1 dc in the next dc, dc2inc, 1 dc in the next 4 dc, dc2inc, 1 dc in the next 2 dc, turn (50 sts).
- Row 4: 1 ch (does not count as a st), work 1 dc into the dc in front of the first dc, 1 dc in the next 13 dc, turn.
- Row 5 (inc): 1 ch (does not count as a st), work 1 dc into the dc in front of the first dc, (4 dc, dc2inc) twice, 1 dc in the next 5 dc, turn (52 sts).
- Row 6: 1 ch (does not count as a st), work 1 dc into the dc in front of the first dc, 1 dc in the next 19 dc, turn.
- Join in B.
- Row 7 (inc): With B, make 1 ch (does not count as a st), work 1 dc into the dc in front of the first dc, 1 dc in the next 7 dc, dc2inc, 1 dc in the next 4 dc, dc2inc, 1 dc in the next 8 dc, turn (54 sts).
- Row 8: Make 1 ch (does not count as a st), work 1 dc into the dc in front of the first dc, 1 dc in the next 25 dc, turn.
- Row 9 (inc): With A, make 1 ch (does not count as a st), work 1 dc into the dc in front of the first dc, 1 dc in the next 10 dc, dc2inc, 1 dc in the next 4 dc, dc2inc, 1 dc in the next 11 dc, turn (56 sts).
- Row 10: Make 1 ch (does not count as a st), work 1 dc into the dc in front of the first dc, 1 dc in the next 31 dc, turn.
- Row 11 (inc): With B, make 1 ch (does not count as a st), work 1 dc into the dc in front of the first dc, 1 dc in the next 13 dc, dc2inc, 1 dc in the next 4 dc, dc2inc, 1 dc in the next 14 dc, turn (58 sts).
- Row 12: Make 1 ch (does not count as a st), work 1 dc into the dc in front of the first dc, 1 dc in the next 37 dc, turn.
- Row 13 (inc): With A, make 1 ch (does not count as a st), work 1 dc into the dc in front of the first dc, 1 dc in the next 16 dc, dc2inc, 1 dc in the next 4 dc, dc2inc, 1 dc in the next 17 dc, turn (60 sts).
- Row 14: Make 1 ch (does not count as a st), work 1 dc into the dc in front of the first dc, 1 dc in the next 43 dc, turn.
- Row 15 (inc): With B, make 1 ch (does not count as a st), work 1 dc into the dc in front of the first dc, 1 dc in the next 19 dc, dc2inc, 1 dc in the next 4 dc, dc2inc, 1 dc in the next 20 dc, turn (62 sts).
- Row 16: Make 1 ch (does not count as a st), work 1 dc into the dc in front of the first dc, 1 dc in the next 49 dc, turn.
- Row 17 (inc): With A, make 1 ch (does not count as a st), work 1 dc into the dc in front of the first dc, 1 dc in the next 22 dc, dc2inc, 1 dc in the next 4 dc, dc2inc, 1 dc in the next 23 dc, turn (64 sts).
- Row 18: Make 1 ch (does not count as a st), work 1 dc into the dc in front of the first dc, 1 dc in the next 55 dc, turn.
- Row 19 (inc): With B, make 1 ch (does not count as a st), work 1 dc into the dc in front of the first dc, 1 dc in the next 25 dc, dc2inc, 1 dc in the next 4 dc, dc2inc, 1 dc in the next 26 dc, turn (66 sts).
- Row 20: Make 1 ch (does not count as a st), work 1 dc into the dc in front of the first dc, 1 dc in the next 61 dc, with A, work 1 dc in the next 4 dc, turn.
- Fasten off B and continue in A.
Shape top of face
- Row 1 (dec) (RS): 1 ch (does not count as a st), work 1 dc into the dc in front of the first dc, 1 dc in the next 3 dc, dc2dec, turn (65 sts).
- Row 2 (dec) (WS): 1 ch (does not count as a st), work 1 dc into the dc in front of the first dc, 1 dc in the next 4 dc, dc2dec, turn (64 sts).
- Row 3 (dec): 1 ch (does not count as a st), work 1 dc into the dc in front of the first dc, 1 dc in the next 5 dc, dc2dec, turn (63 sts).
- Row 4 (dec): 1 ch (does not count as a st), work 1 dc into the dc in front of the first dc, 1 dc in the next 6 dc, dc2dec, turn (62 sts).
- Row 5 (dec): 1 ch (does not count as a st), work 1 dc into the dc in front of the first dc, 1 dc in the next 7 dc, dc2dec, turn (61 sts).
- Row 6 (dec): 1 ch (does not count as a st), work 1 dc into the dc in front of the first dc, 1 dc in the next 8 dc, dc2dec, turn (60 sts).
- Row 7: 1 ch (does not count as a st), work 1 dc into the dc in front of the first dc, 1 dc in the next 11 dc, turn.
- Row 8: 1 ch (does not count as a st), work 1 dc into the dc in front of the first dc, 1 dc in the next 13 dc, turn.
- Row 9: 1 ch (does not count as a st), work 1 dc into the dc in front of the first dc, 1 dc in the next 15 dc, turn.
- Row 10: 1 ch (does not count as a st), work 1 dc into the dc in front of the first dc, 1 dc in the next 17 dc, turn.
- Row 11: 1 ch (does not count as a st), work 1 dc into the dc in front of the first dc, 1 dc in the next 19 dc, turn.
- Row 12: 1 ch (does not count as a st), work 1 dc into the dc in front of the first dc, 1 dc in the next 21 dc, turn.
- Row 13: 1 ch (does not count as a st), work 1 dc into the dc in front of the first dc, 1 dc in the next 23 dc, turn.
- Row 14: 1 ch (does not count as a st), work 1 dc into the dc in front of the first dc, 1 dc in the next 25 dc, turn.
- Row 15: 1 ch (does not count as a st), work 1 dc into the dc in front of the first dc, 1 dc in the next 27 dc, turn.
- Row 16: 1 ch (does not count as a st), work 1 dc into the dc in front of the first dc, 1 dc in the next 29 dc, turn. Join in B.
- Row 17: With B, make 1 ch (does not count as a st), work 1 dc into the dc in front of the first dc, 1 dc in the next 31 dc, turn.
- Row 18: Make 1 ch (does not count as a st), work 1 dc into the dc in front of the first dc, 1 dc in the next 33 dc, turn.
- Row 19: With A, make 1 ch (does not count as a st), work 1 dc into the dc in front of the first dc, 1 dc in the next 59 dc, do not turn.
- The following is worked in rounds:
- Round 1 (inc): (Dc2inc, 9 dc) 6 times (66 sts).
- Fasten off A and B. Miss the first 20 dc and join B to the 21st dc with a sl st. The visible join at the start and end of each stripe will now be at the top of the face and eventually hidden beneath the vertical striped piece that will be stitched over the top.
- Round 2: With B, work 1 dc into the same dc as the sl st, 1 dc in each of the next 65 dc.
- Round 3: 1 dc in each dc. Join in A.
- Round 4: With A, 1 dc in each dc.
- Round 5 (inc): (Dc2inc, 10 dc) 6 times (72 sts).
- Rounds 6–7: With B, 1 dc in each dc.
- Round 8: With A, 1 dc in each dc.
- Round 9 (inc): (Dc2inc, 11 dc) 6 times (78 sts).
- Round 10: With B, 1 dc in each dc.
- Round 11 (inc): (Dc2inc, 12 dc) 6 times (84 sts).
- Round 12: With A, 1 dc in each dc.
- Round 13 (inc): (Dc2inc, 13 dc) 6 times (90 sts).
- Round 14: With B, 1 dc in each dc.
- Round 15 (inc): (Dc2inc, 14 dc) 6 times (96 sts).
- Rounds 16–17: With A, 1 dc in each dc.
- Rounds 18–19: With B, 1 dc in each dc.
- Rounds 20–21: With A, 1 dc in each dc.
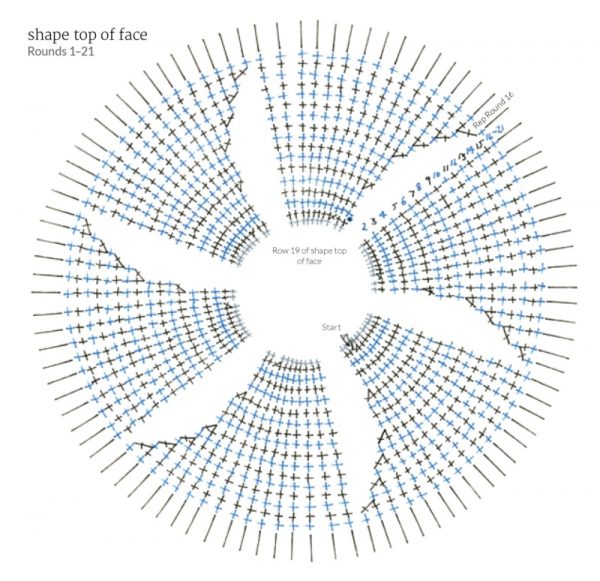
Shape top of head
- Note from Underground Crafter: Many people find this video tutorial helpful for understanding the next section of the pattern.
- Carry the unused yarn up the wrong side of the work.
- The following is worked in rows:
- Row 1 (RS): With A, work 1 dc into the next 13 dc, turn.
- Row 2 (WS): Make 1 ch (does not count as a st), work 1 dc into the dc in front of the first dc, 1 dc in the next 7 dc, turn.
- Row 3 (inc): Make 1 ch (does not count as a st), work 1 dc into the dc in front of the first dc, 1 dc in the next 3 dc, (dc2inc) twice, 1 dc in the next 4 dc, turn (98 sts).
- Row 4: Make 1 ch (does not count as a st), work 1 dc into the dc in front of the first dc, 1 dc in the next 13 dc, turn.
- Row 5 (inc): Make 1 ch (does not count as a st), work 1 dc into the dc in front of the first dc, 1 dc in the next 6 dc, (dc2inc) twice, 1 dc in the next 7 dc, turn (100 sts).
- Row 6: Make 1 ch (does not count as a st), work 1 dc into the dc in front of the first dc, 1 dc in the next 19 dc, turn.
- Row 7 (inc): Make 1 ch (does not count as a st), work 1 dc into the dc in front of the first dc, 1 dc in the next 9 dc, (dc2inc) twice, 1 dc in the next 10 dc, turn (102 sts).
- Row 8: Make 1 ch (does not count as a st), work 1 dc into the dc in front of the first dc, 1 dc in the next 25 dc, turn.
- Row 9: With B, make 1 ch (does not count as a st), work 1 dc into the dc in front of the first dc, 1 dc in the next 27 dc, turn.
- Row 10: Make 1 ch (does not count as a st), work 1 dc into the dc in front of the first dc, 1 dc in the next 29 dc, turn.
- Row 11: With A, make 1 ch (does not count as a st), work 1 dc into the dc in front of the first dc, 1 dc in the next 31 dc, turn.
- Row 12: Make 1 ch (does not count as a st), work 1 dc into the dc in front of the first dc, 1 dc in the next 33 dc, turn.
- Row 13 (dec): With B, make 1 ch (does not count as a st), work 1 dc into the dc n front of the first dc, 1 dc in the next 33 dc, dc2dec, turn (101 sts).
- Row 14 (dec): Make 1 ch (does not count as a st), work 1 dc into the dc in front of the first dc, 1 dc in the next 34 dc, dc2dec, turn (100 sts).
- Row 15 (dec): With A, make 1 ch (does not count as a st), work 1 dc into the dc in front of the first dc, 1 dc in the next 35 dc, dc2dec, turn (99 sts).
- Row 16 (dec): Make 1 ch (does not count as a st), work 1 dc into the dc in front of the first dc, 1 dc in the next 36 dc, dc2dec, turn (98 sts).
- Row 17 (dec): With B, make 1 ch (does not count as a st), work 1 dc into the dc in front of the first dc, 1 dc in the next 37 dc, dc2dec, turn (97 sts).
- Row 18 (dec): Make 1 ch (does not count as a st), work 1 dc into the dc in front of the first dc, 1 dc in the next 38 dc, dc2dec (96 sts).
- Fasten off A and B.
Shape back of head
- With RS of top of head facing, miss the first 15 sts of the 40 dc worked on the previous row and join B to the 16th dc with a sl st.
- Row 1 (RS): With B, work 1 dc into the same dc as the sl st, 1 dc in the next 9 dc, turn.
- Row 2 (WS): Make 1 ch (does not count as a st), work 1 dc into the dc in front of the first dc, 1 dc in the next 11 dc, turn.
- Join in A.
- Row 3: With A, make 1 ch (does not count as a st), work 1 dc into the dc in front of the first dc, 1 dc in the next 13 dc, turn.
- Row 4: Make 1 ch (does not count as a st), work 1 dc into the dc in front of the first dc, 1 dc in the next 15 dc, turn.
- Row 5: With B, make 1 ch (does not count as a st), work 1 dc into the dc in front of the first dc, 1 dc in the next 17 dc, turn.
- Row 6: Make 1 ch (does not count as a st), work 1 dc into the dc in front of the first dc, 1 dc in the next 19 dc, turn.
- Row 7: With A, make 1 ch (does not count as a st), work 1 dc into the dc in front of the first dc, 1 dc in the next 21 dc, turn.
- Row 8: Make 1 ch (does not count as a st), work 1 dc into the dc in front of the first dc, 1 dc in the next 23 dc, turn.
- Row 9: With B, make 1 ch (does not count as a st), work 1 dc into the dc in front of the first dc, 1 dc in the next 25 dc, turn.
- Row 10: Make 1 ch (does not count as a st), work 1 dc into the dc in front of the first dc, 1 dc in the next 27 dc, turn.
- Row 11: With A, make 1 ch (does not count as a st), work 1 dc into the dc in front of the first dc, 1 dc in the next 29 dc, turn.
- Row 12: Make 1 ch (does not count as a st), work 1 dc into the dc in front of the first dc, 1 dc in the next 31 dc, turn.
- Row 13: With B, make 1 ch (does not count as a st), work 1 dc into the dc in front of the first dc, 1 dc in the next 33 dc, turn.
- Row 14: Make 1 ch (does not count as a st), work 1 dc into the dc in front of the first dc, 1 dc in the next 35 dc, turn.
- Row 15: With A, make 1 ch (does not count as a st), work 1 dc into the dc in front of the first dc, 1 dc in the next 37 dc, turn.
- Row 16: Make 1 ch (does not count as a st), work 1 dc into the dc in front of the first dc, 1 dc in the next 39 dc, turn.
- Row 17: With B, make 1 ch (does not count as a st), work 1 dc into the dc in front of the first dc, 1 dc in the next 41 dc, turn.
- Row 18: Make 1 ch (does not count as a st), work 1 dc into the dc in front of the first dc, 1 dc in the next 43 dc, turn.
- Row 19: With A, make 1 ch (does not count as a st), work 1 dc into the dc in front of the first dc, 1 dc in the next 45 dc, turn.
- Row 20: Make 1 ch (does not count as a st), work 1 dc into the dc in front of the first dc, 1 dc in the next 47 dc, turn.
- Row 21: With B, make 1 ch (does not count as a st), work 1 dc into the dc in front of the first dc, 1 dc in the next 49 dc, turn.
- Row 22: Make 1 ch (does not count as a st), work 1 dc into the dc in front of the first dc, 1 dc in the next 51 dc, turn.
- Row 23: With A, make 1 ch (does not count as a st), work 1 dc into the dc in front of the first dc, 1 dc in the next 53 dc, turn.
- Row 24: Make 1 ch (does not count as a st), work 1 dc into the dc in front of the first dc, 1 dc in the next 55 dc, turn.
- Row 25: With B, make 1 ch (does not count as a st), work 1 dc into the dc in front of the first dc, 1 dc in the next 57 dc, turn.
- Row 26: Make 1 ch (does not count as a st), work 1 dc into the dc in front of the first dc, 1 dc in the next 59 dc, turn.
- Row 27: With A, make 1 ch (does not count as a st), work 1 dc into the dc in front of the first dc, 1 dc in the next 61 dc, turn.
- Row 28: Make 1 ch (does not count as a st), work 1 dc into the dc in front of the first dc, 1 dc in the next 63 dc, turn.
- Row 29: With B, make 1 ch (does not count as a st), work 1 dc into the dc in front of the first dc, 1 dc in the next 65 dc, turn.
- Row 30: Make 1 ch (does not count as a st), work 1 dc into the dc in front of the first dc, 1 dc in the next 67 dc, turn.
- Row 31: With A, make 1 ch (does not count as a st), work 1 dc into the dc in front of the first dc, 1 dc in the next 69 dc, turn.
- Row 32: Make 1 ch (does not count as a st), work 1 dc into the dc in front of the first dc, 1 dc in the next 71 dc, turn.
- Row 33: With B, make 1 ch (does not count as a st), work 1 dc into the dc in front of the first dc, 1 dc in the next 73 dc, turn.
- Row 34: Make 1 ch (does not count as a st), work 1 dc into the dc in front of the first dc, 1 dc in the next 75 dc, turn.
- Row 35: With A, make 1 ch (does not count as a st), work 1 dc into the dc in front of the first dc, 1 dc in the next 77 dc, turn.
- Row 36: Make 1 ch (does not count as a st), work 1 dc into the dc in front of the first dc, 1 dc in the next 79 dc, turn.
- Row 37: With B, make 1 ch (does not count as a st), work 1 dc into the dc in front of the first dc, 1 dc in the next 81 dc, turn.
- Row 38: Make 1 ch (does not count as a st), work 1 dc into the dc in front of the first dc, 1 dc in the next 83 dc, turn.
- Row 39: With A, make 1 ch (does not count as a st), work 1 dc into the dc in front of the first dc, 1 dc in the next 85 dc, turn.
- Row 40: Make 1 ch (does not count as a st), work 1 dc into the dc in front of the first dc, 1 dc in the next 87 dc, turn.
- Row 41: With B, make 1 ch (does not count as a st), work 1 dc into the dc in front of the first dc, 1 dc in the next 89 dc, turn.
- Row 42: Make 1 ch (does not count as a st), work 1 dc into the dc in front of the first dc, 1 dc in the next 95 dc, turn.

Shape front neck
- Row 43: With B, make 1 ch (does not count as a st), work 1 dc into the dc in front of the first dc, 1 dc in the next 5 dc, turn.
- Row 44: With A, make 1 ch (does not count as a st), work 1 dc into the dc in front of the first dc, 1 dc in the next 7 dc, turn.
- Row 45 (inc): Make 1 ch (does not count as a st), work 1 dc into the dc in front of the first dc, 1 dc in the next 3 dc, (dc2inc) twice, 1 dc in the next 4 dc, turn (98 sts).
- Row 46: With B, make 1 ch (does not count as a st), work 1 dc into the dc in front of the first dc, 1 dc in the next 13 dc, turn.
- Row 47 (inc): Make 1 ch (does not count as a st), work 1 dc into the dc in front of the first dc, 1 dc in the next 6 dc, (dc2inc) twice, 1 dc in the next 7 dc, turn (100 sts).
- Row 48: With A, make 1 ch (does not count as a st), work 1 dc into the dc in front of the first dc, 1 dc in the next 19 dc, turn.
- Row 49 (inc): Make 1 ch (does not count as a st), work 1 dc into the dc in front of the first dc, 1 dc in the next 9 dc, (dc2inc) twice, 1 dc in the next 10 dc, turn (102 sts).
- Row 50: With B, make 1 ch (does not count as a st), work 1 dc into the dc in front of the first dc, 1 dc in the next 25 dc, turn.
- Row 51 (inc): Make 1 ch (does not count as a st), work 1 dc into the dc in front of the first dc, 1 dc in the next 12 dc, (dc2inc) twice, 1 dc in the next 13 dc, turn (104 sts).
- Row 52: With A, make 1 ch (does not count as a st), work 1 dc into the dc in front of the first dc, 1 dc in the next 31 dc, turn.
- Row 53 (inc): Make 1 ch (does not count as a st), work 1 dc into the dc in front of the first dc, 1 dc in the next 15 dc, (dc2inc) twice, 1 dc in the next 16 dc, turn (106 sts).
- Row 54: With B, make 1 ch (does not count as a st), work 1 dc into the dc in front of the first dc, 1 dc in the next 37 dc, turn.
- Row 55 (inc): Make 1 ch (does not count as a st), work 1 dc into the dc in front of the first dc, 1 dc in the next 18 dc, (dc2inc) twice, 1 dc in the next 19 dc, turn (108 sts).
- Row 56: With A, make 1 ch (does not count as a st), work 1 dc into the dc in front of the first dc, 1 dc in the next 43 dc, turn.
- Row 57 (inc): Make 1 ch (does not count as a st), work 1 dc into the dc in front of the first dc, 1 dc in the next 21 dc, (dc2inc) twice, 1 dc in the next 22 dc, turn (110 sts).
- Row 58: With B, make 1 ch (does not count as a st), work 1 dc into the dc in front of the first dc, 1 dc in the next 49 dc, turn.
- Row 59 (inc): Make 1 ch (does not count as a st), work 1 dc into the dc in front of the first dc, 1 dc in the next 24 dc, (dc2inc) twice, 1 dc in the next 25 dc, turn (112 sts).
- Row 60: Make 1 ch (does not count as a st), work 1 dc into the dc in front of the first dc, 1 dc in the next 55 dc, turn.
- Row 61 (inc): Make 1 ch (does not count as a st), work 1 dc into the dc in front of the first dc, 1 dc in the next 27 dc, (dc2inc) twice, 1 dc in the next 28 dc, turn (114 sts).
- Row 62: With A, make 1 ch (does not count as a st), work 1 dc into the dc in front of the first dc, 1 dc in the next 61 dc, turn.
- Row 63 (inc): Make 1 ch (does not count as a st), work 1 dc into the dc in front of the first dc, 1 dc in the next 30 dc, (dc2inc) twice, 1 dc in the next 31 dc, turn (116 sts).
- Row 64: Make 1 ch (does not count as a st), work 1 dc into the dc in front of the first dc, 1 dc in the next 67 dc, turn.
- Row 65 (inc): Make 1 ch (does not count as a st), work 1 dc into the dc in front of the first dc, 1 dc in the next 33 dc, (dc2inc) twice, 1 dc in the next 34 dc, turn (118 sts).
- Row 66: With B, make 1 ch (does not count as a st), work 1 dc into the dc in front of the first dc, 1 dc in the next 73 dc, turn.
- Row 67 (inc): Make 1 ch (does not count as a st), work 1 dc into the dc in front of the first dc, 1 dc in the next 36 dc, (dc2inc) twice, 1 dc in the next 37 dc, turn (120 sts).
- Row 68: Make 1 ch (does not count as a st), work 1 dc into the dc in front of the first dc, 1 dc in the next 79 dc, turn.
- Row 69: Make 1 ch (does not count as a st), work 1 dc into the dc in front of the first dc, 1 dc in the next 81 dc, turn.
- Row 70: With A, make 1 ch (does not count as a st), work 1 dc into the dc in front of the first dc, 1 dc in the next 83 dc, turn.
- Row 71: Make 1 ch (does not count as a st), work 1 dc into the dc in front of the first dc, 1 dc in the next 85 dc, turn.
- Row 72: Make 1 ch (does not count as a st), work 1 dc into the dc in front of the first dc, 1 dc in the next 87 dc, turn.
- Row 73: With A, make 1 ch (does not count as a st), work 1 dc into the dc in front of the first dc, 1 dc in the next 89 dc, turn.
- Row 74: With B, make 1 ch (does not count as a st), work 1 dc into the dc in front of the first dc, 1 dc in the next 91 dc, turn.
- Row 75: Make 1 ch (does not count as a st), work 1 dc into the dc in front of the first dc, 1 dc in the next 93 dc, do not turn.
- The following is worked in rounds:
- Rounds 1–2 (RS): Work 1 dc in the next 120 dc.
- Fasten off. Stuff the head and neck firmly, up to just below the last round. Be careful not to overstuff the head, keeping it narrow at the front of the face. More stuffing will be added when the base is attached.
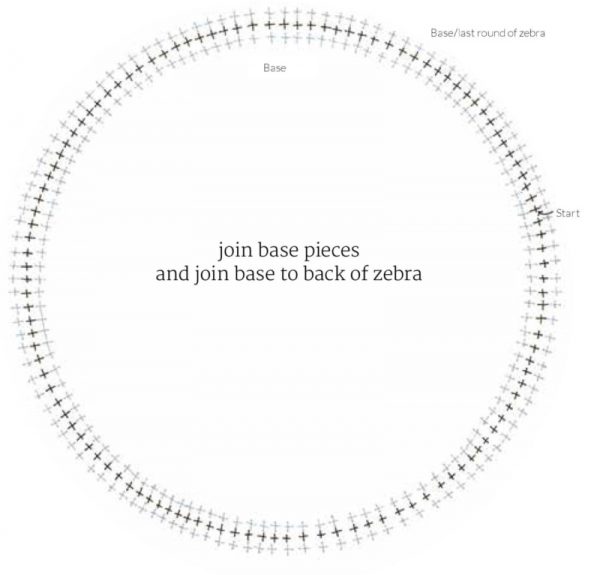
Base
- With 4.5mm hook and B, wind yarn around finger a couple of times to form a ring, insert hook into ring, catch yarn and draw through.
- Rounds 1–11: Work Rounds 1–11 of head (66 sts).
- Round 12 (inc): (Dc2inc, 10 dc) 6 times (72 sts).
- Round 13 (inc): (Dc2inc, 11 dc) 6 times (78 sts).
- Round 14 (inc): (Dc2inc, 12 dc) 6 times (84 sts).
- Round 15 (inc): (Dc2inc, 13 dc) 6 times (90 sts).
- Round 16 (inc): (Dc2inc, 14 dc) 6 times (96 sts).
- Round 17 (inc): (Dc2inc, 15 dc) 6 times (102 sts).
- Round 18 (inc): (Dc2inc, 16 dc) 6 times (108 sts).
- Round 19 (inc): (Dc2inc, 17 dc) 6 times (114 sts).
- Round 20 (inc): (Dc2inc, 18 dc) 6 times (120 sts).
- Rounds 21–23: 1 dc in each dc. Fasten off.
- Make one more piece to match the first. Do not fasten off at the end.
Join base pieces
- Place the two base pieces with WS together. Work 1 dc in each of the next 90 dc of both pieces at the same time to join. Slip the two circular boards in between the pieces and continue to join the two, stretching the work over the board and crocheting into the remaining 30 dc of both pieces at the same time to close. Do not fasten off.
Join base to back of zebra
- With the base facing up, work 1 dc in the first dc of the base and, at the same time, into a dc of the last round at the back of the zebra to join. Continue to work 1 dc into each of the next 99 dc, inserting the hook first into the base and then into the last round of the zebra. Add more stuffing before continuing, filling the neck firmly. Work 1 dc into the remaining 20 dc of each piece as before, adding extra stuffing, if necessary, before closing. Sl st to the next st and fasten off.
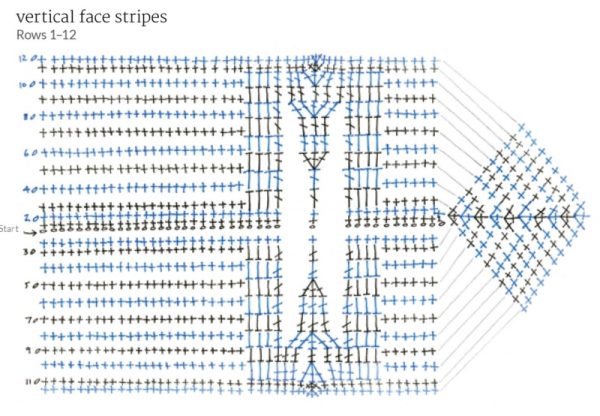
Vertical face stripes
- Carry the unused yarn across the lower edge of the work.
- With 4.5mm hook and A, make 40 ch.
- Row 1: 1 dc into second ch from hook, 1 dc into next 38 ch, turn (39 sts).
- Join in B.
- Row 2 (inc): With B, make 1 ch (does not count as a st), 1 dc in the first 38 dc, dc2inc, 1 dc in the reverse side of the 39 ch, turn (79 sts).
- Row 3 (inc): With A, make 1 ch (does not count as a st), 1 dc in the first 24 dc, 1 htr in the next 3 dc, 1 tr in the next 3 dc, 1 htr in the next 3 dc, 1 dc in the next 6 dc, dc3inc, 1 dc in the next 6 dc, 1 htr in the next 3 dc, 1 tr in the next 3 dc, 1 htr in the next 3 dc, 1 dc in the next 24 dc, turn (81 sts).
- Row 4 (inc): With B, make 1 ch (does not count as a st), 1 dc in the first 24 dc, 1 htr in the next 3 htr, 1 tr in the next 3 tr, 1 htr in the next 3 htr, 1 dc in the next 7 dc, dc3inc, 1 dc in the next 7 dc, 1 htr in the next 3 htr, 1 tr in the next 3 tr, 1 htr in the next 3 htr, 1 dc in the next 24 dc, turn (83 sts).
- Row 5 (inc): With A, make 1 ch (does not count as a st), 1 dc in the first 24 dc, 1 htr in the next 3 htr, 1 tr in the next tr, tr3inc, 1 tr in the next tr, 1 htr in the next 3 htr, 1 dc in the next 8 dc, dc3inc, 1 dc in the next 8 dc, 1 htr in the next 3 htr, 1 tr in the next tr, tr3inc, 1 tr in the next tr, 1 htr in the next 3 tr, 1 dc in the next 24 dc, turn (89 sts).
- Row 6 (inc): With B, make 1 ch (does not count as a st), 1 dc in the first 24 dc, 1 htr in the next 3 htr, 1 tr in the next 5 tr, 1 htr in the next 3 htr, 1 dc in the next 9 dc, dc3inc, 1 dc in the next 9 dc, 1 htr in the next 3 htr, 1 tr in the next 5 tr, 1 htr in the next 3 htr, 1 dc in the next 24 dc, turn (91 sts).
- Row 7 (inc): Make 1 ch (does not count as a st), 1 dc in the first 24 dc, 1 htr in the next 3 htr, 1 tr in the next 5 tr, 1 htr in the next 3 htr, 1 dc in the next 10 dc, dc3inc, 1 dc in the next 10 dc, 1 htr in the next 3 htr, 1 tr in the next 5 tr, 1 htr in the next 3 htr, 1 dc in the next 24 dc, turn (93 sts).
- Row 8 (inc): With A, make 1 ch (does not count as a st), 1 dc in the first 24 dc, 1 htr in the next 3 htr, 1 tr in the next 2 tr, tr3inc, 1 tr in the next 2 tr, 1 htr in the next 3 htr, 1 dc in the next 11 dc, dc3inc, 1 dc in the next 11 dc, 1 htr in the next 3 htr, 1 tr in the next 2 tr, tr3inc, 1 tr in the next 2 tr, 1 htr in the next 3 htr, 1 dc in the next 24 dc, turn (99 sts).
- Row 9 (inc): Make 1 ch (does not count as a st), 1 dc in the first 24 dc, 1 htr in the next 3 htr, 1 tr in the next 7 tr, 1 htr in the next 3 htr, 1 dc in the next 12 dc, dc3inc, 1 dc in the next 12 dc, 1 htr in the next 3 htr, 1 tr in the next 7 tr, 1 htr in the next 3 htr, 1 dc in the next 24 dc, turn (101 sts).
- Row 10 (inc): With B, make 1 ch (does not count as a st), 1 dc in the first 24 dc, 1 htr in the next 3 htr, 1 tr in the next 3 tr, tr3inc, 1 tr in the next 3 tr, 1 htr in the next 3 htr, 1 dc in the next 13 dc, dc3inc, 1 dc in the next 13 dc, 1 htr in the next 3 htr, 1 tr in the next 3 tr, tr3inc, 1 tr in the next 3 tr, 1 htr in the next 3 htr, 1 dc in the next 24 dc, turn (107 sts).
- Row 11 (inc): Make 1 ch (does not count as a st), 1 dc in the first 24 dc, 1 dc in the next 3 htr, 1 dc in the next 4 tr, dc3inc, 1 dc in the next 4 tr, 1 dc in the next 3 htr, 1 dc in the next 14 dc, dc3inc, 1 dc in the next 14 dc, 1 dc in the next 3 htr, 1 dc in the next 4 tr, dc3inc, 1 dc in the next 4 tr, 1 dc in the next 3 htr, 1 dc in the next 24 dc, turn (113 sts).
- Row 12 (inc): With A, make 1 ch (does not count as a st), 1 dc in the first 32 dc, dc3inc, 1 dc in the next 23 dc, dc3inc, 1 dc in the next 23 dc, dc3inc, 1 dc in the next 32 dc, turn (119 sts).
- Fasten off, leaving a long length of A at the end.
Mouth
Bottom lip
- With 4.5mm hook and B, wind yarn around finger a couple of times to form a ring, insert hook into ring, catch yarn and draw through.
- Round 1: 1 ch (does not count as a st), work 6 dc into ring (6 sts).
- Round 2 (inc): (Dc2inc) 6 times (12 sts). Pull tight on the short end of the yarn to close the ring.
- Round 3 (inc): (Dc2inc, 1 dc) 6 times (18 sts).
- Round 4 (inc): (Dc2inc, 2 dc) 6 times (24 sts).
- Round 5: 1 dc in each dc.
- Round 6 (inc): (Dc2inc, 3 dc) 6 times (30 sts).
- Round 7 (inc): (Dc2inc, 4 dc) 6 times (36 sts).
- Round 8 (inc): (Dc2inc, 5 dc) 6 times (42 sts).
- Round 9 (inc): (Dc2inc, 6 dc) 6 times (48 sts).
- Rounds 10–12: 1 dc in each dc.
- Sl st to the next st and fasten off, leaving long length of yarn at the end.
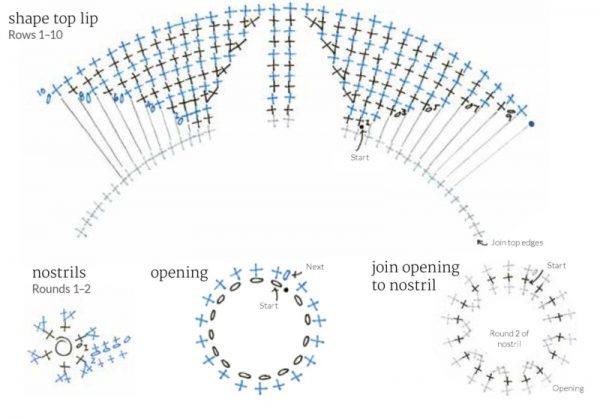
Top lip
- With 4.5mm hook and B, wind yarn around finger a couple of times to form a ring, insert hook into ring, catch yarn and draw through.
- Rounds 1–11: Work Rounds 1–11 of head (66 sts).
- Round 12 (inc): (Dc2inc, 10 dc) 6 times (72 sts).
- Rounds 13–18: 1 dc in each dc.
Join top edges
- Flatten the piece and work 1 dc into each of the 36 dc from both sides at the same time to join (36 sts). Fasten off.
Shape top
- Miss the first 15 sts of the 36 dc of the joined edges and rejoin B to the 16th dc with a sl st.
- Row 1: Work 1 dc into the same dc as the sl st, 1 dc in the next 5 dc, turn.
- Row 2: 1 ch (does not count as a st), work 1 dc into the dc in front of the first dc, 1 dc in the next 7 dc, turn.
- Row 3 (inc): 1 ch (does not count as a st), work 1 dc into the dc in front of the first dc, (2 dc, dc2inc) twice, 1 dc in the next 3 dc, turn (38 sts).
- Row 4: 1 ch (does not count as a st), work 1 dc into the dc in front of the first dc, 1 dc in the next 13 dc, turn.
- Row 5 (inc): 1 ch (does not count as a st), work 1 dc into the dc in front of the first dc, 1 dc in the next 5 dc, dc2inc, 1 dc in the next 2 dc, dc2inc, 1 dc in the next 6 dc, turn (40 sts).
- Row 6: 1 ch (does not count as a st), work 1 dc into the dc in front of the first dc, 1 dc in the next 19 dc, turn.
- Row 7 (inc): 1 ch (does not count as a st), work 1 dc into the dc in front of first dc, 1 dc in next 8 dc, dc2inc, 1 dc in next 2 dc, dc2inc, 1 dc in next 9 dc, turn (42 sts).
- Row 8: 1 ch (does not count as a st), work 1 dc into the dc in front of the first dc, 1 dc in the next 25 dc, turn.
- Row 9 (inc): 1 ch (does not count as a st), work 1 dc into the dc in front of the first dc, 1 dc in the next 11 dc, dc2inc, 1 dc in the next 2 dc, dc2inc, 1 dc in the next 12 dc, turn (44 sts).
- Row 10: 1 ch (does not count as a st), work 1 dc into the dc in front of the first dc, 1 dc in the next 31 dc.
- Sl st to the next st and fasten off, leaving a long length of yarn at the end.

Nostrils (make 2)
- With 4.5mm hook and B, wind yarn around finger a couple of times to form a ring, insert hook into ring, catch yarn and draw through.
- Round 1: 1 ch (does not count as a st), work 6 dc into ring (6 sts).
- Round 2 (inc): Make 4 ch, work 1 dc into the second ch from hook, 1 dc in the next 2 ch, (dc2inc) 6 times, 1 dc into the reverse side of the 3 ch (18 sts). Pull tight on the short end of the yarn to close the ring. Fasten off.
Opening
- With 4.5mm hook and B, make 15 ch and sl st to the first ch to form a ring.
- Next: 1 ch (does not count as a st), work 18 dc into the ring.
- Do not fasten off.
Join opening to nostril
- Place the pieces together, with the opening on top. Join the two by crocheting 1 dc into each of the 18 dc of both pieces at the same time. Sl st to the first dc and fasten off, leaving a long length of yarn at the end.
Eyes (make 2)
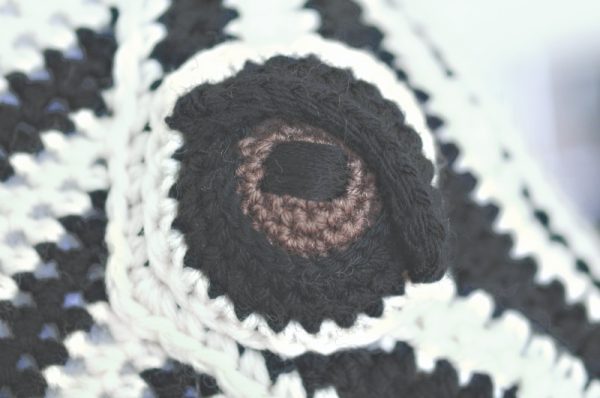
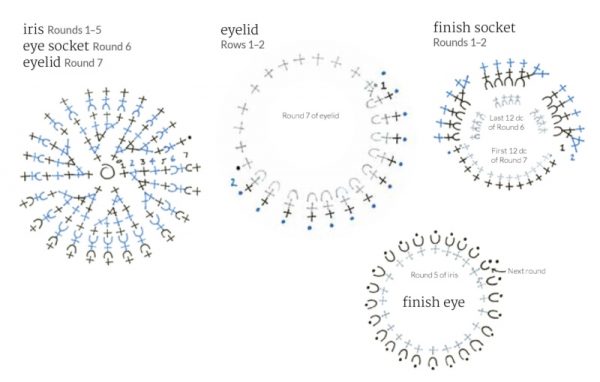
Iris
- With 3mm hook and E, wind yarn around finger a couple of times to form a ring, insert hook into ring, catch yarn and draw through.
- Round 1 (RS): 1 ch (does not count as a stitch), 6 dc into ring (6 sts).
- Round 2 (inc): (Dc2inc) 6 times (12 sts). Pull on the short end of yarn to close the ring.
- Round 3 (inc): (Dc2inc, 1 dc) 6 times (18 sts).
- Round 4 (inc): (Dc2inc, 2 dc) 6 times (24 sts).
- Join in F.
- Round 5: With F, work 1 dc in each dc.
Eye socket
- Join and continue in B, keeping F at the front of the work.
- Change to 4.5mm hook.
- Round 6: With B, work 1 dc in the back loop only of each dc.
Eyelid
- Round 7: 1 dc in the first 12 dc, work 1 dc in the front loop only (the loop nearest to you) of the next 12 dc (these 12 sts form the eyelid), sl st into the next dc, turn.
- The following is worked in rows:
- Row 1 (WS): 1 dc into each of the 12 dc of the eyelid, sl st into the next dc, turn.
- Row 2 (RS): Sl st into each of the 12 dc of the eyelid, sl st into the same dc as the sl st on round 7, turn.
Finish socket
- Join in A.
- The following is worked in rounds:
- Round 1 (inc) (WS): With A, (dc2inc, 3 dc) 3 times into the remaining back loops of round 6, behind the eyelid, 1 dc in the same dc as the sl st, 1 dc into the next 10 dc, 1 dc in the same dc as the next sl st (27 sts).
- Round 2 (inc): (Dc2inc, 4 dc) 3 times, sl st to the next st (30 sts).
- Fasten off, leaving a long length of yarn at the end.
Finish eye
- Next round: With 3mm hook and F, sl st into the front loops of the 24 dc of Round 5, sl st into the first st and fasten off.
Ears (make 2)
Inner ear
- With 4.5mm hook and A, make 20 ch.
- Row 1 (WS): 1 dc into second ch from hook, 1 dc into next 17 ch, 3 dc into next ch, 1 dc down reverse side of the next 18 ch, turn (39 sts).
- Row 2 (inc) (RS): 1 ch (does not count as a st), 1 dc in the first 19 dc, dc3inc, 1 dc in the next 19 dc, turn (41 sts).
- Row 3 (inc): 1 ch (does not count as a st), dc2inc, 1 dc in the first 19 dc, dc3inc, 1 dc in the next 19 dc, dc2inc, turn (45 sts).
- Row 4 (inc): 1 ch (does not count as a st), 1 dc in the first 22 dc, dc3inc, 1 dc in the next 22 dc, turn (47 sts).
- Row 5 (inc): 1 ch (does not count as a st), 1 dc in the first 23 dc, dc3inc, 1 dc in the next 23 dc, turn (49 sts).
- Row 6 (inc): 1 ch (does not count as a st), 1 dc in the first 24 dc, dc3inc, 1 dc in the next 24 dc, turn (51 sts).
- Row 7 (inc): 1 ch (does not count as a st), 1 dc in the first 25 dc, dc3inc, 1 dc in the next 25 dc (53 sts). Fasten off.
Outer ear
- With 4.5mm hook and A, make 19 ch.
- Row 1 (RS): 1 dc into second ch from hook, 1 dc into next 16 ch, 3 dc into next ch, 1 dc down reverse side of the next 17 ch, turn (37 sts).
- Row 2 (inc) (WS): 1 ch (does not count as a st), 1 dc in the first 18 dc, dc3inc, 1 dc in the next 18 dc, turn (39 sts).
- Row 3 (inc): As row 2 of inner ear.
- Row 4 (inc): As row 3 of inner ear.
- Row 5 (inc): As row 4 of inner ear.
- Row 6 (inc): As row 5 of inner ear.
- Row 7 (inc): 2 ch (to count as first htr), miss first dc, 1 htr in the next 13 dc, 1 dc in the next 10 dc, dc3inc, 1 dc in the next 10 dc, 1 htr in the next 14 dc, turn (51 sts).
- Join in B.
- Row 8 (inc): With B, make 1 ch (does not count as a st), 1 dc in the first 14 htr, 1 dc in the next 11 dc, dc3inc, 1 dc in the next 11 dc, 1 dc in the next 13 htr, 1 dc in the second of 2 ch (53 sts). Do not fasten off.
Join ear pieces
- Place wrong sides of inner and outer ear together, with the inner ear facing up.
- Next: With B, make 1 ch (does not count as a st), inserting the hook under both loops of each stitch of the inner ear first, then the outer ear to join, work 1 dc in each of the next 26 dc, dc3inc, 1 dc into each of the next 26 dc (55 sts). Fasten off, leaving a long length of yarn at the end.

Making up
Vertical face stripes
- Position the stripes going down the centre of the head, aligning the pointed tip with the top of the first stripe in B at the top of the face shaping. Sew the piece neatly to the face, stitching all around the edges.
Mouth
- Place the bottom lip off-centre, on the lower part of the front of the face, so the lower edge of the mouth covers the first stripe in B. Thread the length of yarn, left after fastening off, onto a needle and sew it in place, leaving an opening to stuff it before closing.
- Place the top lip piece so it covers the last four rounds at the top of the bottom lip, and the shaped top of the lip covers the lower end of the vertical stripes. Stitch the top edge in place using the length of yarn left over after fastening off and sew down the outer edges that overhang the sides of the bottom lip.
Nostrils
- Sew the nostrils in place on the top lip, positioning the top of each nostril around two rounds down, before the top of the lip shaping. Stitch all around the edges.
Eyes
- With three strands of embroidery thread, embroider the horizontal pupil in satin stitch (see below for Satin Stitch tutorial). Position an eye to each side of the face, over the shaping on each side of the vertical stripes. With the length of yarn left after fastening off, sew all around the outer edges of the eyes, inserting a small amount of stuffing before closing the opening.
Ears
- Lightly score a line down the centre of each piece of mount board cut for the ears and fold to shape it. Insert a strip of board into the centre of each crocheted ear, so the pointed arch is at the pointed tip of the ears. Add a thin layer of stuffing to the back of each ear, behind the board. With the length of yarn left after fastening off, sew together the lower edges. Bring the lower corners together to meet in the middle of the inner ear and stitch 5⁄8in (1.5cm) of each side together to shape. Sew each ear neatly to the head, behind the eyes, stitching all around the edges to attach them securely in place.
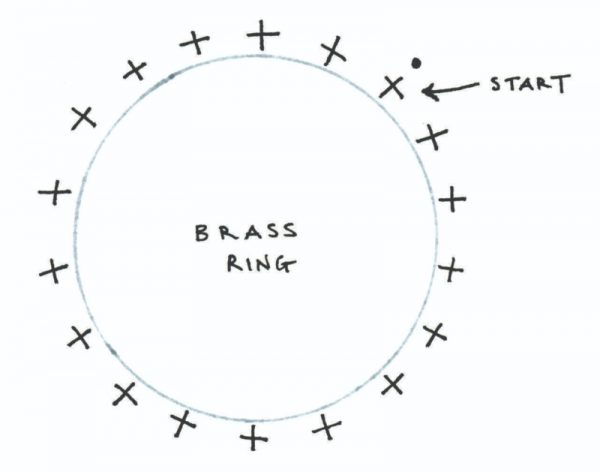
Hanging loop
- With 3mm hook and B, work 18 dc around the brass ring. Sl st to the first dc. Follow the chart for the hanging loop below. Fasten off, leaving a long length of yarn. Thread the length of yarn onto a needle and sew the lower edge of the ring securely to the top of the base.
Mane
- The mane is made with three rows of tassels that are threaded through the stitches. Follow the instructions to attach the tassels (below), using two 8in (20cm) lengths together. Starting at the first black stripe at the top of the head, between the ears, attach one tassel in C to each narrow stripe going down the centre back. Attach two tassels to the wider black stripe at the beginning of the back of head shaping. Attach one tassel to the first round of the last black stripe, in front of the hanging loop, to finish the first row.
- On each side of the central line of tassels, attach a tassel in C to the next stitch on the black stripes only. Attach a tassel in D on each side of the central tassel, on each white stripe.
- Lay the zebra on one side. Separate the outer row of tassels and, keeping one hand beneath the remaining two rows, use the hairbrush to brush through them both, from the knot up to the ends. Quite a bit of fluff will come out of the yarn, but the fibres will matt together and help the mane stand up. Lay the separated tassels back over the brushed rows and brush through them, with a hand beneath the mane, as before.
- Turn the zebra onto the other side and brush through once more. The stripes will be quite soft and standing upright from the head.
- The mane can be fixed, to help keep it in place, with a little watered-down PVA glue. Lay the zebra on its side. Spray one side at a time and allow to dry before spraying the other side of the mane. The mane can be brushed through again while the glue is still damp, but remember to rinse the brush out thoroughly before using on your own hair.
- Trim the ends of the mane to neaten.
- Weave in all the ends of yarn.
Satin Stitch
- Work straight stitches side by side and close together across a shape. Take care to keep the stitches even and the edge neat. The finished result will look like satin.

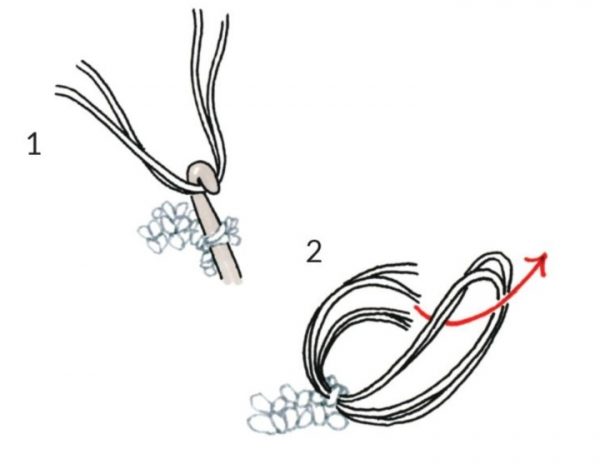
Tassels
- Fold two 9.5in (24cm) lengths of A in half to form a loop. Insert the crochet hook behind the post of the stitch and back out through to the front. Catch the looped yarn.
- Pull the loop a little way through, remove the hook and then thread the ends of the yarn back through the loop, pulling them tight. This completes one tassel.
- Miss 1 stitch and rep steps 1 and 2 to attach the yarn to the next st. Continue adding tassels to every alternate stitch to the end of the round. Miss the round of stitches above and attach more tassels to the next round in the same way, threading the yarn through a stitch so the tassel lies between the two below.
- Attach tassels, as before, to the alternate rows and stitches that shape the front of the chest. Continue onto the rounds at the neck and then thread more tassels onto the visible stitches of the rows shaping the back of the head, working around the horns and ears. On the final layer of fringe, attach a tassel to every stitch going under the chin and across the last row at the front of the head, between the horns, so there are no noticeable gaps.
- Trim the ends to neaten.
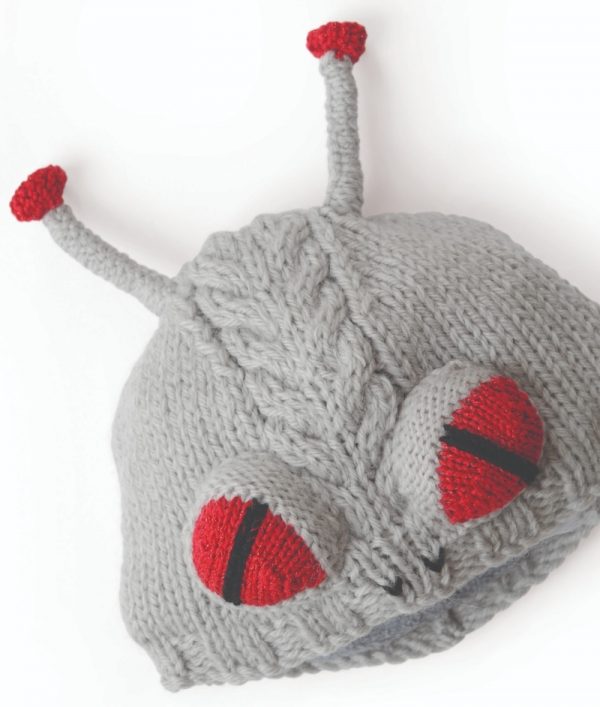
If you enjoyed this pattern by Vanessa Mooncie and you also knit, check out my review of Monster Hats: 15 Scary Head Warmers to Knit with the knitting pattern for the Alien hat here.
These are truly amizing.
I’d love to have a pattern for a life size standing zebra.
I just stumbled across this book today when it popped up as a suggestion on my Kindle. Just the sample of the book was spectacular! I have noticed when the samples are higher quality the book rarely disappoints overall (no book is ever perfect for everyone). I only wish I could find more patterns like this along with body options as another reader commented. Since I can barely follow a pattern properly, I doubt I am anywhere near the point of altering or creating one from scratch!
Thank you for the detailed review…sorry I’m 2 years late to the party! Lol! It was very well written, answered every question I had, & got me excited to try the pattern! I also thank you for that!