

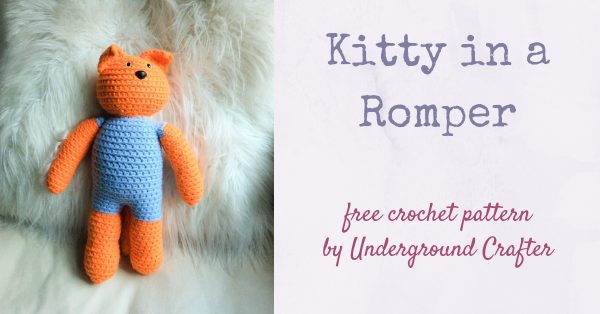
Kitty in a Romper is a cat amigurumi crochet pattern for a standing cat in a cute little one-piece outfit. At 17″ (43 cm) tall, this cat is ready for play time with 18″ dolls. She is also ready to be hugged and loved.
This post contains affiliate links. I may receive compensation (at no added cost to you) if you make a purchase using these links. Materials for the sample were generously provided by Fairfield, LoveCrochet/Paintbox Yarns, Clover, and Consumer Crafts.
You may have noticed I like cats. They are my favorite characters to crochet (and I have several free cat patterns in different styles). This is my first marmalade cat pattern, so let me share the inspiration.

Back in September, I was able to add this Duck Egg Blue Paintbox Yarns Wool Mix Chunky to my stash at an event with LoveCrafts. They had previously sent me the Blood Orange, and I loved how the two colors worked together. I knew I would have enough Blood Orange to make a jumbo softie, but I wasn’t too sure about the Duck Egg Blue.

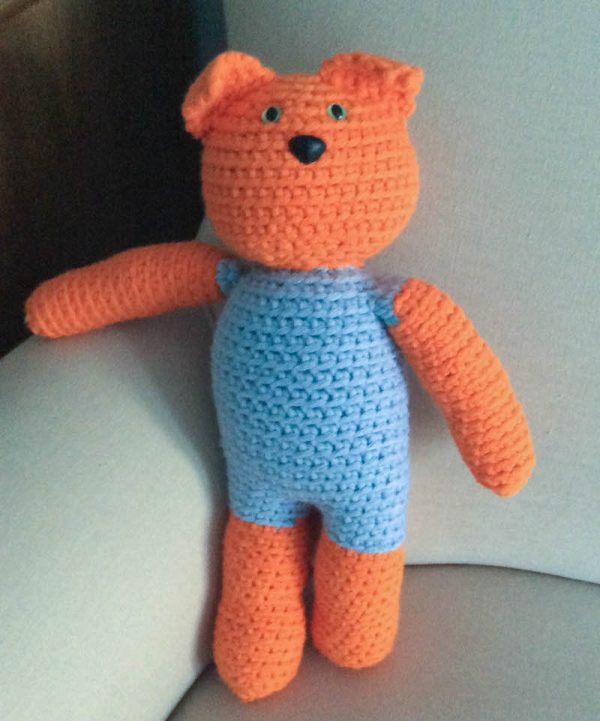
After a few false starts, the Kitty in a Romper was born. I usually add a mouth to my amigurumi characters, but I really felt that she was more expressive without it! Just move the ears up or down and you can tell a lot about her mood.

Unlike the cats I know in real life, this amigurumi cat stands tall, making her much more like a doll than a toy cat.

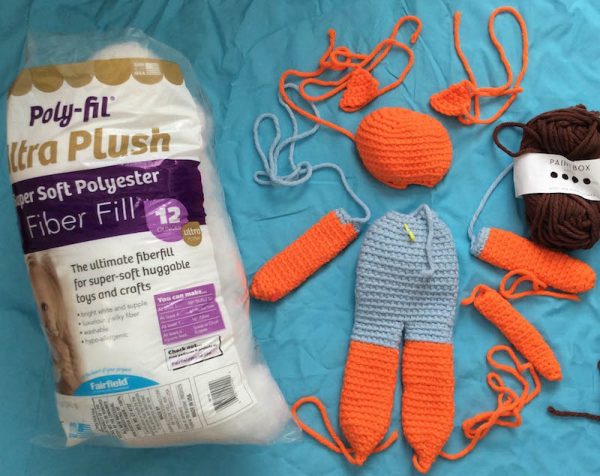
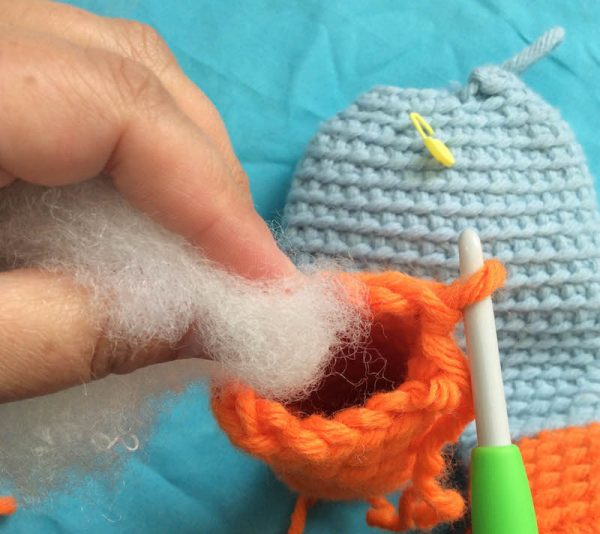
I used Fairfield Poly-Fil Royal Silk Fiber Fill, an extra soft fiber fill stuffing, to make this kitty extra huggable. And, with the bulky yarn, she really works up quickly. She would make a great gift for any child on your handmade holidays list. (If the child is under 3, substitute embroidered eyes and nose instead of using safety eyes and an animal nose, as I did.)
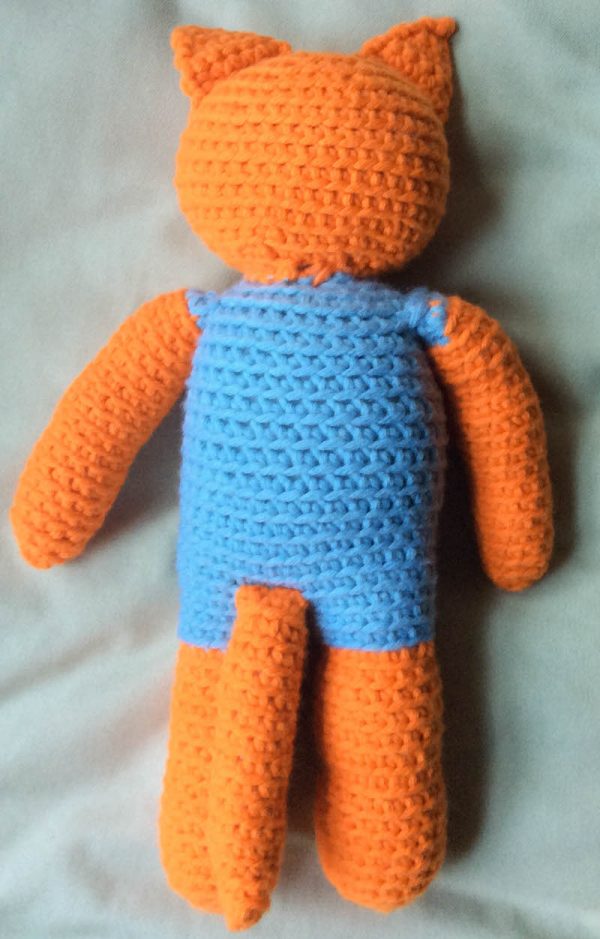
And, this time, I didn’t cheat. I actually crocheted the tail. (See evidence photo above for proof!)
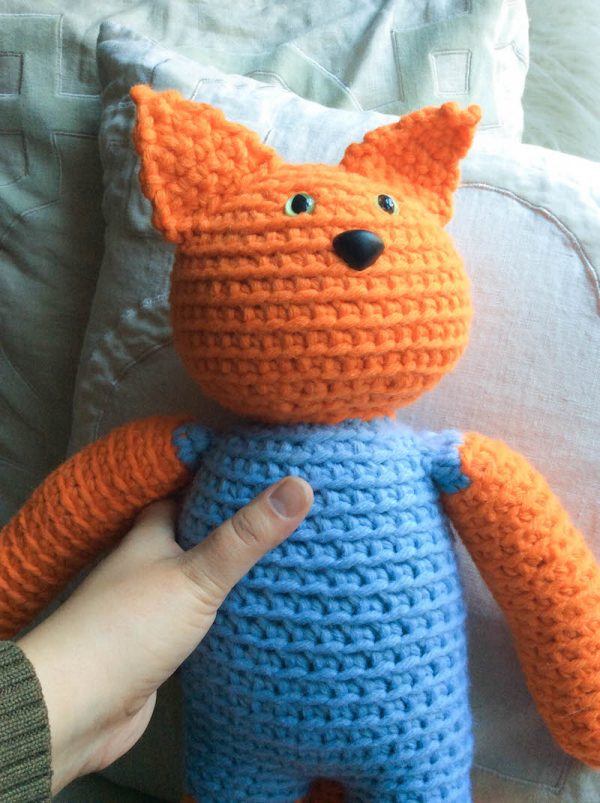
You can get a sense of how big she is from this picture. The Kitty in a Romper is so much fun to play with!
If you make your own Kitty in a Romper, I’d love to see it! Share your progress and questions by tagging me on Facebook as @Underground Crafter or Instagram as @ucrafter. You can also share a picture in the Underground Crafters Facebook group. Sign up for my weekly newsletter and get a coupon code for your choice of one of my premium patterns and other subscriber goodies. Plus, you’ll never miss one of my free patterns again!
Add the Kitty in a Romper to your Ravelry favorites or queue.

Kitty in a Romper
Crochet Cat Amigurumi Pattern by Underground Crafter
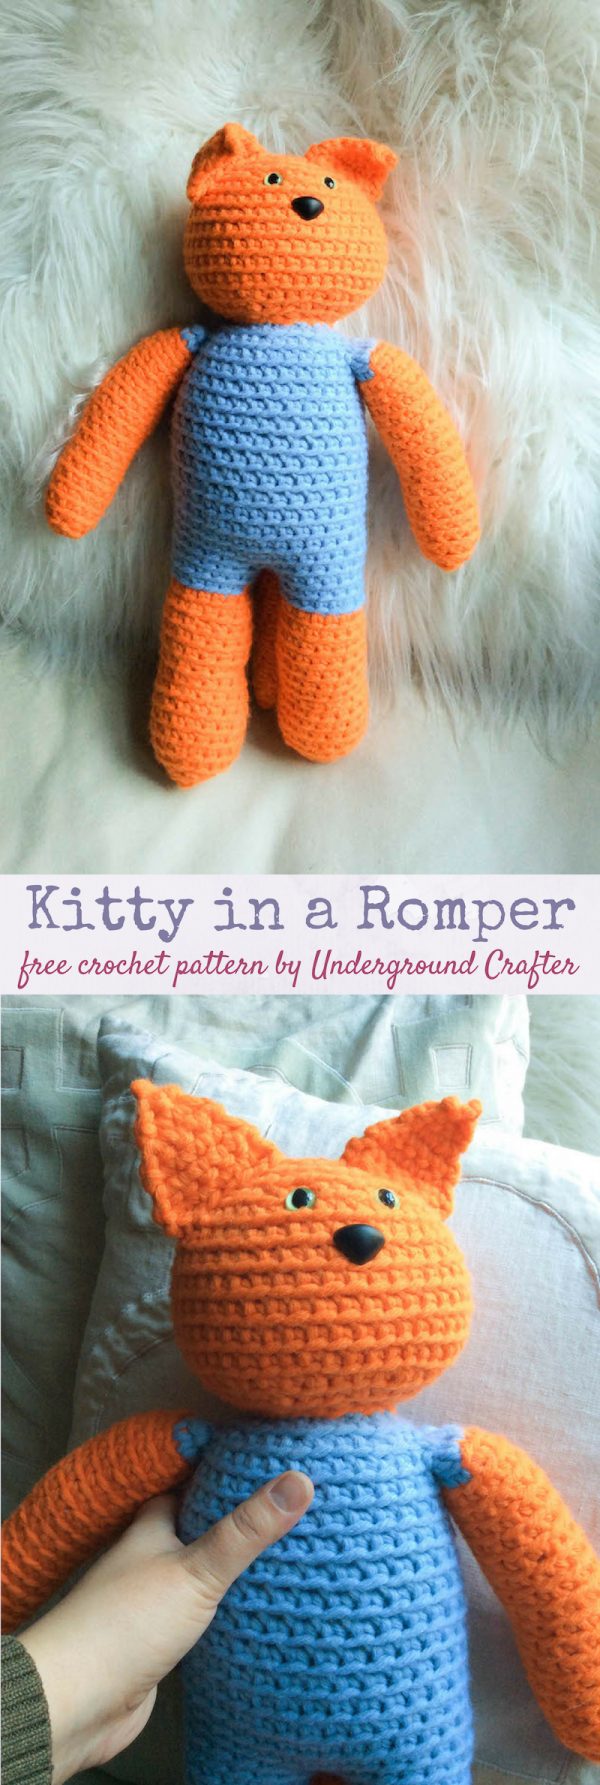


This little kitty cat amigurumi is ready to play in her romper.
Finished Size
- Approximately 17” (43 cm) tall from feet to top of head after stuffing.
Materials
- Paintbox Yarns Wool Mix Chunky yarn (50% wool/50% acrylic, 3.5 oz/100 g/109 yd/100 m) – 3 skeins in 1019 Blood Orange (CA) and 2 skeins in 1035 Duck Egg Blue (CB), or approximately 262 yd (239.5 m) in CA and 115 yd (105 m) in CB in any bulky weight yarn.
- US Size J-10/6 mm crochet hook, or size needed to obtain gauge.
- Yarn needle.
- Fairfield Poly-Fil Royal Silk Fiber Fill – 12 oz. bag.
- 21 mm Animal Nose.
- 12 mm Cat Safety Eyes – 1 pair.
- Clover Quick Locking Stitch Marker Set.
Gauge
- Through Rnd 5 = 4” (10 cm) diameter in pattern. Exact gauge is not critical for this project. Stitches should be small so that fiber filling doesn’t show.
Abbreviations Used in This Pattern
- BL – back loop only
- CA – Color A
- CB – Color B
- ch – chain
- ea – each
- invdec – invisible decrease – Insert hook in back loop only of each of next 2 sts, yarn over and draw up a loop, yarn over and draw through 2 loops. Planet June has a great invisible decrease tutorial here, though she works into the front loops instead.
- pm – place marker
- rep – repeat
- Rnd(s) – Round(s)
- sc – single crochet
- sl st – slip stitch
- st(s) – stitch(es)
- *Repeat instructions after asterisk as indicated.
Pattern Notes
- Marly Bird has a helpful video for identifying the back loop here.
- FreshStitches has a helpful tutorial for joining amigurumi pieces with whip stitch seams here.
- Most pieces are worked in rounds in continuous spirals without joining.
- Move stitch marker up each round to mark last st.
- Head and Body start with magic adjustable ring. Oombawka Design has a helpful magic ring tutorial here.
Pattern Instructions
Head
- With CA beginning at crown, start with magic adjustable ring (see Pattern Notes).
- Rnd 1: Ch 1, 8 sc in ring, pull the yarn tail tightly to close ring, pm to mark last st. (8 sts)
- Rnd 2: 2 scBL in ea st around. (16 sts)
- Rnd 3: *2 scBL in next st, scBL in next st; rep from * around. (24 sts)
- Rnd 4: *2 scBL in next st, scBL in next 2 sts; rep from * around. (32 sts)
- Rnd 5: *2 scBL in next st, scBL in next 3 sts; rep from * around. (40 sts)
- Rnd 6: ScBL in ea st around.
- Rnds 7-12: Rep Rnd 6, 6 times.
- Rnd 13: *Invdec, scBL in next 3 sts; rep from * around. (32 sts)
- Rnd 14: *Invdec, scBL in next 2 sts; rep from * around. (24 sts)
- Rnd 15: *Invdec, scBL in next st; rep from * around. (16 sts)
- Fasten off with long yarn tail (approximately 24”/61 cm) for seaming.
Body
- With CB beginning at neck, ch 17.
- Set Up Row: Turn, skip 1 ch, sc in next 16 ch, pm in last st to mark position, begin working in the round. (16 sts)
- Rnd 1: *2 scBL in next st, scBL in next st; rep from * around. (24 sts)
- Rnd 2: *2 scBL in next st, scBL in next 2 sts; rep from * around. (32 sts) Pm, but do not move up next rnd.
- Rnd 3: ScBL in ea st around.
- Rep Rnd 3 until body measures approximately 4.25” (11 cm) from Rnd 2 marker. Do not fasten off.
First Leg
- Rnd 1: Skip 16 sts on Body, scBL in next 16 sts. (16 sts)
- Rnd 2: ScBL in ea st around.
- Rnds 3-4: Rep Rnd 2 twice, changing to CA in final yarn over of last st of Rnd 4.
- Rep Rnd 2 until leg measures approximately 6” (15 cm) long. Stuff leg thoroughly. Begin decreasing for Foot.
- Rnd 5: *Invdec, scBL in next 2 sts; rep from * around. (12 sts)
- Rnd 6: *Invdec, scBL in next st; rep from * around. (8 sts)
- Stuff Foot thoroughly.
- Fasten off with long yarn tail (approximately 12”/30.5 cm) for seaming. With yarn needle and yarn tail, whipstitch Foot closed (see Pattern Notes).
Second Leg
- Join CB with sl st in BL to Body at one of skipped sts on Rnd 1 of First Leg. ScBL in next 16 skipped sts. (16 sts)
- Rep as for First Leg, starting with Rnd 2.
Arms (Make 2)
- With CA, beginning at finger tips, ch 2.
- Set Up Row: Skip 1 ch, 4 sc in next ch, pm in last st to mark position, begin working in the round. (4 sts)
- Rnd 1: 2 scBL in ea st around. (8 sts)
- Rnd 2: *2 scBL in next st, scBL in next st; rep from * around (12 sts).
- Rnd 3: ScBL in ea st around.
- Rep Rnd 3 until Arm measures approximately 5” (13 cm) long, changing to CB in last yarn over of final st of last Rnd.
- Rep Rnd 3 with CA. Fasten off with long yarn tail (approximately 12”/30.5 cm) for seaming.
Ears (Make 2)
- With CA, ch 2.
- Row 1: Turn, skip 1 ch, 2 sc in next ch. (2 sts)
- Row 2: Turn, ch 1, sc in first st, 2 sc in next st. (3 sts)
- Row 3: Turn, ch 1, sc in first st and in ea st across to last st, 2 sc in last st. (+ 1 st)
- Rows 4-6: Rep Row 3, 3 times.
- Fasten off with long yarn tail (approximately 12”/30.5 cm) for seaming.
Tail
- With CA, beginning at tip, ch 2.
- Set Up Row: Skip 1 ch, 4 sc in next ch, pm in last st to mark position, begin working in the round. (4 sts)
- Rnd 1: 2 scBL in ea st around. (8 sts)
- Rnd 2: ScBL in ea st around.
- Rep Rnd 2 until Tail measures approximately 5” (13 cm) long. Fasten off with long yarn tail (approximately 12”/30.5 cm) for seaming.
Assembly and Finishing
- See Pattern Notes for seaming tutorial. Use stitch markers to pin pieces in position before seaming.
- With yarn needle, weave in non-seaming yarn tails.
- Insert safety nose inside Face (approximately at center of Rnd 6). When you are satisfied with the position, insert the washer until it clicks.
- Position safety eyes inside Face (approximately centered around nose at Rnd 4). When you are satisfied with the position, insert the washers until they click.
- Stuff Head thoroughly.
- Thread yarn needle with the yarn tail from the first Ear. Sew the Ear to the Head on the diagonal, starting at Rnd 1 and matching each stitch on edge of Ear to a different Rnd. Repeat with second Ear. Weave yarn tails from Ears inside of Head.
- Stuff Body firmly. Thread yarn needle with yarn tail from the Head. Sew the Head to the Body, adding additional stuffing before closing join.
- Stuff first Arm. Thread yarn needle with yarn tail from first Arm. Sew Arm closed using whipstitch (see Pattern Notes). Do not fasten off. Sew Arm to Body (approximately at Rnd 2) using yarn needle. Repeat for second Arm.
- Stuff Tail. Thread yarn needle with yarn tail from Tail. Sew to back of Body, centered between Legs (approximately one Rnd above Leg opening).
- Weave all remaining ends into inside of Body.
Very clear and concise pattern instructions. Easy to follow. Thank you.