

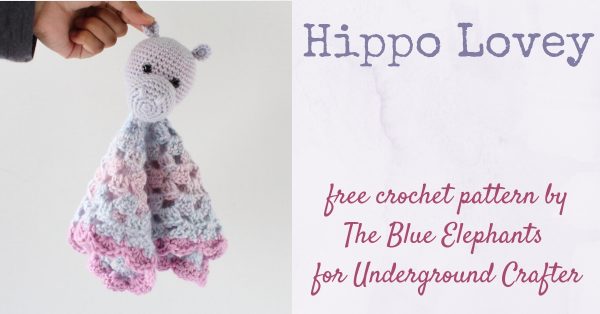
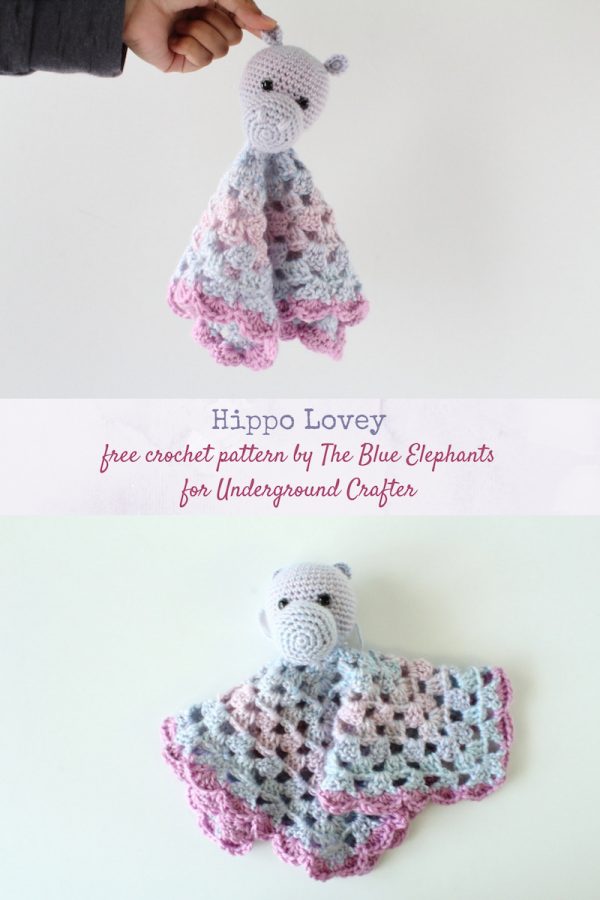
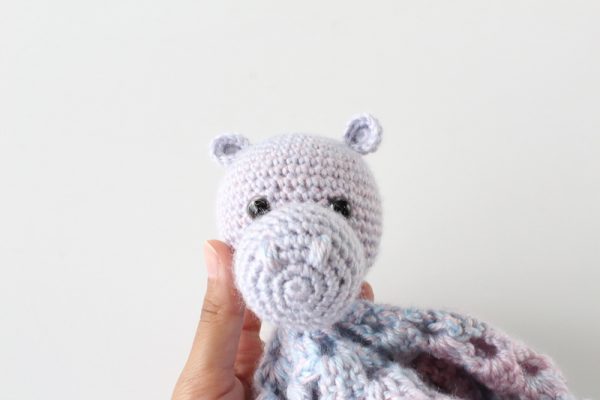
The Hippo Lovey is a cuddly hippo lovey crochet pattern with an adorable amigurumi character a child can hug designed by Shehla from The Blue Elephants! This adorable Hippo Lovey is crocheted in one piece, leaving fewer ends to weave in and making the head even more secure for repeated huggings and washings.
This post contains affiliate links. I may receive compensation (at no added cost to you) if you make a purchase using these links. Photos in this post are © Shehla Ahmed/The Blue Elephants and are used with permission.
About The Blue Elephants

Shehla Ahmed started knitting and crocheting in high school with the help of tutorials on YouTube. Since then, she’s created The Blue Elephants blog to share her designs and new projects, and to help others. You’ll learn how to crochet, knit, and get access to patterns that are fun and modern – but more than that, you’ll be part of a community of makers. A community of strong women who make things happen and empower each other to grow and share their unique gifts. Shehla’s goal here is to guide and teach you how to take your passions and create a business with them, to find joy in doing what you love no matter what others think, and to reach for the things you want in life.
Show your support by following Shehla on Website | Etsy | Facebook | Instagram | Pinterest | Ravelry
Hippo Lovey
Hippo Lovey Crochet Pattern by The Blue Elephants
Hi, everyone! I’m so excited to be here sharing a pattern with you. For me, crocheting has always been about creating fun and unique pieces, so I always try to incorporate bright colors and little details in a way that beginners can enjoy, too. Some of my favorite things to make are plushies and crochet baby blankets, and today’s pattern is a combination of the two!

This adorable hippo lovey is a simple pattern that uses basic shapes and stitches. I sold these at my first craft fair a few months ago and they were a big hit, plus they’re quick to work up. Unlike most loveys that crochet the blanket part and the plushie part separately and seam them together, I wanted to work the head and blanket in one piece and eliminate that extra step. I also found that it made the join much more secure since you never break the yarn.
You could easily adapt this pattern for different animals, just by using the head of your favorite plush pattern and working the blanket in matching colors. You can even make the blanket different sizes if you want! I have a guide to sizing blankets available in my crochet planner, the Make It Happen Resource Pack on Etsy.
Materials
- 3.25mm crochet hook
- 4.00mm crochet hook
- #4 worsted weight yarn – I used I Love This Yarn in Pastels and Caron Simply Soft in Blackberry
- Fairfield World Poly- Fil Premium Fiber Fill
- 10mm safety eyes
- tapestry needle
- stitch marker
Abbreviations
- ch – chain
- DC – double crochet
- SC – single crochet
- sl – slip stitch
Pattern Notes
- Skill level: Beginner
- Sizing: Lovey measures 12″ x 12″ (30.5 cm x 30.5 cm)
- Gauge: 2 blocks = 1″ (2.5 cm) in Blanket pattern.
- Notes from Underground Crafter:
- This pattern uses U.S. crochet terminology.
- You can find helpful photo and video tutorials for the magic ring by Oombawka Design here.
- You can find a helpful photo tutorial for the invisible bind off by Petals to Picots here.
Instructions
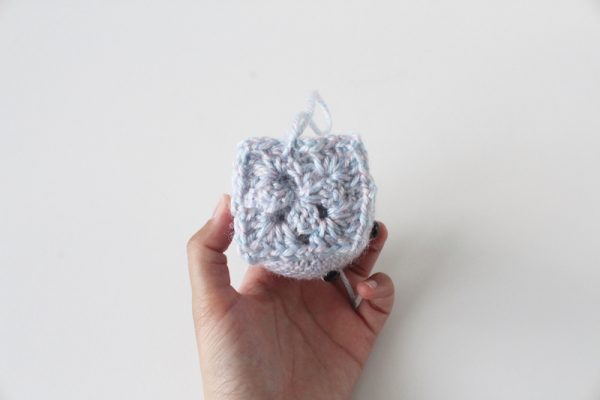
Head
- Round 1: With your main color of yarn and smaller hook, create a magic loop (see Pattern Notes) and work 6 SC into it. Pull the loop closed and use a stitch marker to mark the first space. You’ll be working in continuous rounds for the entire pattern.
- Round 2: Inc in each space by working 2 SC into each (12).
- Round 3: *SC, inc* around (18).
- Round 4: *SC 2, inc* around (24).
- Round 5: *SC 3, inc* around (30).
- Round 6: *SC 4, inc* around (36).
- Round 7: *SC 5, inc* around (42).
- Rounds 8-16: SC around for 9 rounds.
- Insert the eyes on the 6th round from the last increase round and about 4 stitches apart. You can play around with the placement, but once you’re happy with it, secure the backings. Start to add in the stuffing now.
- Round 17: *SC 5, dec* around (36).
- Round 18: *SC 4, dec* around (30).
- Round 19: *SC 3, dec* around (24).
- Round 20: *SC 2, dec* around (18). Finish adding stuffing.
- Round 21: *SC, dec* around (12).
- Round 22: Decrease around (6). Do not cut the yarn!
Blanket
- Work the blanket
from the bottom of the head to keep it all in one piece. This is going to be a
basic granny square pattern that’s anchored at the base of the head. - Switch to larger hook and ch 2.
- Round 1: DC twice by going
through the opening of the bottom of the head and catching the space on the
opposite side. This is to bring the sides together and close the hole. *Ch 2,
DC 3 through the next space and the space across it*, twice. Ch 2, and work 3
DC into a space on the head, ch 2 and slip stitch to the top of the ch 2 that
started the round. You’ll have 3 blocks around the 6 stitches from the opening
and 1 block just anchored to a stitch.


- Round 2: Ch 2 and turn. DC 2 into the next ch-2 space, ch 2, DC 3. *Ch 2, DC 3 into the next ch-2 space, ch 2, DC 3.* Repeat around and slip stitch to the beginning of the round. (8 blocks)

- Round 3: Ch 2 and turn. *DC 3 into the ch-2 space. Ch 2, and into the corner space: DC 3, ch 2, DC 3.* Repeat around and slip stitch to the beginning of the round. (12)
- Round 4: Ch 2 and turn. *DC 3 into the next 2 ch-2 space. Ch 2, and into the corner space: DC 3, ch 2, DC 3.* Repeat around and slip stitch to the beginning of the round. (16)
- Round 5: Ch 2 and turn. *DC 3 into the next 3 ch-2 space. Ch 2, and into the corner space: DC 3, ch 2, DC 3.* Repeat around and slip stitch to the beginning of the round. (20)
- Round 6: Ch 2 and turn. *DC 3 into the next 4 ch-2 space. Ch 2, and into the corner space: DC 3, ch 2, DC 3.* Repeat around and slip stitch to the beginning of the round. (24)
- Round 7: Ch 2 and turn. *DC 3 into the next 5 ch-2 space. Ch 2, and into the corner space: DC 3, ch 2, DC 3.* Repeat around and slip stitch to the beginning of the round. (28)
- Round 8: Ch 2 and turn. *DC 3 into the next 5 ch-2 space. Ch 2, and into the corner space: DC 3, ch 2, DC 3.* Repeat around and slip stitch to the beginning of the round. (32)
- Round 9: Ch 2 and turn. *DC 3 into the next 6 ch-2 space. Ch 2, and into the corner space: DC 3, ch 2, DC 3.* Repeat around and slip stitch to the beginning of the round. (36)
- Round 10: Ch 2 and turn. *DC 3 into the next 7 ch-2 space. Ch 2, and into the corner space: DC 3, ch 2, DC 3.* Repeat around and slip stitch to the beginning of the round. (40)
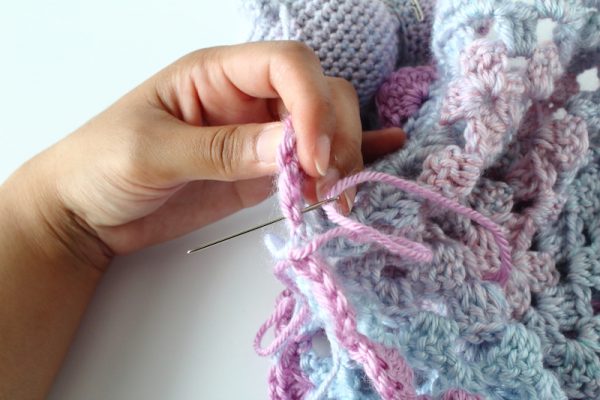
- Round 11: Switch to the yarn for the border. Ch 2 and turn. DC 4 into the middle DC of the block, then SC into the next ch-2 space. DC 5 into the middle of the next block, and SC into the next ch-2 space. Work from * around and bind off at the end of the round. Use an invisible bind off (shown below/see Pattern Notes) for a clean finish.


Snout
- Round 1: With your main color of yarn, create a magic loop and work 6 SC into in. Pull the loop closed and use a stitch marker to mark the first space.
- Round 2: Inc in each space by working 2 SC into each (12).
- Round 3: SC, inc around (18).
- Round 4: SC 2, inc around (24).
- Round 5: SC 3, inc around (30).
- Rounds 6-10: SC around for 4 rounds.
- Round 11: SC 3, dec around (24).
- Round 12: SC 2, dec around (18). Add a small amount of stuffing and bind off leaving a long tail for sewing the snout onto the face.
Ears (make 2)
- Round 1: With your main color of yarn, create a magic loop and work 6 SC into in.
- Round 2: Inc in each space by working 2 SC into each (12). Bind off leaving a long tail.
Assembly and Finishing
- Now let’s assemble the features. Start by positioning the snout just below the eyes and using the tail yarn and a tapestry needle to sew it into place using a whip stitch. Then bring the remaining yarn through the snout to embroider a few straight stitched as the nostrils. Fasten off and weave the tail into the snout to hide the end.
- Fold the ears in half and position them onto the head. Use the tail yarn and a few simple stitches going through the ear and 2 spaces on the head to sew it into place. Weave in all the ends and trim the excess yarn to finish!

- And you’re done! I hope you enjoyed making this crochet hippo lovely. If you make her, tag me @_theblueelephants on Instagram so I can see your versions. I’ll be sharing a pattern for a full-bodied plushie of this hippo on my blog soon so be sure to head over there and subscribe so you don’t miss it. Updated to add: Here’s the free crochet pattern for Holly the Hippo.

So adorable and I love the one piece construction. So much more secure-thanks for designing this piece for us.
Perfect to gift with the granny square blanket I made.
Thank you
What a love little snug blanket, this is going to be a item for my craft market.
Thanks
So cute! Having never done a granny square, the pattern felt difficult to understand and I had to redo the blanket part many times. But I got and I love how it turned out!