
Naomi from How To Heat Press is joining us for the first of three guest posts that will help you to explore your Cricut! Today, she’ll show you how easy it is to customize a pencil case with your Cricut and adhesive vinyl. She’ll share tips for using heat transfer vinyl (also known as iron-on), too. The best part is that once you master this project, you can use the same process to customize so many different projects with your Cricut and vinyl.
This post contains affiliate links. I may receive compensation (at no added cost to you) if you make a purchase using these links. Photos in this post are © How To Heat Press and are used with permission.
About How To Heat Press
How To Heat Press was started by Naomi and Dan in 2016. They’ve been using heat press and cutting machines for years, and they love all the wonderful projects you can create with these machines. How To Heat Press provides information about heat press and cutting machines (with a focus on Cricut machines), heat press and Cricut tips and tutorials, and t-shirt business tutorials.
Show your support by following Naomi on Website | Facebook | Instagram | Pinterest | Twitter
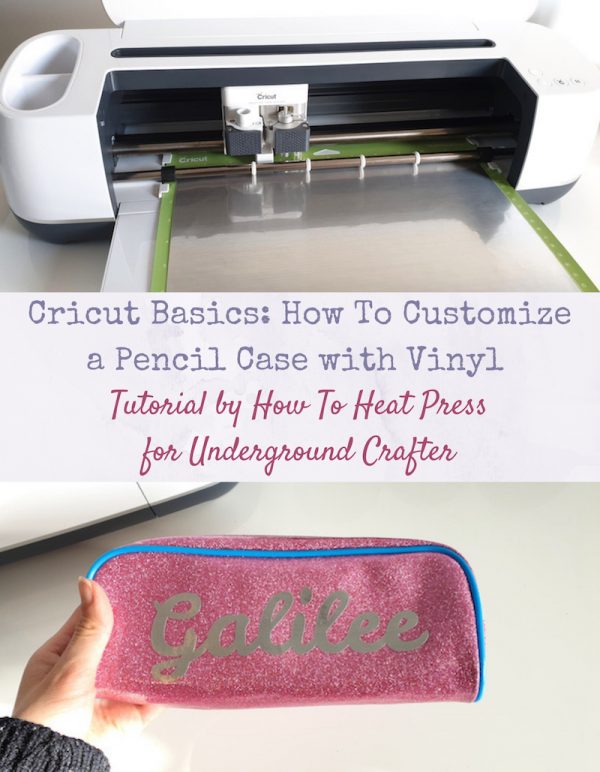
Cricut Basics: How To Customize a Pencil Case with Vinyl
Tutorial by How To Heat Press
Do you want to make a cool custom pencil case with Cricut?
This project is a Cricut Basic, but if you haven’t done it before, you’ll need to know a few things!
Depending on what your blank pencil case is made of, you could use adhesive vinyl or iron-on vinyl.
The pencil case I’m using for this project is only suitable for adhesive because it’s made of a type of flexible plastic. This would immediately melt if I applied heat. But if you had a blank pencil case made of fabric, you would use heat transfer vinyl (iron-on) instead.
How To Make A Custom Pencil Case
Here is what I am using to complete this project:
- The Cricut Maker (Note from Underground Crafter: You could also use any Cricut Explore family cutting machine.)
- EZ Craft USA Permanent Vinyl (the silver sheet)
- Cricut Standard Grip Transfer Tape
- Blank girls pencil case
Now let me show you how I customized this pencil case for my daughter.
1. Choose Pencil Case Design
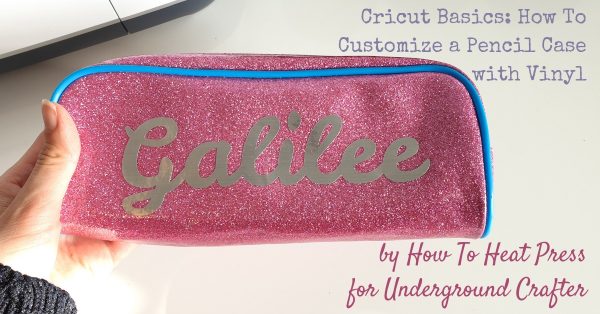
The design I am using for this pencil case is very simple… It is just my oldest daughter’s name: Galilee!
Does that even justify being called a design? I’m not sure! Nevertheless, sometime the best designs are the most simple.
You can really put anything you like:
- Make a text design like me
- Choose a free SVG image
- Use a combination of text and image
It’s up to you, and will depend on the surface area on your pencil case.
To make this simple design, I opened a new project in Cricut Design Space. I created a text box by clicking the text icon on the left menu, and then selected the font ‘Leckerli One’.
If you wanted to use this font yourself, and didn’t have it in Design Space already, you can find it free here on Google Fonts.
Once I had typed out the name, the text was spread out and needed to be joined up so that it would be cut as one piece.
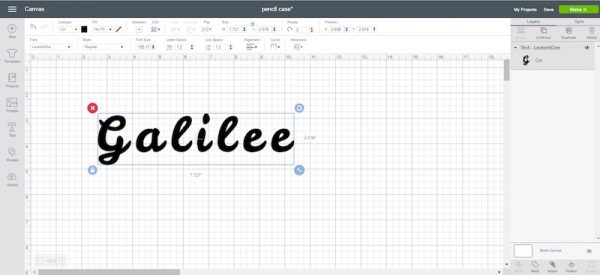
To do this I selected the text and clicked ‘advanced’ and ‘ungroup to letters’ (top edit panel).
I was then free to shift the letters together so that they were touching. Once the letters were touching, I clicked weld (bottom right of the canvas).
Welding cannot be undone, so make sure everything is in the right place before clicking it. This makes the whole design a single layer that will be cut as one piece.
The final step before cutting was to size the design. I made this design 6 inches (15 cm) to fit the blank pencil case.

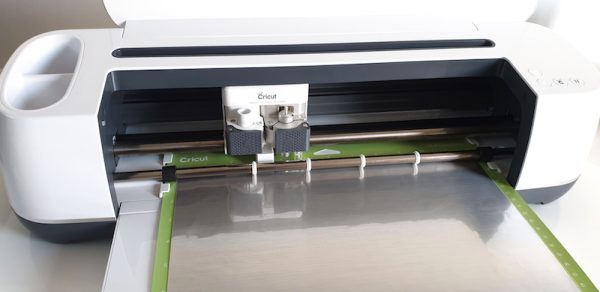
2. Cut Design in Adhesive Vinyl
Now I’m ready to cut the design out of adhesive vinyl.
Because I’m using vinyl, I do not need to mirror the design. If you are using heat transfer vinyl, you will need to mirror the design as it is applied in reverse.
Set material settings to ‘vinyl’ for Cricut Maker, or set the dial to ‘vinyl’ for Explore Air 2.
Adhesive vinyl goes color side up, and backing paper side down on cutting mat.
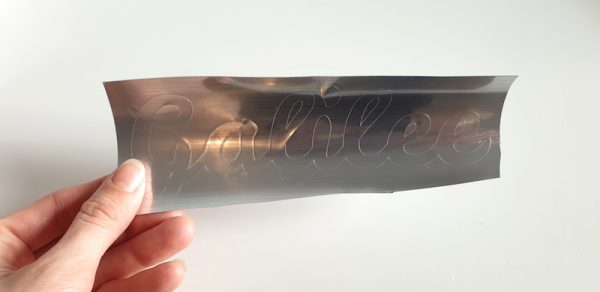
3. Weed Vinyl
Once your design has been cut, weed away the excess vinyl.
This just means pull away any piece of vinyl that you don’t want to end up on your pencil case (or other surface). The Cricut Basic Tool Set has the perfect tools for doing this.
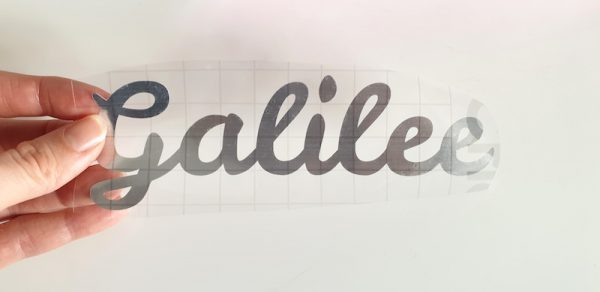
5. Apply Transfer Tape
For this type of project, make sure you’re using the Standard Grip Transfer Tape, not the Strong Grip Tape!
Place the transfer tape over the weeded design. Press down from the middle of design towards the outer sides, one side at a time, to reduce the chance of air bubbles. Then burnish (rub/press down) with a squeegee (also included in the Cricut Basic Tool Set).
Remove the vinyl backing paper carefully to make sure all of the vinyl is stuck to the transfer tape.
6. Apply Vinyl To Pencil Case
The final step is to apply the vinyl decal to the pencil case.
You can measure out the perfect spot with a ruler, or just have a good guess as to where it will be centered (like I did).
Position the vinyl on top of the pencil case and start by pressing it down in the center of your design. From the center, press it down out towards one side, and then starting from the center again, press it down out towards the other side.
Once the whole decal is down, burnish it again to make sure it is stuck onto the pencil case.
Now start to remove transfer tape by rolling it back onto itself at a sharp angle, and slowly roll it back carefully, in case some has not stuck down.
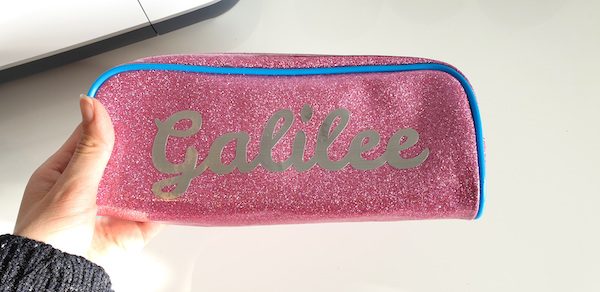
A Custom Pencil Case
That’s all there is to it – now you can make vinyl designs to put on anything and everything!
To be honest the vinyl I used wasn’t the best quality, but it was super cheap!
I’ve used it before on other projects and it lasts well… it doesn’t crack, peel, or fade, but it’s just not as nice or easy to work with as something like Oracal 651.
Any adhesive vinyl project really.
It’s another permanent vinyl that’s great for:
- mug decals
- car and window decals
- permanent wall decal
However, the result with the much cheaper vinyl is still good, and my daughter loves it (which has got to be the most important thing).
Thanks for reading!
Awesome!!!