

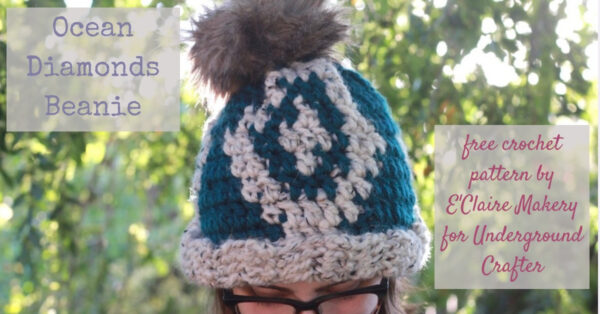
Tapestry crochet is on trend again and in today’s free pattern, guest contributor, Claire from E’Claire Makery, is going to share how to do tapestry crochet in the round! For her Ocean Diamonds Beanie, she’s included both a written pattern and a video tutorial to walk you through completing this dramatic hat using tapestry crochet in the round.
This post contains affiliate links. I may receive compensation (at no added cost to you) if you make a purchase using these links. Photos in this post are © Claire Goodale/E’Claire Makery and are used with permission.
About E’Claire Makery
Claire Goodale is the owner, designer, and maker behind E’Claire Makery. When she’s not obsessing over yarn and coming up with patterns, you can find her out exploring, baking, watching superhero shows, and enjoying her newly married life with her husband Stephen. As a maker, her goal is to create patterns and tutorials, and share design and business tips to help give crocheters the confidence to create.
Show your support by following Claire on Website | Etsy | Facebook | Instagram | Pinterest | Ravelry | YouTube
Ocean Diamonds Beanie
Tapestry Crochet in the Round Pattern by E’Claire Makery

Sizes
- Teen/Adult Small (21”/53.5 cm)
- Medium (22”/56 cm) and Large (23”/58.5 cm) sizes, along with a complete color graph, included in the Ad Free PDF
Gauge
4″ x 4″ (10 cm x 10 cm) square: 8 double crochets by 5 rows
Abbreviations
- Blo = back loops only = Fiber Flux has a helpful video tutorial for identifying the back loops here.
- Ch = Chain
- Dc = double crochet
- Flo = front loops only = Fiber Flux has a helpful video tutorial for identifying the front loops here.
- MC = main color
- Rnd = Round
- SC = secondary color
- Sl st = slip stitch

Supplies
- 2 skeins of Weight 6 Super Bulky Yarn in two colors. I used:
- 1 skein Lion Brand Hometown USA in Montpelier Peacock (81 yards / 74 meters / 5 oz / 142 grams)
- 1 skein Lion Brand Wool Ease Thick & Quick in Oatmeal (81 yards / 74 meters / 5 oz / 142 grams)
- Size 9mm crochet hook
- Scissors
- Yarn Needle
- Optional Faux Fur Pom Pom

Pattern Notes
- A complete video tutorial is available at the end of this pattern.
- Want to avoid crochet mistakes while crocheting this pattern? Learn how to avoid them with my blog post: 10 Mistakes Common Mistakes Crocheters Make and How to Avoid Them.
- Want all 3 sizes of the pattern and a color chart to help make this hat easier to crochet? Grab the $2 discounted PDF in my Etsy and Ravelry stores!
- This pattern uses US crochet stitch terminology.
- This pattern starts out worked flat, is joined together, and then worked in the round.
- The pattern involves color changes using tapestry crochet. Experience with color work is recommended, but if you’re a beginner to tapestry crochet than you can totally do it!
- If you’ve never done tapestry crochet before, I’ve created a beginner’s guide to tapestry crochet that shows you how to do it. See the written and photo tutorial at The Beginner’s Guide to Tapestry Crochet.
- I recommend reading through the pattern completely before beginning just to make sure that you understand everything in the pattern.
- Color changes happy in the middle of the rows in this pattern. The color changes are indicated in the written pattern by a new color in parentheses (for example: (MC) hdc 1, (SC) hdc 2.)

Pattern
Brim
- Row 1: ch 7, starting in 3rd ch from hook dc 5
- Row 2 (in blo): ch 2, turn, dc 5
- Row 3 (in flo): ch 2, turn, dc 5
- Rows 4-21: repeat rows 2-3
- Join row 1 to row 21 by slip stitch through the stitches on each row. See youtube tutorial video for more details.

Main Part of Hat
- You’ll start working in the round now by crocheting along the top of the brim. See video tutorial below for how to do this. For all 3 sizes and a complete color graph of the rest of the pattern, grab a copy of the $2 discounted ad-free pdf copy.
- Rnd 1: (SC) ch 2, dc 3, (MC) dc 11, (SC) dc 3, (MC) dc 11, (SC) dc 3, (MC) dc 11, join with sl st to ch 2 at beginning of round
- Rnd 2: (SC) ch 2, dc 4, (MC) dc 9, (SC) dc 5, (MC) dc 9, (SC) dc 5, (MC) dc 9, (SC) dc 1, join with sl st to ch 2 at beginning of round
- Rnd 3: (MC) ch 2, dc 3, (SC) dc 2, (MC) dc 7, (SC) dc 2, (MC) dc 3, (SC) dc 2, (MC) dc 7, (SC) dc 2, (MC) dc 3, (SC) dc 2, (MC) dc 7, (SC) dc 2, join with sl st to ch 2 at beginning of round
- Rnd 4: (MC) ch 2, dc 1, (SC) dc 1, (MC) dc 2, (SC) dc 2, (MC) dc 5, (SC) dc 2, (MC) dc 2, (SC) dc 1, (MC) dc 2, (SC) dc 2, (MC) dc 5, (SC) dc 2, (MC) dc 2, (SC) dc 1, (MC) dc 2, (SC) dc 2, (MC) dc 5, (SC) dc 2, (MC) dc 1, join with sl st to ch 2 at beginning of round
- Rnd 5: (SC) ch 2, dc 3, (MC) dc 1, (SC) dc 3, (MC) dc 3, (SC) dc 3, (MC) dc 1, (SC) dc 3, (MC) dc 1, (SC) dc 3, (MC) dc 3, (SC) dc 3, (MC) dc 1, (SC) dc 3, (MC) dc 1, (SC) dc 3, (MC) dc 3, (SC) dc 3, (MC) dc 1, join with sl st to ch 2 at beginning of round
- Rnd 6: (MC) ch 2, dc 1, (SC) dc 1, (MC) dc 2, (SC) dc 2, (MC) dc 5, (SC) dc 2, (MC) dc 2, (SC) dc 1, (MC) dc 2, (SC) dc 2, (MC) dc 5, (SC) dc 2, (MC) dc 2, (SC) dc 1, (MC) dc 2, (SC) dc 2, (MC) dc 5, (SC) dc 2, (MC) dc 1, join with sl st to ch 2 at beginning of round
- Rnd 7: (MC) ch 2, dc 3, (SC) dc 2, (MC) dc 7, (SC) dc 2, (MC) dc 3, (SC) dc 2, (MC) dc 7, (SC) dc 2, (MC) dc 3, (SC) dc 2, (MC) dc 7, (SC) dc 2, join with sl st to ch 2 at beginning of round
- Rnd 8: (SC) ch 2, dc 4, (MC) dc 9, (SC) dc 5, (MC) dc 9, (SC) dc 5, (MC) dc 9, (SC) dc 1, join with sl st to ch 2 at beginning of round
- Rnd 9: (SC) ch 2, dc 3, (MC) dc 11, (SC) dc 3, (MC) dc 11, (SC) dc 3, (MC) dc 11, join with sl st to ch 2 at beginning of round, fasten off leaving a long tail for sewing.
- Using long tail, sew around the top of the hat using a basting stitch to close it. See video tutorial below for how to do this. Attach Faux Fur or Yarn Pom Pom to top of hat once it is closed up.
- Then you’re done!
