Cute Crocheted Animals By Emma Varnam Book Review with Foxes Pattern

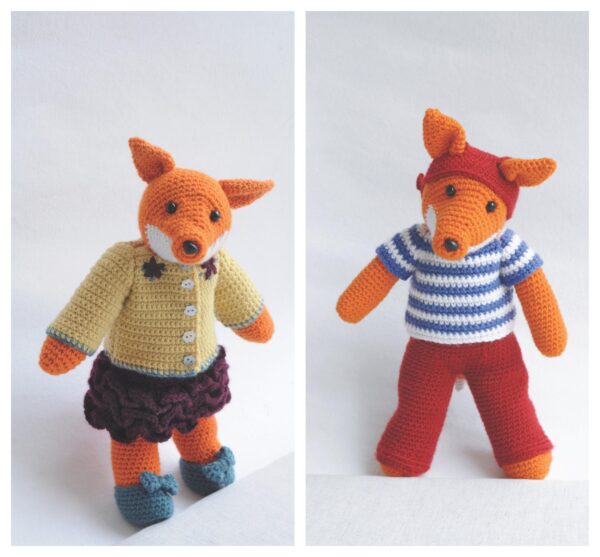
If you love to crochet cute and cuddly animals, you’ll want to check out my review of a crochet pattern book for 12” (30 cm) animal friends with adorable outfits to mix and match. My review also includes an excerpt for free crochet fox toy patterns from the book, so read on for details!

This post contains affiliate links. I may receive compensation (at no added cost to you) if you make a purchase using these links. GMC Publications provided me with a free review copy of Cute Crocheted Animals by Emma Varnam. Although I accept free products for review, I do not accept additional compensation, nor do I guarantee a positive review. My reviews are based entirely on my honest opinions.

Book Review

Cute Crocheted Animals by Emma Varnam is an interesting twist on crochet animals or amigurumi books. The book includes patterns for ten animal friends in five pairs, along with 39 patterns for clothing and accessories. As Emma mentions in the introduction, all of the animals have the same size limbs and bodies (and all stand 12”/30 cm tall), so all of the clothing and accessories are interchangeable. If you know a child that is interested in playing “dress up” with toys you may just have stumbled upon the perfect pattern collection!

The book is organized into 3 main sections: The Animals, The Wardrobe, and The Basics. After the Introduction where Emma shares her inspiration, the Gallery includes 11 full pages of lovely photographs of each pair of animals with and without various outfits. 

The Animals includes full page, photographic introductions to each animal, followed by the patterns for the animal bodies. Each pattern includes:

  • You will need, which lists the yarn used by brand, fiber content, length in yards and meters, and weight in grams; the crochet hook size (in mm with UK/US sizes in parenthesis), and any notions used,
  • Finished size, which lists the finished size in inches and centimeters, and
  • Pattern instructions in UK pattern abbreviations.

After the animal patterns, the wardrobe patterns for those animals are provided. However, as noted above, these can be easily substituted with the clothing and accessories patterns for the other animals. Each pattern also includes multiple large photographs of the animals posing with their wardrobes.

The Wardrobe is a photo gallery of the clothing and accessories, arranged by type, so that you can easily find an outfit. In this section, the clothes are shown clothing hung and/or in flat lay images rather than on the animals. There are 5 tops, 5 trousers and shorts, 7 extra layers (including jackets, coats, cardigans, and a poncho), 5 dresses and skirts, and 17 accessories including hats, bags, shoes, scarves, balls, and more.

The Basics section starts with Getting Started, a 4-page overview of yarn and hooks, the differences between US and UK crochet terms, information about notions such as stuffing, needles, and safety eyes, written and illustrated instructions for holding the hook, holding yarn, and making a slip knot, and a list of pattern abbreviations. Crochet Stitches includes written and illustrated instructions for the chain, slip stitch, double crochet (US single crochet), working in the back loop, treble crochet (US double crochet), double treble crochet (US treble/triple crochet), working in rows, working in rounds, joining a ring, starting with the magic adjustable ring, changing colors, increasing, decreasing, crab stitch, raised treble front (US front post double crochet), and shell stitches. Finishing Touches provides written and illustrated instructions for 3 methods of seaming and for weaving in ends. It includes written instructions for making pompoms with a fork and slip-stitch surface decoration. Embroidery Stitches provides written and illustrated instructions for the back stitch, chain stitch, cross stitch, satin stitch, daisy stitch, stem stitch, and blanket stitch, which are used to embellish the animals and their accessories. Blocking provides instructions for finishing your projects with blocking. 

The book ends with Resources, which includes information on the yarns used in the book and inspirational books and websites, acknowledgements, and an about the author page, as well as the original concept drawings and background about Stanley the cat.

Some of my favorite things about this book…

  • The pictures are great eye candy! They inspire you to pick up your hook.
  • The flaps on the front and back cover. While this is a paperback, the flaps help you to keep track of the pages you are working from, even though the book doesn’t lay flat while you’re reading.
  • The concept. Because the animals have the same size bodies, it really extends the wardrobe. You can make one pair of animals (or several individual animals) to gift to a child with a complete wardrobe, or make animals with just one outfit each — the choice is yours!
  • The patterns. The animals really are cute and I love the outfits and accessories, too.

If you like to crochet animals, or to crochet for children, check out Cute Crocheted Animals! Read on for the free crochet fox toy patterns excerpted from the book, including the outfits.

Foxes

Crochet Fox Toy Patterns by Emma Varnam

Published in Cute Crocheted Animals 

Text © Emma Varnam, 2016. Copyright in the Work © GMC Publications Ltd, 2016. Shared with permission from GMC Publications.

Notes from Underground Crafter

  • This pattern uses standard UK crochet pattern abbreviations. You can find a list of these abbreviations here, along with the differences in terms between US and UK abbreviations.
  • This pattern uses 2 special stitches.
    • dc2inc – double crochet increase by one stitch (or 2 dc in the same stitch or space)
    • Fiber Flux has a helpful dc2tog (US sc2tog) video tutorial here.
  • Oombawka Design has helpful magic ring tutorials here.
  • You can find written and illustrated tutorials for the stem stitch and daisy stitch at the end of the patterns. There are helpful video tutorials for the blanket stitch and stem stitch at the end of this blog post.

The Foxes

Evie loves playing the piano or reading in a corner of her room. Although shy, she will be the first to give you a hug if you need cheering up.

What an adventurer Ben is! This budding pirate is in his element out in his imaginary boat on the open water. He loves maps and is always planning his next voyage.

You will need

  • Debbie Bliss Baby Cashmerino, 55% wool, 33% acrylic, 12% cashmere (137yds/125m per 50g ball):
  • For Evie
    • 2 balls in 092 Orange (A)
    • 1 ball in 100 White (B)
    • 1 ball in 101 Ecru (C) for her underpants
  • For Ben
    • 2 balls in 092 Orange (A)
    • 1 ball in 100 White (B)
    • 1 ball in 027 Denim (C) for his underpants
  • 3.5mm (UK9:USE/4) crochet hook
  • 3mm (UK11:US–) crochet hook
  • Tapestry needle
  • Safety pin
  • Polyester toy stuffing
  • 3⁄8in (10mm) safety eyes and nose

Finished size

  • The foxes are 12in (30cm) tall.

Ears (make 2)

  • Using 3.5mm hook and A, make a magic ring (see Underground Crafter’s Notes).
  • Round 1: 1 ch, 4 dc into centre of the ring (4 sts).
  • Round 2: *1 dc, dc2inc; rep from * to end of round (6 sts).
  • Round 3: *2 dc, dc2inc; rep from * to end of round (8 sts).
  • Round 4: *3 dc, dc2inc; rep from * to end of round (10 sts).
  • Round 5: *4 dc, dc2inc; rep from * to end of round (12 sts).
  • Round 6: *5 dc, dc2inc; rep from * to end of round (14 sts).
  • Round 7: *6 dc, dc2inc; rep from * to end of round (16 sts).
  • Round 8: *7 dc, dc2inc; rep from * to end of round (18 sts).
  • Rounds 9–12: Work 4 rounds straight.
  • Round 13: *7 dc, dc2tog; rep from * to end of round (16 sts).
  • Fasten off, leaving a 12in (30cm) tail of yarn.
  • Flatten ear and fold in half. Using the yarn tail, sew these layers together.

Head

  • Using 3.5mm hook and A, make a magic ring (see Underground Crafter’s Notes).
  • Round 1: 1 ch, 8 dc into the centre of the ring. Place marker (8 sts).
  • Round 2: 2 dc in each st (16 sts).
  • Rounds 3–4: Work 2 rounds straight.
  • You will now work half the head in white (B) and half in orange (A).
  • When you are not crocheting a colour run the yarn through the back of the stitch and then pick up this strand of yarn when you need to change colour.
  • Round 5: Join in white (B), 8 dc, then change to orange (A), 8 dc (16 sts).
  • Round 6: Change to B, (3 dc, dc2inc) twice, change to A, (3 dc, dc2inc) twice (20 sts).
  • Round 7: Change to B, (4 dc, dc2inc) twice, change to A, (4 dc, dc2inc) twice (24 sts).
  • Round 8: Change to B, (5 dc, dc2inc) twice, change to A, (5 dc, dc2inc) twice (28 sts).
  • Round 9: Change to B, (6 dc, dc2inc) twice, change to A, (6 dc, dc2inc) twice (32 sts).
  • Round 10: Change to B, (7 dc, dc2inc) twice, change to A, (7 dc, dc2inc) twice (36 sts).
  • Round 11: Change to B, (8 dc, dc2inc) twice, change to A, (8 dc, dc2inc) twice (40 sts).
  • Round 12: Change to B, (9 dc, dc2inc) twice, change to A, (9 dc, dc2inc) twice (44 sts).
  • Round 13: Change to B, (10 dc, dc2inc) twice, change to A, (10 dc, dc2inc) twice (48 sts).
  • Rounds 14–19: Continue working only in orange (A). Work 6 rounds straight.

Make slots for ears

  • Round 20: 31 dc, 5 ch, miss 5 sts, 6 dc, 5 ch, miss 5 sts, 1 dc.
  • Round 21: 1 dc in each dc and each ch.
  • Round 22: Work 1 round straight.
  • Round 23: (6 dc, dc2tog) 6 times (42 sts).
  • Round 24: (5 dc, dc2tog) 6 times (36 sts).
  • Round 25: (4 dc, dc2tog) 6 times (30 sts).
  • Round 26: (3 dc, dc2tog) 6 times (24 sts).
  • Stop at this point. Put a safety pin on your working loop. Using the photograph as a guide, position and secure the safety eyes and nose on the head. Then place the base of the ears in each ear slot and sew on firmly. Stuff the head firmly. Then return to finishing the decreasing, putting the working loop back on your crochet hook.
  • Round 27: (2 dc, dc2tog) 6 times (18 sts).
  • Round 28: (1 dc, dc2tog) 6 times (12 sts).
  • Round 29: Dc2tog to end (6 sts).
  • Fasten off. Finish stuffing the head. Then use the yarn tail to gather and secure the last 6 sts.

Arms (make 2)

  • Using 3.5mm hook and A, make 12 ch, join with sl st to make a ring.
  • Round 1: 1 ch, dc into first ch, dc in each ch to end (12 sts).
  • Round 2: (2 dc, dc2inc) 4 times (16 sts).
  • Round 3: (3 dc, dc2inc) 4 times (20 sts).
  • Rounds 4–12: Work 9 rounds straight.
  • Round 13: (3 dc, dc2tog) 4 times (16 sts).
  • Rounds 14–20: Work 7 rounds straight.
  • Round 21: (2 dc, dc2tog) 4 times (12 sts).
  • Rounds 22–24: Work 3 rounds straight.
  • Round 25: (4 dc, dc2tog) 2 times (10 sts).
  • Round 26: Work 1 round.
  • Fasten off. Fold arm in half and sew starting ch together to form paw. Stuff both arms.

Feet and legs (make 2)

  • Using 3.5mm hook and A, make 8 ch; work around this central ch to make an oval base to the foot.
  • Round 1: Dc in 2nd ch from hook, 1 dc in each of next 6 dc, 2 ch, 1 dc in other side of each ch, 2 ch, join with a sl st to 1st ch (18 sts).
  • Round 2: 1 ch, 7 dc, 3 dc in ch sp, 7 dc, 3 dc in ch sp, join with a sl st to 1st ch (20 sts).
  • Round 3: 1 ch, 7 dc, dc2inc in each 3 end dc sts, 7 dc, dc2inc in each 3 end dc sts, join with a sl st to 1 ch (26 sts).
  • Round 4: 1 ch, work 1 dc in the back loop of each dc, join with a sl st to 1st ch.
  • Now work in a continuous spiral, placing a marker in the last st of the round.
  • Rounds 5–7: Work 3 rounds straight.
  • Round 8: 8 dc, (dc2tog) 3 times, 12 dc (23 sts).
  • Round 9: 8 dc, dc3tog, 10 dc, dc2tog (20 sts).
  • Rounds 10–27: Work 18 rounds straight.
  • Fasten off, leaving an 8in (20cm) tail of yarn. Fill each foot and leg firmly with stuffing. Fold the top of the leg width-wise. You will now use the stitches at the top of the leg to start working the body.

Body

  • Using the correct colour for the underpants, attach yarn C to the back of the left leg, work 20 dc, then attach the right leg by working 20 dc from the right leg. Now work in continuous spirals (40 sts).
  • Round 1: Work 1 round straight (40 sts).
  • Round 2: (9 dc, dc2inc) 4 times (44 sts).
  • Round 3: Work 1 round straight.
  • Round 4: (10 dc, dc2inc) 4 times (48 sts).
  • Rounds 5–8: Work 4 rounds straight.
  • Change to A.
  • Rounds 9–10: Work 2 rounds straight.
  • Round 11: (10 dc, dc2tog) 4 times (44 sts).
  • Rounds 12–15: Work 4 rounds straight.
  • Round 16: (9 dc, dc2tog) 4 times (40 sts).
  • Rounds 17–20: Work 4 rounds straight.
  • Round 21: (8 dc, dc2tog) 4 times (36 sts).
  • Rounds 22–25: Work 4 rounds straight.
  • Round 26: (7 dc, dc2tog) 4 times (32 sts).
  • In the next round you will place the arms working through the top stitches of the arms.
  • Round 27: 6 dc, fold the first arm in half, (dc through two layers of the arm and the next dc st) 5 times, 11 dc, (dc through two layers of the arm and the next dc st) 5 times, 5 dc (32 sts).
  • Round 28: Work 1 round straight.
  • Fasten off, leaving an 8in (20cm) tail of yarn.
  • Using a tapestry needle, weave this yarn through the last dc sts of the round and gather the hole together slightly to create a 4in (10cm) diameter neck edge.
  • Stuff the feet, legs and body firmly and sew the head firmly to the top of the body.

Tail

  • Using 3.5mm hook and B, make a magic ring (see Underground Crafter’s Notes).
  • Round 1: 1 ch, 4 dc into centre of the ring (4 sts).
  • Round 2: *1 dc, dc2inc; rep from * to end of round (6 sts).
  • Round 3: *2 dc, dc2inc; rep from * to end of round (8 sts).
  • Round 4: *3 dc, dc2inc; rep from * to end of round (10 sts).
  • Change to A.
  • Round 5: *4 dc, dc2inc; rep from * to end of round (12 sts).
  • Round 6: *5 dc, dc2inc; rep from * to end of round (14 sts).
  • Round 7: *6 dc, dc2inc; rep from * to end of round (16 sts).
  • Rounds 8–12: Work 5 rounds straight.
  • Round 13: *6 dc, dc2tog; rep from * to end of round (14 sts).
  • Round 14: Work 1 round straight.
  • Round 15: *5 dc, dc2tog; rep from * to end of round (12 sts).
  • Round 16: *4 dc, dc2tog; rep from * to end of round (10 sts).
  • Fasten off, leaving a 12in (30cm) tail of yarn. Stuff with a small amount of toy stuffing. Sew the tail firmly to the back of the fox between rounds 6 and 7 of the body.

Fox wardrobe

Evie’s cardigan: You will need

  • Debbie Bliss Rialto 4ply, 100% extra fine merino (197yds/180m per 50g ball): 1 ball in 39 Amber
  • Debbie Bliss Baby Cashmerino, 55% wool, 33% acrylic, 12% cashmere (137yds/125m per 50g ball): Small amounts in 076 Plum and 203 Teal for embroidery decoration
  • 3mm (UK11:US–) crochet hook
  • Tapestry needle
  • 5 x 1⁄4in (7mm) buttons (I have used flower-shaped shell buttons)

Note: This cardigan is made in a finer-weight yarn than most of the garments in this book.

Back

  • Work in rows.
  • Using 3mm hook, ch 31sts.
  • Row 1: 1 dc in 2nd ch from hook, dc to end, turn (30 sts).
  • Rows 2–20: Work 19 rows straight.
  • Row 21: Sl st across 4 sts, 1 ch, 22 dc, turn leaving 4 sts (22 sts).
  • Rows 22–24: Work 3 rows straight.
  • Row 25: 1 ch, miss 1 st, dc to last 2 sts, miss 1 st, dc in last st, turn (20 sts).
  • Row 26: 1 ch, 1 dc in each st to end, turn.
  • Row 27: 1 ch, miss 1 st, dc to last 2 sts, miss 1 st, dc in last st, turn (18 sts).
  • Row 28: 1 ch, 1 dc in each st to end, turn.
  • Row 29: 1 ch, miss 1 st, dc to last 2 sts, miss 1 st, dc in last st, turn (16 sts).
  • Rows 30–32: Work 3 rows straight.
  • Fasten off and weave in ends.

Front (button side)

  • Work in rows.
  • Using 3mm hook, ch 19 sts.
  • Row 1: 1 dc in 2nd ch from hook, dc to end, turn (18 sts).
  • Rows 2–20: Work 19 rows straight.
  • Row 21: Sl st across 4 sts, (sl st, 1 ch, 1 dc) in next st, 13 dc, turn (14 sts).
  • Rows 22–24: Work 3 rows straight.
  • Row 25: 1 ch, miss 1 st, 1 dc in each st to end, turn (13 sts).
  • Rows 26–27: Work 2 rows straight.
  • Row 28: Sl st across 5 sts, (sl st, 1 ch, 1 dc) in next st, 7 dc, turn (8 sts).
  • Row 29: 1 ch, miss 1 st, 5 dc miss 1 st, dc in last st, turn (6 sts).
  • Row 30: 1 ch, miss 1 st, 5 dc, turn (5 sts).
  • Row 31: 1 ch, 3 dc, miss 1st, dc in last st, turn (4 sts).
  • Row 32: 1 ch, 1 dc in each st to end, turn.
  • Fasten off and weave in ends.

Front (buttonhole side)

  • Work in rows.
  • Using 3mm hook, ch 19 sts.
  • Row 1: 1 dc in 2nd ch from hook, dc to end, turn (18 sts).
  • Row 2: 1 ch, 1 dc in each st to end, turn.
  • Row 3: 1 ch, 1 dc, 2 ch, miss 2 sts, 15 dc, turn.
  • Row 4: 1 ch, 15 dc, 2 dc in ch sp, 1 dc, turn.
  • Rows 5–8: Work 4 rows straight.
  • Row 9: 1 ch, 1 dc, 2 ch, miss 2 sts, 15 dc, turn.
  • Row 10: 1 ch, 15 dc, 2 dc in ch sp, 1 dc, turn.
  • Rows 11–14: Work 4 rows straight.
  • Row 15: 1 ch, 1 dc, 2 ch, miss 2 sts, 15 dc, turn.
  • Row 16: 1 ch, 15 dc, 2 dc in ch sp, 1 dc, turn.
  • Rows 17–20: Work 4 rows straight.
  • Row 21: 1 ch, 1 dc, 2 ch, miss 2 sts, 11 dc, turn (14 sts).
  • Row 22: 1 ch, 11 dc, 2 dc in ch sp, 1 dc, turn.
  • Rows 23–24: Work 2 rows straight.
  • Row 25: 1 ch, 1 dc, 2 ch, miss 2 sts, 9 dc miss 1 st, 1 dc in each st to end, turn (13 sts).
  • Row 26: 1 ch, 10 dc, 2 dc in ch sp, 1 dc, turn.
  • Row 27: 1 ch, 1 dc in each st to end, turn.
  • Row 28: 1 ch, 8 dc, turn, leaving 5 sts (8 sts).
  • Row 29: 1 ch, miss 1 st, 5 dc, miss 1 st, dc in last st, turn (6 sts).
  • Row 30: 1 ch, 4 dc, miss 1 st, dc in last st, turn (5 sts).
  • Row 31: 1 ch, miss 1 st, 4 dc, turn (4 sts).
  • Row 32: 1 ch, 1 dc in each st to end, turn.
  • Fasten off and weave in ends.

Sleeves (make 2)

  • Work in rows.
  • Using 3mm hook, ch 27 sts.
  • Row 1: 1 dc in 2nd ch from hook, dc to end, turn (26 sts).
  • Rows 2–20: Work 19 rows straight.
  • Row 21: Sl st across 5 sts, 1 ch, 16 dc, turn, leaving 5 sts (16 sts).
  • Row 22: 1 ch, miss 1 st, dc to last 2 sts, miss 1 st, dc in last st, turn (14 sts).
  • Rows 23–28: Continue to work as for row 22, dec 1 st at each end of row until you have 2 sts.
  • Row 29: 1 ch, 2 dc.
  • Fasten off.

Finishing

  • With RS facing, sew the shoulder seams together so that the buttonholes will be on your left when the cardigan is right-side out. Sew the raglan sleeve seams to the fronts and back. Sew the side seams of the front and back together and then up each sleeve seam on each side. Sew five buttons so that they correspond with the buttonholes. Fasten off and weave in ends.
  • Using teal, blanket stitch (see Underground Crafter’s Notes) around the sleeve and bottom of the cardigan. Then, using the photographs as a guide, embroider daisies using daisy stitch in plum yarn and three stem stitch leaves (see Underground Crafter’s Notes for video or read the daisy and stem stitch tutorials at the end of the pattern).

Evie’s skirt: You will need

  • Debbie Bliss Baby Cashmerino, 55% wool, 33% acrylic, 12% cashmere (137yds/125m per 50g ball): 25g in 76 Plum
  • 3.5mm (UK9:USE/4) crochet hook
  • Tapestry needle
  • Safety pin
  • Approx. 12in (30cm) of elastic cord for waistband

Note: The skirt is made by working top down in continuous spirals. The ruffle is then made using a base of treble stitches.

  • Using 3.5mm hook, ch 42 sts, join with a sl st to make a loop. Work in continuous rounds.
  • Round 1: 1 ch, 1 dc in every ch. Place marker (42 sts).
  • Rounds 2–7: Work 6 rounds straight.
  • Round 8: (19 dc, dc2inc, dc2inc), rep (46 sts).
  • Rounds 9–12: Work 4 rounds straight.
  • Now you will create a mesh to form a base on which to place the ruffles.
  • Round 13: 4 ch, *miss 1 st, (1 tr, 1 ch); rep from * around, sl st in top of 3rd ch (23 sps).
  • Round 14: 5 ch, *miss 1 st, (1 tr, 2 ch); rep from * around, sl st in top of 3rd ch.
  • Round 15: 5 ch, *miss 1 st, (1 tr, 2 ch); rep from * around, sl st in top of 3rd ch.
  • Fasten off.

Ruffle

  • Round 1: Join yarn using a sl st at the base of 4 ch at the beg of round 13, 3 ch, 5 tr in 4 ch sp, * 3 tr down next tr of round 13, 3 tr in next dc of round 12, 3 tr up next tr of round 13, 3 tr in next 1 ch sp; rep from * around, finish with sl st to the top first tr.
  • Round 2: Sl st along 3 tr from previous round, 6 tr in 5 ch sp, * 4 tr down next tr of round 14, 3 tr in next 1 ch sp of round 13, 4 tr up next tr of round 14, 3 tr in next 2 ch sp; rep from * around, finish with sl st to the top first tr.
  • Round 3: Sl st along 3 tr from previous round, 6 tr in 5 ch sp, * 4 tr down next tr of round 15, 3 tr in next 2 ch sp of round 14, 4 tr up next tr of round 15, 3 tr in next 2 ch sp; rep from * around, finish with sl st to the top first tr.
  • Fasten off and weave in ends.

Finishing

  • With WS facing, fold over the top of the skirt to create a waistband and use the tail of yarn to sew the edge of the waistband to the inside of the skirt. Leave a small gap. Use a safety pin to thread some elastic cord through the waistband through the gap. Gather the waistband slightly and knot the ends of the elastic together, poke the elastic into the gap so that it is hidden within the waistband, then sew the gap down.

Evie’s shoes (make 2): You will need

  • Debbie Bliss Baby Cashmerino, 55% wool, 33% acrylic, 12% cashmere (137yds/125m per 50g ball): Small amount in 203 Teal
  • 3.5mm (UK9:USE/4) crochet hook
  • Tapestry needle

Note: There is a small bow attached to the front of each shoe.

  • Using 3.5mm hook, make 8 ch; work around this central ch to make an oval base to the foot.
  • Round 1: Dc in 2nd ch from hook, 1 dc in each of next 6 dc, 2 ch, 1 dc in other side of each ch, 2 ch, join with a sl st to 1st ch (18 sts).
  • Round 2: 1 ch, 7 dc, 3 dc in ch sp, 7 dc, 3 dc in ch sp, join with a sl st to 1st ch (20 sts).
  • Round 3: 1 ch, 7 dc, dc2inc in each 3 end dc sts, 7 dc, dc2inc in each 3 end dc sts, join with a sl st to 1 ch (26 sts).
  • Round 4: 1 ch, work 1 dc in the back loop of each dc, join with a sl st to 1st ch.
  • Now work in a continuous spiral, placing a marker in the last st of the round.
  • Rounds 5–7: Work 3 rounds straight.
  • Round 8: 8 dc, (dc2tog) 3 times, 12 dc (23 sts).
  • Round 9: 8 dc, dc3tog, 10 dc, dc2tog (20 sts).
  • Round 10: Sl st in every st.
  • Fasten off and weave in ends.

Bow (make 2)

  • Using 3.5mm hook, ch 4 sts.
  • Row 1: 1 dc in 2nd ch from hook, dc to end, turn (3 sts).
  • Rows 2–13: Work 11 rows straight.
  • Fasten off and leave a 15in (40cm) tail of yarn. Sew the first and the last rows together to create a loop. Flatten the loop with the seam in the centre at the back. Wrap the rest of the yarn tightly around the middle of the loop to create a centre knot. Secure with a few stitches and then sew securely to the front of each shoe.

Ben’s pirate hat: You will need

  • Debbie Bliss Baby Cashmerino, 55% wool, 33% acrylic, 12% cashmere (137yds/125m per 50g ball): Small amount in 34 Red
  • 3.5mm (UK9:USE/4) crochet hook
  • Tapestry needle
  • Using 3.5mm hook, make a magic ring (see Underground Crafter’s Notes).
  • Round 1: 1 ch, 6 dc into the centre of the ring (6 sts).
  • Round 2: 2 dc in each st (12 sts).
  • Round 3: (1 dc, dc2inc) 6 times (18 sts).
  • Round 4: (2 dc, dc2inc) 6 times (24 sts).
  • Round 5: (3 dc, dc2inc) 6 times (30 sts).
  • Round 6: (4 dc, dc2inc) 6 times (36 sts).
  • Round 7: (5 dc, dc2inc) 6 times (42 sts).
  • Round 8: (6 dc, dc2inc) 6 times (48 sts).
  • Round 9: 14 dc, 7 ch, miss 7 sts, 6 dc, 7 ch, miss 7 sts, 14 dc (48 sts).
  • Round 10: 1 dc in each dc and each ch.
  • Rounds 11–13: Work 3 rounds straight.
  • Now make knotted decoration by making two long ties that will be knotted together.
  • Round 14: 9 dc, 11 ch, 1 dc in 2nd ch from hook, (1 dc in ch) 10 times, 1 dc, 11 ch, 1 dc in 2nd ch from hook, (1 dc in ch) 10 times, 38 dc.
  • Fasten off and weave in ends. Tie a double knot at the side of the hat.

Ben’s stripy T-shirt: You will need

  • Debbie Bliss Baby Cashmerino, 55% wool, 33% acrylic, 12% cashmere (137yds/125m per 50g ball):
    • 25g in 100 White (A)
    • 25g in 70 Royal (B)
  • 3.5mm (UK9:USE/4) crochet hook
  • Tapestry needle

Notes: The T-shirt uses stripes of white and blue worked in rows.

Back/Front (make 2)

  • Using 3.5mm hook and A, ch 27 sts.
  • Row 1: 1 dc in 2nd ch from hook, dc to end, turn (26 sts).
  • Row 2: 1 ch, 1 dc in each st to end, turn.
  • Rows 3–4: Change to B, rep row 2.
  • Rows 5–6: Change to A, rep row 2.
  • Rows 7–14: Rep row 2, changing colours every two rows to create a stripe, end with a row of A.
  • Row 15: Change to B, 1 ch, miss 1 st,
  • 1 dc in each st to end, turn (25 sts).
  • Row 16: 1 ch, miss 1 st, 1 dc in each st to end, turn (24 sts).
  • Row 17: Change to A, sl st across 3 sts, (sl st, 1 ch, 1 dc) in next st, 17 dc, turn (18 sts).
  • Row 18: 1 ch, 1 dc in each st to end, turn.
  • Row 19: Change to B, 1 ch, miss 1 st, dc to last 2 sts, miss 1 st, dc in last st, turn (16 sts).
  • Row 20: 1 ch, 1 dc in each st to end, turn.
  • Rows 21–22: Change to A, 1 ch, 1 dc in each st to end, turn.
  • Row 23: Change to B, 1 ch, miss 1 st, dc to last 2 sts, miss 1 st, dc in last st, turn (14 sts).
  • Row 24: 1 ch, 1 dc in each st to end, turn.
  • Fasten off and weave in ends.

Sleeves (make 2)

  • Using 3.5mm hook and B, ch 21 sts.
  • Row 1: 1 dc in 2nd ch from hook, dc to end, turn (20 sts).
  • Row 2: 1 ch, 1 dc in each st to end, turn.
  • Rows 3–4: Change to A, rep row 2.
  • Rows 5–6: Change to B, rep row 2.
  • Row 7: Change to A, sl st across 3 sts, (sl st, 1 ch, 1 dc) in next st, 13 dc, turn (14 sts).
  • Row 8: 1 ch, miss 1 st, dc to last 2 sts, miss 1 st, dc in last st, turn (12 sts).
  • Row 9: Change to B, 1 ch, miss 1 st, dc to last 2 sts, miss 1 st, dc in last st, turn (10 sts).
  • Row 10: 1 ch, miss 1 st, dc to last 2 sts, miss 1 st, dc in last st, turn (8 sts).
  • Row 11: Change to A, 1 ch, miss 1 st, dc to last 2 sts, miss 1 st, dc in last st, turn (6 sts).
  • Row 12: 1 ch, miss 1 st, dc to last 2 sts, miss 1 st, dc in last st, turn (4 sts).
  • Row 13: Change to B, 1 ch, 1 dc in each st to end, turn.
  • Fasten off and weave in ends.

Finishing

  • With RS facing, sew just one stitch either side of the neck edge of the front and back of the T-shirt. Sew the raglan sleeve seams to the fronts and back. Sew the side seams of the front and back together and then up each sleeve seam on each side. Make sure the stripes match along the seam.

Ben’s trousers: You will need

  • Debbie Bliss Baby Cashmerino, 55% wool, 33% acrylic, 12% cashmere (137yds/125m per 50g ball): 25g in 34 Red
  • 3.5mm (UK9:USE/4) crochet hook
  • Tapestry needle
  • Safety pin
  • Approx. 12in (30cm) of elastic cord for waistband
  • Using 3.5mm hook, ch 28 sts, join with a sl st to make a loop. Work in continuous rounds.

First leg

  • Round 1: 1 ch, 1 dc in every ch (28 sts).
  • Rounds 2–3: 1 dc in back loop every st.
  • Rounds 4–20: Work 17 rounds straight.
  • Fasten off.

Second leg

  • Make a second leg exactly the same but do not fasten off. Place marker.
  • Round 21: Join second leg by working across the 28 sts of first leg and then the 28 sts of the second leg (56 sts).
  • Rounds 22–24: Work 3 rounds straight.
  • Round 25: 1 dc in every st until 2 sts before the marker, 2 ch, place marker, miss 2 sts.
  • Round 26: 2 ch, miss 2 sts (4 sts missed in total), 1 dc in next st, 9 dc, dc2tog, (8 dc, dc2tog) four times, 1 dc in each of next 2 ch (51 sts).
  • Round 27: 1 dc in each of next 2 ch, 1 dc in every st, turn (51 sts).
  • Rounds 28–29: Work 2 rounds straight.
  • Round 30: 1 dc, (8 dc, dc2tog) 5 times (46 sts).
  • Rounds 31–37: Work 7 rounds straight.
  • Fasten off, leaving a 12in (30cm) tail of yarn.

Finishing

  • With WS facing, fold over the top of the trousers to create a waistband, then use the tail of yarn to sew the edge of the waistband to the inside of the trousers. Leave a small gap. Use a safety pin to thread some elastic cord through the waistband through the gap. Gather the waistband slightly and knot the ends of the elastic together, poke the elastic into the gap so that it is hidden within the waistband, then sew the gap down.

Daisy stitch

  • To make a daisy stitch, bring your needle up through the fabric where the centre of the flower will be. Insert the tip of your needle again next to where it first came up and bring the point up through the fabric at the place where the petal will end. Before you pull the thread through, make sure the loop of thread is caught under the needle tip. Insert the needle back into the fabric on the opposite side of the thread so that you create a small stitch to keep your loop petal in place. Repeat this process to make more petals around the centre point of the flower.

Stem stitch

  • Stem stitch is great for making curved lines. Bring your needle up at A and back down at B. Then bring it up again at C, a little to the right and back from B. Repeat using evenly sized stitches and always taking the needle back down to the same side of the previous stitch. 

Looking for more crochet inspiration? Check out my reviews of Emma’s Granny Squares Weekend with the Panda Comforter pattern excerpt or Emma’s Granny Squares Home with the Cuddy Lion and Panda pattern excerpts.

Leave a Comment

Subscribe to the newsletter to get my secrets and access to the subscriber vault!

5 Secrets for Improving Your Crochet Skills