

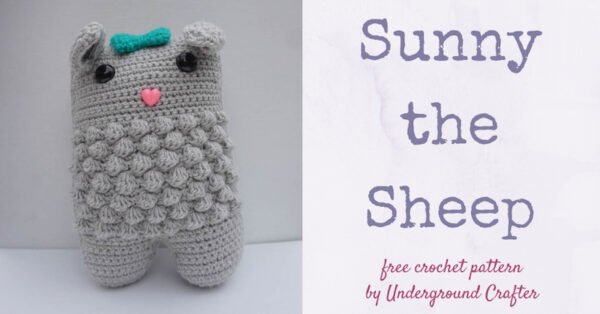
Spring time makes me think of outdoors and nature, so a crochet sheep pattern seemed the perfect fit. Sunny the Sheep is a rag doll style amigurumi bobble sheep with a cute little bow.
This post contains affiliate links. I may receive compensation (at no added cost to you) if you make a purchase using these links. Materials for the sample were generously provided by Furls. B&H Photo Video Pro Audio generously provided the camera used for finished project photography.
I’m so excited to be participating in the 2020 Furls Blog Hop, including 52 weeks of free crochet and knitting patterns by fabulous designers!
My very first free crochet pattern published on Underground Crafter was for a textured sheep amigurumi, the Chubby Sheep.

Wool yarn just seems to call for a sheep pattern (hmmm, I wonder why?). And, after swatching with the Furls Whims Merino DK yarn using the Furls Streamline Swirl Cherry on Top crochet hook, I knew the stitch definition would be great for a bobble sheep crochet pattern.
This was my first time using a Furls Streamline Swirl Cherry on Top crochet hook, though I’ve previously used their handmade Alpha wooden hooks (reviewed here). I really liked the lightweight feel of the Streamline Swirl. It seemed perfectly weighted for my knife grip.

As usual, once I completed this crochet sheep pattern, I had no good ideas for the name. I decided to take her for a walk around the neighborhood for inspiration.

She seems to enjoy the urban lifestyle though she is clearly a farm girl at heart.

Ultimately, it was my friend Pia from Stitches n Scraps who came up with the name Sunny the Sheep, and I think it fits perfectly. What do you think?

Don’t forget to stop by the 2020 Furls Blog Hop, where you’ll find more patterns using Furls Whims Merino yarn.
If you make your own Sunny the Sheep, I’d love to see it! I’d love to see it! Share your progress and questions by tagging me on Bluesky as @UndergroundCrafter, Facebook as @UndergroundCrafter, or on Instagram as @ucrafter. You can also share a picture in the Underground Crafters Facebook group. Sign up for my weekly newsletter and get a coupon code for your choice of one of my premium patterns and private access to my vault of subscriber goodies. Plus, you’ll never miss one of my free patterns again!
Add Sunny the Sheep to your favorites or queue, or buy the ad-free PDF on Ravelry.

Sunny the Sheep
Crochet Sheep Pattern by Underground Crafter


This pretty and textured, rag doll style amigurumi ruminant will bring a smile to your face.
Finished Size
- Approximately 7.5” (19 cm) tall x 5” (13 cm) wide before stuffing.
Materials
- Furls Whims Merino DK yarn (50% superwash Merino wool/50% nylon, 3.5 oz/100 g, 196 yd/180 m) – 1 skein each in Light Grey (CA) and Teal (CB), or approximately 196 yd (180 m) in CA and 15 yd (14 m) in CB in any light weight yarn.
- Furls Streamline Swirl Cherry on Top US Size G-8/5 mm crochet hook, or any size needed to obtain gauge.
- Fairfield World Poly-Fil Premium Fiber Fill – 12 ounce bag.
- 15 mm black safety eyes – 1 pair.
- 13 mm pink heart safety nose – 1 piece.
- Yarn needle.
Gauge
- 20 sc = 4” (10 cm) across. Exact gauge is not required for this pattern. Stitches should be small so that fiber filling doesn’t show.
Abbreviations Used in This Pattern
- BL – back loop only – Fiber Flux has a helpful tutorial for identifying the back loop in crochet here.
- CA – Color A
- CB – Color B
- ch – chain
- bob – 5-repeat bobble – [Yo, insert hook into st, yo and draw up a loop, yo and draw through 2 loops] 5 times in the same st, yo and draw through all 6 loops on hook. A video tutorial for the bob is available below.
- If you can’t see the bob video above, watch it on YouTube.
- rep – repeat
- sc – single crochet
- sc2tog – single crochet 2 together (decrease) – [Insert hook in next st, yo and draw up a loop] twice, yo and draw through all 3 loops on hook. A video tutorial for the sc2tog is available below.
- If you can’t see the sc2tog video above, watch it on YouTube.
- sl st – slip stitch
- sk – skip
- st(s) – stitch(es)
- yo – yarn over
- *Repeat instructions after asterisk as indicated.
- [] Repeat instructions between brackets as indicated.
Pattern Notes
- The Body and Legs are crocheted flat in rows with an edging worked in the round. The Ears and Bow are crocheted flat in rows.
- When selecting colors, note that CA is the color of the Body and Ears. CB is the color of the Bow.
- A helpful tutorial for joining with a whipstitch seam is available below.
- If you can’t see the whipstitch tutorial above, watch it on YouTube.
- A helpful tutorial for joining with a slip stitch seam is available below.
- If you can’t see the slip stitch seam tutorial above, watch it on YouTube.
Pattern Instructions
Ears (Make 2)
- With CA and starting with long yarn tail (approximately 12”/30.5 cm) for seaming, ch 11.
- Row 1: Turn, skip 1 ch, sc in next 10 ch. (10 sts)
- Row 2: Turn, ch 1, sc in first st and in each st across.
- Rows 3-4: Rep Row 2 twice.
- Row 5: Turn, ch 1, sc2tog in first 2 sts, sc in each st across. (9 sts)
- Row 6: Rep Row 5. (8 sts)
- Row 7: Rep Row 5. (7 sts)
- Row 8: Rep Row 5. (6 sts)
- Row 9: Rep Row 5. (5 sts)
- Row 10: Rep Row 5. (4 sts)
- Row 11: Rep Row 5. (3 sts)
- Row 12: Rep Row 5. (2 sts)
- Row 13: Turn, ch 1, sc2tog in first 2 sts. (1 st)
- Turn to work along shaped edge, ch 1, sc in side of each row across to foundation ch.

- Sk 10 sts on foundation chain, fold Ear in half along foundation chain, sc in side of first st on other shaped edge.

- Sc in side of next rows across shaped edge, join with sl st to sc2tog from Row 13, fasten off.
Bow
- With CB, ch 6.
- Row 1: Turn, sk 1 ch, sc in next 5 ch. (5 sts)
- Row 2: Turn, ch 1, sc in first st and in each st across.
- Row 3: Turn, ch 1, sc2tog in first 2 sts, sc in next 3 sts. (4 sts)
- Row 4: Turn, ch 1, sc2tog in first 2 sts, sc in next 2 sts. (3 sts)
- Rows 5-7: Rep Row 2, 3 times.
- Row 8: Turn, ch 1, 2 sc in first st, sc in next 2 sts. (4 sts)
- Row 9: Turn, ch 1, 2 sc in first st, sc in next 3 sts. (5 sts)
- Row 10: Rep Row 2 once.
- Row 11: Turn, ch 1, scBL in first st and in each st across.
- Rows 12-20: Rep Rows 2-10, fasten off with long yarn tail (approximately 12”/30.5 cm) for seaming.
- Thread yarn needle with long yarn tail.
- Fold Bow along unworked front loops of Row 11.
- With yarn needle, join both sides of Bow together with whipstitch seam (see Pattern Notes). With yarn needle, weave in ends on inside of Bow.
Body – Back
- With CA, ch 26.
- Row 1: Turn, sk 1 ch, sc in next 25 ch. (25 sts)
- Row 2: Turn, ch 1, sc in first st and in each st across.
- Rep Row 2 until piece measures approximately 2.5” (6.5 cm) long.
- Row 3: Turn, ch 1, sc in first st, *bob in next st, sc in next 2 sts; rep from * across.
- Row 4: Rep Row 2 once.
- Row 5: Turn, ch 1, sc in first st, *sc in next 2 sts, bob in next st; rep from * across to last 3 sts, sc in next 3 sts.
- Row 6: Rep Row 2 once.
- Rep Rows 3-6 until piece measures approximately 5.5” (14 cm) long, ending after a rep of Row 3.
- Rows 7-8: Rep Row 2 twice.
First Leg
- Row 9: Turn, ch 1, sc in first 12 sts, sk next 13 sts. (12 sts)
- Row 10: Turn, ch 1, sc in first st and in each of next 11 sts.
- Rows 11-15: Rep Row 10, 4 times.
- Row 16: Turn, ch 1, sc2tog in first 2 sts, sc in each st across to last 2 sts, sc2tog. (10 sts)
- Row 17: Rep Row 16. (8 sts)
- Row 18: Rep Row 16. (6 sts)
- Row 19: Rep Row 16, fasten off. (4 sts)
Second Leg
- Next Row: Sk next st on Row 8 after First Leg, join yarn with sl st to next st, ch 1, sc in same st and in each of next 11 sts. (12 sts)
- Rep as for First Leg Rows 10-19, do not fasten off.
Body Edging
- Round 1: With textured side of bobbles facing you as Right Side, turn to work along unworked edge, ch 1, sc in side of each row across Second Leg and Body to foundation chain, turn, sc in next 25 sts across foundation row, turn, sc in side of each Row across Body and First Leg, turn to work along Row 19, sc in next 4 sts, turn to work along inner side of First Leg, sc in side of each row, sc in skipped st on Row 8, sc in side of each row on inner side of Second Leg, sc in next 4 sts along Row 19 of Second Leg, join with sl st to first sc, fasten off.
Body – Front
- Rep Body as for Front, do not fasten off.
Assembly and Finishing

- With bobble side of Body Front facing you, position lower, folded edge of first Ear. Thread yarn needle with yarn tail from Ear, sew into position. Repeat for second Ear.

- Position first safety eye on Body Front below ears. When satisfied with position, attach by firmly securing washer on back. Repeat for second safety eye. Position nose on Body Front below eyes. When satisfied with position, attach by firmly securing washer on back.

- Position Bow above Eyes on Body Front. With yarn needle threaded with approximately 12”/30.5 cm in CB, *insert needle from inside (wrong side) of Body Front underneath fold in Bow to outside (right side) of Body Front, insert needle from outside above fold in Bow; rep from * until Bow is securely tied down. Fasten off, weave in ends of CB on wrong side of Body Front.
- Position Body Back underneath Body Front so that wrong sides are facing each other and bobble sides are facing out. Line up stitches and form a slip stitch seam (see Pattern Notes) through back loops of both layers until inner edges of Legs. Stuff Body and First Leg firmly with fiber filling. Continue to work seam down inner edge of First Leg. Stuff Second Leg firmly with fiber filling. Continue to work seam up inner edge of Second Leg. Join with sl st to first stitch. Fasten off.
- Weave in ends onto inside of Body.