
This easy fabric bookmark pattern is a great way to use up scraps of cotton fabric left over from larger projects, to practice your sewing skills on a low-stakes project, or to get in some “mindless” sewing after a difficult week.

This post contains affiliate links. I may receive compensation (at no added cost to you) if you make a purchase using these links. I am a 2020 Brand Ambassador with Michael Miller Fabrics and this post is part of our ongoing collaboration. All opinions and thoughts are my own. Additional materials for this post were generously provided by Baby Lock, Clover, and Yarnspirations. Camera was generously provided by B&H Photo Video and Pro Audio.
Back in 2005, I went on a weekend trip to a bed and breakfast with two friends and we learned to make our own quilts with some help from the owner and Make a Quilt in a Day: Log Cabin Pattern by Eleanor Burns.
I got hooked on strip piecing then, but now that 2-1/2″ precut fabric rolls are a thing, there are even more quilting and home decor patterns available that use 2-1/2″ strips. When I moved in with MC, I had to abandon my old fabric scrap pile, so now when I’m cutting fabric for a project, I usually cut down any remaining fabric into 2-1/2″ strips because I know I’ll find a project for those strips… someday.
This week I was cutting fabric for an upcoming project that I’ll be sharing in another blog post using some beautiful Michael Miller Fabrics. These were just too cute not to use for something fun right away. The fabric on the left is called Enjoy the Little Things from the Black & White collection and the one on the right is Fairy Frost Ice Glitter.

Lately, I’ve been spending a lot of time in meetings online for work. In my off hours, I have been unplugging with good old fashioned print books, and that’s how the idea for the fabric bookmark pattern was born.

Now if you don’t have 2-1/2″ strips already cut, don’t worry. Fabric bookmarks are pretty forgiving — there really is no “wrong size” and you can cut pieces from yardage, fat quarters, or even 10″ precut squares to make them.

By the way, if you’re a true sewing beginner, don’t forget to check out How To Use a Sewing Machine for Beginners and Sewing Tips & Resources for Beginners from Your Favorite Bloggers.
How To Sew an Easy Fabric Bookmark

This easy-to-sew fabric bookmark pattern is a great way to practice your stitches, use up fabric scraps, or sew something “mindless.” This would even make a great gift! Gift a fabric bookmark with a Log Cabin Pocket Pillow and a great book for your favorite bookworm.
Finished Size
- Approximately 2″ (5 cm) wide x 7″ – 8″ (18 – 20.5 cm) long. Exact size doesn’t matter as long as it fits in your book!
Tools
- Sewing machine. I used my Baby Lock Jubilant. You can read my review and see what’s in the box here.
- Clover Flower Head Pins.
- Iron and iron-safe surface.
- Rotary cutter, cutting mat, and acrylic ruler.
- Basic sewing supplies (seam ripper, thread snips, etc.).
Materials
- For each bookmark, you’ll need:
- 2-1/2″ (6.5 cm) x 14-1/2″ (37 cm) fabric strips (for the folded method), or
- 2 pieces of fabric cut to 2-1/2″ (6.5 cm) x 7-1/2″ (19 cm) strips (for the seamed method).
- I used Michael Miller Fabrics Enjoy the Little Things in White, Fairy Frost Ice Glitter, and Scenic View in Lavender.
- Thread. I used Coats & Clark Cotton Machine Quilting Thread (350 yd) in White inside and Coats & Clark Cotton Machine Quilting Thread (1200 yd) in Pink Passion for the topstitching.
Step 1: Prepare your strips for sewing.

- Fold longer strips with the right sides together so that the short edges meet (for the folded method).
- Position shorter strips with the right sides together (for the seamed method).

- Pin the folded strips on the longer sides, leaving the narrow top edge un-pinned.
- Pin the shorter strips on three sides, leaving one narrow top edge un-pinned.

Step 2: Seam Your Strips
- For the folded method: using a straight stitch and a 1/4″ seam allowance, sew straight down each long edge, being sure to secure stitches at the start and end. Trim your threads.
- For the seamed method: using a straight stitch and a 1/4″ seam allowance, sew straight down the first long edge, being sure to secure stitches at the start and end. Fasten off thread. Sew straight down the next short edge, being sure to secure stitches at the start and end. Fasten off thread. Sew straight down the next long edge, being sure to secure stitches at the start and end. Fasten off and trim your threads.

Step 3: Turn Your Strips Right Side Out
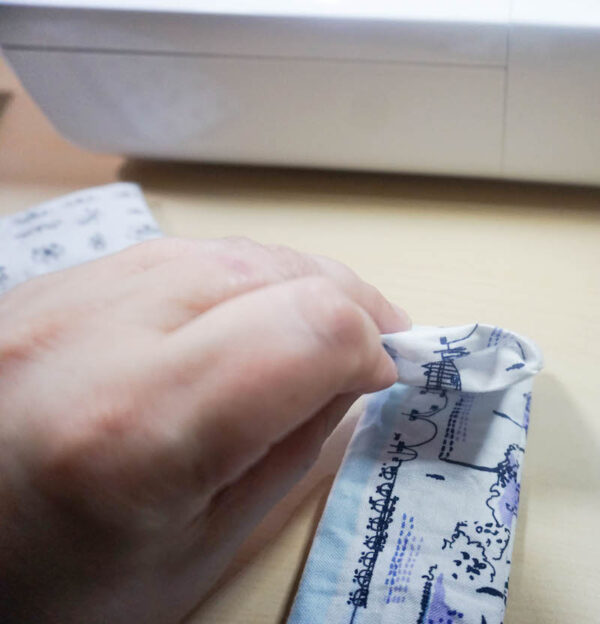
- Insert your fingers through the un-seamed short edge and pull the fabric right side out.

(By the way, if you’re wondering, my seamed bookmark was cut a bit longer than what I listed in the materials section to about 8-1/2″/21.5 cm because it was an actual leftover scrap from another sewing project.)

Step 4: Finish Your Bookmark
- You’ll finish your fabric bookmark with topstitching. I like to use a thread that’s bold but some how works with the fabric when I topstitch. You may need to audition a few candidates.

- Once you’ve picked your topstitching thread, you’ll want to use it for both the bobbin and top thread.

- Fold the ends on the un-seamed end of your bookmark inside for about 1/2″ (1.3 cm). This will allow you to seam the edge closed with a 1/4″ seam allowance.
- If your fabric doesn’t want to cooperate, it helps to use your iron to press the fabric into place.
- Change to your topstitching thread in the top and bobbin.
- Position your bookmark so that you are starting about 1/4″ (.6 cm) away from the side of the un-seamed short edge.
- Using a straight stitch and a 1/4″ seam allowance, and being sure to secure your first few stitches, sew straight down the first short edge. As you get to about 1/4″ from the edge, stop sewing.
- Lift your presser foot, and reposition your bookmark so that you are ready to sew down the next long edge.

- Lower your presser foot and continue sewing down the long edge. As you get to about 1/4″ from the edge, stop sewing.
- Lift your presser foot, and reposition your bookmark so that you are ready to sew down the next short edge.
- Repeat this process all the way around, ending at the short edge where you started.
- Fasten off and trim your threads.

You are now ready to read all the things! Support independent and local bookstores while shopping for these books on my Bookshop store.