
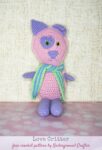
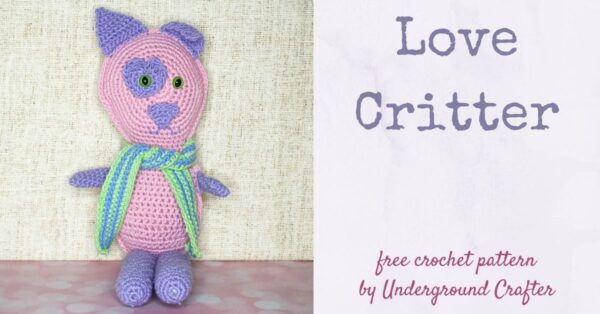
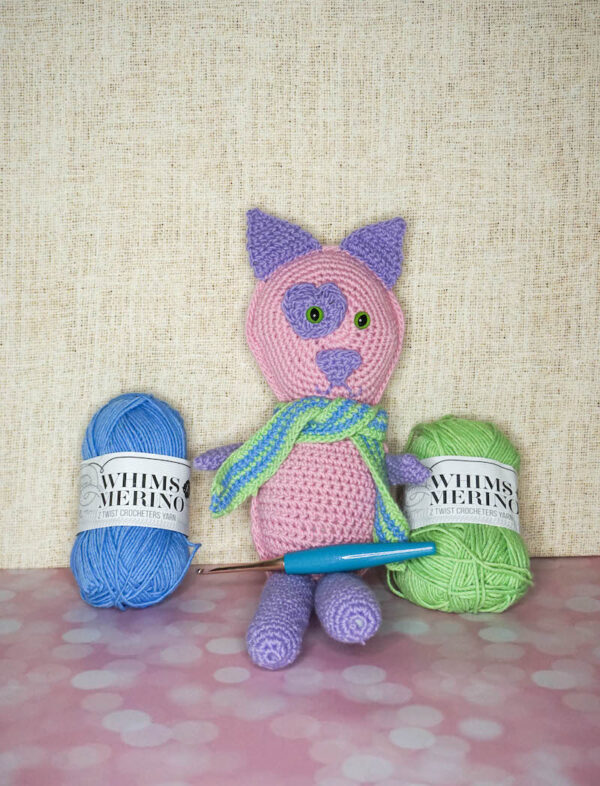
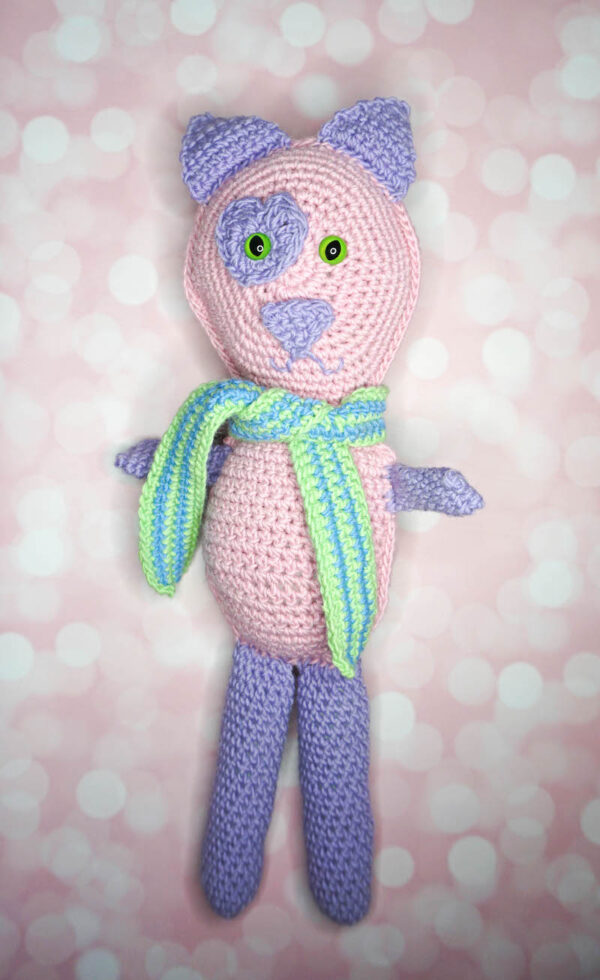
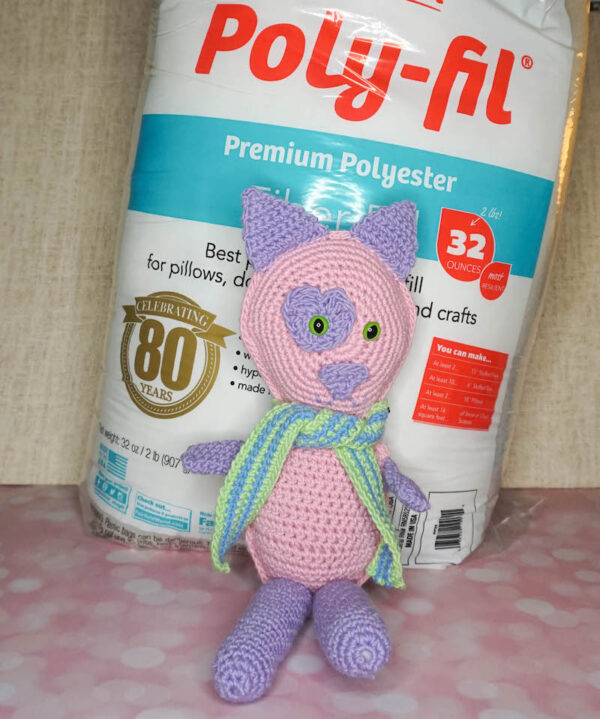
Today, I’m bringing you a pattern for an adorable crochet critter as part of the Furls Blog Hop. The Love Critter is huggable with floppy limbs that can be carried around by hands of all sizes.
This post contains affiliate links. I may receive compensation (at no added cost to you) if you make a purchase using these links. Materials for this project were generously provided by Furls, Clover USA, and Fairfield World.
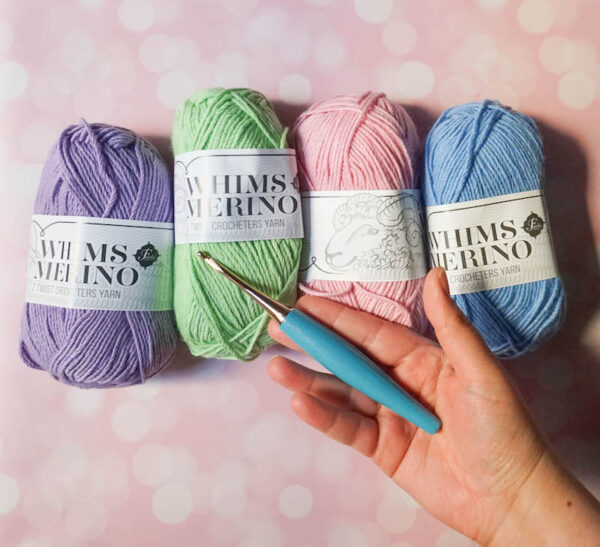
At the end of last year, Furls released several new colors in their Worsted Whims Merino yarn.
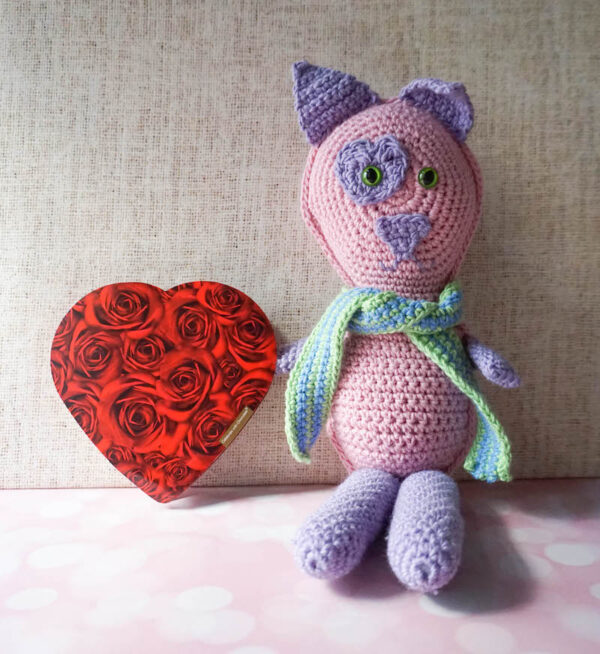
As soon as I saw these, I knew I’d have to crochet a cute little critter. With Valentine’s Day and Easter around the corner, I thought a Love Critter that could be gifted in fun spring colors would be a great idea!
I made the limbs floppy so it’s more of a rag doll style. And this critter is part cat, part dog, part alien — really all the fun parts of a softie.
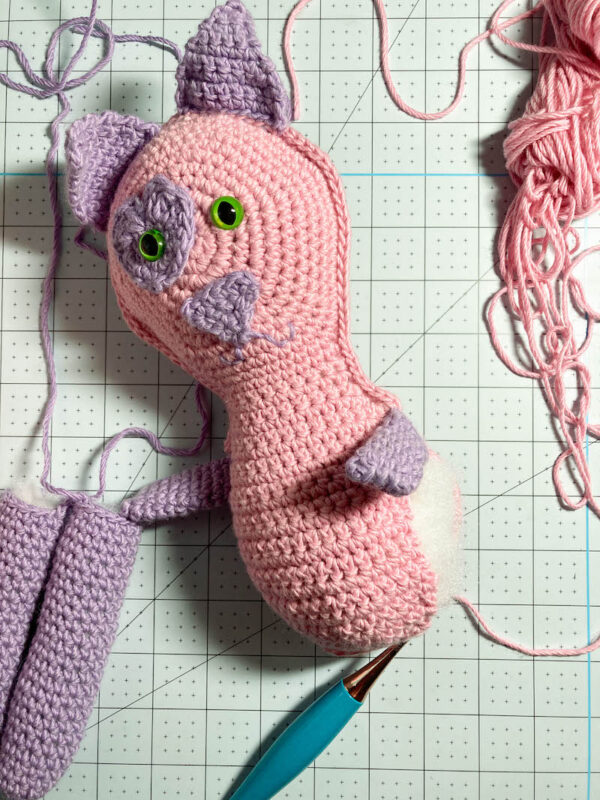
In my version, the Arms are unstuffed to give them a really floppy appearance. If you decide to stuff them, do so before seaming the arms closed.
You can find other crochet, Tunisian crochet, and knit patterns from the Furls Blog Hop here.
If you make your own Love Critter, I’d love to see it! Share your progress and questions by tagging me on Facebook as @Underground Crafter or Instagram as @ucrafter. You can also share a picture in the Underground Crafters Facebook group. Sign up for my weekly newsletter and get a coupon code for your choice of one of my premium patterns and private access to my vault of subscriber goodies. Plus, you’ll never miss one of my free patterns again!
Add the Love Critter to your favorites or queue, or buy the ad-free PDF on Ravelry.

Love Critter
Crochet Critter Pattern by Underground Crafter
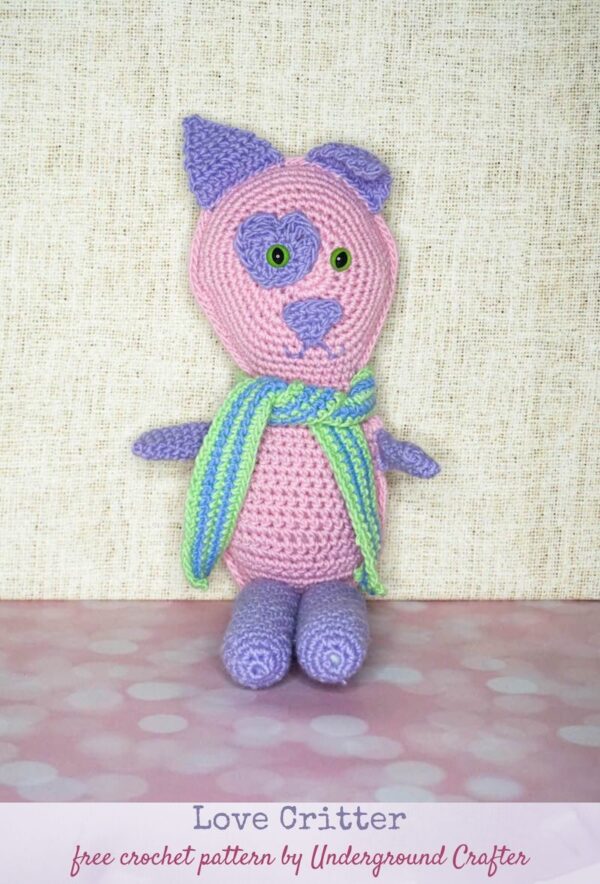


This adorable softie is ready to love. Its floppy arms and legs make it perfect for hugging and carrying around.
Finished Size
- Approximately 15.75” (40 cm) tall from tip of ears to bottom of legs before stuffing.
Materials
- Furls Worsted Whims Merino yarn (50% superwash Merino wool/50% nylon, 3.5 oz/100 g/120 yd/109 m) – 1 skein each in Pink (CA), Lavender (CB), Spearmint (CC), and Periwinkle (CD), or approximately 120 yd (109 m) in CA, 65 yd (59.5 m) in CB, 25 yd (23 m) in CC, and 10 yd (9 m) in CD in any medium weight yarn.
- Furls Odyssey US Size G-6/4 mm crochet hook, or size needed to obtain gauge.
- Clover Quick Locking Stitch Marker Set, or locking stitch markers.
- Clover Chibi bent needle yarn needle.
- Fairfield Poly-Fil Premium Polyester Fiber Fill – 12 ounce bag.
- 12 mm cat safety eyes – 1 pair.
- WeCrochet Premium Blocking Mats with T-Pins – optional.
Gauge
- Head through Rnd 12 = 4.75” (12 cm) diameter in pattern. Exact gauge is not critical for this pattern. Stitches should be small so that fiber filling doesn’t show.
Abbreviations Used in This Pattern
- CA – Color A
- CB – Color B
- CC – Color C
- CD – Color D
- ch – chain
- dc – double crochet
- FL – front loop only
- hdc – half double crochet
- Rnd(s) – Round(s)
- sc – single crochet
- sc2tog – single crochet 2 stitches together (decrease) – [Insert hook in next st, yo and draw up a loop] twice, yo and draw through all 3 loops on hook. A helpful tutorial for sc2tog by ChristaCoDesign is available here.
- sl st – slip stitch
- st(s) – stitch(es)
- tr – treble (triple) crochet
- yo – yarn over
- * Repeat instructions after asterisk as indicated.
- [] Repeat instructions between brackets as indicated.
Pattern Notes
- The video tutorial below includes helpful tutorials for crocheting the dc, hdc, sc, sl st, and tr.
- If you can’t see the video tutorial above, click here to watch it on YouTube.
- Oombawka Design has helpful magic ring tutorials here.
- Fiber Flux has a helpful tutorial for identifying the front loop here.
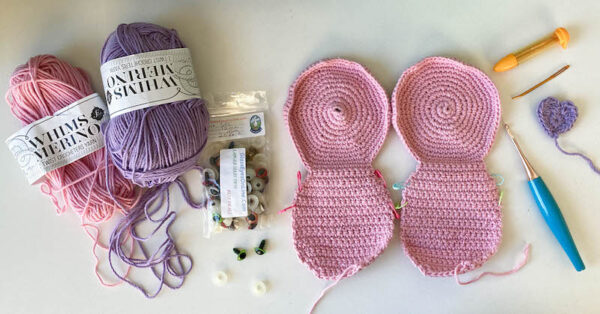
- Love Critter is made with 2 Body Panels. Each Body Panel begins with a Face crocheted in the round in unjoined spirals and continues with Torso crocheted flat in rows. Scarf is crocheted flat in rows. Heart, Arms, and Legs are crocheted in the Round in unjoined spirals. Body Panels are joined together with single crochet seam and stuffed. Scarf is wrapped around neck after stuffing.
- Change color in last yo of final sc of indicated Row and crochet over yarn tails when possible as demonstrated in the video below.
- If you can’t see the video above demonstrating color changes, click HERE to watch it on YouTube.
- A helpful video tutorial for seaming with the whipstitch is available below.
- If you can’t see the video above demonstrating the whipstitch, click HERE to watch it on YouTube.
- A helpful video tutorial for the embroidery backstitch is available at the end of this blog post.
- A helpful video tutorial for seaming with single crochet is available below.
- If you can’t see the video above demonstrating the single crochet seam, click HERE to watch it on YouTube.
Pattern Instructions
Scarf
- With CC, ch 91.
- Row 1: Turn, skip 1 ch, sc in next ch and in next 89 ch, changing to CD in last yo of final sc (see Pattern Notes). Fasten off CC. (90 sts)
- Row 2: Turn, ch 1, sc in first st and in next 89 sts, changing to CC in last yo of final sc. Fasten off CD.
- Row 3: Repeat Row 2, changing to CD in last yo of final sc. Fasten off CC.
- Row 5: Repeat Row 2, chaging to CC in last yo of final sc. Fasten off CD.
- Row 6: Repeat Row 2, do not change color, Fasten off CC.
- With yarn needle, weave in ends.
Heart
- With CB, ch 4, skip 3 ch, join with sl st to next ch to form ring.
- Rnd 1: Ch 1, (sc twice, hdc twice, dc, sl st, dc, hdc twice, sc twice) in ring, ch 1.
- Rnd 2: Sc in next 2 st, 2 hdc in next st, 2 dc in next st, 2 tr in next st, ch 2, sl st to sl st from previous Rnd, ch 2, 2 tr in next st, 2 dc in next st, 2 hdc in next st, sc in next 2 sts, ch 2, sl st to first sc to join. Fasten off with long yarn tail (approximately 12”/30.5 cm) for seaming.
- With yarn needle, weave in yarn tail from foundation chain.
Ears (Make 2)
- With CB, ch 2.
- Row 1: Turn, skip 1 ch, 2 sc in next ch. (2 sts)
- Row 2: Turn, ch 1, sc in first st, 2 sc in next st. (3 sts)
- Row 3: Turn, ch 1, sc in first st and in ea st across to last st, 2 sc in last st. (+ 1 st)
- Rows 4-10: Repeat Row 3, 6 times. (11 sts total)
- Fasten off with long yarn tail (approximately 12”/30.5 cm) for seaming.
Nose
- With CB, ch 2.
- Row 1: Turn, skip 1 ch, 2 sc in next ch. (2 sts)
- Row 2: Turn, ch 1, sc in first st, 2 sc in next st. (3 sts)
- Row 3: Turn, ch 1, sc in first st and in ea st across to last st, 2 sc in last st. (+ 1 st)
- Rows 4-5: Repeat Row 3, twice. (6 sts total)
- Fasten off with long yarn tail (approximately 12”/30.5 cm) for seaming.
Leg (Make 2)
- With CB, start with magic ring (see Pattern Notes).
- Rnd 1: (Right Side) Ch 1, 6 sc in ring, pull the yarn tail tightly to close ring, place marker in last st to mark position. Move marker up each round. (6 sts)
- Rnd 2: 2 sc in each st around. (12 sts)
- Rnd 3: Sc in each st around.
- Rnds 4-25: Repeat Rnd 3, 22 times. Fasten off with long yarn tail (approximately 12”/30.5 cm) for seaming.
Body Panel (Make 2)
Face
- With CA, start with magic ring (see Pattern Notes).
- Rnd 1: (Right Side) Ch 1, 6 sc in ring, pull the yarn tail tightly to close ring, place marker in last st to mark position. Move marker up each round. (6 sts)
- Rnd 2: 2 sc in each st around. (12 sts)
- Rnd 3: *2 sc in next st, sc in next st; repeat from * around. (18 sts)
- Rnd 4: *2 sc in next st, sc in next 2 sts; repeat from * around. (24 sts)
- Rnd 5: *2 sc in next st, sc in next 3 sts; repeat from * around. (30 sts)
- Rnd 6: *2 sc in next st, sc in next 4 sts; repeat from * around. (36 sts)
- Rnd 7: *2 sc in next st, sc in next 5 sts; repeat from * around. (42 sts)
- Rnd 8: *2 sc in next st, sc in next 6 sts; repeat from * around. (48 sts)
- Rnd 9: *2 sc in next st, sc in next 7 sts; repeat from * around. (54 sts)
- Rnd 10: *2 sc in next st, sc in next 8 sts; repeat from * around. (60 sts)
- Rnd 11: *2 sc in next st, sc in next 9 sts; repeat from * around. (66 sts)
- Rnd 12: *2 sc in next st, sc in next 10 sts; repeat from * around. (72 sts)
- Do not fasten off. Begin working in Rows.
Shape Neck
- Row 1: (Right Side) Sc in next 12 sts, skip next 60 sts. (12 sts)
- Row 2: Turn, ch 1, sc in first st and in each st across.
- Row 3: Repeat Row 2.
- Row 4: Turn, ch 1, 2 sc in first st, sc in each st across to last st, 2 sc in last st. (14 sts, increases by 2 sts)
Torso
- Rows 5-6: Repeat Row 4 twice. (Row 5: 16 sts; Row 6: 18 sts) Place stitch marker in first and last stitch of Row 6 to mark position for Arms.
- Rows 7-10: Repeat Row 2, 4 times. Place stitch marker in first and last stitch of Row 10 to mark position for Arms.
- Rows 11-20: Repeat Row 10, 10 times.
- Row 21: Turn, ch 1, sc2tog in first 2 sts, sc in each st across to last 2 sts, sc2tog in last 2 sts. (16 sts, decreases by 2 sts)
- Rows 22-25: Repeat Row 21, 4 times. (Row 22: 14 sts; Row 23: 12 sts; Row 24: 10 sts; Row 25: 8 sts)
- Fasten off CA.
Finishing and Assembly
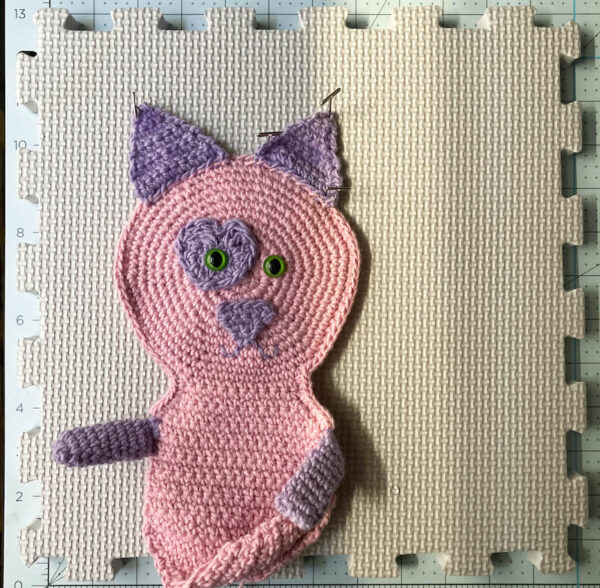
Decorate Face
- Position safety eyes as follows. Position on Right Side of Face of one Body Panel as desired. Remove safety eye, positioning yarn needle in same location. Place center of Heart over yarn needle to mark position. Remove yarn needle and position safety eye on top of Heart. Once position is satisfactory, secure safety eye with washer on back. Secure second safety eye.
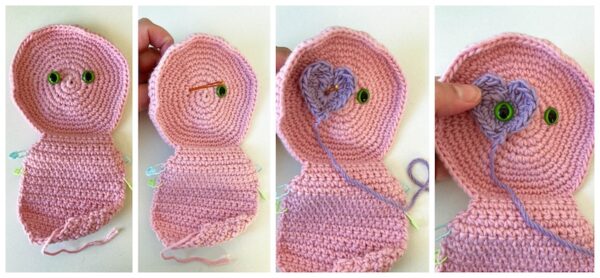
- With yarn needle and long yarn tail from Heart, sew Heart into position on Face. With yarn needle, weave in ends on Wrong Side of Face.
- Position Nose on Face. With yarn needle and long yarn tail from Nose, sew Nose into position on Face. With yarn needle, weave in ends on Wrong Side of Face.
- With CB and yarn needle, use embroidery backstitch (see Pattern Notes) to create smile or other facial expression. Fasten off and weave in ends on Wrong Side of Face.
- Position first Ear at top of Face. With yarn needle and long yarn tail from Ear, whipstitch Ear to Face in front loops only (see Pattern Notes). With yarn needle, weave in ends on Wrong Side of Face. Repeat for second Ear.
- If necessary, spray block ears.

Attach Arms
- Position second Body Panel with Wrong Side up. Position Body Panel with Face Right Side up so Wrong Sides are together. At ends of Rows 6 and 10, remove one set of stitch markers and use the other set to pin both layers together at the appropriate Row.
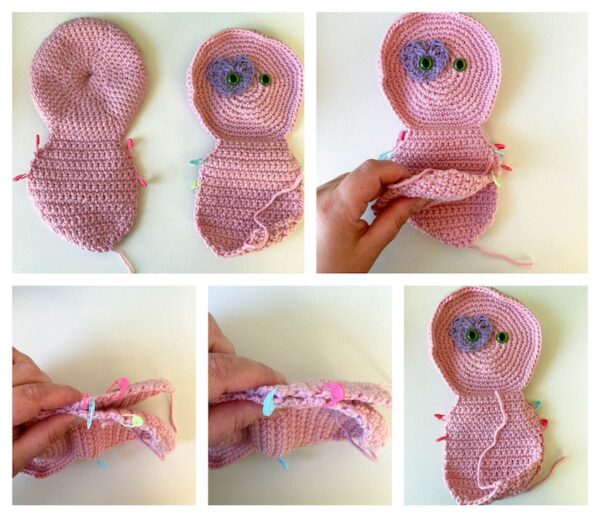
- Working through both layers, join CB with sl st at one marked row.

- Ch 1, sc in the side of same row and next 3 rows to next marker. Remove stitch markers. Turn to Wrong Side, scFL in next 4 sts, turn to Right Side, sc in FL in next 4 sts. (8 sts)
- Place stitch marker in last st to mark end of Rnd. Sc in each st around until Arm measures approximately 2” (5 cm) long. Fasten off with long yarn tail (approximately 12”/30.5 cm) for seaming.
- With yarn needle and CB from end of Arm, sew Arm closed. With yarn needle, weave in yarn tails on inside of Arm.
- Repeat for Second Arm on opposite side of Body Panel.
Stuff Legs
- Stuff Legs with fiber filling. Set aside.
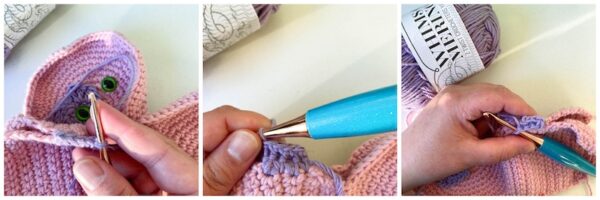
Seam Top of Body
- With Right Side facing up and working through both Panels, join CA with sl st to side of next Row above Arm, ch 1. Join with single crochet seam (see Pattern Notes) from Arm to Arm. Fasten off CA. With yarn needle, weave in ends on inside of Body. Stuff Body with fiber filling.

Seam Bottom of Body
- With Right Side facing up and working through both Panels, join CA with sl st to side of next Row below Arm, ch 1. Join with single crochet seam (see Pattern Notes) from Arm bottom of Torso.
- Continue to work single crochet seam around remaining part of Torso to bottom of second Arm, adding fiber filling as necessary. Fasten off CA. With yarn needle, weave in ends on inside of Body.
Attach Legs
- With yarn needle and CB from first Leg, seam Leg closed with whipstitch (see Pattern Notes) so you have 6 sts across. Starting at center of bottom of Body, whipstitch seam Leg to bottom of Torso in 4 stitches on the bottom seam and 2 stitches on the side seam. Repeat for second Leg. With yarn needle, weave in ends on inside of Leg.
© 2021 by Marie Segares (Underground Crafter). This pattern is for personal use only. You may use the pattern to make unlimited items for yourself, for charity, or to give as gifts. You may sell items you personally make by hand from this pattern. Do not violate Marie’s copyright by distributing this pattern or the photos in any form, including but not limited to scanning, photocopying, emailing, or posting on a website or internet discussion group. If you want to share the pattern, point your friends to this link: https://undergroundcrafter.com/2021/01/24/crochet-pattern-love-critter/. Thanks for supporting indie designers!
This huggable critter is precious. I want to make one for each of my 3 grandkids! Maybe one for me! Thank you for sharing the pattern 💞