

As it gets closer to spring, I’ve been eager to get outside and see some more nature. That was my inspiration behind the crochet flower beanie pattern for the Power Walk in the Park Slouchy Beanie. This is a quick make that you can wear on your next neighborhood adventure.

This post contains affiliate links. I may receive compensation (at no added cost to you) if you make a purchase using these links. Materials for this project were generously provided by Lion Brand and WeCrochet.
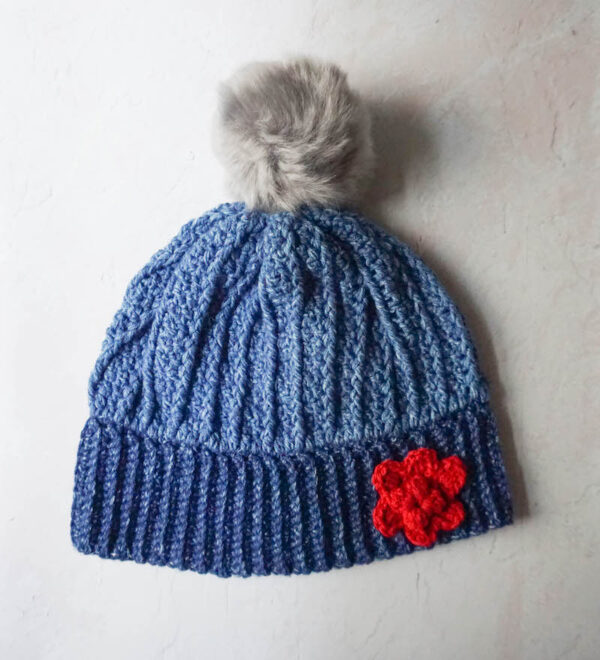
I like the ease of crocheting and wearing slouchy hats, but sometimes I want to add a bit of fun to the pattern. For the Power Walk in the Park Slouchy Beanie, I decided first to add a flower.

And then I realized that a pom pom would be a lot of fun. I didn’t want to be overpowered by the blues, so I decided to use a faux fur pom pom in silver. I love how it turned out.
This pattern is listed as intermediate because the flower has bobbles and the main hat includes post stitches. With that being said, it is definitely in the range of possibility for a patient beginner because it includes video tutorials for both stitches. This is a fun project to make in an evening, and then you’ll be ready for your walk the next day!
If you make your own Power Walk in the Park Slouchy Beanie, I’d love to see it! Share your progress and questions by tagging me on Facebook as @Underground Crafter, Instragram as @ucrafter, or Twitter as @ucrafter. You can also share a picture in the Underground Crafters Facebook group. Sign up for my weekly newsletter and get a coupon code for your choice of one of my premium patterns and private access to my vault of subscriber goodies. Plus, you’ll never miss one of my free patterns again!
Add the Power Walk in the Park Slouchy Beanie to your favorites or queue, or buy the ad-free PDF on Ravelry.

Power Walk in the Park Slouchy Beanie
Crochet Flower Beanie Pattern by Underground Crafter


A flower applique in a bold color and a faux fur pom pom add vibrancy to this textured slouchy beanie.
Finished Sizes
- Teen/Adult: 21” (53.5 cm) hat circumference x 8.5” (21.5 cm) height.
Materials
- Lion Brand Jeans yarn (100% acrylic, 3.5 oz/100 g, 246 yd/225 m) – 1 skein each in 110 Classic (CA) and 109 Stonewash (CB), or approximately 75 yd (68.5 m) in CA and 180 yd (164.5 m) in CB in any medium weight yarn.
- Lion Brand Basic Stitch Premium yarn (100% acrylic, 3.5 oz/100 g/219 yd/220 m) – 1 skeins in 113 Garnet (CC), or approximately 10 yd (9 m) in any medium weight yarn.
- WeCrochet Mosaic US Size H-8/5 mm and US Size I-9/5.5 mm crochet hooks, or any sizes needed to obtain correct gauge.
- Yarn needle.
- WeCrochet Faux Fur Pom Pom 12 cm diameter in 83756 Silver.
Gauge
- 15 scBL = 3.25” (8.5 cm) in pattern for Hat Band using smaller hook.
- 14 sts = 4” (10 cm) in pattern for Work Even using larger hook.
- For best fit, always check your gauge.
Abbreviations Used in This Pattern
- BL – back loop only – Lion Brand has a helpful video for identifying the back loop here.
- bob – 5-repeat bobble – [Yo, insert hook into st, yo and draw up a loop, yo and draw through 2 loops] 5 times in the same st, yo and draw through all 6 loops on hook. A video tutorial for this stitch pattern is available here.
- CA – Color A
- CB – Color B
- CC – Color C
- ch – chain
- dc – double crochet
- FPdc – front post double crochet – Yo, insert hook from front around back to front of st in previous round, yo and draw up a loop, (yo and draw through 2 loops) twice. A video tutorial for this stitch is available below.
- If you can’t see the video tutorial for the FPdc above, click here to watch it on YouTube.
- hdc – half double crochet
- rep – repeat
- sc – single crochet
- sl st – slip stitch
- sp – space
- st(s) – stitch(es)
- yo – yarn over
- *Repeat instructions after asterisk as indicated.
- () Work instructions between parentheses into same stitch or space.
- [] Repeat instructions between brackets as indicated.
Pattern Notes
- When choosing colors, note that CA the color of the Hat Band, CB is the color of the rest of the Hat, and CC is the color of the Flower.
- Hat Band is worked flat in rows with smaller hook until it reaches the desired hat circumference length. Then, stitches are picked up along the long edge of seamed Hat Band. The rest of the hat is worked even in the round with the larger hook and then cinched closed at crown.
- Helpful photo and video tutorials for joining pieces with the slip stitch is available here.
- Ch 1 at beginning of Rows and Rounds does not count as a stitch.
- A helpful photo tutorial showing how to close a slouchy hat by cinching is available here.
Pattern Instructions
Hat Band
- With CA and smaller hook, ch 16, or any number of sts.
- Row 1: Turn, skip first ch, sc in next 15 ch. (15 sts)
- Row 2: Turn, ch 1, scBL in first st and in each st across.
- Rep Row 2 until Hat Band measures approximately 21” (53.5 cm) long. Do not fasten off.
- Fold over Hat Band so short edges are aligned and seam closed with a slip stitch seam (see Pattern Notes). Do not fasten off.
Pick Up Stitches Along Hat Band
- Begin working along long edge with CA and smaller hook.
- Round 1: Ch 1, work 75 sc (or any multiple of 3 sts) evenly around long edge, join with CA when joining with sl st to first sc. Fasten off CB.
Work Even
- With larger hook and CA, begin to work even.
- Round 2: Ch 1, dc in same st and in each st around, join with sl st to first dc.
- Round 3: Ch 1, starting in same st [FPdc in next st, dc in next 2 sts] around, join with sl st to first FPdc.
- Rep Rnd 3 until hat measures approximately 8.5” (21.5 cm) in height, or desired final height.
- Fasten off CB with long yarn tail (approximately 36”/91.5 cm in length) for closing top of hat.
Flower
- Starting with long yarn tail (approximately 18”/46 cm) for seaming and using CC and smaller hook, ch 4, skip 3 ch, join with sl st to next ch to form ring.
- Round 1: (Wrong Side) Ch 1, [bob in ring, ch 1] 4 times, join with sl st to top of first bob.
- Round 2: Turn to Right Side, ch 1, [3 sc in ch-1 sp, skip bob] 4 times, join with sl st to first sc.
- Round 3: Sl st to next st, [(sc, hdc, 3 dc, hdc, sc) in next st, skip 1 st] 6 times, join with sl st to first sc. Fasten off CC.
Finishing
- Thread yarn needle with long yarn tail in CB from top of hat. Cinch top of hat closed (see Pattern Notes).
- Thread yarn needle with long yarn tail in CC from start of Flower. Sew Flower to Hat Band through Round 2. Weave in ends on inside of Hat Band.
- Thread yarn needle with strands tied to Faux Fur Pom Pom and sew to top of Hat.
- With yarn needle, weave in ends on inside of hat.