

Caleb from Crafting at the Poole is back as a guest contributor. In this post, Caleb is sharing an easy crochet beanie pattern that works up lightning fast with a jumbo yarn.

This post contains affiliate links. I may receive compensation (at no added cost to you) if you make a purchase using these links. Photos in this post are © Caleb Poole/Crafting at the Poole and are used with permission.
About Crafting at the Poole

Caleb Poole is the designer behind Crafting at the Poole. Caleb is a young man who loves to design cute amigurumi and wearables with big yarns and bright colors! He also enjoys walking in the rain and baking elaborate cakes.
Show your support by following Caleb on Website | Etsy | Facebook Page and Group | Instagram | Newsletter | Pinterest | Ravelry | TikTok | YouTube
Squishy Stripes Beanie
Easy Crochet Beanie Pattern by Crafting at the Poole

Hey there everyone! Caleb from Crafting at the Poole here again! (Thanks, Marie!) Today, I present you with an easy, free beanie pattern!
I call it a “knit-look” hat in the video, but in reality, it doesn’t look like I was expecting. Sadness…
But it’s now the Squishy Stripes Beanie! The yarn I used, Loops and Threads Chenille Home, is such plush!
I was at Michael’s a few months ago for some yarn to make a wedding gift for my friend’s wedding (this post is a review of the pattern I used!), and I saw the L+T sitting on the rack.
I immediately buried my hand into the pile of skeins… Lol. I love touching new yarns, and this one was so big and soft! It’s a jumbo yarn, and is SO FLUFFY!
I decided they needed to come home with me, grabbed three or four skeins, and that was that!
So far, I’ve started a pair of slippers, made half a pillow, and made this hat with the yarn! It’s a total joy to work with, and the only issue arises when you need to cut it. It’s made similarly to Loops and Threads Serenity. However, they seem to have improved it, and it’s relatively easy to tie a couple of the core strands in a knot.
Make sure to tag me on social media @craftingatthepoole if you make a Squishy Stripes Beanie! Enjoy the pattern!
I’ve filmed a YouTube video for you visual people, and it should help anyone who gets stuck! (Hey, make sure to subscribe while you’re on my channel!)

Supplies
- 1 skein Loops and Threads Chenille Home #7 Jumbo, I used Bone
- Size 10.mm crochet hook, or size you need to obtain gauge.
- Yarn/Tapestry needle
Gauge
- Unimportant for this pattern. You just need it to be reasonably tight, not so loose you can easily stick your fingers through the fabric.
Notes
- The hat is worked in a flat piece, sewn into a tube, and gathered at one end.
- The pattern is written in an Adult Large size.
- Depending on the head size of the recipient of the hat, you’ll need to adjust the number of starting stitches and the number of rows.
- This yarn falls apart easily when a strand is broken, so make sure to tie it off quick, or tying two of the center strands together does the trick!
Abbreviations and Stitch Library
- Ch(s): chain(s)
- FHDC: foundation half double crochet- YouTube Tutorial
- Hdc: half double crochet- YouTube Tutorial
- Sl St: slip stitch- insert hook into stitch, yarn over, pull through both loops on hook.
- Sc: single crochet- YouTube Tutorial
- St(s): stitch(es)
- [..]: Repeat text between brackets as many times as stated.
Pattern Instructions
- Row 1: FHDC 15, or enough stitches to measure from tip of nose to peak of crown. Ch 1, and turn.

- Row 2: Sc in 3rd loop of each st across, ch 1, and turn. See photo below, and the video above for a demonstration.


- Row 3: Hdc in each st across, ch 1, and turn.
- Row 4: Sc in 3rd loop of each st across, ch 1, and turn.
- Repeat rows 3+4 until desired circumference is reached. It takes 30 total rows to comfortably fit my head, but you’ll need to experiment/measure.
- Make sure to finish with an even number of total rows.
- Ch 1, and fasten off, leaving around 18 inches (45.5 cm) of tail for sewing.
Finishing
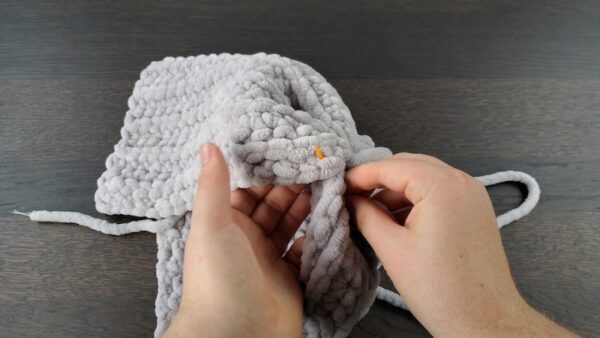
- Thread your yarn needle with the tail, and pass it through each loop on the top edge of the panel created by the chains as shown below.

- Cinch it up…

- …and tie it tight with the starting tail.
- Match up the first row with the last, and whipstitch (tutorial here) together as shown below.
- Tie off end, then weave in all ends.
Fold up the brim, secure it if desired, and you’re done!

I like it!!