

Duke the Teatime Teddy is a crochet teddy bear pattern that (literally) stands on his own. This adorable softie is stuffed with Fairfield Poly-Fil and Poly-Pellets Weighted Stuffing Beads to give him the weight needed to stay standing.

This post contains affiliate links. I may receive compensation (at no added cost to you) if you make a purchase using these links. I am a King Cole Brand Ambassador and this pattern is part of our ongoing collaboration. Additional supplies were generously provided by Clover USA and Fairfield World.
When I was young, my grandmother would crochet these adorable teddy bears. For Christmas, she would make them as stocking stuffers for me, my mom, and my aunts and uncle. Some of my favorite holiday memories are of opening up these bears!
So, when I got this skein of King Cole Forest Aran in 1921 Epping Forest to sample, I thought the color would be great for a one-skein teddy bear. Forest Aran is a recycled yarn made up of wool and acrylic from old sweaters and spinning waste, and polyester from recycled bottles. Forest Aran is available at your local yarn shop or shop online at LoveCrafts | Wool Warehouse UK. The colors are subtle and beautiful.

I was inspired by the bears my grandmother crocheted, but I didn’t want to be a copy cat. I thought about what I could do differently and I decided to add some bobble fingers, change up the body, and use feet weighted with Fairfield Poly-Fil Poly-Pellets Weighted Stuffing Beads so my teddy bear could stand on his own.

The whole process of designing this guy was a lot of fun, but when it came time to name him, I drew a blank. With the help of my friend Pia from Stitches n Scraps, I settled on Duke the Teatime Teddy. When Duke was finished, he stood up just like I imagined, and that put a real smile on my face.

Isn’t he cute? The best part is Duke the Teatime Teddy works up pretty quickly, and I’ve included lots of assembly photos to guide you through completing your version.

Even though Duke the Teatime Teddy is made in several pieces, this crochet teddy bear pattern is definitely a one day project! I’m excited to be joining in for 24 Days of Quickies with Marly Bird and Friends this year. Head over to this post on Marly’s blog to get coupon codes for daily free crochet and knitting patterns and other bonuses through December 24, 2021. Each of these patterns can be made in a day as a last-minute gift. Scroll down for the free crochet pattern for Duke the Teatime Teddy!

If you make your own Duke the Teatime Teddy, I’d love to see it! Share your progress and questions by tagging me on Facebook as @Underground Crafter, Instragram as @ucrafter, or Twitter as @ucrafter. You can also share a picture in the Underground Crafters Facebook group. Sign up for my weekly newsletter and get a coupon code for your choice of one of my premium patterns and private access to my vault of subscriber goodies. Plus, you’ll never miss one of my free patterns again!
Add Duke the Teatime Teddy to your favorites or queue, or buy the ad-free PDF on Ravelry.


Duke the Teatime Teddy
Crochet Teddy Bear Pattern by Underground Crafter


This adorable teddy bear stands on his own with weighted feet.
Finished Size
- Approximately 9.5” (24 cm) tall excluding ears when stuffed.
Materials
- King Cole Forest Aran (35% wool/20% acrylic/20% polyamide (nylon)/25% viscose (rayon), 3.5 oz/100 g/328 yds/300 m) – 1 skein each in 1921 Epping Forest, or approximately 165 yd (151 m) in any medium weight yarn.
- King Cole Forest Aran is available at your local yarn shop or shop online at LoveCrafts | Wool Warehouse UK.
- Tulip Etimo US Size F-5/3.75 mm crochet hook, or size needed to obtain gauge.
- Fairfield Poly-Fil Poly-Pellets Weighted Stuffing Beads – 24 oz. bag.
- Fairfield Poly-Fil Premium Polyester Fiber Fill – 16 oz. bag.
- Clover Quick Locking Stitch Marker Set.
- Clover bent-tip yarn needle.
- 12 mm blue safety eyes – 1 pair.
- 15 mm black triangle safety nose – 1.
- Pair of stockings or tights.
- Tablespoon (optional, for measuring stuffing beads).
Gauge
- Through Rnd 11 in pattern for head = 3” (7.5 cm) diameter. Exact gauge is not critical for this project but stitches should be small so that fiber filling doesn’t show.
Abbreviations Used in This Pattern
- bob – 5-repeat bobble – [Yo, insert hook into st, yo and draw up a loop, yo and draw through 2 loops] 5 times in the same st, yo and draw through all 6 loops on hook. A video tutorial for this stitch pattern is below.
- If you can’t see the video tutorial for bobble stitch above, click here to watch it on Instagram.
- ch – chain
- invdec – invisible decrease – Insert hook in front loop only of each of next 2 sts, yo and draw up a loop, yo and draw through 2 loops. Planet June has a great invisible decrease tutorial here.
- pm – place stitch marker
- Rnd(s) – Round(s)
- sc – single crochet
- sl st – slip stitch
- st(s) – stitch(es)
- yo – yarn over
- [] Repeat instructions between brackets as indicated.
Pattern Notes
- This pattern is worked in pieces that are crocheted in continuous rounds or spirals. Do not join or turn unless otherwise noted.
- Move stitch marker up as each round is completed to mark position of last stitch unless otherwise noted.
- Oombawka Design has a great magic ring tutorial here.
- Unless otherwise noted, move stitch marker up as each Round is completed to mark position.
- A helpful photo tutorial for joining with a whipstitch seam is available here.
- Fiber Flux has a helpful video tutorial for the foundation single crochet here.
Pattern Instructions
First Leg
- Ch 2.
- Rnd 1: Skip 1 ch, 6 sc in next ch, pm in last st to mark position (see Pattern Notes). (6 sts)
- Rnd 2: 2 sc in each st around. (12 sts)
- Rnd 3: [2 sc in next st, sc in next st] around. (18 sts)
- Rnd 4: [2 sc in next st, sc in next 2 sts] around. (24 sts)
- Rnd 5: Sc in each st around.
- Rnds 6-15: Repeat Rnd 5, 10 times.
- Sl st to next st, fasten off.
Second Leg
- Repeat as for First Leg through Rnd 15. Do not sl st or fasten off.
Join Legs
- Note: In the photos below, the Second Leg is pictured at right while the First Leg is pictured at left. The blue stitch marker on the right is the one that marks the end of Rnd 15 and subsequent Rnds, and the pink stitch markers are the ones joining both Legs.
- Position both Legs together. Skip 9 sts on Second Leg, pm to next st on Second Leg and to st on First Leg, skip 4 sts on both Legs, pm to next st on both Legs.

- Rnd 1: Sc in next 9 sts on Second Leg, join with single crochet seam (see Pattern Notes) as follows:
- Sc in next marked st to join both Legs, remove stitch marker, sc in each of next 4 sts to join both Legs, sc in next marked st to join both Legs, remove stitch marker.

- Sc in next 9 sts on Second Leg, pm to mark last st to mark position and continue to move up each Rnd.
- Rnd 2: Sc in next 9 sts on Second Leg, sc in next st on both Legs, sc in next 18 sts on First Leg, sc in next st on both Legs, sc in next 9 sts on Second Leg. (38 sts)

- Rnd 3: Working only on outer sts and skipping the 6 joined sts between Legs, sc in next 38 sts.
- Rnds 4-6: Repeat Rnd 3, 3 times.
Shape Torso
- Rnd 7: [Sc in next 5 sts, 2 sc in next st] 6 times, sc in next 2 sts. (44 sts)
- Rnd 8: [Sc in next 10 sts, 2 sc in next st] around. (48 sts)
- Rnd 9: [Sc in next 4 sts, 2 sc in next st] around. (60 sts)
- Rnd 10: Sc in each st around.
- Rnds 11-14: Repeat Rnd 10, 4 times.
- Rnd 15: [Sc in next 4 sts, invdec] around. (50 sts)
- Rnd 16: [Sc in next 3 sts, invdec] around. (40 sts)
- Rnd 17: [Sc in next 2 sts, invdec] around. (30 sts)
- Rnd 18: [Sc in next 8 sts, invdec] around. (27 sts)
- Remove crochet hook, pm in loop of last st to prevent unraveling during assembly.
- Cut off foot of each stocking. Pour 2-3 Tablespoons of Poly-Pellets Weighted Stuffing Beads into each stocking foot. Tie top of each stocking foot with knot.

- Place one weighted stocking foot into each Leg. Stuff Legs firmly with Poly-Fil Fiber Filling. Stuff the Torso lightly with Poly-Fil Fiber Filling. Return crochet hook to last loop and pm to last st of Rnd 18.

- Rnd 19: [Sc in next 7 sts, invdec] around. (24 sts)
- Rnd 20: [Sc in next 6 sts, invdec] around. (21 sts)
- Rnd 21: [Sc in next 5 sts, invdec] around. (18 sts)
- Rnd 22: [Sc in next 4 sts, invdec] around. (15 sts)
- Fasten off with long yarn tail (approximately 18”/45.5 cm) for seaming.
Head
- Start with magic adjustable ring (see Pattern Notes).
- Rnd 1: Ch 1, 6 sc in ring, pull yarn tightly to close ring, pm in last st to mark position. (6 sts)
- Rnd 2: 2 sc in each st around. (12 sts)
- Rnd 3: [2 sc in next st, sc in next st] around. (18 sts)
- Rnd 4: [2 sc in next st, sc in next 2 sts] around. (24 sts)
- Rnd 5: [2 sc in next st, sc in next 3 sts] around. (30 sts)
- Rnd 6: [2 sc in next st, sc in next 4 sts] around. (36 sts)
- Rnd 7: [2 sc in next st, sc in next 5 sts] around. (42 sts)
- Rnd 8: [2 sc in next st, sc in next 6 sts] around. (48 sts)
- Rnd 9: Sc in each st around.
- Rnds 10-17: Repeat Rnd 9, 8 times, remove crochet hook, pm in loop of last st to prevent unraveling during assembly.
- Position Nose at approximately Rnd 16 or as desired. When satisfied with position, secure by attaching washer firmly on inside of Head. Position first Eye at approximately Rnd 13 or as desired, to the side of Nose. When satisfied with position, secure by attaching washer firmly inside of Head. Repeat for second Eye. Return crochet hook to last loop and pm to last st of Rnd 17.

- Rnds 18-20: Repeat Rnd 9, 3 times.
- Rnd 21: [Invdec, sc in next 6 sts] around. (42 sts)
- Rnd 22: [Invdec, sc in next 5 sts] around. (36 sts)
- Rnd 23: [Invdec, sc in next 4 sts] around. (30 sts)
- Rnd 24: [Invdec, sc in next 3 sts] around. (24 sts)
- Rnd 25: [Invdec, sc in next 2 sts] around. (18 sts)
- Rnd 26: [Invdec, sc in next 4 sts] around. (15 sts)
- Fasten off yarn.
Ears – Make 2
- Repeat as for First Leg through Rnd 4.
- Rnd 5: [2 sc in next st, sc in next 3 sts] around. (30 sts)
- Remove stitch marker. Do not fasten off. Fold circle in half across diameter.

- Join curved edges together with single crochet join (see video tutorial below). Fasten off with long yarn tail (approximately 12”/30.5 cm) for seaming.
- If you can’t see the video tutorial above, click here to watch it on Instagram.
- Thread yarn needle with long yarn tail from first Ear. Seam to Head along straight edge/diameter of original circle with whipstitch (see Pattern Notes) using photos as guide for placement. With yarn needle, weave in ends on inside of Head or back of first Ear. Repeat for second Ear.
- Stuff Head firmly with Poly-Fil Fiber Filling.

Arms – Make 2
- Begin with long yarn tail (approximately 12”/30.5 cm) for seaming.
- Start with foundation single crochet (see Pattern Notes): Ch 2, turn, skip 1 ch, insert hook in next ch, yo and draw up a loop, yo and pull through 1 loop (counts as ch 1), yo and draw through 2 loops, [insert hook in ch 1 from previous st, yo and draw up a loop, yo and pull through 1 loop (counts as ch 1), yo and draw through 2 loops] 7 times, pm and begin crocheting in the round. (8 sts)
- Rnd 1: Sc in each st around.
- Rnds 2-3: Repeat Rnd 1 twice.
- Rnd 4: [2 sc in next st, sc in next st] around. (12 sts)
- Rnds 5-10: Repeat Rnd 1, 6 times.
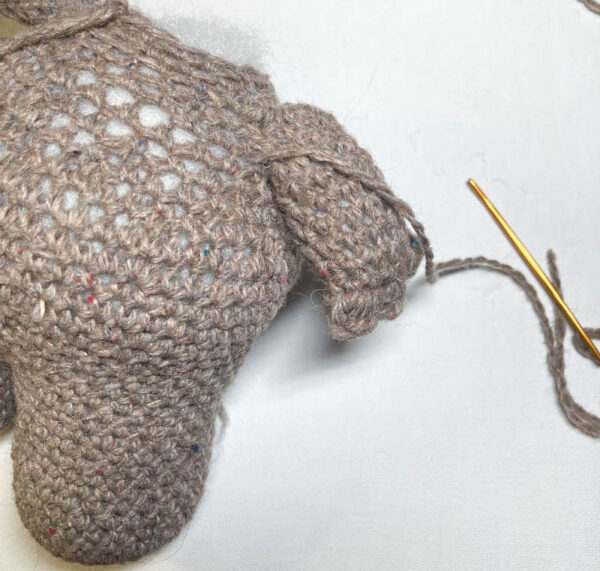
Form Paw
- Rnd 11: Line up stitches on each side and join across Rnd 10 as follows: [bob in next st, sc in next st] 3 times. Fasten off. With yarn needle, weave in ends on inside of Arm.

Tail
- Ch 2.
- Rnd 1: Skip 1 ch, 4 sc in next ch, pm in last st to mark position (see Pattern Notes). (4 sts)
- Rnd 2: 2 sc in each st around. (8 sts)
- Rnd 3: [2 sc in next st, sc in next st] around. (12 sts)
- Rnd 4: [2 sc in next st, sc in next 2 sts] around. (16 sts)
- Rnd 5: Sc in each st around.
- Rnds 6-12: Repeat Rnd 5, 7 times.
- Fasten off with long yarn tail (approximately 12”/30.5 cm) for seaming. Stuff Tail firmly with Fiber Filling.
Assembly and Finishing
- Stuff Arms firmly with Poly-Fil Fiber Filling. Thread yarn needle with yarn tail from start of first Arm.

- With whipstitch seam (see Pattern Notes), join first Arm to Body at approximately Rnds 19-21 or as desired. (Optional: If desired, attach first and second Rnds of Arm to Body so it lays flatter at side of Body.) Repeat for second Arm. With yarn needle, weave in ends on inside of Body.
- Stuff Body and Head with firmly with Poly-Fil Fiber Filling.

- Using stitch markers to hold pieces together, position Head to Body. Thread yarn needle with long yarn tail from Body. Join Head and Body together with whipstitch seam (see Pattern Notes), adding Fiber Filling as necessary. With yarn needle, weave in ends on inside of Body.

- Thread yarn needle with long yarn tail from Tail. Position Tail at center above Leg join on back of Body, or as desired. With yarn needle, join Tail to Body with whipstitch seam (see Pattern Notes). With yarn needle, weave in ends on inside of Body.

© 2021 by Marie Segares (Underground Crafter). This pattern is for personal use only. You may use the pattern to make unlimited items for yourself, for charity, or to give as gifts. You may sell items you personally make by hand from this pattern. Do not violate Marie’s copyright by distributing this pattern or the photos in any form, including but not limited to scanning, photocopying, emailing, or posting on a website or internet discussion group. If you want to share the pattern, point your friends to this link: https://undergroundcrafter.com/2021/12/06/crochet-teddy-bear-pattern-duke-the-teatime-teddy/. Thanks for supporting indie designers!

Thank You!! I love this..
Cute! Love how you weighted the legs, thank you!!
What a cute bear! He looks well-loved and like an old friend, even though we’ve only just met! 🙂