

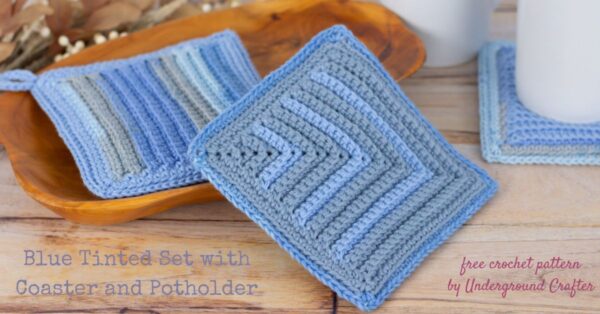
The Blue Tinted Set includes coasters and a two-layered potholder in two sizes. These work up quickly using beginner-friendly stitch patterns. The pattern includes helpful video tutorials to walk you through the project.
This post contains affiliate links. I may receive compensation (at no added cost to you) if you make a purchase using these links. I am a King Cole Brand Ambassador and this post is part of our ongoing collaboration. All opinions and words are my own. Nelsonwood generously provided the crochet hook for this project.
King Cole Cottonsoft DK is one of my favorite cotton yarns. It’s very soft but also durable. It’s available only in solid colors. (Cottonsoft Crush DK was the self-striping variation which is now discontinued.) Cottonsoft DK is available from your local yarn shop or online at LoveCrafts or Wool Warehouse UK. Both yarns are perfect for kitchen projects that may be exposed to high heat.

For the Blue Tinted Set, I used two colors of Cottonsoft DK and one colorway of Cottonsoft Crush DK to make a very easy coaster and a two-layered potholder.

The potholder pattern includes options for a hanging loop and is available in two sizes.

If you make your own Blue Tinted Set, I’d love to see it! Share your progress and questions by tagging me on Bluesky as @UndergroundCrafter, Facebook as @UndergroundCrafter, or on Instagram as @ucrafter. You can also share a picture in the Underground Crafters Facebook group. Sign up for my weekly newsletter and get a coupon code for your choice of one of my premium patterns and private access to my vault of subscriber goodies. Plus, you’ll never miss one of my free patterns again!
Add the Blue Tinted Set to your favorites or queue, or buy the ad-free PDF on Ravelry.

Blue Tinted Set
Crochet Pattern by Underground Crafter


This matching set of coasters and two-layered potholders works up quickly using beginner-friendly stitch patterns. This was the fourth pattern in the Weekend Mystery Crochet Alongs with Underground Crafter.
Finished Sizes
- Coaster: 5” (13 cm) square.
- Potholder: Small/Large. Photographed sample is size Small.
- Small: 5” (13 cm) square.
- Large: 7” (18 cm) square.
Materials
- King Cole Cottonsoft DK yarn (100% cotton, 3.5 oz/100 g, 229 yd/210 m) – 1 skein each in 714 Sky (CA) and 3365 Midnight (CB), or approximately 229 yd (210 m) in each of two colors in any light weight, cotton yarn.
- Cottonsoft DK is available from your local yarn shop or online at LoveCrafts or Wool Warehouse UK.
- King Cole Cottonsoft Crush DK yarn (100% cotton, 3.5 oz/100 g, 229 yd/210 m) – 1 skein in 2436 Bluebell (as seen in in-progress photos) or 2439 Waves (as seen in finished photos) (CC), or approximately 229 yd (210 m) in any light weight, cotton yarn.
- Nelsonwood Black Cat US Size G-6/4 mm crochet hook, or size needed to obtain gauge.
- Stitch markers.
- Yarn needle.
Gauge
- Coaster = 5” (13 cm) square in pattern when completed. Exact gauge is not critical for this pattern.
- 22 scBL = 4” (10 cm). Exact gauge is not critical for this pattern.
Abbreviations Used in This Pattern
- BL – back loop only – Leisure Arts has a helpful video tutorial for identifying the back loop here.
- CA – Color A
- CB – Color B
- CC – Color C
- ch – chain
- pm – place stitch marker
- rep – repeat
- sc – single crochet
- sl st – slip stitch
- sp – space
- st(s) – stitch(es)
- yo – yarn over
- * Repeat instructions after asterisk as indicated.
- [] Repeat instructions between brackets as indicated.
- () Work stitches between parentheses into same stitch or space.
Pattern Notes
- If you’re new to blocking, you can find helpful tips and videos here: Blocking Basics for Crocheters and Knitters.
Pattern Instructions
Coaster
- Use your choice of CA, CB, or CC for the inside color and another color as the outside color.
- With inside color, ch 2.
- Row 1: Turn, skip first ch, 3 sc in next ch, pm in second (center) sc to mark position. Move up marker each row unless otherwise indicated. (3 sts)
- Row 2: Turn, 1, scBL in first st, 3 scBL in marked st, pm in second (center) of 3 sc to mark position, scBL in next st. (5 sts)
- Row 3: Turn, ch 1, scBL in first st and in each st across to marked st, 3 scBL in marked st, pm in second (center) of 3 sc to mark position, scBL in next st and in each st across. (Increases by 2 sts)
- Rep Row 3, 18 more times, or until piece measures approximately 4.25” (11 cm), changing to outside color in last yo of final sc (see video below). Fasten off inside color.
- If you can’t see the video above for changing colors in single crochet and crocheting over yarn tails, watch it on YouTube.
- Border Round 1: Turn, ch 1, scBL in first st and in each st across to marked st, (sc, ch 2, sc) in marked st, scBL in next st and in each st across final row, ch 2, turn to work along next side, sc in side of each row (see video below) to foundation row, (sc, ch 2, sc) in unworked side of foundation row, turn to work along next edge, sc in side of each row, ch 1, join with sc (counts as second ch in ch-2 sp) to first sc.
- If you can’t see the video above for single crocheting around the side of your project, watch it on YouTube.
- Border Round 2: Ch 1, sc in same ch-2 sp, *sc in next st and in each st across side to ch-2 sp,** (sc, ch 2, sc) in next ch-2 sp; rep from * around, ending at ** with final repeat, sc in first ch-2 sp, ch 1, join with sc (counts as second ch in ch-2 sp) to first sc.
- Rep Border Round 2 if necessary until Motif measures approximately 5” (13 cm) square (see video below).
- If you can’t see the video tutorial above demonstrating how to make sure a crochet piece is square, watch it on YouTube.
- Make additional Coasters as needed for your household size, average guest list size, or in the household size of the intended recipient.
- You can choose to make all in the same color combination for uniformity, or use different combinations of inside and outside colors.
Coaster Finishing
- With yarn needle, weave in ends.
- Spray block if necessary (see Pattern Notes).

Two-Layered Potholder Piece I
- With CB, ch 23 (31).
- Row 1: Turn, skip 1 ch, sc in next ch and each ch across. – 22 (30) sts
- Row 2: Turn, ch 1, scBL in first st and in each st across.
- Rep Row 2 until piece is square (see video above in Coaster pattern), changing to CC in last yo of final sc. Fasten off CB.
- Border Round 1: Turn, ch 1, sc in first st and next 21 (29) sts across row, ch 2, turn to work along side, evenly work 22 (30) sc across side of rows (see video above in Coaster pattern), ch 2, turn to work along foundation ch, sc in unworked side of 22 (30) sts across foundation chain, ch 2, turn to work along side, evenly work 22 (30) sc across side of rows, ch 1, join with sc (counts as second ch in ch-2 sp) to first sc. – 88 sts (120 sts) + 4 ch-2 sp
- Rep Border Rnd 2 (below) as necessary until piece measures approximately 5″ (7”)/13 cm (18 cm) square. Fasten off CC.
- Border Round 2: Ch 1, sc in same ch-2 sp, *sc in next st and in each st across side to ch-2 sp,** (sc, ch 2, sc) in next ch-2 sp; rep from * around, ending at ** with final repeat, sc in first ch-2 sp, ch 1, join with sc (counts as second ch in ch-2 sp) to first sc.

Two-Layered Potholder Piece II
- Rep as for Piece I/Part II, starting with CA and finishing with CC. Aim to have the same number of Border Rounds in both pieces. This is more important than having each piece measure a specific size. Do not fasten off CC.
Two-Layered Potholder Assembly and Finishing
- Position Piece I on bottom, then place Piece II on top with ridges from scBL rows perpendicular to Piece I scBL rows. This will create extra depth between layers. Line up pieces so that corner ch-2 spaces are aligned. Join with single crochet seam (see video below) by working through both pieces as follows:
- If you can’t see the video tutorial for joining with the single crochet seam above, watch it on YouTube.
- Ch 1, sc in same ch-2 sp, [*sc in each st across side to next ch-2 sp,** (sc, ch 2, sc) in ch-2 sp] 3 times, rep from * to ** once, sc in next ch-2 sp.
- To add optional hanging loop: Ch 13, sl st to first sc, sl st in next 13 ch, sl st to last sc. Fasten off CC.
- To finish without hanging loop: Ch 2, join with sl st to first sc. Fasten off CC.
- With yarn needle, weave in ends.