

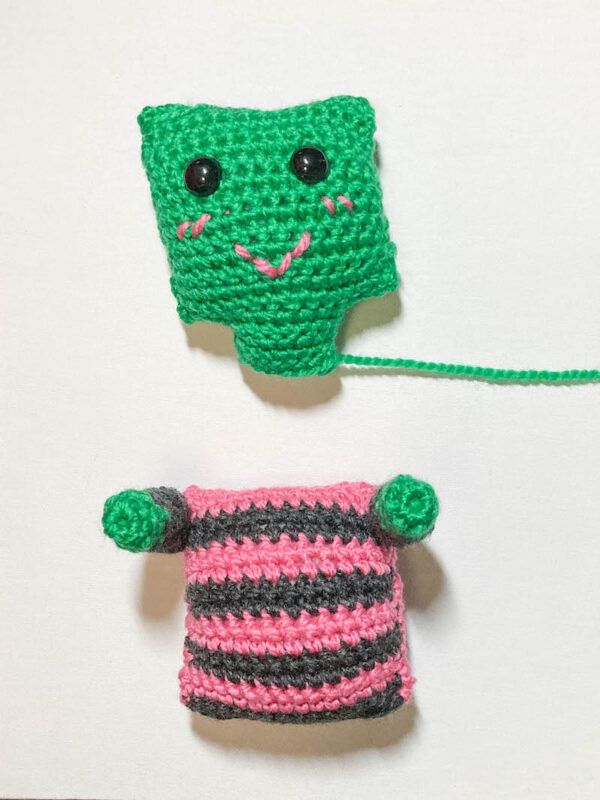
I’m so excited to kick off the fourth annual Halloween Crochet Along with CAL Central with a crochet Frankenstein baby doll. The Friendly Baby Frankenstein’s Monster has arms reached out for hugs and friendship, and is a great size for little hands to play with.

This post contains affiliate links. I may receive compensation (at no added cost to you) if you make a purchase using these links. I am a King Cole Brand Ambassador and this post is part of our ongoing collaboration. Additional supplies for this post were generously provided by Clover and Fairfield World.
I am a huge fan of Mary Shelley’s Frankenstein. I remember reading it for the first time in high school and being blown away that a young girl just a few years older than me had written it. Since my first reading, I’ve returned to it several times. (By the way, if you want to dive into another Mary Shelley book, I recommend The Last Man.)
But, I’m a huge fan of the classic Hollywood Frankenstein’s monsters, too! It’s those iconic film images that have shaped what we imagine when we think about Halloween monsters. When I saw these colors in King Cole Big Value Chunky yarn, I felt like I just had to make my own crochet Frankenstein.

If you haven’t used King Cole Big Value Chunky yarn yet, it’s a soft and durable acrylic yarn that comes in really fun colors. I also like the way the yarn is plied. It has a great texture. Big Value Chunky is available from your local yarn shop or online at LoveCrafts or Wool Warehouse UK.
Scroll down to get the free pattern for the Friendly Baby Frankenstein’s Monster. This is the first pattern in the fourth Summer Quickies Crochet Along with CAL Central Crochet. You can get all the details, including links to all 12 included patterns, and enter the giveaway to win one of ten great prizes in this blog post. To join the Halloween CAL:
- Sign up for Crochet Along updates and the Underground Crafter newsletter to get regular updates, including links to new CAL patterns as they are released. When you sign up, you’ll also get access to my subscriber vault which includes exclusive free PDF patterns, a coupon code for your choice of any crochet or knitting pattern or ebook from my Ravelry shop, and coupon codes from other indie designers and crafts businesses.
- You can join in by crocheting the patterns as you have time.
- Share your progress and post pictures of your finished projects. Tag your projects and posts #CALCentralCrochet on all social media.
- If you’d like to chat with other crocheters, join the CAL Central Crochet Facebook group, or visit this thread in the CAL Central Ravelry group.
- By the end of the CAL, you’ll have up to 12 spooky Halloween projects.
- Use this button below on your Ravelry project pages or elsewhere on social media. Right click (on desktop) or tap and hold (on mobile) to save.

If you make your own Friendly Baby Frankenstein’s Monster, I’d love to see it! Share your progress and questions by tagging me on Facebook as @Underground Crafter on on Instagram as @ucrafter. You can also share a picture in the Underground Crafters Facebook group. Sign up for my weekly newsletter and get a coupon code for your choice of one of my premium patterns and private access to my vault of subscriber goodies. Plus, you’ll never miss one of my free patterns again!
Add the Friendly Baby Frankenstein’s Monster to your favorites or queue, or buy the ad-free PDF on Ravelry.

Friendly Baby Frankenstein’s Monster
Crochet Frankenstein Pattern by Underground Crafter


This crochet Frankenstein baby doll reaches out with friendship and is just the right size for small hands to play with. This pattern is part of the fourth annual Halloween Crochet Along with CAL Central Crochet.
Finished Size
- Approximately 5” (13 cm) diameter after stuffing.
Materials
- King Cole Big Value Chunky yarn (100% acrylic, 3.5 oz/100 g, 167 yd/152 m) – 1 skein each in 833 Green (CA), 1542 Rose (CB), and 3281 Charcoal (CC), or approximately 80 yd (73 m) in CA, 40 yd (36.5 m) in CB, and 35 yd (32 m) in CC in any bulky weight yarn.
- Big Value Chunky is available from your local yarn shop or online at LoveCrafts or Wool Warehouse UK.
- US Size H-8/5 mm crochet hook, or size needed to obtain gauge.
- Fairfield World Poly-Fil Premium Polyester Fiber Fill – 12 oz. bag.
- Clover Quick Locking Stitch Markers.
- Clover bent-tip yarn needle.
- 15 mm black safety eyes – 1 pair.
Gauge
- Exact gauge is not critical for this pattern. Stitches should be small so fiber filling doesn’t show.
Abbreviations Used in This Pattern
- BL – back loop only – Fiber Flux has a helpful video tutorial for identifying the back loop here.
- CA – Color A
- CB – Color B
- CC – Color C
- ch – chain
- pm – place stitch marker
- rep – repeat
- Rnd(s) – Round(s)
- sc – single crochet
- sl st – slip stitch
- st(s) – stitch(es)
- yo – yarn over
Pattern Notes
- When choosing colors, note that CA is the color of the Head, Arms, and Legs. CB is the color of facial decorations and the Onesie stripes. CC is the color of the Onesie stripes and sleeves.
- Head is crocheted flat in rows. Onesie is crocheted flat in rows, carrying unworked color of yarn along edge. Arms and Legs are worked in the round in unjoined spirals.
- Oombawka Design has a helpful video tutorial for starting with the magic adjustable ring here.
- A helpful video tutorial for embroidery back stitch is available towards the end of this blog post.
- A helpful photo tutorial for seaming with the whipstitch is available here.
- The Friendly Baby Frankenstein’s Monster is designed for little ones to play with, but use common sense. It has safety eyes so isn’t safe for infants and toddlers who may be tempted to put the toy into their mouths.
Pattern Instructions
Front of Head
- With CA, ch 16.
- Row 1: Turn, skip 1 ch, sc in next 15 ch. (15 sts)
- Row 2: Turn, ch 1, sc in first 15 sts.
- Rows 3-15: Rep Row 2, 13 times.
Shape Neck
- Row 16: Turn, sl st in first 4 sts, ch 1, sc in next 7 sts, skip 4 sts. (7 sts)
- Row 17: Turn, ch 1, sc in first 7 sts.
- Rows 18-19: Rep Row 17 twice. Fasten off CA.
Back of Head
- Repeat as for Front of Head, but fasten of CA with long yarn tail (approximately 48”/122 cm) for seaming.
- With yarn needle, weave in yarn tail from start of Back of Head.
- Weave in yarn tails for Front of Head.
Onesie
- Starting with a long yarn tail (approximately 12”/30.5 cm) for seaming, with CB, ch 16.
- Row 1: Turn, skip 1 ch, sc in next 15 ch. (15 sts)
- Row 2: Turn, ch 1, sc in first 15 sts, changing to CC in last yo of final sc (see video below).
- If you can’t see the video tutorial for changing colors and crocheting over yarn tails above, click HERE to watch the video on Facebook.
- Row 3: Turn, ch 1, sc in first 15 sts.
- Row 4: Turn, ch 1, sc in first 15 sts, changing to CB in last yo of final sc.
- Row 5: Rep Row 3.
- Rows 6-13: Rep Rows 2-5 twice.
- Row 14: Rep Row 2 once.
- Rows 15-16: Rep Row 3 twice.
- Row 17: Turn, ch 1, scBL in first 15 sts.
- Row 18: Rep Row 4 once.
- Row 19: Rep Row 5.
- Rows 20-31: Rep Rows 2-5, 3 times. Fasten off CC.
- Row 32: Rep Row 3.
- Fasten off CB with a long yarn tail (approximately 18”/46 cm) for seaming.
Legs (Make 2)
- With CA, start with magic adjustable ring (see Pattern Notes).
- Rnd 1: (Right Side) Ch 1, 6 sc in ring, pull yarn tightly to close ring, pm in last st to mark position. Move marker up each Rnd. (6 sts)
- Rnd 2: 2 sc in each st around. (12 sts)
- Rnd 3: Sc in each st around.
- Rnds 4-11: Rep Rnd 3, 8 times.
- Remove marker, fasten off CA with a long yarn tail (approximately 18”/46 cm) for seaming.
- With yarn needle, weave in yarn tail from start of Leg.
Arms with Onesie Sleeve (Make 2)
- With CA, start with magic adjustable ring (see Pattern Notes).
- Rnd 1: (Right Side) Ch 1, 6 sc in ring, pull yarn tightly to close ring, pm in last st to mark position. Move marker up each Rnd. (6 sts)
- Rnd 2: Sc in each st around.
- Rnd 3: Rep Rnd 2 once.
- Rnd 4: Rep Rnd 2 once, changing to CC in last yo of final sc. Fasten off CA.
- Rnds 5-11: Rep Rnd 2, 7 times.
- Remove marker, fasten off CC with a long yarn tail (approximately 18”/46 cm) for seaming.
- With yarn needle, weave in yarn tail from start of Arm.

Assembly and Finishing
- Position first safety eye on Front of Head as desired. When satisfied with position, secure by attaching washer firmly on the wrong (back) side of Front of Head. Repeat for second safety eye. Thread yarn needle with approximately 18”/46 cm in CB. Using the embroidery back stitch (see Pattern Notes), decorate Front of Head with smile and cheeks using the photo below as a guide, or as desired. Fasten off CB and knot on the wrong side of Front of Head.

- Position Back of Head underneath Front of Head. Thread yarn needle with CA from end of Back of Head.

- Lining up rows and stitches, whipstitch Back of Head to Front of Head around, leaving neck open to stuff firmly with fiber fill. Continue seaming Head pieces together, adding fiber filling as necessary. Leave neck bottom (Row 19) unseamed. Do not fasten off CA.

- Fold Onesie at center so that unworked front loops from Row 17 are the right (front) side. Thread yarn needle with shorter yarn tail in CB from one side of Onesie and seam striped edge closed with whipstitch.

- Thread yarn needle with longer yarn tail in CB. Seam other striped edge closed with whipstitch. Stuff Onesie firmly with fiber filling. Continue to seam top (foundation chain and Row 32) closed, adding fiber filling if necessary. Weave in both CB yarn tails on inside of Onesie.

- Stuff Arms firmly with fiber fill. With CC from end of first Arm sleeve, whipstitch Arm closed. Position first Arm sleeve at top of Onesie on the right (front) side. Join with whipstitch so that Arm is reaching forward. Repeat for second Arm.

- With yarn needle, weave in yarn tails from Arms on inside of Onesie.
- Thread yarn needle with CA from neck of joined Head. Whipstitch neck to Onesie. Weave in yarn tail from Head/neck on inside of Head.
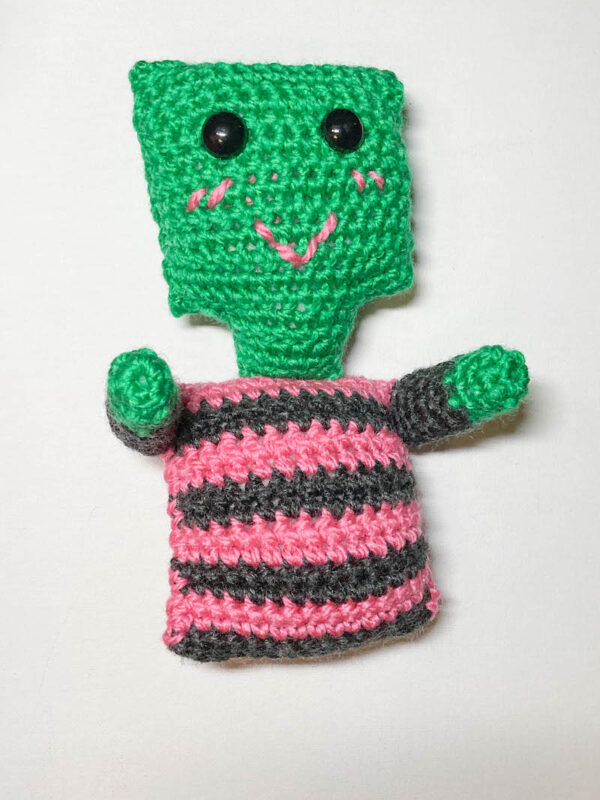
- Stuff Legs firmly with fiber fill. With CA from end of first Leg, whipstitch Leg closed. Position first Leg sleeve at bottom of Onesie on the right (front) side. Join with whipstitch so that Leg is reaching forward. Repeat for second Leg.

- With yarn needle, weave in yarn tails on inside of Leg.