
In today’s Sewing Basics post, I’m sharing the easy beginner sewing project for the Rustic Pillow. The Rustic Pillow uses precut fabric squares so that you can complete unique projects quickly for last-minute gifts or to add a handmade touch to any room. The pattern includes instructions for 7 popular sizes of decorative pillows, so you can easily customize it for your space or the recipient’s home.

This post contains affiliate links. I may receive compensation (at no added cost to you) if you make a purchase using these links. I am a Baby Lock Brand Ambassador and a Benartex Brand Ambassador and this post is part of our ongoing collaborations. Additional supplies were provided by Cricut, Fairfield, Oliso, and Sewing by Sarah.
As a Benartex Brand Ambassador, I was asked to make a project using precut fabrics from their Red Rhapsody Collection. If you’re a newer sewist, you may not have heard of Benartex yet, but most quilters will already be familiar with their high quality quilting fabrics. If you’re new to working with precut fabrics, find out more and check out the Red Rhapsody collection in the video below.
If you can’t see the video above about precut fabrics, click HERE to watch it on Facebook.
How is the Rustic Pillow an Easy Beginner Sewing Project?
What makes this project easy and ideal for beginners? Well, there are a few things, actually! First, the precut fabrics dramatically cuts down on the time spent for pressing and cutting, as well as the time spent contemplating which 18-72 fabric options you would like to use for your pillow! While precut fabrics are a bit more expensive than buying fabric yardage off the bolt, if you are looking for a lot of variety in fabrics, it ends up being much cheaper than the alternative (buying 1/4 yard of each of the fabrics you’d want to use and then cutting out a few squares from that fabric).

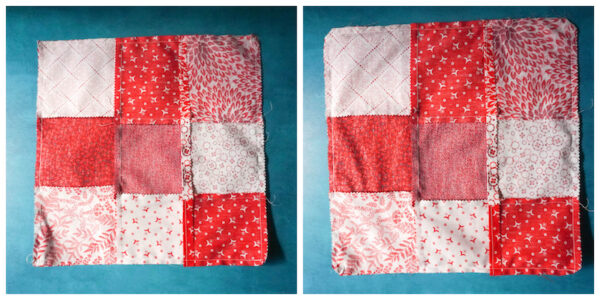
Second, the Rustic Pillow has a specific design feature that is perfect for beginner sewists and beginner quilters: Not only are you not required to align the seams of your squares (which can be difficult to do if your seam allowances aren’t perfect), but it’s actually designed so that your seams shouldn’t align! This staggered look means that most sewing boo boos will be hidden, and also that your project will have a more modern and unique look. As you can see from the photos, the project looks very different from each side and you can get multiple different “looks” from the same pillow.

Finally, the Rustic Pillow uses an envelope closure, which also allows for a little bit of imperfection and is easier to pull off than a zipper or button for newbie sewists.

Sewing Tips for Making the Rustic Pillow
I used my Baby Lock Brilliant sewing machine to make the Rustic Pillow, and specifically, I really used the operation buttons on the front panel (above the sewing area and creative space in the photo below).

The Reinforcement Stitch Button makes it possible to do a quick reinforcement stitch rather than sewing forward and backwards in the same area. For beginner sewists, it can be tough to get that forward and backward motion done exactly, and you often end up with wonky seams when you try to reinforce seams manually. The Needle Position Button is great for turning corners at the edge of each side of the pillow, because you can keep the needle down, lift the presser foot, and rotate the piece as you sew. And, I’ve mentioned before that I love the Start/Stop Button because when my cats are underfoot, I don’t like to use the foot controller pedal and this makes it possible to sew without worrying about running over cat tails. All of these features were also included in my previous sewing machine, the Baby Lock Jubilant (check out my unboxing with a review after using the machine for 3-1/2 years here).

The Brilliant has a specific additional feature that makes this project fly off the machine: the Thread Cutter Button. This allows you trim the threads after your last stitch and before lifting up the presser foot. It’s a time saver and it also makes things a bit neater for the newer sewist — you don’t need to have thread snips or fabric shears as close to the machine. This was definitely what allowed me to speed through this project so quickly!

So, are you ready to get started on your own Rustic Pillow? Scroll down for the pattern.

If you make your own Rustic Pillow, I’d love to see it! Share your progress and questions by tagging me on Facebook as @Underground Crafter on on Instagram as @ucrafter. You can also share a picture in the Underground Crafters Facebook group. Sign up for my weekly newsletter and get a coupon code for your choice of one of my premium crochet or knitting patterns patterns and private access to my vault of subscriber goodies. Plus, you’ll never miss one of my free patterns again! You can also buy the ad-free PDF of the Rustic Pillow pattern in my Payhip shop.
Rustic Pillow
Easy Beginner Sewing Project by Underground Crafter

The Rustic Pillow is an easy beginner sewing project. It helps you to get you familiar with using precut fabrics; practice piecing together quilting fabric; and make a pillow case with an envelope closure. The Rustic Pillow comes together very quickly so it makes great last-minute gifts or a speedy option for adding a handmade touch to any room. The pattern is available in 7 popular decorative pillow sizes.
Finished Sizes:
- 12”, 14”, 16”, 18”, 20”, 22”, or 24” square. Photographed sample is 12” square.
Tools
- Baby Lock Brilliant sewing machine. Watch my Baby Lock Brilliant unboxing video below.
- If you can’t see my unboxing of the Baby Lock Brilliant above, click HERE to watch the video on YouTube.
- Cricut 45 mm rotary cutter, cutting mat, and acrylic ruler.
- If you’re new to working with a rotary cutter, the video below demonstrates how to use a rotary cutter safely.
- If you can’t see the video above demonstrating how to safely use a rotary cutter, click HERE to watch the video on YouTube.
- Fabric shears.
- Oliso Mini Project Iron and Sewing by Sarah Wool Press ‘n Lock Tiles™ with Nifty Notions Mist Spray Bottle.
- Dritz Quilting Pins.
- Klassé Universal needle.
- Basic sewing supplies (seam ripper, thread snips, etc.).
- Optional: 1/4″ quilting presser foot with guide for seaming.
Materials
- Universal sewing needle.
- 100% cotton thread in coordinating or contrasting colors for bobbin and top thread.
- 100% cotton quilting fabric cut to 5” x 5” squares. I used Benartex Red Rhapsody 5” x 5” precut fabric squares. You will need 1 set (42 precut squares) for the following sizes: 12”, 14” 16” square pillows. You will need 2 sets (84 precut squares) for the following sizes: 18”, 20”, 22”, 24” square pillows.
- Fairfield pillow form in 12”, 14”, 16”, 18”, 20”, 22”, or 24” square size – 1 pillow.
Instructions
- Instructions below are listed for 12” (14”, 16”, 18”, 20”, 22”, 24”) square finished sizes.
Prepare Fabric
- Open your pack of precut fabrics and create the number of row stacks needed for your project size. Each row stack should contain the number of squares needed for your project size. Row stack and squares per row stack for each finished size are listed in the table below.
| Finished Size | Total number of 5” squares needed | Number of Row Stacks Needed | Number of Squares Per Row Stack |
| 12” square | 18 | 6 (3 each front and back) | 3 |
| 14” square | 32 | 8 (4 each front and back) | 4 |
| 16” square | 32 | 8 (4 each front and back) | 4 |
| 18” square | 50 | 10 (5 each front and back) | 5 |
| 20” square | 50 | 10 (5 each front and back) | 5 |
| 22” square | 72 | 12 (6 each front and back) | 6 |
| 24” square | 72 | 12 (6 each front and back) | 6 |
- The photo below shows one row stack with 3 squares for the 12” size. Tip: Do not repeat fabrics in each row stack, and aim to include as many different fabrics as possible in your project.

Assemble Rows
- Sew the first row stack together using a 1/4″ seam allowance, with right sides together and sewing on the wrong side. Sew first pair of squares together and then continue by adding the next square from the row stack until the entire row is joined. You should have 3 (4, 4, 5, 5, 6, 6) squares in this row.
- Repeat using each row stack until each row is assembled into a single strip. Do not join the rows. You should have 6 (8, 8, 10, 10, 12, 12) rows completed.
- With your iron and pressing mat, press seams flat for each row. Tip: Press seams open, or press seams in the same direction after each square for ease in assembly.
Assemble Front of Pillow
- Set aside 3 (4, 4, 5, 5, 6, 6) rows. You will work with the remaining 3 (4, 4, 5, 5, 6, 6) rows now.
- Assemble the rows for the Front of Pillow as follows. Stagger the alignment of the rows, so that seams of the squares from one row do not align with the seams from the squares of the next row, but so that the aligned parts of each row measures at least 13” (15”, 17”, 19”, 21”, 23”, 25”). The photo below shows this process for the 12” size (where there is at least 13” of overlap across all staggered rows).

- Pin the rows to each other, right sides together, once you have selected your preferred positioning. Seam rows together with a 1/4″ seam allowance to form a Front of Pillow piece with a layout of 3×3 squares (4×4 squares, 4×4 squares, 5×5 squares, 5×5 squares, 6×6 squares, 6×6 squares).
- With your iron and pressing mat, press seams flat on the wrong side of the Front of Pillow.
- Using your rotary cutter, cutting mat, and acrylic ruler, trim your Front of Pillow to 12.5” (14.5”, 16.5”, 18.5”, 20.5”, 22.5”, 24.5”) square.
Assemble Back of Pillow with Envelope Closure
- You will work with the 3 (4, 4, 5, 5, 6, 6) rows you set aside now.
- Select 2 rows from this set. Fold over one edge (along the unseamed side) approximately 1/4″ for each of these 2 rows and press flat as shown in the photo below.

- With the right side of the row facing up, topstitch along the folded/pressed edge of each of these 2 rows.
- Set aside one of these seamed edge rows as one Back of Pillow with Envelope Closure piece.
- Position the second seamed edge row so that the seamed edge row is on the outside. Align the remaining 2 (3, 3, 4, 4, 5, 5) rows as described in the instructions for the Front of Pillow, with staggered rows that measure at least 13” (15”, 17”, 19”, 21”, 23”, 25”) across on each side that is parallel to the seamed edge.
- Pin the rows to each other, right sides together, once you have selected your preferred positioning. (Remember that the seamed edge should be on the outside of this group of rows before seaming.) Seam rows together with a 1/4″ seam allowance (removing pins as you sew) to form a second Back of Pillow with Envelope Closure piece with a layout of 3×2 squares (4×3 squares, 4×3 squares, 5×4 squares, 5×4 squares, 6×5 squares, 6×5 squares).
- With your iron and pressing mat, press seams flat on the wrong side of the Back of Pillow.
- Using your rotary cutter, cutting mat, and acrylic ruler, trim both Back of Pillow with Envelope Closure pieces to 12.5” (14.5”, 16.5”, 18.5”, 20.5”, 22.5”, 24.5”) parallel to the folded/pressed/seamed edges.
Assemble Pillow Cover
- Position Front of Pillow with right side up.

- Place the larger/second Back of Pillow with Envelope Closure piece on top of the Front of Pillow piece with the seamed edge towards the inside/center and the right sides facing as shown in the photo below.

- Place the smaller/first Back of Pillow with Envelope Closure piece on top of the Front of Pillow piece with the seamed edge towards the inside/center and the right sides facing. The seamed edge should overlap the seamed edge of the other piece as shown in the photo below. If you find that the top (Back of Pillow) pieces are significantly wider than the bottom (Front of Pillow) piece, you can also trim the width of the larger Back of Pillow piece as long as while the seamed edges overlap, the top (Back of Pillow) pieces are at least the same width of the bottom (Front of Pillow Piece).

- Pin around the outside edges, being sure to pin seams flat.

- Using reinforcement stitches at start and end, seam along outside edge of the square with a 1/4″ seam allowance (removing pins as you sew). With fabric shears, clip the corners.
- Turn the pillow form right side out, using a sewing stiletto or crochet hook to push out corners. Insert your pillow and enjoy!
