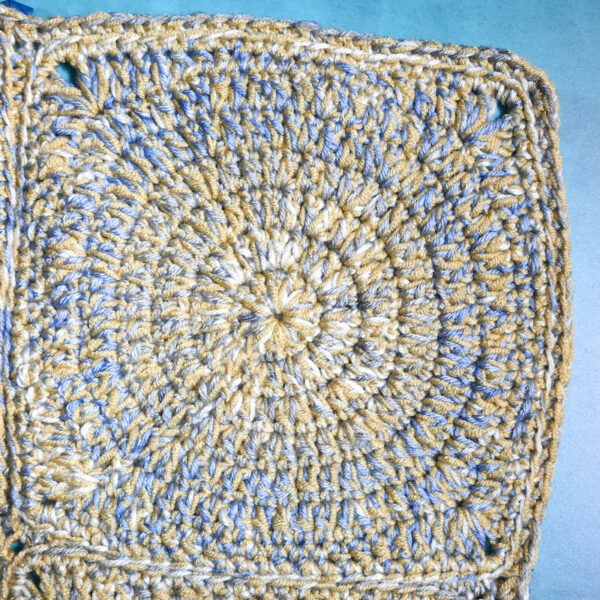
Today’s crochet pet blanket pattern is made by alternating two variations on a square motif. It also uses two strands of yarn to work up faster and create a unique, tweedy color combination. The Motif Pet Blanket is forever free on my blog, but it is also available as a free PDF download with coupon code as part of the Pet Appreciation Blog Hop with Jo’s Crafty Hook through 8:59am Eastern time on August 17, 2023, so read on for details!

This post contains affiliate links. I may receive compensation (at no added cost to you) if you make a purchase using these links. I am a King Cole Brand Ambassador and this post is part of our ongoing collaboration. Additional materials for this project were provided by Clover USA.
I’m so excited to be joining the Pet Appreciation Blog Hop with Jo’s Crafty Hook! If you’ve been following my blog or reading my newsletters for a while, you know that I’m firmly on “team cat.” I love (other people’s) dogs just fine, but I have had cats in my life since childhood and really enjoy their companionship! The Pet Appreciation Blog Hop includes patterns for cats, dogs, and other pets and continues on through August 24, 2023.

Scroll down for the free Motif Crochet Pet Blanket pattern. My pattern for the Motif Pet Blanket is the featured design for August 16, 2023. There are two ways to participate in the Pet Appreciation Blog Hop.

- Visit the Pet Appreciation Blog Hop roundup post on Jo’s Crafty Hook to get links to all of the free patterns included in the Blog Hop. Each day through August 24, 2023, you’ll also be able to grab the coupon code to get the PDF version of that day’s featured pattern for free.
- Visit each designer’s post through August 24, 2023 to get the featured PDF pattern for free for 24 hours. Get the coupon code in the Pet Appreciation Blog Hop post on Jo’s Crafty Hook.
- You can grab the ad-free PDF for the Motif Pet Blanket on Ravelry for free through 8:59am Eastern time on August 17, 2023.or click on the button below to add the pattern with coupon code to your cart on Ravelry. Make sure the cart is set to $0 before checking out as there will be no refunds for accidental purchases.
If you make your own Motif Pet Blanket, I’d love to see it! Share your progress and questions by tagging me on Facebook as @Underground Crafter on on Instagram as @ucrafter. You can also share a picture in the Underground Crafters Facebook group. Sign up for my weekly newsletter and get a coupon code for your choice of one of my premium patterns and private access to my vault of subscriber goodies. Plus, you’ll never miss one of my free patterns again!
Add the Motif Pet Blanket to your favorites or queue, or buy the ad-free PDF on Ravelry.
Motif Pet Blanket
Crochet Pet Blanket Pattern by Underground Crafter


This simple pet blanket is made by alternating two variations on a square motif. Worked in the round, this pattern uses two strands of yarn held together to work up faster and to create unique, tweedy color combinations.
Finished Sizes
- Small (Medium, Large, Extra Large).
- Small: Approximately 15” (38 cm) square.
- Medium: Approximately 22” (56 cm) square.
- Large: Approximately 29” (73.5 cm) square.
- Extra Large: Approximately 36” (91.5 cm) square.
Materials
- King Cole Fjord DK yarn (100% acrylic, 3 oz/100 g, 273 yd/250 m) – 1 (3, 4, 6) skeins in 4558 Volda, or approximately 260 yd (560 yd, 975 yd, 1,500 yd)/237 m (512 m, 891.5 m, 1,271.5 m) in any light weight, self-patterning, acrylic yarn.
- Fjord DK is available from your local yarn shop or online at LoveCrafts | Wool Warehouse UK.
- King Cole Cherished DK yarn (100% acrylic, 3 oz/100 g, 262 yd/240 m) – 1 (3, 4, 6) skeins in 3442 Antique Gold, or approximately 260 yd (560 yd, 975 yd, 1,500 yd)/237 m (512 m, 891.5 m, 1,271.5 m) in any light weight, solid color, acrylic yarn.
- Cherished DK is available from your local yarn shop or online at LoveCrafts | Wool Warehouse UK.
- Clover Amour US Size J-10/6 mm crochet hook, or size needed to obtain gauge.
- Clover Quick Locking Stitch Marker Set.
- Clover bent-tip yarn needle.
Gauge
- Motif 1 = 7” (18 cm) square holding one strand in each yarn in pattern. Exact gauge is not critical for this pattern.
Abbreviations Used in This Pattern
- BL – back loop only – Fiber Flux has a helpful video tutorial for identifying the back loop in crochet here.
- ch – chain
- dc – double crochet
- hdc – half double crochet
- pm – place stitch marker
- rep – repeat
- Rnd(s) – Round(s)
- RS – right (front) side
- sc – single crochet
- sc2tog – single crochet 2 stitches together (decrease) – [Insert hook in next st, yo and draw up a loop] twice, yo and draw through all 3 loops on hook. Yarn Obsession has a helpful video tutorial for this stitch here.
- sl st – slip stitch
- sp – space
- st(s) – stitch(es)
- WS – wrong (back) side
- yo – yarn over
- * Repeat instructions after asterisk as indicated.
- () Work stitches between parentheses into same stitch or space.
- [] – Repeat instructions between brackets as indicated.
Pattern Notes
- Ch 1 at beginning of Rounds and sl st at end of Rounds do NOT count as stitches.
- Chain-1 spaces within Rounds DO count as stitches.
- There are several ways to crochet into chain spaces shown in the video below. This pattern uses the first method shown in the video below.
- If you can’t see the video above demonstrating how to crochet into chain spaces, click HERE to watch it on YouTube.
- If you are new to blocking, you can find helpful descriptions and tutorials here.
Pattern Instructions
Motif 1 – Make 2 (5, 8, 13)
- Holding one strand in each color throughout, ch 4, skip 3 ch, join with sl st to next ch form ring.
- Rnd 1: (RS) Ch 1, 12 dc in ring, join with sl st to first dc. (12 sts)
- Rnd 2: Ch 1, starting in same st [dc in next st, ch 1] around, join with sl st to first dc. (24 sts)
- Rnd 3: Ch 1, starting in first st [2 dc in next st, dc in next ch-1 sp] around, join with sl st to first dc. (36 sts)
- Rnd 4: Ch 1, starting in first st [(dc, ch 1) in next st, dc in next st, ch 1, skip 1 st] around, join with sl st to first dc. (48 sts)
- Rnd 5: Ch 1, starting in first st [2 dc in next st, dc in next ch-1 sp, dc in next st, dc in next ch-1 sp] around, join with sl st to first dc. (60 sts)
- Rnd 6: Ch 1, starting in first st *(dc, ch 1) in next st, dc in next ch-1 sp, [dc in next st, dc in next ch-1 sp] twice; rep from * around, join with sl st to first dc. (72 sts)
- Rnd 7: Ch 1, 2 dc in same st, *dc in next 3 sts, hdc in next 3 sts, sc in next 5 sts, hdc in next 3 sts, dc in next 3 sts,** (2 dc, ch 2, 2 dc) in next st; rep from * around, ending last rep at **, 2 dc in first st, ch 1, join with sc (counts as second ch in ch-2 sp) to first dc. (21 sts on each side + 4 ch-2 sp)
- Rnd 8: Ch 1, 2 sc in same ch-2 sp (pm in first sc to mark corner), *sc in next 21 sts,** (3 sc in ch-1 sp, pm in second sc to mark corner); rep from * around, ending last rep at *, sc in first ch-2 sp, join with sl st to first sc. (96 sts)
- Fasten off.

Motif 2 – Make 2 (4, 8, 12)
- Holding one strand in each color throughout, ch 4, skip 3 ch, join with sl st to next ch form ring.
- Rnd 1: (RS) Ch 1, 12 dc in ring, join with sl st to first dc. (12 sts)
- Rnd 2: Ch 1, starting in same st [2 dc in next st] around, join with sl st to first dc. (24 sts)
- Rnd 3: Ch 1, starting in first st [2 dc in next st, dc in next ch-1 sp] around, join with sl st to first dc. (36 sts)
- Rnd 4: Ch 1, starting in first st [2 dc in next st, dc in next 2 sts] around, join with sl st to first dc. (48 sts)
- Rnd 5: Ch 1, starting in first st [2 dc in next st, dc in next ch-1 sp, dc in next st, dc in next ch-1 sp] around, join with sl st to first dc. (60 sts)
- Rnd 6: Ch 1, starting in first st [2 dc in next st, dc in next 4 sts] around, join with sl st to first dc. (72 sts)
- Rnd 7: Ch 1, 2 dc in same st, *dc in next 3 sts, hdc in next 3 sts, sc in next 5 sts, hdc in next 3 sts, dc in next 3 sts,** (2 dc, ch 2, 2 dc) in next st; rep from * around, ending last rep at **, 2 dc in first st, ch 1, join with sc (counts as second ch in ch-2 sp) to first dc. (21 sts on each side + 4 ch-2 sp)
- Rnd 8: Ch 1, 2 sc in same ch-2 sp (pm in first sc to mark corner), *sc in next 21 sts,** (3 sc in ch-1 sp, pm in second sc to mark corner); rep from * around, ending last rep at *, sc in first ch-2 sp, join with sl st to first sc. (96 sts)
- Fasten off.

Assembly
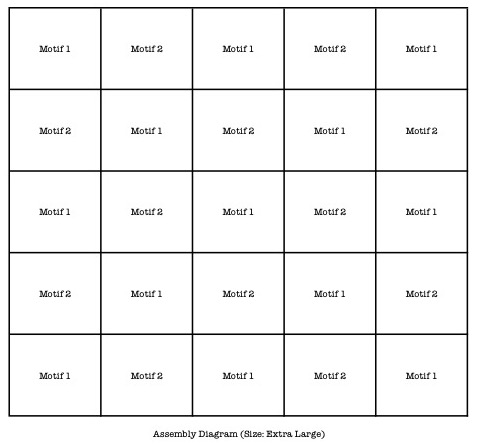
- Join squares with slip stitch seam (see video below) on WS from marked corner st to marked corner st following the assembly diagram below. First, join squares into rows. Then, join rows.
- If you can’t see the video above demonstrating the slip stitch seam, click HERE to watch it on Facebook.


Border (All Sizes)
- Rnd 1: (RS) Holding one strand in each color throughout, join with sl st to any marked corner st and removing markers as you work, ch 1, 2 scBL in marked st, *[scBL in next 23 sts, sc2togBL in next 2 marked corner sts] across to last square on side, scBL in next 23 sts,** 3 scBL in marked corner st; rep from * around, ending last rep at **, scBL in first st, join with sl st to top of first sc. Fasten off.
Finishing
- With yarn needle, weave in ends on WS.


So fun! and thank you for sharing your talents with us, especially in the Pet Appreciation Blog Hop!