

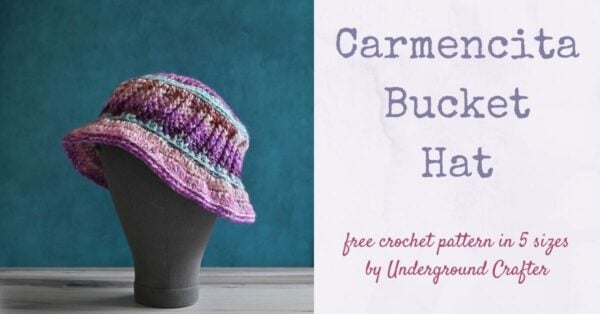
Carmencita is a crochet bucket hat pattern with a beautiful texture. Bucket hats are classic but they happen to be in style again. A self-striping yarn makes colorwork easy and Carmencita works up quickly with bulky yarn so you’ll have a fabulous accessory or gift in no time! The pattern is available in five sizes from infant through adult large. Update: There’s now a matching Carmencita Infinity Scarf pattern!
This post contains affiliate links. I may receive compensation (at no added cost to you) if you make a purchase using these links. I am a King Cole Brand Ambassador and this pattern is part of our ongoing collaboration.
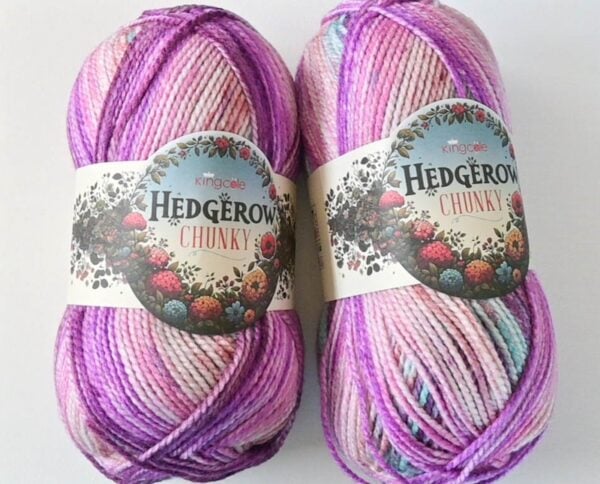
Hedgerow Chunky is a new yarn from King Cole and as soon as I saw it, I fell in love. (I’m a sucker for a pretty yarn!) It’s a bulky (chunky/#5) weight yarn with visible plies twisted together. It’s also self striping and the colors are meant to capture the beauty of the English countryside and its hedgerows by combining floral, green, and earthy colors. It’s soft enough to wear comfortably next to the skin, but it feels hearty and strong. Each skein includes 200 grams (7.05 ounces) and 246 yards (225 meters) of yarn! For this project, I used one-skein of Hedgerow Chunky in 5845 Wildberry. Hedgerow Chunky is available at your local yarn shop or online at Wool Warehouse UK.
I’m not much of a hat person (because I suffer from debilitating cases of “hat hair”), but one of the things I love about bucket hats is that they are usually a bit larger, allowing your hair not to get crushed (a plus, if yours is easily flattened like mine), and you can wear them in multiple ways including with brim down as shown in the photo above, or the brim up as shown below.
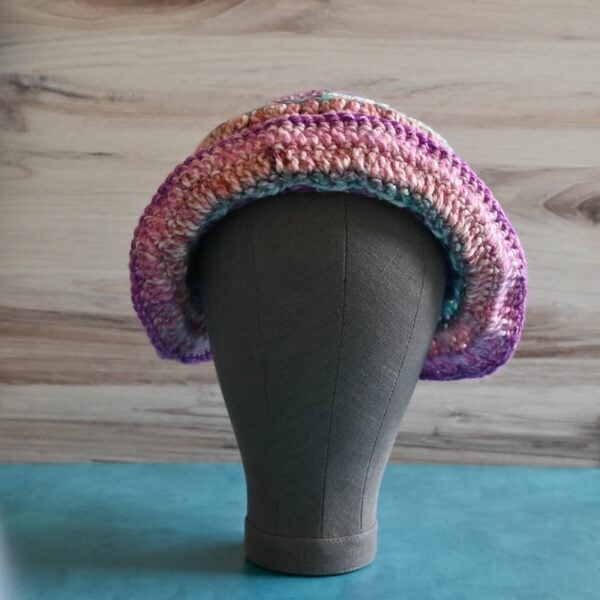
What can I say, I like options in my headwear! If you’ve been looking for a crochet bucket hat pattern with texture, or made with one skein or yarn, or available in several sizes, the Carmencita Bucket Hat has you covered!

If you make your own Carmencita Bucket Hat, I’d love to see it! Share your progress and questions by tagging me on Bluesky as @UndergroundCrafter, Facebook as @UndergroundCrafter, or on Instagram as @ucrafter. You can also share a picture in the Underground Crafters Facebook group. Sign up for my weekly newsletter and get a coupon code for your choice of one of my premium patterns and private access to my vault of subscriber goodies. Plus, you’ll never miss one of my free patterns again!
Add the Carmencita Bucket Hat to your favorites or queue, or buy the ad-free PDF on Ravelry.

Carmencita Bucket Hat
Crochet Bucket Hat Pattern by Underground Crafter


This crochet bucket hat pattern has a beautiful texture. A self-striping yarn makes colorwork easy and it works up quickly with bulky yarn. The pattern is available in five sizes, too! A matching Carmencita Infinity Scarf is available here.
Finished Sizes
- Infant (Toddler, Child/Teen, Adult Small, Adult Large). Photographed sample is size Adult Small shown on a mannequin with 22.5” (57 cm) head circumference.
- Infant: 14” (35.5 cm) hat circumference x 6.75” (17 cm) height.
- Toddler: 17.25” (44 cm) hat circumference x 7” (18 cm) height.
- Child/Teen: 20.5” (52 cm) hat circumference x 8” (20.5 cm) height.
- Adult Small: 23.5” (59.5 cm) hat circumference x 8.5” (21.5 cm) height.
- Adult Large: 26.5” (67.5 cm) hat circumference x 9” (23 cm) height.
Materials
- King Cole Hedgerow Chunky yarn (100% acrylic,7.05 oz/200 g/246 yd/225 m) – 1 skein in 5845 Wildberry, or approximately 65 yd (85 yd, 120 yd, 145 yd, 175 yd)/59.5 m (77.5 m, 109.5 m, 132.5 m, 160 m) in any self-striping, bulky weight yarn.
- US Size J-10/6 mm crochet hook, or size needed to obtain gauge.
- Stitch marker.
- Yarn needle.
- I used the MECHEER crochet hook set including yarn needles, stitch markers, scissors, measuring tape, and case.
Gauge
- Through Rnd 3 = 4” (10 cm) diameter in pattern. For best fit, always check your gauge.
Abbreviations Used in This Pattern
- BL – back loop only – Rich Textures Crochet has a helpful video demonstrating how to identify the back loop in crochet here.
- ch – chain
- dc – double crochet
- FPdc – front post double crochet – Yarn over, insert hook from front around back to front of st in previous row, yarn over and draw up a loop, [yarn over and draw through 2 loops] twice. A helpful video tutorial for this stitch is available below.
- If you can’t see the video tutorial for the FPdc above, watch it on YouTube.
- hdc – half double crochet
- Rnd(s) – Round(s)
- sc – single crochet
- sl st – slip stitch
- st(s) – stitch(es)
- [] Repeat instructions between brackets as indicated.
Pattern Note
- Ch 1 at start and sl st at end of Rounds DO NOT count as stitches.
Pattern Instructions
Bucket Hat
Increase from Crown – All Sizes
- Starting at crown, ch 4, skip 3 ch, join with sl st to next ch to form ring.
- Rnd 1: Ch 1, 12 dc in ring, join with sl st to first dc. (12 sts)
- Rnd 2: Ch 1, 2 dc in first st and each st around, join with sl st to first dc. (24 sts)
- Rnd 3: Ch 1, starting in first st [2 dc in next st, dc in next st] around, join with sl st to first dc. (36 sts) INFANT SIZE ONLY: CONTINUE TO INSTRUCTIONS FOR WORK EVEN.
- Rnd 4: Ch 1, starting in first st [2 dc in next st, dc in next 2 sts] around, join with sl st to first dc. (48 sts) TODDLER SIZE ONLY: CONTINUE TO INSTRUCTIONS FOR WORK EVEN.
- Rnd 5: Ch 1, starting in first st [2 dc in next st, dc in next 3 sts] around, join with sl st to first dc. (60 sts) CHILD/TEEN SIZE ONLY: CONTINUE TO INSTRUCTIONS FOR WORK EVEN.
- Rnd 6: Ch 1, starting in first st [2 dc in next st, dc in next 4 sts] around, join with sl st to first dc. (72 sts) ADULT SMALL SIZE ONLY: CONTINUE TO INSTRUCTIONS FOR WORK EVEN.
- Rnd 7: Ch 1, starting in first st [2 dc in next st, dc in next 5 sts] around, join with sl st to first dc. (84 sts) ADULT LARGE SIZE ONLY: CONTINUE TO INSTRUCTIONS FOR WORK EVEN.
Work Even – Infant (Toddler, Child/Teen, Adult Small, Adult Large) Sizes
- Work Even Rnd 1: Ch 1, scBL in same st and each st around, join with slstBL to first sc. – 36 (48, 60, 72, 84) sts
- Work Even Rnd 2: Ch 1, dcBL in same st and each st around, join with sl st to first dc. Place stitch marker on unworked front loop of any stitch in Work Even Rnd 2 to mark position. Do NOT move marker up each Rnd.
- Work Even Rnd 3: Ch 1, starting in same st [FPdc around next 2 sts, hdc in next 2 sts], join with sl st to first FPdc.
- Repeat Work Even Rnd 3 until section measures approximately 2.75” (2.5”, 3”, 3”, 3”)/7 cm (6.5 cm, 7.5 cm, 7.5 cm, 7.5 cm) from marker, ending final Rnd with slstBL.
- Continue to instructions for Brim in specific size.
Brim – Infant
- Note: Starts with 36 sts.
- Brim Rnd 1: Ch 1, starting in same st [2 dcBL in next st, dcBL in next st] around, join with sl st to first dc. (54 sts)
- Brim Rnd 2: Ch 1, starting in same st [2 dc in next st, dc in next 2 sts] around, join with sl st to first dc. (72 sts)
- Brim Rnd 3: Ch 1, starting in same st [2 dc in next st, dc in next 11 sts] around, join with slstBL to first dc. (78 sts)
- Brim Rnd 4: Ch 1, scBL in first st and each st around.
- Fasten off. Continue on to instructions for Finishing.
Brim – Toddler
- Note: Starts with 48 sts.
- Brim Rnd 1: Ch 1, starting in same st [2 dcBL in next st, dcBL in next 2 sts] around, join with sl st to first dc. (64 sts)
- Brim Rnd 2: Ch 1, starting in same st [2 dc in next st, dc in next 3 sts] around, join with sl st to first dc. (80 sts)
- Brim Rnd 3: Ch 1, starting in same st [2 dc in next st, dc in next 7 sts] around, join with slstBL to first dc. (90 sts)
- Brim Rnd 4: Ch 1, scBL in first st and each st around.
- Fasten off. Continue on to instructions for Finishing.
Brim – Child/Teen
- Note: Starts with 60 sts.
- Brim Rnd 1: Ch 1, starting in same st [2 dcBL in next st, dcBL in next 2 sts] around, join with sl st to first dc. (80 sts)
- Brim Rnd 2: Ch 1, starting in same st [2 dc in next st, dc in next 4 sts] around, join with sl st to first dc. (96 sts)
- Brim Rnd 3: Ch 1, starting in same st [2 dc in next st, dc in next 11 sts] around, join with slstBL to first dc. (104 sts)
- Brim Rnd 4: Ch 1, scBL in first st and each st around.
- Fasten off. Continue on to instructions for Finishing.
Brim – Adult Small
- Note: Starts with 72 sts.
- Brim Rnd 1: Ch 1, starting in same st [2 dcBL in next st, dcBL in next 3 sts] around, join with sl st to first dc. (90 sts)
- Brim Rnd 2: Ch 1, starting in same st [2 dc in next st, dc in next 4 sts] around, join with sl st to first dc. (108 sts)
- Brim Rnd 3: Ch 1, starting in same st [2 dc in next st, dc in next 11 sts] around, join with slstBL to first dc. (117 sts)
- Brim Rnd 4: Ch 1, scBL in first st and each st around.
- Fasten off. Continue on to instructions for Finishing.
Brim – Adult Large
- Note: Starts with 84 sts.
- Brim Rnd 1: Ch 1, starting in same st [2 dcBL in next st, dcBL in next 3 sts] around, join with sl st to first dc. (105 sts)
- Brim Rnd 2: Ch 1, starting in same st [2 dc in next st, dc in next 4 sts] around, join with sl st to first dc. (126 sts)
- Brim Rnd 3: Ch 1, starting in same st [2 dc in next st, dc in next 13 sts] around, join with slstBL to first dc. (135 sts)
- Brim Rnd 4: Ch 1, scBL in first st and each st around.
- Fasten off. Continue on to instructions for Finishing.
Finishing
- With yarn needle, weave in ends on inside of Bucket Hat.