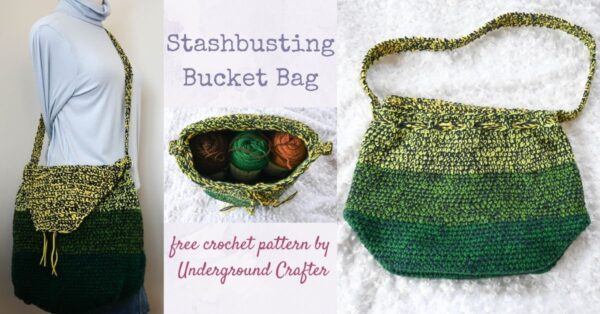
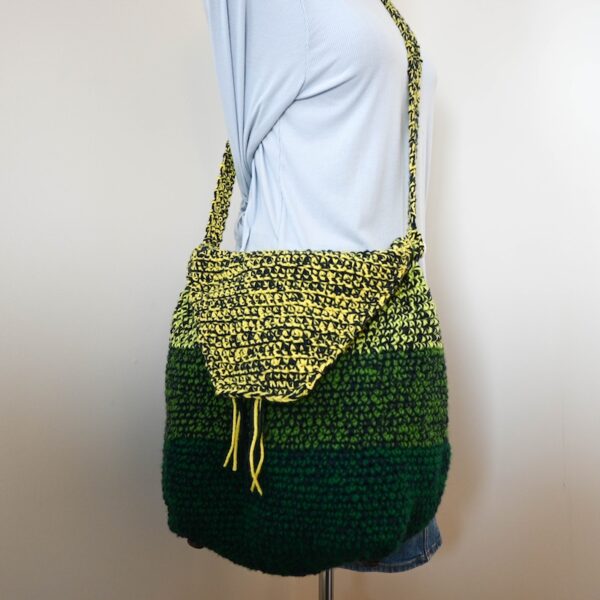
I’m excited to be sharing the first pattern in CAL Central Crochet’s Fantastical BagtastiCAL Crochet Along! The Stashbusting Bucket Bag is an easy crochet bag pattern. It’s perfect for beginners or more advanced crocheters looking for a project they can work on during errands or while watching streaming. It’s a great way to use up leftover yarn and it can be worn and used so many ways: as a project bag, a tote, a drawstring bag, or as a shoulder bag.
This post contains affiliate links. I may receive compensation (at no added cost to you) if you make a purchase using these links.
I love crocheting bags, and I love the look of crochet bags, but let’s face it. Some of them are just not very practical. They don’t hold their shape or they snag easily, and then you never want to show them off.
Before I designed this easy crochet bag pattern, I really thought about it. I decided on a bucket bag because they can hold a lot but the shape is flexible, expanding easily but also getting flatter pretty easily. As I was doing online bag research, I noticed that most bucket bags had bag feet to protect the bottom from getting dirty and snagging, and I realize that would be a great addition to a crochet bag.
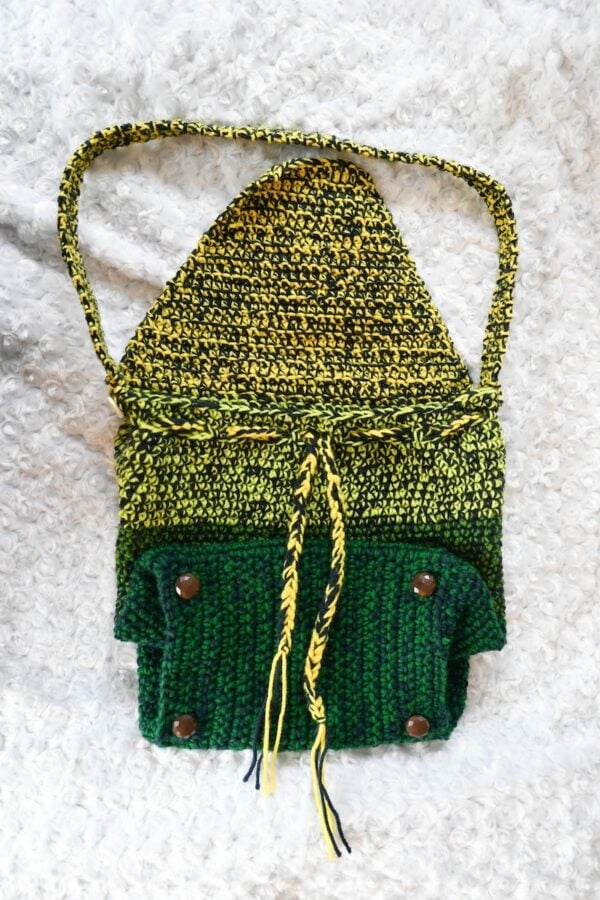
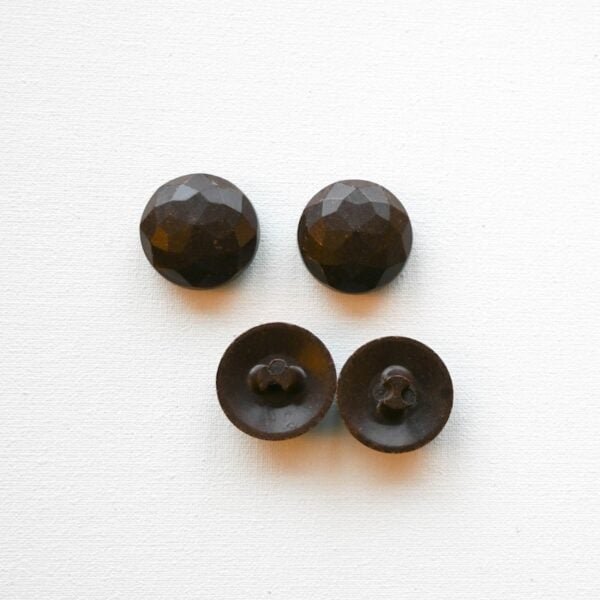
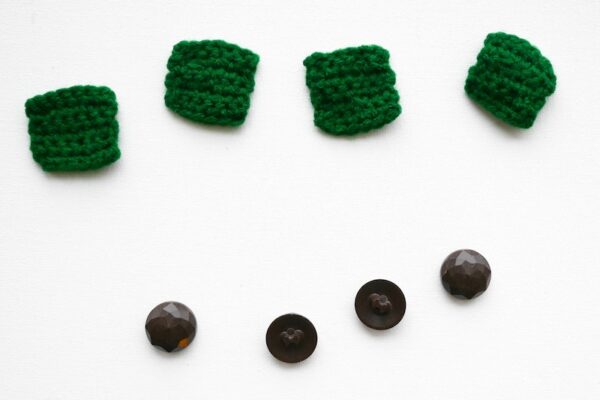
In keeping with the scrappy spirit of this bag, I got the buttons at The Makery, my local second-hand craft supply store. (The set actually came with five buttons, but one was broken in a tragic vacuum cleaner incident.)
In keeping with my goal of making this a functional bag, I thought long and hard about the strap, which is reinforced with both buttons (from my stash) and seams.
I had so much fun making this bag and it turned out just as versatile as I hoped. You can see it in action in the preview video below.
If you can’t see the video above, watch it on YouTube. I hope you love the Stashbusting Bucket Bag as much as I do. I used two strands of medium weight acrylic yarn throughout. You could probably substitute one strand of bulky yarn. If you use another fiber, keep in mind the weight. For example, if made with a nylon blend yarn, this would be a pretty heavy bag!
Scroll down for the free easy crochet bag pattern for the Stashbusting Bucket Bag. This is the first pattern in the Fantastical BagtastiCAL Crochet Along with CAL Central Crochet. To follow the CAL…
- Sign up for Crochet Along updates and the Underground Crafter newsletter to get regular updates, including an update as each CAL pattern is released. When you sign up, you’ll also get access to my subscriber vault which includes exclusive free PDF patterns, a coupon code for your choice of any crochet or knitting pattern or ebook from my Ravelry shop, and coupon codes from other indie designers and crafts businesses. Or, visit this blog post regularly for updates.
- Enter the giveaway at the bottom of this blog post by Sunday May 31, 2026 at 11:59pm Eastern for your chance to win one of six prizes from GlassEyesOnline, KnitPal, Knitter’s Relief Balm, LennyMudPottery, MBT Creates, and Unicorn.
- You can join in by crocheting the patterns as you have time.
- Share your progress and post pictures of your finished projects. Tag your projects and posts #CALCentralCrochet and #BagtastiCAL on all social media.
- If you’d like to chat with other crocheters, join the CAL Central Facebook group or visit this thread the CAL Central Ravelry group.
- By the end of the CAL, you’ll have up to 9 fantastic bags!
- Use this button below on your Ravelry project pages or elsewhere on social media. Right click (on desktop) or tap and hold (on mobile) to save.

If you make your own Stashbusting Bucket Bag, I’d love to see it! Share your progress and questions by tagging me on Bluesky as @UndergroundCrafter, Facebook as @UndergroundCrafter, or on Instagram as @ucrafter. You can also share a picture in the Underground Crafters Facebook group. Sign up for my weekly newsletter and get a coupon code for your choice of one of my premium patterns and private access to my vault of subscriber goodies. Plus, you’ll never miss one of my free patterns again!
Add the Stashbusting Bucket Bag to your favorites or queue, or buy the ad-free PDF on Ravelry.

Stashbusting Bucket Bag
Easy Crochet Bag Pattern by Underground Crafter
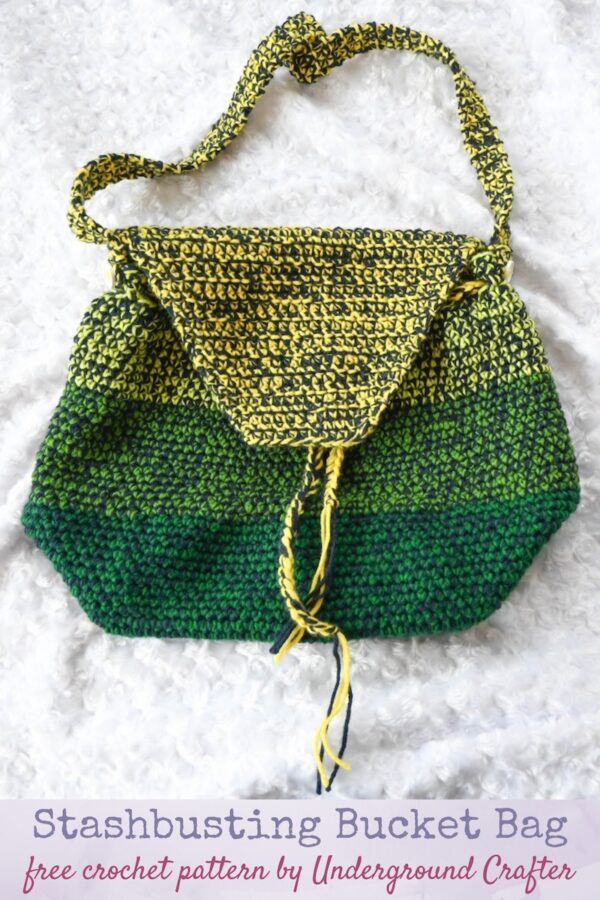


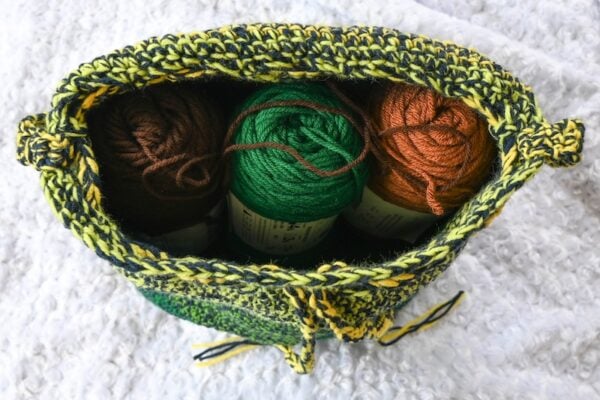
This easy crochet bag pattern is great for using up leftover yarn. This functional bag can be used as project bag (it holds four 6-7 ounce skeins!), a tote bag, a drawstring bag, or as a shoulder bag. The “bag feet” made from dome buttons are reinforced on the inside and minimize scuffs and snags on the bag bottom. This is the first pattern in the Fantastical BagtastiCAL Crochet Along with CAL Central Crochet.
Finished Size
- Teen/Adult: Approximately 9″ (23 cm) width x 7.25″ (18.5 cm) depth x 13″ (33 cm) height.
Materials
- Big Twist Value yarn (100% acrylic, 6 oz/170 g, 380 yd/347 m) – 2 skeins in Varsity Navy Blue (MC) and 1 skein each in Varsity Green (CA), Forest Green (CB), Slime (CC), and Varsity Yellow (CD), or approximately 550 yd (503 m) in MC, 235 yd (215 m) in CA, 105 yd (96 m) each in CB and CC, and 125 yd (114.5 m) in CD in any medium weight yarn.
- KnitPro Waves 2.0 hooks (available online at LoveCrafts | Amazon) US Size K-10.5/6.5 mm crochet hook, or any size needed to obtain correct gauge.
- US Size G-6/4 mm crochet hook, or any size needed to obtain correct gauge.
- Locking stitch markers – 4.
- Domed shank buttons for bag feet – 4. (I used a set that measured approximately 0.75″/2 cm in diameter, but you can use almost any size.)
- 0.75″ (2 cm) sew-through flat buttons for strap – 2.
- Yarn needle small enough to fit through button holes and shanks.
Gauge
- With larger hook and holding 2 strands of yarn together, 12 sc = 4″ (10 cm) across. Exact gauge is not critical for this pattern. Stitches should be stiff with minimal drape to add shape to the bag.
- With smaller hook and holding 1 strand of yarn, 6 sc = 1.25″ (3 cm) across. Exact gauge is not critical for this pattern. Stitches should be stiff with minimal drape to add shape to the bag.
Abbreviations Used in This Pattern
- BL – back loop – Fiber Flux has a helpful video identifying the back loop in crochet here.
- CA – Color A
- CB – Color B
- CC – Color C
- CD – Color D
- ch – chain
- FL – front loop – A helpful video identifying the front loop is available below.
- If you can’t see the front loop video above, watch it on YouTube.
- invdec – invisible decrease – Insert hook in front loop only of each of next 2 sts, yo and draw up a loop, yo and draw through 2 loops. A video tutorial for this decrease is available below.
- If you can’t see the invdec video above, watch it on YouTube.
- MC – Main Color
- pm# – place stitch marker #
- rm# – remove marker #
- Rnd(s) – Round(s)
- sc – single crochet
- sc2tog – single crochet 2 stitches together – [Insert hook in next st, yo and draw up a loop] twice, yo and draw through all 3 loops on hook. A video tutorial for this decrease is available below.
- If you can’t see the sc2tog video above, watch it on YouTube.
- sl st – slip stitch
- sp – space
- st(s) – stitch(es)
- yo – yarn over
- * Repeat instructions after asterisk as indicated.
- [] Repeat instructions within brackets as indicated.
Pattern Notes
- Stitch markers are moved up each round to mark position(s) unless otherwise noted.
- A video demonstrating how to crochet around the unworked sides of your project is available below.
- If you can’t see the video above showing crocheting around the side of your project, watch it on YouTube.
- There are multiple ways to crochet into chain spaces. For this pattern, I used the second method shown in the video below for Rnd 39 and the first method shown for the buttonholes on the Strap.
- If you can’t see the video above showing ways to crochet into a chain space, watch it on YouTube.
Pattern Instructions
Bucket Bag
Bag Base
- With larger hook and holding 1 strand each of MC and CA, ch 21.
- Row 1: Turn, skip 1 ch, sc in next 20 ch. (20 sts)
- Row 2: Turn, ch 1, sc in first 20 sts.
- Rows 3-30: Repeat Row 2, 28 times.
- Do not fasten off MC and CA.
Begin Bag Sides
- Set Up Rnd: Continuing with larger hook and holding 1 strand each of MC and CA, turn, ch 1, scBL in first 19 sts, 3 scBL in last st, *turn to work along edge (see Pattern Notes), sc in side of each of next 30 rows,** turn to work along foundation row, 3 scBL in first st, scBL in each of next 18 sts, 3 scBL in next st, repeat from * to ** once, turn, 2 scBL in first st, pm1 in last st to mark position. (108 sts)
- Rnd 1: Sc in each st around.
- Rnds 2-4: Repeat Rnd 1, 3 times.
- Rnd 5: [Invdec, sc in next 16 sts] around. (102 sts)
- Rnds 6-12: Repeat Rnd 1, 7 times.
- Rnd 13: Rm1, sl st in next 2 sts, skip 100 sts.
- Fasten off MC and CA.
Bag Feet Stabilizers – Make 4
- With smaller hook and 1 strand of CA, ch 7.
- Row 1: Turn, skip 1 ch, sc in next 6 ch. (6 sts)
- Row 2: Turn, ch 1, sc in first 6 sts.
- Rows 3-6: Repeat Row 2, 4 times.
- Fasten off CA.
- With yarn needle, weave in yarn tails.
Add Bag Feet and Stabilizers
- Cut 4 strands of CA, each measuring approximately 12″ (30.5 cm) long.
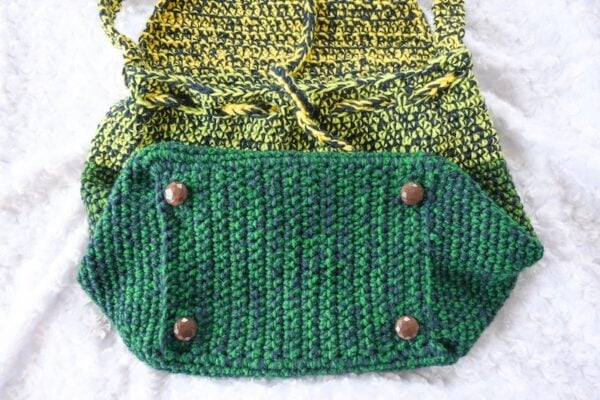
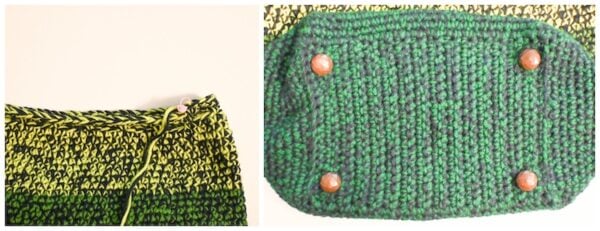
- On the right side (outside/front) of the bag base, use 4 locking stitch markers to mark positions of the 4 Bag Feet (photo at left). Mine were positioned 3 rows and 3 stitches from each edge. Your 4 domed buttons will be attached in those positions as Bag Feet. For each domed button/Bag Foot, thread your yarn needle with 1 strand of CA. Insert the shank through the Bag Base so that the dome is on the outside and the shank is inside of the bag. Position 1 Bag Foot Stabilizer over the shank on the inside of the bag. Insert your yarn needle through the shank. Attach the button/Bag Foot securely by weaving the yarn through the Bag Foot Stabilizer, seaming the Bag Foot Stabilizer to the Bag Base, and then weaving in the ends. Repeat until all 4 Bag Feet and Bag Feet Stabilizers are firmly secured (photo at right).
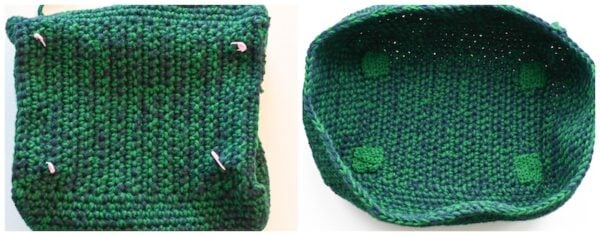
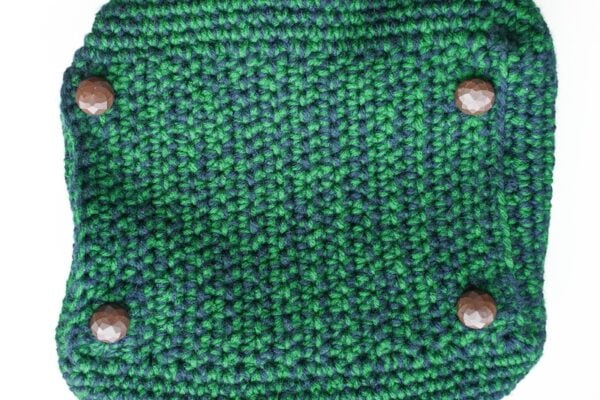
- Here is how the bag should look from the bottom/outside with the Bag Feet attached.
Continue Bag Sides
- Rnd 15: With larger hook and holding 1 strand each of MC and CB, join with sl st to any st in Rnd 14, ch 1, sc in same st and each st around, pm1 in last st to mark position. (102 sts)
- Rnd 16: [Invdec, sc in next 15 sts] around. (96 sts)
- Rnd 17: Sc in each st around.
- Rnd 18-25: Repeat Rnd 17, 8 times.
- Rnd 26: [Invdec, sc in next 14 sts] around. (90 sts)
- Rnd 27: Rm1, sl st in next 2 sts, skip 88 sts.
- Fasten off MC and CB.
- Rnd 28: With larger hook and holding 1 strand each of MC and CC, join with sl st to any st in Rnd 27, ch 1, sc in same st and each st around, pm1 in last st to mark position. (90 sts)
- Rnds 29-35: Repeat Rnd 17, 7 times.
- Rnd 36: [Invdec, sc in next 13 sts] around. (84 sts)
- Rnd 37: Repeat Rnd 17 once.
- Do not fasten off MC and CC.
Form Eyelets for Drawstring
- Rnd 38: [Ch 3, skip 3 sts, sc in next st] around. (21 ch-3 sp + 21 sc)
- Rnd 39: (See Pattern Notes) [ScFL in next 3 ch, sc in next st] around.
- Do not fasten off MC and CC.
Mark Positions for Strap
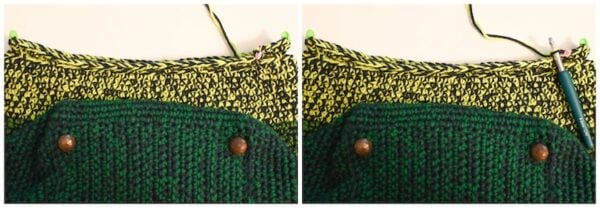
- Remove hook and pm1 in loop of last st to prevent unraveling (photo at left) and flatten bag at Base (photo at right) so that long edges are at front and back and short edges are at sides.
- With Bag Base flat, pm2 at first corner ch-3 sp to mark button and Strap placement, skip 9 ch-3 sp across front, pm3 at second corner ch-3 sp to mark button and Strap placement. This shorter segment is the FRONT of the bag. There will be 10 ch-3 sp between marker2 and marker 3 on the BACK of the bag. In the photo below, marker1 is pink and marker2 and marker3 are green. (Optional: You can also place a marker on the Front to differentiate from the Back.)
Continue Bag Sides
- Rnd 40: Return pm1 to last st of Rnd 39 to mark position and continuing with larger hook and holding 1 strand each of MC and CC, sc in each st around, rm1. Fasten off MC and CC.
Strap
- With larger hook, holding 1 strand each of MC and CD, and starting with a long yarn tail (approximately 12″/30.5 cm long), ch 4.
- Row 1: Turn, skip 1 ch, sc in next 3 ch. (3 sts)
- Row 2: Turn, ch 1, sc in first 3 sts.
Form First Buttonhole
- Row 3: Turn, ch 1, sc in first st, ch 1, skip 1, sc in next st, pm1 around side of Row to mark buttonhole, DO NOT move marker up each Row. (2 sts + ch-1 sp)
- Row 4: Turn, ch 1, sc in first st, sc in ch-1 sp, sc in next st. (3 sts)
Continue Strap
- Repeat Row 2 until strap measures 32″ (81.5 cm) from marker1, or desired length. (Note that the strap works as a crossbody fit for the mannequin, but it is a shoulder strap for me!)
Form Second Buttonhole
- Rows 5-6: Repeat Rows 3-4 once.
- Row 7: Repeat Row 2 once.
- Fasten off MC and CD with long yarn tail (approximately 12″/30.5 cm long).
Assemble Strap
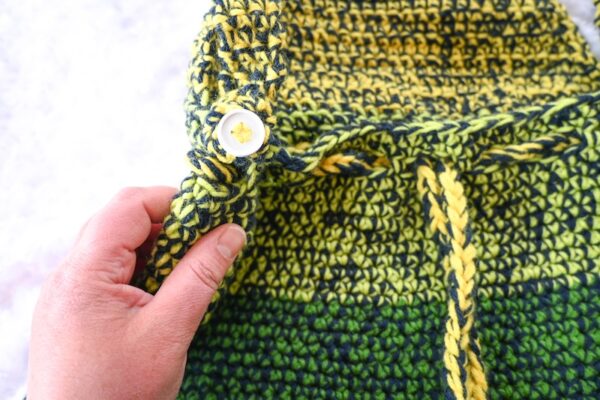
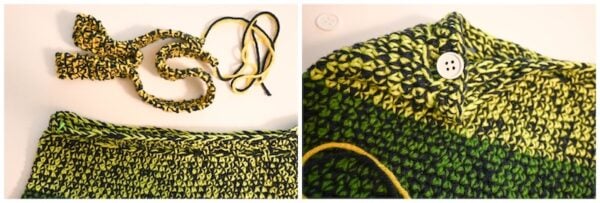
- Thread yarn needle with 18″ (45.5 cm) strand of CD. Center first flat button on the stitches above the ch-3 sp with marker2 as shown in the photo at right.
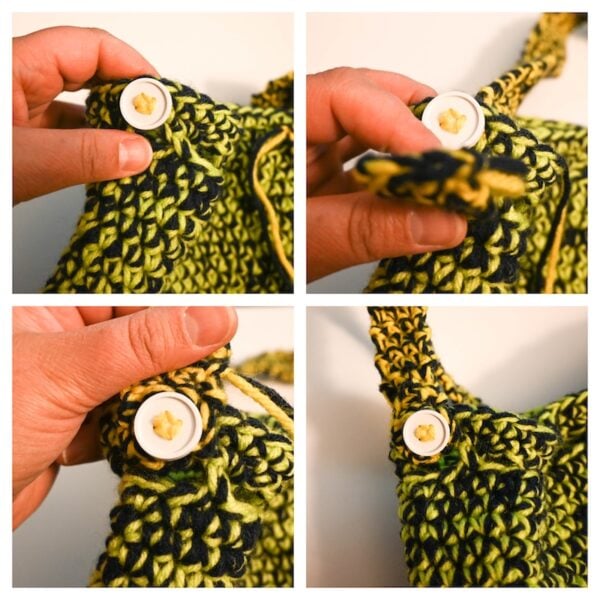
- Rm2, with yarn needle, sew button into position. Weave yarn tail on inside of bag (photo at top left below). Insert Strap through same ch-3 sp from inside of Bag to outside of bag (photo at top right below). Use the buttonhole on Strap to button to Bag so that short end of Strap is on the outside Bag (photo at bottom left below). Thread yarn needle with long yarn tails from bag Strap. Sew short end of bag Strap securely to strap. Weave in yarn tails on inside of Strap (photo at bottom right).
- Repeat process to attach other side of Strap above marker3.
Flap
- Row 1: With larger hook, holding 1 strand each of MC and CD, join with sl st on Back of Bag in first st after Strap, ch 1, scBL in same st and next 38 sts, ending before Strap. (38 sts)
- Row 2: Turn, ch 1, sc in first 38 sts.
- Row 3: Repeat Row 2 once.
- Row 4: Turn, ch 1, sc2tog in first 2 sts, sc in next st and each st across to last 2 sts, sc2tog in last 2 sts. (36 sts/decreases by 2 sts)
- Rows 5-6: Repeat Rows 3-4. (34 sts)
- Rows 7-8: Repeat Rows 3-4. (32 sts)
- Rows 9-10: Repeat Rows 3-4. (30 sts)
- Rows 11-12: Repeat Rows 3-4. (28 sts)
- Rows 13-14: Repeat Rows 3-4. (26 sts)
- Rows 15-16: Repeat Rows 3-4. (24 sts)
- Rows 17-18: Repeat Rows 3-4. (22 sts)
- Rows 19-20: Repeat Rows 3-4. (20 sts)
- Rows 21-22: Repeat Rows 3-4. (18 sts)
- Rows 23-24: Repeat Rows 3-4. (16 sts)
- Row 25: Repeat Row 3.
- Fasten off MC and CD. With yarn needle, weave in ends on inside of Flap.
Drawstring
- With larger hook, holding 1 strand each of MC and CD, and starting with a long yarn tail (approximately 12″/30.5 cm long), ch until you reach 42″ (106.5 cm), fasten off MC and CD with long yarn tail (approximately 12″/30.5 cm long).
- Starting at center ch-3 sp at front of Bag (5th ch-3 sp from buttonholes), insert Drawstring, weaving in and out of ch-3 sp around Bag. Other side of Drawstring will exit through the same ch-3 sp as you started, as shown in photo below.
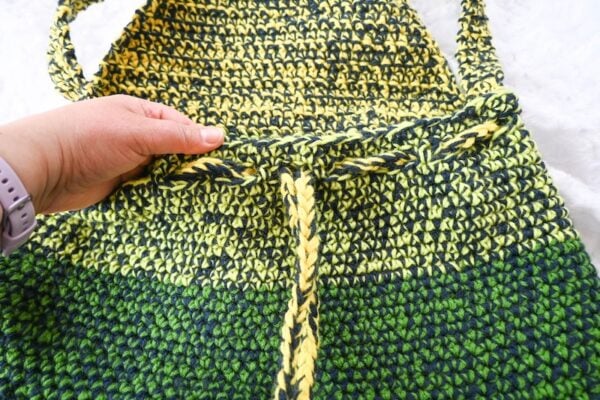
- Trim yarn tails from Drawstring to desired length.