

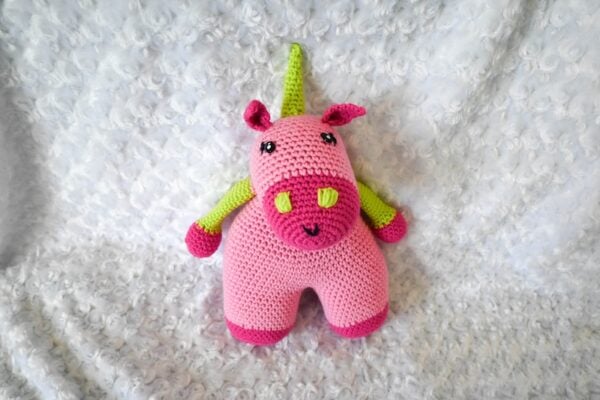
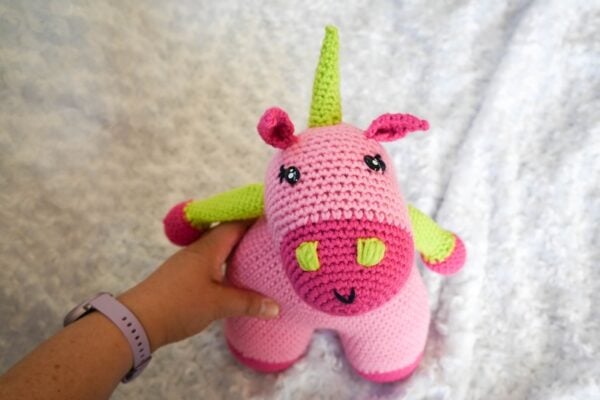
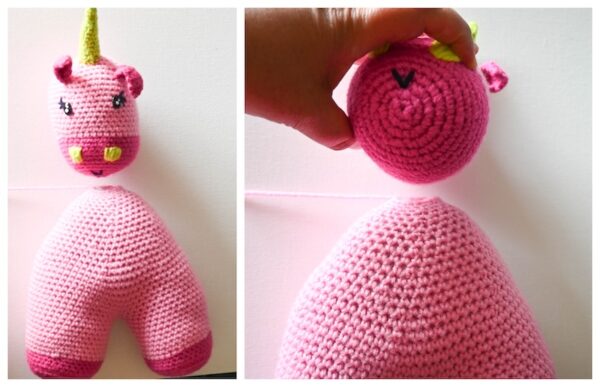
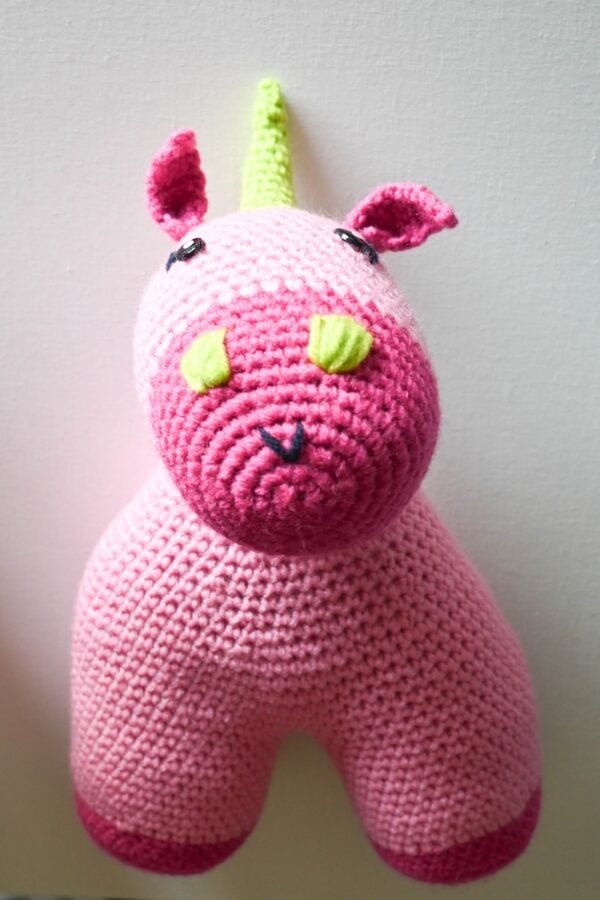
I’m sharing the first pattern in CAL Central Crochet’s Second Annual Toy Box Crochet Along. Urbana is an adorable unicorn crochet pattern. At just over 12″ tall, she is perfect for hugging and her floppy arms are just right for toting around on your kiddo’s next adventure!

This post contains affiliate links. I may receive compensation (at no added cost to you) if you make a purchase using these links.
One of the best things about childhood is being comfortable with your imagination and creativity. So many adults have lost or are trying to rekindle their creative freedom and imaginativity. Unicorns are mystical creatures that really capture the imagination of kiddos.
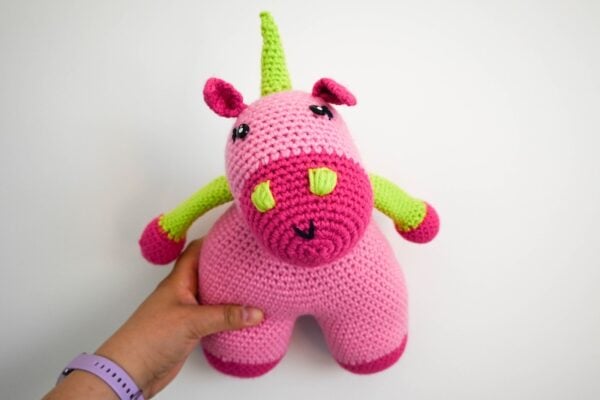
Because unicorns aren’t “real,” you don’t have to be constrained by choosing the “right” colors for a unicorn crochet pattern, either. For my version of Urbana, I dove through my Big Twist Value yarn stash until I found some fun colors.
Though you’ll need a bit of patience to assembly Urbana the Unicorn, the result is pretty stinking cute. Plus, it uses only basic stitches so even a beginner could make this. I’ve included videos and pictures for any parts that might be challenging. So are you ready to crochet your own Urbana the Unicorn? (By the way, if you love crocheting mystical creatures, you may enjoy the free Belinda the Caticorn pattern, too.)
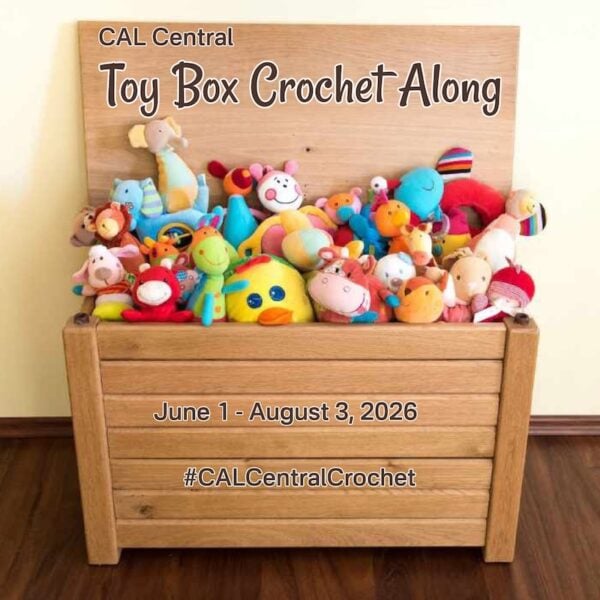
Scroll down for the free Urbana the Unicorn crochet pattern. This is the first pattern in the Second Annual Toy Box Crochet Along with CAL Central Crochet. To follow the CAL…
- Sign up for Crochet Along updates and the Underground Crafter newsletter to get regular updates, including an update as each CAL pattern is released. When you sign up, you’ll also get access to my subscriber vault which includes exclusive free PDF patterns, a coupon code for your choice of any crochet or knitting pattern or ebook from my Ravelry shop, and coupon codes from other indie designers and crafts businesses. Or, visit this blog post regularly for updates.
- Enter the giveaway at the bottom of this blog post by Augus 9, 2026 at 11:59pm Eastern for your chance to win a prize from GlassEyesOnline, GMC Books, KnitPal, Knitter’s Relief Balm, LennyMudPottery, Underground Crafter, or Unicorn!
- You can join in by crocheting the patterns as you have time.
- Share your progress and post pictures of your finished projects.
- Tag your projects and posts #CALCentralCrochet on all social media.
- If you’d like to chat with other crocheters, join the CAL Central Facebook group or visit this thread in the CAL Central Ravelry group.
- By the end of the CAL, you’ll have up to 10 awesome toys, amigurumi, and plushies to cuddle and play with!
- Use this button below on your Ravelry project pages or elsewhere on social media. Right click (on desktop) or tap and hold (on mobile) to save.
If you make your own Urbana the Unicorn, I’d love to see it! Share your progress and questions by tagging me on Bluesky as @UndergroundCrafter, Facebook as @UndergroundCrafter, or on Instagram as @ucrafter. You can also share a picture in the Underground Crafters Facebook group. Sign up for my weekly newsletter and get a coupon code for your choice of one of my premium patterns and private access to my vault of subscriber goodies. Plus, you’ll never miss one of my free patterns again!
Add the Urbana the Unicorn to your favorites or queue, or buy the ad-free PDF on Ravelry.

Urbana the Unicorn
Unicorn Crochet Pattern by Underground Crafter
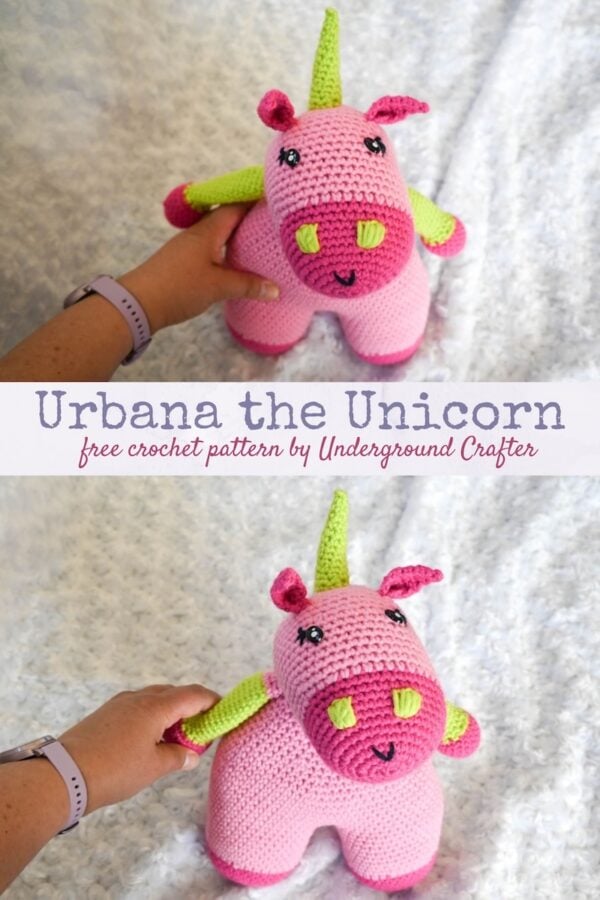


This adorable unicorn crochet pattern is perfect for making a friend that a kiddo can tote everywhere for imaginative adventures. This is the first pattern in the Second Annual Toy Box Crochet Along with CAL Central Crochet.
Finished Size
- One Size: Approximately 12.5″ (32 cm) tall (from horn to hoof) after stuffing.
Materials
- Big Twist Value yarn (100% acrylic, 6 oz/170 g, 380 yd/347 m) – 1 skein each in Medium Rose (MC), Magenta (CA), Slime (CB), and Varsity Navy Blue (CC), or approximately 160 yd (146.5 m) in MC, and 80 yd (73 m) each in CA, CB, and CC in any medium weight yarn.
- KnitPro Waves 2.0 hooks (available online at LoveCrafts | Amazon) US Size E-4/3.5 mm crochet hook, or any size needed to obtain correct gauge.
- Locking stitch markers – 3.
- Safety eyes – 2. I used MUCINNIA 14mm oval kawaii eyes.
- Fiber filling (available at Herrschners | Amazon).
- Yarn needle.
Gauge
- 18 sc = 4” (10 cm) across. Exact gauge is not critical for this pattern. Stitches should be small so fiber filling doesn’t show through.
Abbreviations Used in This Pattern
- BL – back loop – Fiber Flux has a helpful video identifying the back loop in crochet here.
- CA – Color A
- CB – Color B
- CC – Color C
- ch – chain
- invdec – invisible decrease – Insert hook in front loop only of each of next 2 sts, yo and draw up a loop, yo and draw through 2 loops. A video tutorial for this decrease is available below.
- If you can’t see the invdec video above, watch it on YouTube.
- MC – Main Color
- pm# – place stitch marker #
- rep – repeat
- rm# – remove marker #
- Rnd(s) – Round(s)
- sc – single crochet
- sl st – slip stitch
- st(s) – stitch(es)
- yo – yarn over
- * Repeat instructions after asterisk as indicated.
- [] Repeat instructions within brackets as indicated.
Pattern Notes
- Head, Legs, Torso, Front Hooves, and Arms are crocheted in the round in unjoined spirals. Ears and Horn are crocheted flat in rows.
- Oombawka Design Crochet has helpful photo and video tutorials for the magic adjustable ring here.
- Stitch markers are moved up each round to mark position(s) unless otherwise noted.
- When possible, crochet over yarn tails as demonstrated in this video below.
- If you can’t see the video above showing crocheting over your yarn tails, watch it on YouTube.
- Winding Road Crochet has a helpful video with tips for embellishing crochet with embroidery including a back stitch tutorial here.
- Leisure Arts has a helpful video demonstrating how to embellish crochet with the embroidery satin stitch here.
- A helpful video tutorial for seaming and joining with the whipstitch is available below.
- If you can’t see the whipstitch video above, watch it on YouTube.
- A helpful video for seaming with the slip stitch is available below.
- If you can’t see the slip stitch seam video above, watch it on YouTube.
- Everyday Hair Inspiration has a helpful video demonstrating braiding here.
Pattern Instructions
Pattern Instructions
Unicorn Plushie
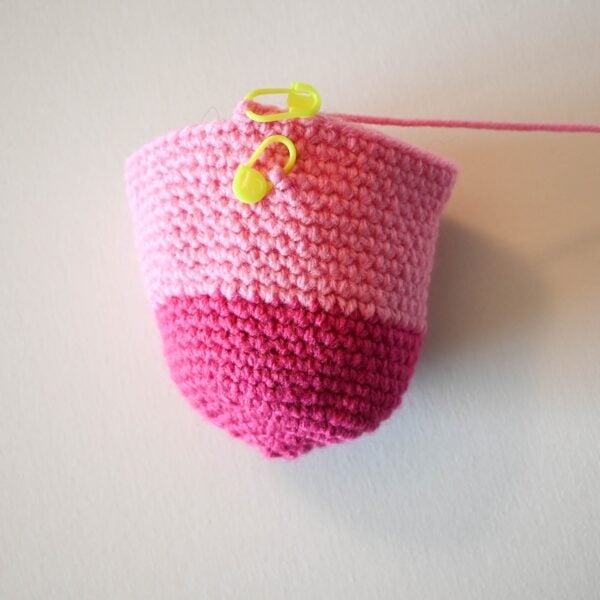
Head
- With CA and starting at muzzle, start with magic adjustable ring (see Pattern Notes).
- Rnd 1: Ch 1, 6 sc in ring, tighten magic ring to close, pm1 in last st to mark end of Rnd, move marker1 up each Rnd. (6 sts)
- Rnd 2: 2 sc in each st around. (12 sts)
- Rnd 3: [2 sc in next st, sc in next st] around. (18 sts)
- Rnd 4: [2 sc in next st, sc in next 2 sts] around. (24 sts)
- Rnd 5: [2 sc in next st, sc in next 3 sts] around. (30 sts)
- Rnd 6: [2 sc in next st, sc in next 4 sts] around. (36 sts)
- Rnd 7: [2 sc in next st, sc in next 5 sts] around. (42 sts)
- Rnd 8: Sc in each st around.
- Rnds 9-12: Rep Rnd 8, 4 times. Rm1 at the end of Rnd 12.
- Rnd 13: Sl st in first 2 sts, fasten off CA, join MC with sl st to any st on Rnd 12, ch 1, sc in same st and in each st around, pm1 in last st to mark end of Rnd, move marker1 up each Rnd.
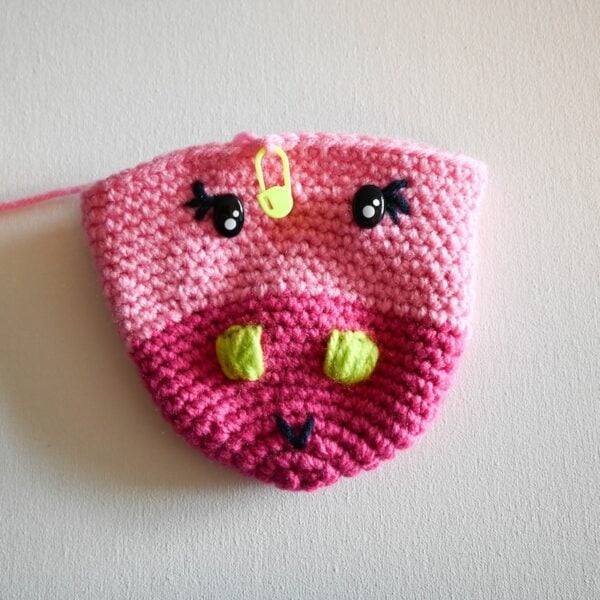
- Rnds 14-20: Rep Rnd 8, 7 times, pm2 around any st in Rnd 20 to mark position for embellishment.
- Rnd 21: [2 sc in next st, sc in next 13 sts] around. (45 sts)
- Rnd 22: [2 sc in next st, sc in next 14 sts] around. (48 sts)
- Rnd 23: Rep Rnd 8 once, remove hook from loop and pm1 to prevent unravelling.
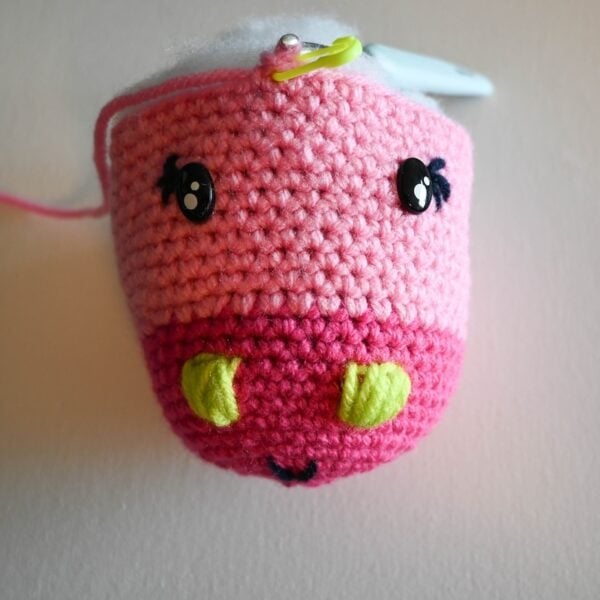
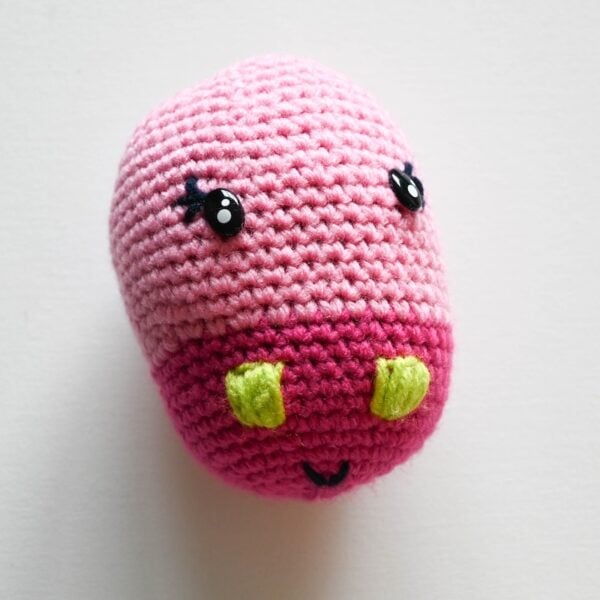
- Embellish face on Head as follows. First, position safety eyes as desired on marked Rnd. When satisfied with position, secure washers on back, rm2. Thread yarn needle with 1 yd (1 m) in CB. Approximately 2 Rnds below color change and positioned underneath safety eyes, embellish Cheeks with embroidery satin stitch (see Pattern Notes) across 3 sts on same Rnd to centered st 3 Rnds below, fasten off CB, and weave in ends or knot securely on inside of Head. Thread yarn needle with 1 yd (1 m) in CC. Use embroidery back stitch (see Pattern Notes) to create Mouth centered below Cheeks and to add 3 short lines next to each safety eye as Eyelashes, fasten off CC, and weave in ends or knot securely on inside of Head.
- Rnd 24: Return hook to loop and pm1 to last st of previous Rnd to mark end of Rnd, sc in each st around.
- Stuff Head firmly.
- Rnd 25: [Invdec, sc in next 14 sts] around. (45 sts)
- Rnd 26: [Invdec, sc in next 13 sts] around.(42 sts)
- Rnd 27: [Invdec, sc in next 5 sts] around.(36 sts)
- Rnd 28: [Invdec, sc in next 4 sts] around.(30 sts)
- Rnd 29: [Invdec, sc in next 3 sts] around.(24 sts)
- Rnd 30: [Invdec, sc in next 2 sts] around.(18 sts)
- Add stuffing to Head.
- Rnd 31: [Invdec, sc in next st] around.(12 sts)
- Rnd 32: Invdec around, rm1.(6 sts)
- Fasten off MC with long yarn tail, approximately 12″ (30.5 cm) long. Thread yarn needle with MC from long yarn tail. Seam Rnd 32 closed with whipstitch join (see Pattern Notes).
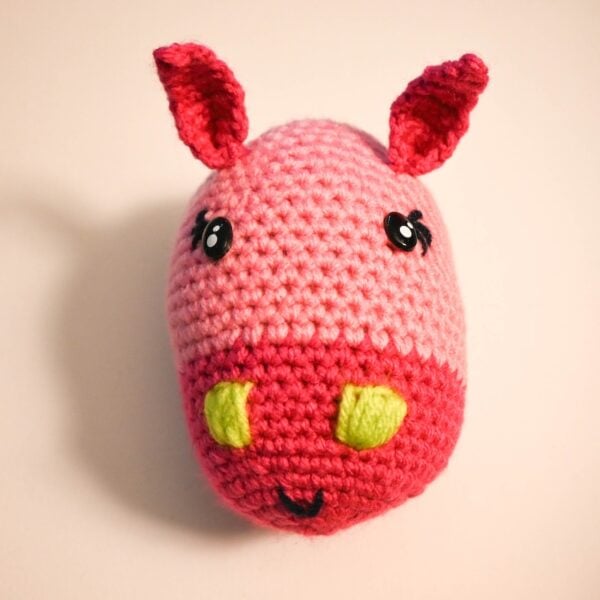
Ears – Make 2
- With CA and starting at tip, ch 2.
- Row 1: Turn, skip 1 ch, 2 sc in next ch. (2 sts)
- Row 2: Turn, ch 1, sc in each st across.
- Row 3: Turn, ch 1, sc in first st, 2 sc in next st. (3 sts)
- Row 4: Rep Row 2 once.
- Row 5: Turn, ch 1, sc in first st and each st across to last st, 2 sc in next st. (4 sts)
- Row 6: Rep Row 2 once.
- Rows 7-8: Rep Rows 5-6 once. (5 sts)
- Rows 9-10: Rep Rows 5-6 once. (6 sts)
- Fasten off CA with long yarn tail, approximately 12″ (30.5 cm), for seaming.
- With yarn needle, weave in CA yarn tail from start of Ears. Fold first Ear at base. Thread yarn needle with CA from long yarn tail. Whipstitch (see Pattern Notes) base stitches together. With angled (increased) side of Ear facing outward, position first Ear 4 Rnds above safety eye. With yarn needle, whipstitch first Ear to Head so that seamed base is vertical above Eye.
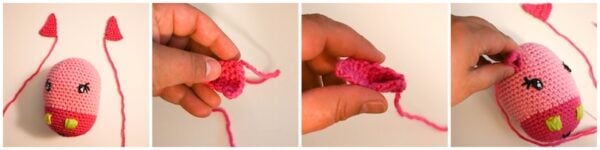
- Weave in yarn tails on inside of Head. Repeat for second Ear.
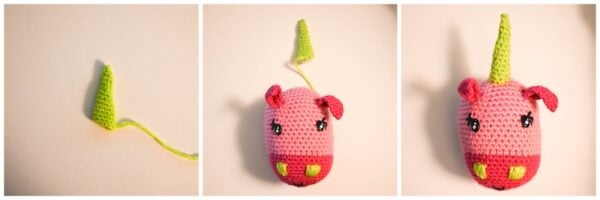
Horn
- With long tail (approximately 12″/30.5 cm) for seaming in CB and starting at base, ch 11.
- Set Up Row: Turn, skip 1 ch, sc in next 10 sts, pm1 in last st to mark end of Rnd, move marker1 up each Rnd. (10 sts)
- Rnd 1: Sc in each st around.
- Rnd 2: Invdec, sc in next 8 sts. (9 sts)
- Rnd 3: Rep Rnd 1 once.
- Rnd 4: Sc in next st, invdec, sc in next 6 sts. (8 sts)
- Rnd 5: Rep Rnd 1 once.
- Rnd 6: Sc in next 2 sts, invdec, sc in next 4 sts. (7 sts)
- Rnd 7: Rep Rnd 1 once.
- Rnd 8: Sc in next 3 sts, invdec, sc in next 2 sts. (6 sts)
- Rnd 9: Rep Rnd 1 once.
- Rnd 10: Invdec, sc in next 4 sts. (5 sts)
- Rnd 11: Rep Rnd 1 once.
- Rnd 12: Invdec, sc in next 3 sts, rm1. (4 sts)
- Fasten off CB. Thread yarn needle with CB from Rnd 12, seam Horn tip closed with whipstitch (see Pattern Notes). Weave yarn tail on inside of Horn.
- Stuff Horn. Thread yarn needle with CB from foundation chain, seam Set Up Row at base closed with whipstitch. Continue on to attach Horn to Head, centered between Eyes and starting 2 Rnds above top of Ears, using whipstitch seam. Weave in yarn tail on inside of Head.
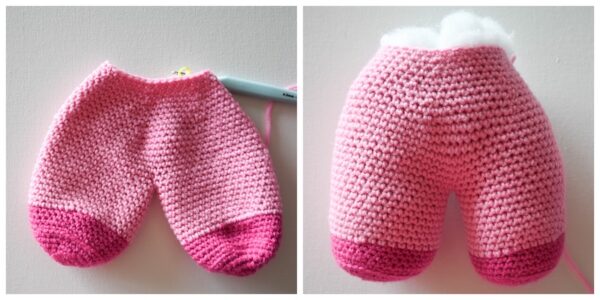
First Leg
- With CA and starting at hoof, start with magic adjustable ring (see Pattern Notes).
- Rnd 1: Ch 1, 6 sc in ring, tighten magic ring to close, pm1 in last st to mark end of Rnd, move marker1 up each Rnd. (6 sts)
- Rnd 2: 2 sc in each st around. (12 sts)
- Rnd 3: [2 sc in next st, sc in next st] around. (18 sts)
- Rnd 4: [2 sc in next st, sc in next 2 sts] around. (24 sts)
- Rnd 5: [2 sc in next st, sc in next 3 sts] around. (30 sts)
- Rnd 6: [2 sc in next st, sc in next 4 sts] around. (36 sts)
- Rnd 7: ScBL in each st around.
- Rnd 8: Sc in each st around.
- Rnds 9-11: Rep Rnd 8, 3 times, rm1 and end of Rnd 11.
- Rnd 12: Sl st in first 2 sts, fasten off CA, join MC with sl st to any st on Rnd 11, ch 1, sc in same st and in each st around, pm1 in last st to mark end of Rnd, move marker1 up each Rnd.
- Rnds 13-21: Rep Rnd 8, 9 times, fasten off MC.
Second Leg
- Rep as for First Leg but do not fasten off MC at end of Rnd 21. Pm2 in 18th st after marker1 on Second Leg and join to any st on First Leg. Pm3 in 19th st after marker 1 on Second Leg and join to next st after marker2 on First Leg.
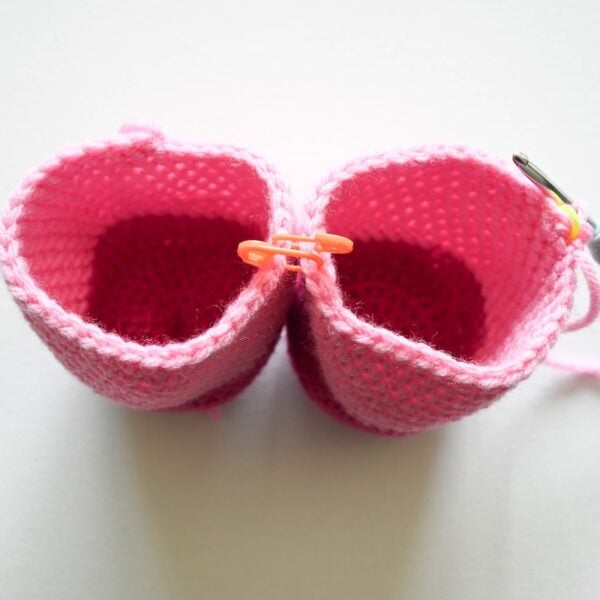
Join Legs
- Rnd 22: Sc in next 17 sts on Second Leg, sc through 18th st on Second Leg and marked st on First Leg to join, rm2, sc in next 34 sts on First Leg, sc through marked st to join both Legs, rm3…
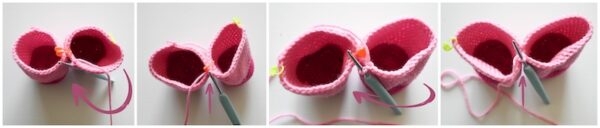
- …sc in next 17 sts on First Leg. (70 sts)
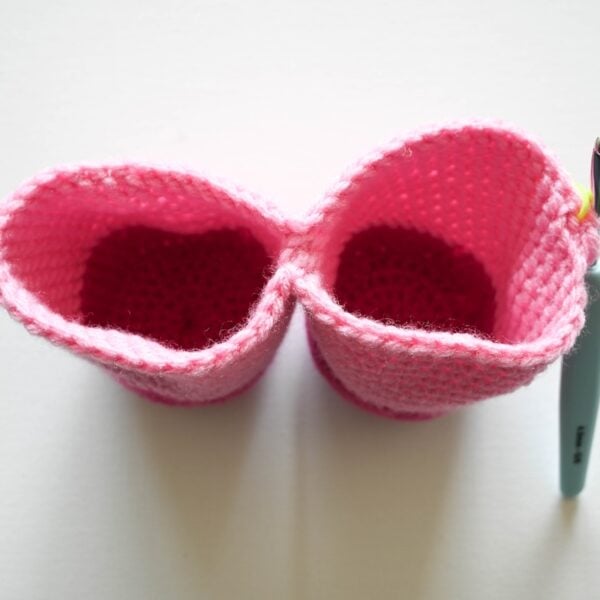
Continue on to Torso
- Rnd 23: Sc in next 68 sts, skipping 2 joined sts at center of Legs. (68 sts)
- Rnd 24: Sc in each st around.
- Rnds 25-28: Rep Rnd 24, 4 times.
- Rnd 29: [Invdec, sc in next 32 sts] around. (66 sts)
- Rnd 30: [Invdec, sc in next 9 sts] around. (60 sts)
- Rnd 31: Sc in each st around.
- Rnd 32: [Invdec, sc in next 8 sts] around. (54 sts)
- Rnd 33: Rep Rnd 31 once.
- Rnd 34: [Invdec, sc in next 7 sts] around. (48 sts)
- Rnd 35: Rep Rnd 31 once.
- Rnd 36: [Invdec, sc in next 6 sts] around. (42 sts)
- Rnd 37: Rep Rnd 31 once.
- Rnd 38: [Invdec, sc in next 5 sts] around. (36 sts)
- Rnd 39: Rep Rnd 31 once.
- Stuff Legs and Torso firmly.
- Rnd 40: [Invdec, sc in next 4 sts] around. (30 sts)
- Rnd 41: Rep Rnd 31 once.
- Rnd 42: [Invdec, sc in next 3 sts] around. (24 sts)
- Rnd 43: Rep Rnd 31 once.
- Rnd 44: [Invdec, sc in next 2 sts] around. (18 sts)
- Rnds 45-46: Rep Rnd 31 twice, rm1 after end of Rnd 31.
- Fasten off MC with long yarn tail (approximately 18″/45.5 cm) for seaming. Add stuffing if necessary.
- Position Head above Torso so underside of Head is centered above opening to Torso. Thread yarn needle with long yarn tail in MC from Torso. You may find it helpful to use stitch markers or pins to position Head to Torso.
- Join Head to Torso with whipstitch seam (see Pattern Notes).
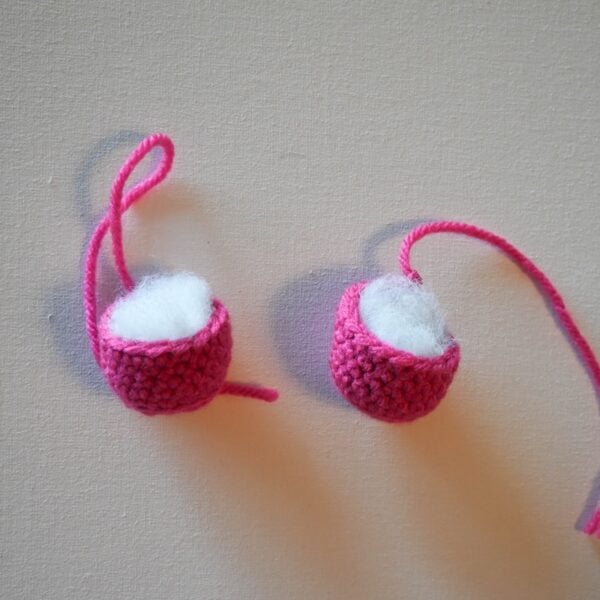
Front Hooves – Make 2
- With CA and starting at hoof, start with magic adjustable ring (see Pattern Notes).
- Rnd 1: Ch 1, 6 sc in ring, tighten magic ring to close, pm1 in last st to mark end of Rnd, move marker1 up each Rnd. (6 sts)
- Rnd 2: 2 sc in each st around. (12 sts)
- Rnd 3: [2 sc in next st, sc in next st] around. (18 sts)
- Rnd 4: ScBL in each st around.
- Rnd 5: Sc in each st around.
- Rnds 6-8: Rep Rnd 5, 3 times, rm1 after Rnd 8.
- Sl st in first 2 sts, fasten off CA. Stuff Front Hooves firmly.
Continue to Arms – Make 2
- Rnd 9: Join CC with sl st to any st on Rnd 8, ch 1, starting in same st [sc in next st, invdec] around, pm1 in last st to mark end of Rnd, move marker1 up each Rnd. (12 sts)
- Rnds 10-24: Rep Rnd 5, 15 times.
- Fasten off CC.
- Rnd 25: Join MC with sl st to any st on Rnd 24, ch 1, sc in same st and each st around, pm1 in last st to mark end of Rnd, move marker1 up each Rnd.
- Rnd 26: Rep Rnd 5 once.
- Join Rnd 26 with slip stitch seam (see Pattern Notes) and fasten off MC with long yarn tail, approximately 12″ (30.5 cm), for seaming. Position Arms at opposite sides of Torso, approximately 5 Rnds below join of Head and Torso.
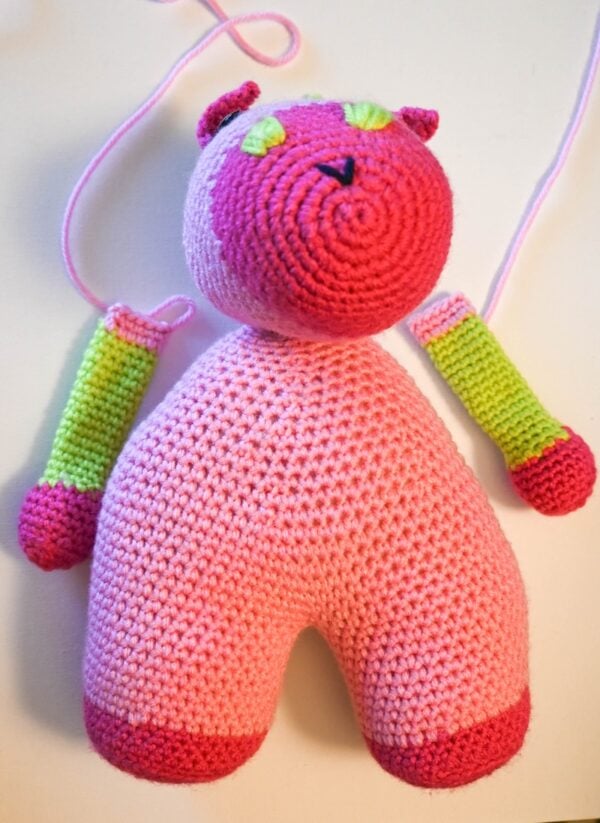
- Join each Arm with whipstitch seam to Torso. Weave in yarn tails on inside of Body.
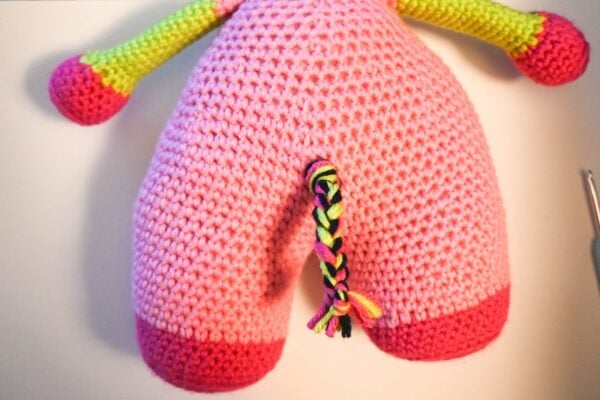
Braided Tail
- Cut 3 strands each in CA, CB, and CC, approximately 20″ (51 cm) long.
- Turn body to the back. Insert hook through a stitch centered above the Legs join, fold yarn strands in half and pull up loops through stitch. Remove hook and knot yarn.
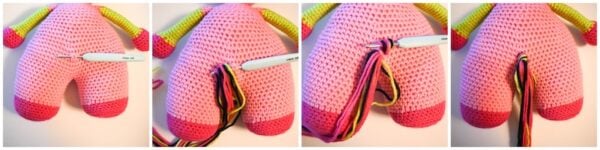
- Holding 3 groups of 6 strands each, braid a tail (see Pattern Notes) to desired length or ending just above hooves. Knot securely at end of braid. Trim yarn ends.
- Weave any remaining yarn tails inside of body.