
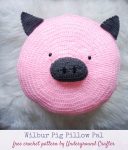
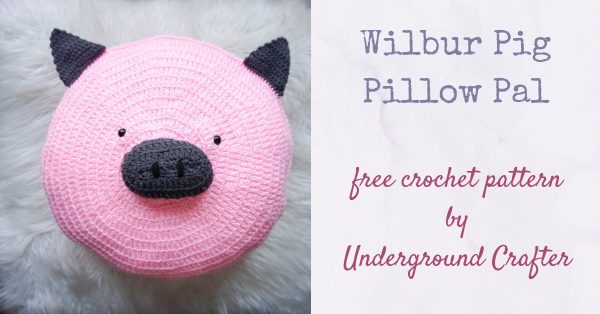
Wilbur Pig is the second of three animal pillow pals I’m sharing this week as part of the Christmas in July Make Along! This adorable crochet amigurumi pig is a simple, beginner-friendly crochet project, and the round pillow form makes stuffing easy peasy, too.
This post contains affiliate links. I may receive compensation (at no added cost to you) if you make a purchase using these links. This project is sponsored by Fairfield World, but all opinions and thoughts are my own. Additional supplies for this project were provided by Clover USA and NELSONWOOD. Camera was generously provided by B&H Photo Video and Pro Audio.
Theodore Bear (at left) was the first pillow pal in this series, and today I’m sharing Wilbur Pig. The third pattern in this series for the Spot Dog Pillow Pal is available here.

Confession: Don’t tell the other Pillow Pals, but Wilbur is my favorite. I really love his face and ears and how the colors combined. I hope you’ll love him, too.

How To Join the 2019 Christmas in July Make Along
- Get all the details, including the full schedule and the link to each project as it goes live here. You can also enter the giveaway at the same link through 11:59 p.m. Eastern on Sunday, August 4, 2019 to win one of 17 great prizes!
- You can join in by crocheting, knitting, or sewing the projects as you have time.
- Share your progress and post pictures of your finished projects. Tag your projects and posts #CIJMakeAlong2019 on all social media.
- If you’d like to chat with other crocheters, join the Underground Crafters Facebook group.
- Get regular emails with links to the Make Along patterns by signing up for the Underground Crafter newsletter.
- By the end of the Make Along, you’ll have up to 31 awesome projects. Get ready for the handmade holiday season while having fun with us!
- Use this button below on your Ravelry project pages or elsewhere on social media. Right click (on desktop) or tap and hold (on mobile) to save.
If you make your own Wilbur Pig Pillow Pal, I’d love to see it! I’d love to see it! Share your progress and questions by tagging me on Bluesky as @UndergroundCrafter, Facebook as @UndergroundCrafter, or on Instagram as @ucrafter. You can also share a picture in the Underground Crafters Facebook group. Sign up for my weekly newsletter and get a coupon code for your choice of one of my premium patterns and private access to my vault of subscriber goodies. Plus, you’ll never miss one of my free patterns again!
Add the Wilbur Pig Pillow Pal to your favorites or queue, or buy the ad-free PDF on Ravelry.

Wilbur Pig Pillow Pal
Crochet Amigurumi Pattern by Underground Crafter
Updated 3/21/2026


Wilbur Pig is the second of three amigurumi animal pillow pals made using Fairfield Poly-Fil Premier 16” Round Accent Pillow Inserts for the 2019 Christmas in July Make Along with Underground Crafter!
Finished Size
- Fits a 16” (40.5 cm) round pillow form.
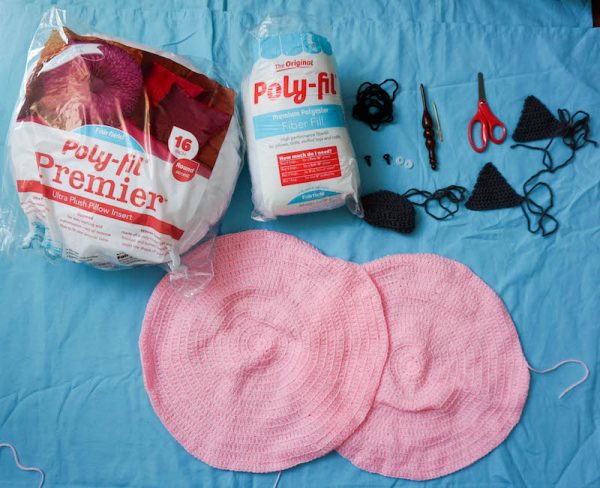
Materials
- Red Heart Super Saver yarn (100% acrylic, 7 oz/198 g/364 yd/333 m) – 1 skein in 373 Petal Pink (CA), 1 skein in 3950 Charcoal (CB), and 1 skein in 312 Black (CC), or approximately 364 yd (333 m) in CA, 30 yd (27.5 m) in CB, and 5 yd (4.5 m) in CC in any medium weight yarn.
- US Size G-6/4 mm crochet hook, or size needed to obtain gauge. I used a handmade wooden NELSONWOOD crochet hook.
- Fairfield Poly-Fil Premier 16” Round Accent Pillow Insert.
- Fairfield Poly-Fil Fiber Fill.
- 12 mm round black safety eyes – 1 pair.
- Clover Quick Locking Stitch Marker set.
- Yarn needle.
Gauge
- Exact gauge is not critical for this project. Stitches should be tight so that pillow doesn’t show through.
Abbreviations Used in This Pattern
- bl – back loop only
- CA – Color A
- CB – Color B
- CC – Color C
- ch – chain
- dc – double crochet
- hdc – half double crochet
- pm – place stitch marker
- rep – repeat
- sc – single crochet
- sl st – slip stitch
- st(s) – stitch(es)
- Repeat instructions after asterisk as indicated.
- [] Repeat instructions between brackets as indicated.
Pattern Notes
- Project is crocheted in the round with the right (front) side facing up.
- Ch 1 at beginning of Rounds does NOT count as a stitch.
- Unless otherwise directed, move stitch marker up each Round to mark position.
- When choosing colors, note CA is the main color of the Face and Back; CB is the color of the Muzzle; and CC is the color of the Nostrils.
- A video tutorial for joining with the whipstitch is available below.
- If you can’t see the whipstitch video above, watch it on YouTube.
- A video tutorial for joining with the single crochet is available below.
- If you can’t see the single crochet join video above, watch it on YouTube.
Pattern Instructions
Muzzle
- With CB, ch 12.
- Round 1: Turn, skip 1 ch, 2 sc in next ch, sc in next 9 ch, 4 sc in next ch, pm in second of 4 sc, turn to crochet along undworked side of foundation chain, sc in next 9 ch, 2 sc in next ch, pm in last st, do not join, begin to work in unjoined spirals.
- Round 2: 2 dc in first st, dc in each st across to marked st, 2 dc in marked st, pm in second of 2 dc, 2 dc in next st, dc in each st across to marked st, 2 dc in marked st, pm in second of 2 dc.
- Rounds 3-4: Rep Round 2 twice.
- Final Round: Hdc in next st, sc in next st, sl st in next st. Fasten off CB with long yarn tail (approximately 18”/46 cm) for seaming.
Ears (Make 2)
- With CB, ch 2.
- Row 1: Turn, skip 1 ch, 2 sc in next ch. (2 sts)
- Row 2: Turn, ch 1, sc in first st, 2 sc in last st. (3 sts)
- Row 3: Turn, ch 1, sc in first st and in each st across to last st, 2 sc in last st. (Increases by 1 st)
- Rows 4-14: Rep Row 3, 11 times until 15 sts remain. Fasten off CB with long yarn tail (approximately 18”/46 cm) for seaming.
Back
- Note: Back diameter should measure 16” (40.5 cm) across to fit the pillow. This is more important than the number of Rounds! If your Back reaches that diameter before 15 Rounds, continue to Final Rnd instructions. If your Back still hasn’t reached that diameter at 15 Rounds, continue increasing following the established pattern before continuing to Final Rnd instructions.
- With CA, ch 4, skip 3 ch, sl st to next ch to form ring.
- Rnd 1: Ch 1, 12 dc in ring, pm in last st to mark position, do not join. (12 sts)
- Rnd 2: 2 dcBL in each st around. (24 sts)
- Rnd 3: *2 dcBL in next st, dcBL in next st; rep from * around. (36 sts)
- Rnd 4: *2 dcBL in next st, dcBL in next 2 sts; rep from * around. (48 sts)
- Rnd 5: *2 dcBL in next st, dcBL in next 3 sts; rep from * around. (60 sts)
- Rnd 6: *2 dcBL in next st, dcBL in next 4 sts; rep from * around. (72 sts)
- Rnd 7: *2 dcBL in next st, dcBL in next 5 sts; rep from * around. (84 sts)
- Rnd 8: *2 dcBL in next st, dcBL in next 6 sts; rep from * around. (96 sts)
- Rnd 9: *2 dcBL in next st, dcBL in next 7 sts; rep from * around. (108 sts)
- Rnd 10: *2 dcBL in next st, dcBL in next 8 sts; rep from * around. (120 sts)
- Rnd 11: *2 dcBL in next st, dcBL in next 9 sts; rep from * around. (132 sts)
- Rnd 12: *2 dcBL in next st, dcBL in next 10 sts; rep from * around. (144 sts)
- Rnd 13: *2 dcBL in next st, dcBL in next 11 sts; rep from * around. (156 sts)
- Rnd 14: *2 dcBL in next st, dcBL in next 12 sts; rep from * around. (168 sts)
- Rnd 15: *2 dcBL in next st, dcBL in next 13 sts; rep from * around. (180 sts)
- Final Rnd: HdcBL in next, scBL in next, slstBL in next. Fasten off CA.
Front
- With CA, rep instructions for Back until Front is the same size. Do not fasten off CA.
Assembly
- Tip: Use locking stitch markers to “pin” pieces into position before sewing in place.
- Thread yarn needle with CC and sew 2 Nostrils on Muzzle.
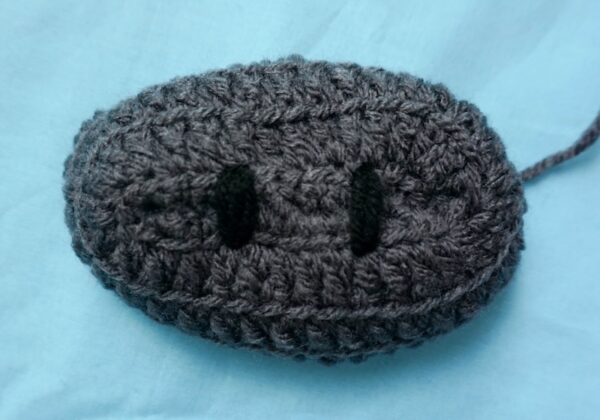
- Position Muzzle on Front. Thread yarn needle with yarn tail from Muzzle and join Muzzle with whipstitch (see Pattern Notes) to Front, stopping to stuff Muzzle with fiber filling before closing seam.
- Position safety eyes. Attach firmly by securing washers on back.
- Position first Ear on right side of Front. Join with whipstitch (see Pattern Notes) to front loops of Front using yarn tail.
- Position second Ear in relation to first Ear on Front. Join with whipstitch seam to front loops of Front using yarn tail.
- With yarn needle, weave in yarn tails on inside of Front.
- Position Front and Back so the wrong sides are touching with the right side of the Front facing you. Join Front and Back with sc seam (see Pattern Notes) working through both layers, stopping once pillow is about half joined to insert pillow form. Continue to join with sc seam. Sl st to first sc to join.
- Fasten off CA.
Finishing
- With yarn needle, weave in ends.
SUPER cute!!
Très beau modèle j’ ai une préférence pour le cochon merci pour ce modele