
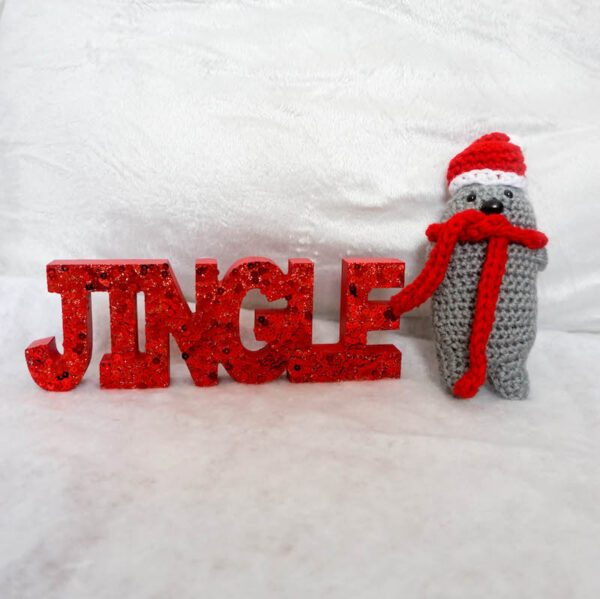
If you’re looking for an easy crochet seal pattern that you can dress up for the holidays, you’ll love the Amigurumi Seal! This simple pattern is a companion to the Amigurumi Baby Penguin and the Amigurumi Polar Bear, and includes the pattern for a festive hat and scarf to adorn your seal for the winter holidays.

This post contains affiliate links. I may receive compensation (at no added cost to you) if you make a purchase using these links. Materials for this project were generously provided by Clover USA, Fairfield World, and Yarnspirations Red Heart.
When I was working on the Amigurumi Baby Penguin pattern for this year’s Holiday Stashdown Crochet Along, I wanted to create a set of friends.

I thought it would make sense if the friends all lived in the same climate, and that’s when I got the idea for a crochet seal pattern.
Once I finished the seal, he looked like he might need something extra, so the next thing I know, I had a little Santa hat and scarf designed, too. I think the Amigurumi Seal looks cute by himself and with the hat and scarf, but you decide what looks better for your version.

This post is part of the third annual Countdown to Christmas I’m sharing with folks signed up for the Crochet Along updates and the Underground Crafter newsletter.

Each day through December 24, 2025, I’m sharing a 2-day free coupon code straight to your inbox for one of my crochet patterns that is perfect for winter or holiday crafting. The Amigurumi Seal is the December 7 featured pattern. Sign up now to get access to the free PDF! (When you sign up for this list, you get regular updates from Underground Crafter, and an update email about every pattern for the CALs I host as those patterns are released. When you sign up, you’ll also get access to my subscriber vault which includes exclusive free PDF patterns, a coupon code for your choice of any crochet or knitting pattern or ebook from my Ravelry shop, and coupon codes from other indie designers and crafts businesses.)
If you make your own Amigurumi Seal, I’d love to see it! Share your progress and questions by tagging me on Bluesky as @UndergroundCrafter, Facebook as @UndergroundCrafter, or on Instagram as @ucrafter. You can also share a picture in the Underground Crafters Facebook group. Sign up for my weekly newsletter and get a coupon code for your choice of one of my premium patterns and private access to my vault of subscriber goodies. Plus, you’ll never miss one of my free patterns again!
Add the Amigurumi Seal to your favorites or queue on Ravelry.

Amigurumi Seal
Crochet Seal Pattern by Underground Crafter
Updated 12/6/2025


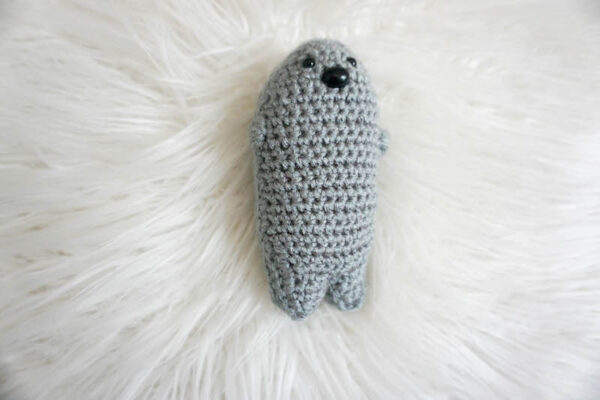
This adorable seal is small enough to be an ornament or gift tag, and cute enough to be gifted as a softie. One in a set of three Arctic Amigurumi Animals with accessories including the Amigurumi Polar Bear and the Amigurumi Baby Penguin.
Finished Size
- Approximately 4.5” (11.5 cm) tall x 3.25” (8.5 cm) wide before stuffing.
Materials
- Red Heart Super Saver yarn (100% acrylic, 7 oz/198 g, 364 yd/333 m) – 1 skein in 340 Dusty Grey (CA), or approximately 50 yd (45.5 m) in any medium weight yarn.
- Optional (for Hat and Scarf): 1 skein in 319 Cherry Red (CB) and 311 White (CC), or approximately 50 yd (45.5 m) in CB and 10 yd (9 m) in CC in any medium weight yarn.
- US Size F-5/3.75 mm crochet hook, or any size needed to obtain correct gauge.
- Optional (for Hat and Scarf) US Size H-8/5 mm crochet hook, or any size needed to obtain correct gauge.
- 6 mm black safety eyes – 1 pair.
- 13 mm black oval craft nose – 1.
- Fairfield Poly-Fil Crafter’s Choice Dry Packing Fiber Fill.
- Clover Quick Locking Stitch Marker Set, or at least 2 stitch markers.
- Yarn needle.
Gauge
- 18 sc = 4” (10 cm) across. Exact gauge is not critical for this project. Stitches should be small so that fiber filling doesn’t show.
Abbreviations Used in This Pattern
- BL – back loop only – Fiber Flux has a helpful video for identifying the back loop here.
- bob – 5-repeat bobble – [Yo, insert hook in st, yo and draw up a loop, yo and draw through 2 loops] 5 times in same st, yo and draw through all 6 loops on hook. A helpful video tutorial for this stitch is available below.
- If you can’t see the video for the bob above, watch it on YouTube.
- CA – Color A
- CB – Color B
- CC – Color C
- ch – chain
- hdc – half double crochet
- invdec – invisible decrease – Insert hook in front loop of each of next 2 sts, yo and draw up a loop, yo and draw through all 3 loops on hook. A helpful video tutorial for this stitch is available below.
- If you can’t see the invisible decrease video above, watch it on YouTube.
- pm – place stitch marker
- rep – repeat
- Rnd – Round
- sc – single crochet
- sc2tog – single crochet 2 stitches together (decrease) – [Insert hook in next st, yo and draw up a loop] twice, yo and draw through all 3 loops on hook. A helpful video tutorial for this decrease is available below.
- If you can’t see the video for the sc2tog above, watch it on YouTube.
- sc6tog – single crochet 6 stitches together (decrease) – [Yo, insert hook in next st, yo and draw up a loop, yo and draw through 2 loops] 6 times, yo and draw through all 7 loops on hook. A helpful video tutorial for this decrease is available below.
- If you can’t see the sc6tog video above, watch it on YouTube.
- sl st – slip stitch
- st(s) – stitch(es)
- yo – yarn over
- *Repeat instructions after asterisk as indicated.
- [] Repeat instructions between brackets as indicated.
Pattern Notes
- The Front and Back Pieces are crocheted flat in rows. The Edgings are crocheted in the round.
- Ch 1 at beginning of Rows does not count as a stitch.
- A helpful video tutorial for seaming crochet pieces together with the mattress stitch is available below.
- If you can’t see the video for the mattress stitch seam above, watch it on YouTube.
- A helpful video tutorial demonstrating how to crochet around the side of your project is available below.
- If you can’t see the video for crocheting around the side of your project above, watch it on YouTube.
Pattern Instructions
Back Piece
- With CA and smaller hook, ch 6.
- Row 1: Turn, skip 1 ch, sc in next 5 sts. (5 sts)
- Row 2: Turn, ch 1, 2 sc in first st, sc to last st, 2 sc in last st. (7 sts)
- Rows 3-5: Rep Row 2, 3 times. (13 sts)
- Row 6: Turn, ch 1, sc in first st and in each st across.
- Rep Row 6 until piece measures approximately 2” (5 cm) long. Pm in first and last stitch of Row to mark front flipper placement.
- Rep Row 6 until piece measures approximately 4” (10 cm) long.
- Row 7: Turn, ch 1, sc2tog in first 2 sts, sc in each st across to last 2 sts, sc2tog. (11 sts)
- Row 8: Rep Row 7 once. (9 sts)
First Back Flipper
- Row 9a: Turn, ch 1, sc2tog in first 2 sts, sc in next 2 sts. (3 sts)
- Rows 10a-11a: Rep Row 6 twice.
- Row 12a: Turn, ch 1, sc2tog in first 2 sts, sc in next st. (2 sts)
- Row 13a: Turn, ch 1, sc2tog in first 2 sts. Fasten off CA. (1 st)
Second Back Flipper
- On Row 8, skip 1 st after First Back Flipper, join CA with smaller hook and sl st to next st.
- Row 9b: Ch 1, sc in same st and next st, sc2tog. (3 sts)
- Rows 10b-13b: Rep Rows 10a-13a, do not fasten off CA.
Back Piece Edging
- Rnd 1: Turn, ch 1, sc in first st, turn to work along side of Flipper (see Pattern Notes), sc in side of each of next 5 rows, sc in skipped st on Row 8, turn to work along side of next Flipper, sc in side of each of next 5 rows, turn to work along edge, sc in next st, turn to work along side of unfinished edge, sc in side of each row across to foundation chain, turn to work along foundation ch, sc in unworked side of next 5 sts from foundation chain, turn to work along side of unfinished edge, sc in side of each row across to first sc, join with sl st. Fasten off CA.
Front Piece
- Rep instructions for Back Piece through Row 13b.
Front Piece Edging
- Rnd 1: Turn, ch 1, sc in first st, turn to work along side of Flipper (see Pattern Notes), sc in side of each of next 5 rows, sc in skipped st on Row 8, turn to work along side of next Flipper, sc in side of each of next 5 rows, turn to work along edge, sc in next st, *turn to work along side of unfinished edge, sc in side of each row across to marked row, bob in side of marked row,** sc in side of each row across to foundation chain, turn to work along foundation ch, sc in unworked side of next 5 sts on foundation chain, rep from * to **, sc in side of each row across to first sc, join with sl st.
- Fasten off CA with long yarn tail (approximately 24”/61 cm) for seaming.
Assembly and Finishing
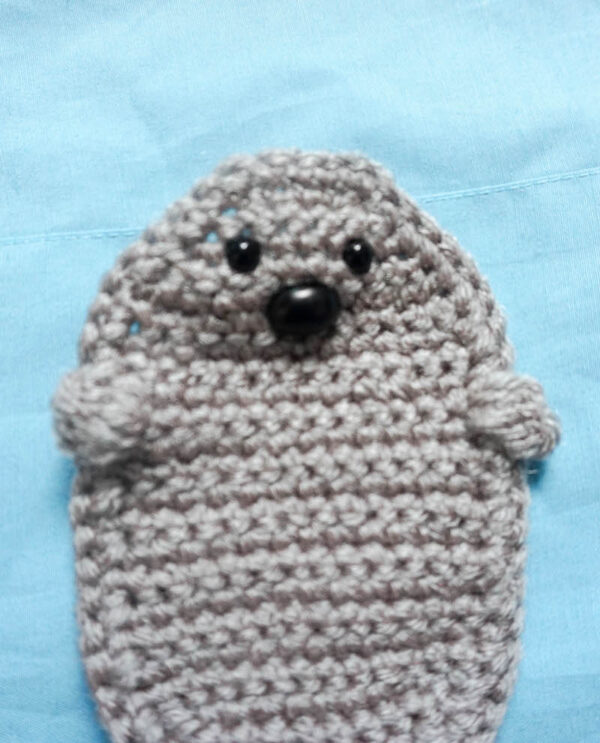
- Position Front Piece so that bobble Flippers “pop” upwards. This is the right (front) side.
- Position safety eyes on face. Attach firmly by securing washers on back. Repeat for craft nose.
- Thread yarn needle with long yarn tail from Front Piece Edging. Starting at Back Flippers, seam pieces together with mattress stitch (see Pattern Notes). As you seam Back Flippers, stuff firmly with fiber filling. Continue to seam. Once you have about 2” (5 cm) unseamed remaining, stuff firmly with fiber filling. As you finish seaming, continue to stuff.
- With yarn needle, weave in ends.
Standard Hat and Scarf
Gauge
- Gauge is not critical for this project.
Pattern Instructions
Standard Scarf
- With CB and larger hook, ch 61.
- Row 1: Turn, skip 1 ch, hdc in next 60 stitches. Fasten off CB. (60 sts)
Hat
- With CC and larger hook, starting with long yarn tail (approximately 12”/30.5 cm) for seaming, ch 16.
- Set Up Row: Turn, skip 1 ch, hdc in next 15 ch, join CB with sl st to first hdc. Fasten off CC. Begin working in the round. (15 sts)
- Round 1: Ch 1, scBL in same st and in each st around, do not join.
- Rounds 3-4: Sc in each st around.
- Round 5: Invdec, sc in next 13 st. (14 sts)
- Round 6: [Invdec, sc in next 5 sts] twice. (12 sts)
- Round 7: [Invdec, sc in next 2 sts] 3 times. (9 sts)
- Round 8: [Invdec, sc in next st] 3 times. (6 ss)
- Sc in each st around until hat measures approximately 2.5” (6.5 cm) long, join CC with sl st, fasten off CB.
- Final Round: Sc6tog. Fasten off CC.
Assembly and Finishing
- With yarn needle, weave in ends on scarf and top of hat.
- Thread yarn needle with long yarn tail from start of hat. Seam Set Up Row of hat closed. With yarn needle, secure hat to Amigurumi Seal’s head. With yarn needle, weave in ends.