

I’m sharing a beginner-friendly sewing tutorial for DIY sensory toys for babies today. If you’re a more advanced sewist or just an adventurous beginner, I’ve included lots of options for variations that will be fun for you to sew and fun for babies to explore! This project is the second pattern in the Baby Sew Along.

This post contains affiliate links. I may receive compensation (at no added cost to you) if you make a purchase using these links. I’m a Baby Lock Ambassador and this post is part of our ongoing collaboration. All opinions and thoughts are my own. Additional supplies for this project were provided by Cricut, Fairfield, and Michael Miller Fabrics. Camera generously provided by B&H Photo Video Pro Audio.
Sensory toys are projects that are designed to stimulate the senses of a baby. These DIY sensory toys for babies focus on tactile stimulation by including fabrics of different textures. For my version, I used a mix of upcycled denim from old jeans and 100% cotton quilting fabric. For your version, you can use all quilting fabric, all denim, cotton batting, or some combination of all three. Remember that most babies put everything in their mouth, so the sensory toys should be easy to wash and dry in the machine. For that reason, I tried to use fabrics that will wash well together even though they have different textures.
This tutorial is the second project in the Baby Sew Along. Follow along and be sure to enter the end-of-SAL giveaway here by December 23, 2021 at 11:59 p.m. Eastern. To join the SAL:
- Sign up for the Underground Crafter newsletter to get regular updates, including links to new SAL patterns.
- You can join in by sewing the projects as you have time.
- Share your progress and post pictures of your finished projects. Tag your projects and posts #babysewalong on all social media.
- If you’d like to chat with other sewists, join the Underground Crafters Facebook group.
- By the end of the SAL, you’ll have over a dozen projects for baby.
- Use the button below on social media. Right click (on desktop) or tap and hold (on mobile) to save.

DIY Sensory Toys for Babies
Sewing Tutorial by Underground Crafter
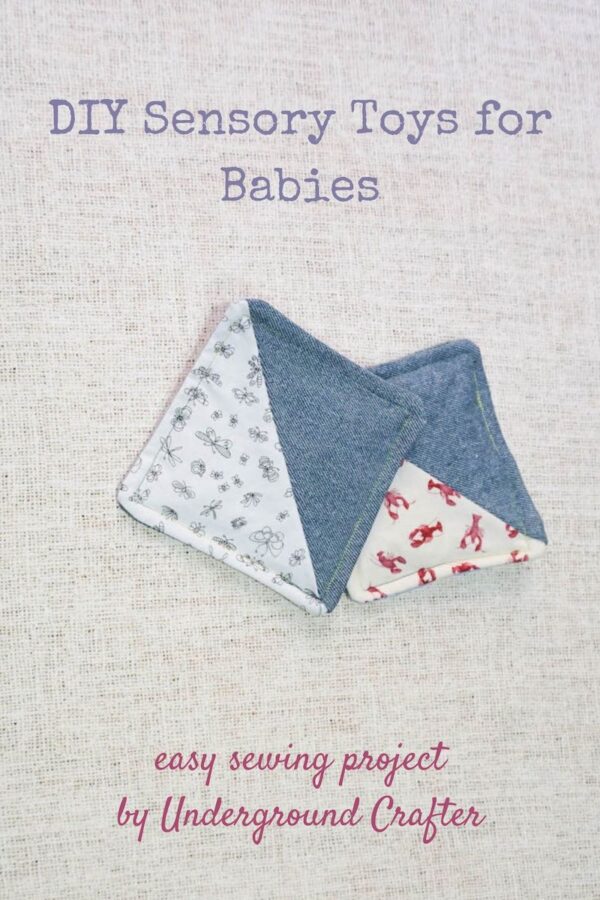
Sensory toys make great baby shower gifts or “just because” gifts for a special baby in your life. In this tutorial, you’ll also make half square triangles but with zero stress because the finished size and corners don’t have to be “perfect” as they would in a quilt. These are great ways to use up little pieces of fabric left over from larger projects. At the end of the tutorial, I’ll include some additional options for more advanced sewists or adventurous beginners!
Finished Size
- Approximately 5″ (13 cm) square. Exact size isn’t critical for this project.
Tools
- Baby Lock Jubilant sewing machine. (Read my review of the Jubilant here.)
- Cricut 45 mm rotary cutter, acrylic ruler, and self-healing cutting mat OR fabric scissors and marking pen.
- Cricut EasyPress Mini with EasyPress Mat, or iron and iron-safe surface.
- Fabric marking pencil.
- Klasse Denim Needle.
- Basic sewing supplies (seam ripper, thread snips, pins, etc.). I used the thread snips, seam ripper, pins, and pin cushion from the Cricut Sewing Kit.
Materials
- Fabric. For each sensory toy, you’ll need two 6″ (15 cm) squares. I used one upcycled denim piece and one 100% cotton piece for each. You can also substitute a batting square for one of the fabric squares.
- I used upcycled denim from old jeans, which has a great texture. If you’re new to working with upcycled denim, this post has 11 tips for upcycling jeans for craft projects.
- I used the following Michael Miller Fabrics: Lobsters in Coral from the By the Sea collection, Enjoy the Little Things in White from the Black & White collection, and Fairy Frost in Ice Glitter from the Basics collection. Ask for this fabric at your local quilt shop or shop online at Fat Quarter Shop or Amazon.
- Batting. For each sensory toy, you’ll need one 6″ (15 cm) square of batting. I used Fairfield Quilter’s 80/20 Batting – Small 45″ x 60″.
- 100% cotton thread.

Prepare Fabric
- Iron your fabric. You may need to use steam to remove any creases or folds.
- Using your rotary cutter, acrylic ruler, and cutting mat OR fabric scissors and marking pen, cut two 6″ (15 cm) of fabric and and one 6″ (15 cm) square of batting for EACH sensory toy.
Change Your Sewing Needle
- Change to the jeans/denim needle, using the small screwdriver that is included with your machine and following the instructions in your manual.

- TIP: Whenever you change your needle, rethread, or switch to a different stitch, check that your machine settings are still optimized by sewing on a small scrap piece of fabric and checking your stitches. (As you can see, my scrap has been through a lot of experimentation!)

Make Half-Square Triangles
- Layer a piece of fabric over a piece of denim with right sides together. Pin together.

- With fabric marker or marking pen and ruler, draw a line down the center from point to point, creating two triangles on your square.

- Repeat as necessary for as many toys as you’d like to make.

- Position the square so that the edge of your presser foot is aligned to the line you’ve drawn. I used a foot with a 1/4″ seam allowance, but it doesn’t really matter for this project. Sew down one side.

- Turn the square. Position it so that the edge of your presser foot is aligned to the line you’ve drawn. Sew down the other side.

- Repeat as necessary for all of your pinned squares. When you finish, trim excess threads.

- Using a scissor or your rotary cutter and acrylic ruler, cut the squares into half square triangles by cutting down the line you drew.

- Warm up EasyPress Mini or iron.

- Press seam towards the denim, or towards the darker fabric if you aren’t using denim.

- Once pressed, trim the excess edges (at top left and bottom right in photo below).

Assemble Sensory Toys
- Layer your fabric and batting as follows: batting on bottom, one square with fabric right side up in middle, one square with fabric wrong side up on top.
- NOTE: I alternated directions on my triangles. There is less denim seam bulk in the corners, you don’t have to worry that your triangles are perfectly aligned on each side, and it makes a more interesting tactile and visual experience for babies!

- Pin all layers securely.
- Using a straight stitch (I used #3 with the default length and width settings on my Baby Lock Jubilant sewing machine) and a 1/4″ seam allowance, sew through all layers on 3 sides. TIP: Be sure to remove the pins as you sew, as both your needle and your machine can be damaged by sewing through pins.

- On the fourth side, sew about a third of the way down the side, leaving an opening.

- Trim your square so any excess batting or fabric is removed.
- Clip the corners as shown in the picture below to reduce bulk.
- Turn your fabric right side out through the opening.

- Using the same settings (straight stitch and 1/4″ seam allowance), top stitch around all four sides, being sure to secure your stitches at the start/end. TIP: Stitch slowly as you get to the corners. Stop sewing with your needle in the down position, lift your presser foot, and rotate the mug rug to turn to sew the next side. After you put your presser foot down and before you start sewing again, make sure you still have a 1/4″ seam allowance.
- Trim your threads. You now have a completed baby sensory toy! Read on for more ideas for adapting this pattern.

Variations
- Make a Simple Matching Game: Babies are too young for matching games, but toddlers can play simple matching games. Make a set using matching fabrics that your baby can grow into. Some ideas for fabrics are solid colors (to teach color recognition), animal prints (to teach animal names), or fussy cut fabrics with large letters (to teach the alphabet).
- Add More Texture:
- You can increase the tactile sensations by using different fabric textures, such as corduroy, batting, minky, etc. for one of your fabric pieces. Just remember to use a fabric that is easy to wash and dry.
- You can use fiber filling or weighted pellets instead of, or in addition to, batting to add squishy or crunchy insides to your toys. Add these after turning the fabrics right side out but before sewing the toy closed.
- Add ribbon, crochet or knit pieces, or embroidery to the fabric before sewing together. Be sure to sew these on securely for safety.
- Make a Gift Set: If you’re making handmade burp cloths, a bib, a quilt, or a receiving blanket to gift, use coordinating fabric for a matching set of sensory toys.