Crocheted Animal Rugs by Vanessa Mooncie

I’m excited to share a book review, an excerpted crochet bear rug pattern, and a giveaway for your chance to win my review copy of a delightful crochet pattern book. Read on for more details!

This post contains affiliate links. I may receive compensation (at no added cost to you) if you make a purchase using these links. GMC Publications Ltd provided me with a free review copy of Crocheted Animal Rugs (available on Amazon or from independent booksellers) by Vanessa Mooncie. Although I accept free products for review, I do not accept additional compensation, nor do I guarantee a positive review. My reviews are based entirely on my honest opinions.

Book Review: Crocheted Animal Rugs

Crocheted Animal Rugs (available on Amazon or from independent booksellers) is a collection of patterns by Vanessa Mooncie. (I have previously reviewed Vanessa’s Animal Heads: Trophy Heads to Crochet and Monster Hats: 15 Scary Head Warmers to Knit.) The book opens with an introduction from Vanessa and then moves on to a 10-page gallery including full color, full page photos of each crocheted animal rug styled in a home setting.

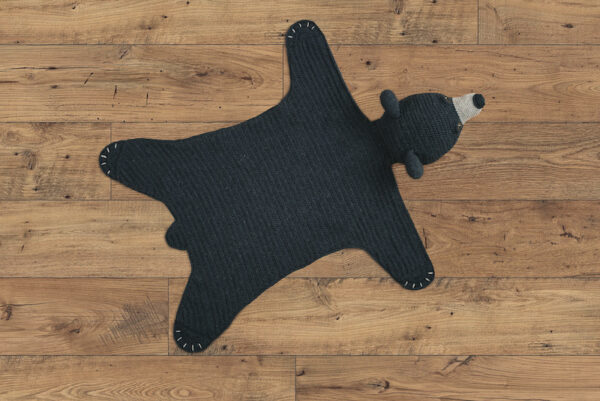
The book then moves on to Projects, of which there are ten. Each project includes a short introduction, a materials list that includes yarn brand but also weight and fiber content so you can make substitutions, the finished size, the tension (gauge), and method, which outlines the construction process. The patterns include a key for crochet symbol charts as well as written instructions using UK pattern abbreviations. The end of each pattern includes detailed making up instructions for assembly. Each pattern starts with a full page, color flat lay photograph of the rug on a wooden floor. Each pattern also includes multiple, smaller photos of details of the project, such as a close up of eyes, mouth, or face.

The next section is the 9-page Getting Started, which includes information about selecting hooks, yarn needles, and yarns; reading pattern charts; tips for measuring and adjusting tension (gauge); written and illustrated instructions for basic crochet stitches and the special stitches (such as bobbles, decreases, and loop stitches) used in the patterns; tips for identifying the front and back loop; and recommendations for changing and working with multiple color yarns.

Finishing Touches is a 5-page section that provides written instructions with illustrations for stuffing the animal heads, seaming methods, embroidery stitches for embellishment, and making tassels. It also includes a pattern abbreviation list and a conversion guide to clarify differences between UK and US crochet terminology and hook sizes. The book closes with a supplier list with more information about purchasing yarns and hooks in various countries and a short index.

While the book does include instructions on basic stitches, the illustrations are limited so I would not recommend it for a complete beginner crocheter. Although the book is a paperback, it does have front and back flaps to make it easier to keep your place so you can read the pattern and crochet at the same time. The patterns and the layout are whimsical and inspiring. As each pattern includes both written and charted instructions, this book gives you the option to choose your preferred approach, and it can also ease you into learning the other pattern method since you have both to refer to throughout. Overall, this is a great book for confident beginner crocheters, or more advanced crocheters looking for fun home decor projects.

Read on for the excerpted crochet bear rug pattern for the Black Bear from Crocheted Animal Rugs (available on Amazon or from independent booksellers).

Black Bear

Crochet Bear Rug Pattern by Vanessa Mooncie

Published in Crocheted Animal Rugs (available on Amazon or from independent booksellers). Text © Vanessa Mooncie, 2021. Copyright in the Work © GMC Publications Ltd, 2021. Shared with permission from GMC Publications Ltd.

This pattern can be crocheted in brown shades of yarn to make a grizzly bear rug. In fact, black bear coats can be brown, blue-black, blue-grey and even white in colour.

Materials

  • Rowan Pure Wool Superwash DK, 100% wool (137yd/125m per 50g ball), or any DK yarn:
    • 6 x 50g balls in 114 Caviar (A)
    • 4 x 50g balls in 118 Granite (B)
    • 1 x 50g ball in 119 Mole (C)
  • Approximately 92.5in (235cm) length of brown DK yarn, such as 110 Dust (D) for the eyes
  • Approximately 23.5in (60cm) length of white DK yarn, such as 012 Snow (E)
  • 4mm (UK8:USG/6) crochet hook
  • Blunt-ended yarn needle
  • Toy stuffing

Size

  • Approximately 32.25in (82cm) wide and 27.5in (70cm) long (excluding head)

Tension

  • 17 sts and 14 rows to 4in (10cm) over half treble using 4mm hook and yarn A. Use larger or smaller hook if necessary to obtain correct tension.

Notes from Underground Crafter

Method

  • The body and identical lining are worked in rows of half treble stitches. Each piece is finished with an edging of double crochet before attaching the paws and paw linings. The pieces are joined together by crocheting into each stitch of the edging and paws on both the body and lining at the same time.
  • The Black Bear’s snout is worked in continuous rounds of double crochet. The main colour is joined in and the head is crocheted in rows of half treble stitches. The head is stuffed and the stitches of the last row are sewn together to form a straight seam. The head is then sewn to the straight edge at the top of the body. The nose is crocheted in continuous rounds of double crochet. Each nostril is formed by skipping a number of stitches and slip stitching into the next group of stitches. The eyes are worked in rounds of double crochet and the eyelid is shaped by crocheting into the front loops of stitches to produce a raised edge over the eye. A reflection of light is embroidered on each eye with white yarn. The ears are made in rounds of double crochet and stuffed lightly before curving the lower edges to shape them and sewing them to the head. The eyes and nose are sewn in place and the rug is finished with embroidered long stitches for the claws on each paw.
  • 1 ch and 2 ch at beg of the row does not count as a st throughout.

Body

  • With 4mm hook and A, make 124 ch.
  • Row 1 (RS):  1 htr in 3rd ch from hook, I htr in each ct to end, turn (122 sts).
  • Rows 2-14:  2 ch, 1 htr in each htr to end, turn.
  • Rows 15-19:  Sl st in next 4 htr, 1 dc in next htr, 1 htr in each htr to last 5 htr, 1 dc in next htr, turn, finishing 4 sts before the end of the row (82 sts).
  • Row 20 (dec):  2 ch, htr2tog, 1 hrt in each htr to last 2 sts, htr2tog, turn (80 sts).
  • Row 21:  2 ch, 1 htr in each htr to end, turn.
  • Rows 22-27:  Rep last 2 rows 3 times more (74 sts).
  • Rows 28-48:  2 ch, 1 htr in each htr to end, turn.
  • Row 49 (inc):  2 ch, htr2inc, 1 htr in each htr to last st, htr2inc, turn (76 sts).
  • Rows 50-52:  2 ch, 1 htr in each htr to end, turn.
  • Rows 53-60 (inc):  Rep rows 49-52, twice more (80 sts).
  • Rows 61-68 (inc):  Rep rows 49-50, 4 times (88 sts).
  • Rows 69-78 (inc):  Rep rows 49, 10 times (108 sts)

Shape first back leg

  • Row 79 (RS) (dec): 2 ch, htr2tog, 1 htr in next 31 htr, htr3tog, turn.
  • Continue on these 33 sts.
  • Row 80 (WS) (dec): 2 ch, htr3tog, 1 htr in each htr to last 2 sts, htr2tog, turn (30 sts).
  • Row 81 (dec): 2 ch, htr2tog, 1 htr in each htr to last 3 sts, htr3tog, turn (27 sts).
  • Rows 82–89 (dec): Rep rows 80–81, 4 times more (3 sts).
  • Row 90 (dec): 2 ch, htr3tog (1 st).
  • Fasten off.  

Shape second back leg

  • Follow chart for first back leg.
  • With WS facing and 4mm hook, rejoin A with a sl st to first htr.
  • Row 1 (WS): 2 ch, starting in same st as sl st, htr2tog, 1 htr in next 31 htr, htr3tog, turn.
  • Continue on these 33 sts.
  • Rows 2–12: Rep rows 80–90 to complete second leg.
  • Fasten off.

Tail

  • With RS facing and 4mm hook, skip first 12 of 36 htr between the legs and join A with a sl st to next htr.
  • Row 1 (RS): 2 ch, 1 htr in same htr as sl st, 1 htr in next 11 htr, turn (12 sts).
  • Row 2: 2 ch, htr in each htr to end.
  • Row 3–6 (dec): 2 ch, htr2tog, 1 htr in each htr to last 2 sts, htr2tog (4 sts).
  • Fasten off.

Edging

  • With RS facing and 4mm hook, rejoin A with a sl st to the reverse side of the first ch.
  • Next: 1 dc in same st as sl st, 1 dc in reverse side of next 121 ch, 1 ch, work 19 dc evenly across end of leg, 1 ch, work 20 dc down front leg, work 100 dc evenly down side of body, 1 ch, work 19 dc evenly across top of leg, 1 ch, work 23 dc evenly along edge of back leg, 1 dc in next 12 sts between leg and tail, work 9 dc evenly down edge of tail, 1 ch, 1 dc in next 4 sts at tip of tail, 1 ch, work 9 dc evenly up edge of tail, 1 dc in next 12 sts between leg and tail, work 23 dc evenly along edge of back leg, 1 ch, work 19 dc evenly across top of leg, 1 ch, work 100 dc evenly up side of body, work 20 dc up front leg, 1 ch, work 19 dc evenly across end of leg, 1 ch, sl st in first st and fasten off.

Paws (make 4)

  • Follow chart for Tiger paw below.
  • With 4mm hook and A, make a magic loop.
  • Row 1 (WS): 2 ch, 5 htr into loop, turn (5 sts).
  • Row 2 (RS) (inc): 2 ch, (htr2inc) 5 times, turn. Close the loop by pulling tight on the short end of the yarn (10 sts).
  • Row 3: 2 ch, (htr2inc, 1 htr) 5 times, turn (15 sts).
  • Row 4: 2 ch, (htr2inc, 2 htr) 5 times, turn (20 sts).
  • Row 5: 2 ch, (htr2inc, 3 htr) 5 times, turn (25 sts).
  • Row 6: 2 ch, (htr2inc, 4 htr) 5 times (30 sts).
  • Next: 1 ch, work 19 dc evenly along the straight edge of the paw, 1 ch, sl st in next htr, turn.

Join paw to leg

  • Place paw against Black Bear leg, with RS together.
  • Next: Inserting hook under both loops of each stitch of paw and leg to join, sl st in 1-ch sp, dc in next 19 dc, sl st in next 1-ch sp. Fasten off.

Lining

  • With 4mm hook and B, work as for body.

Paw linings

  • With 4mm hook and B, work as for paws.

Head

Snout

  • With 4mm hook and C, make a magic loop.
  • Round 1: 1 ch, 6 dc into loop (6 sts).
  • Round 2 (inc): (Dc2inc) 6 times. Close the loop by pulling tightly on the short end of the yarn (12 sts).
  • Round 3 (inc): (Dc2inc, 1 dc) 6 times (18 sts).
  • Round 4 (inc): (Dc2inc, 2 dc) 6 times (24 sts).
  • Round 5 (inc): (Dc2inc, 3 dc) 6 times (30 sts).
  • Rounds 6–10: 1 dc in each dc.
  • Round 11 (inc): (Dc2inc, 4 dc) 6 times (36 sts).
  • Rounds 12–20: 1 dc in each dc. Join A in last dc, turn.

Shape head

  • The following is worked in rows.
  • Continue with A.
  • Row 1 (WS) (inc): 2 ch, 1 htr in next 10 dc, (htr2inc, 2 htr) 6 times, 1 htr in next 8 dc, sl st in first htr, turn (42 sts).
  • Row 2 (RS) (inc): 2 ch, 1 htr in next 10 htr, (htr2inc, 3 htr) 3 times, 1 htr in next htr, (htr2inc, 3 htr) 3 times, 1 htr in next 7 htr, sl st in first htr, turn (48 sts).
  • Row 3 (inc): 2 ch, 1 htr in next 10 htr, (htr2inc, 4 htr) 3 times, 1 htr in next 2 htr, (htr2inc, 4 htr) 3 times, 1 htr in next 6 htr, sl st in first htr, turn (54 sts).
  • Row 4 (inc): 2 ch, 1 htr in next 10 htr, (htr2inc, 5 htr) 3 times, 1 htr in next 3 htr, (htr2inc, 5 htr) 3 times, 1 htr in next 5 htr, sl st in first htr, turn (60 sts).
  • Row 5 (inc): 2 ch, 1 htr in next 10 htr, *(htr2inc, 6 htr) 3 times, 1 htr in next 4 htr; rep from *, sl st in first htr, turn (66 sts).
  • Row 6 (inc):  2 ch, 1 htr in next 10 htr, (htr2inc, 7 htr) 3 times, 1 htr in next 5 htr, (htr2inc, 7 htr) 3 times, 1 htr in next 3 htr, sl st in first htr, turn (72 sts).
  • Row 7 (inc):  2 ch, 1 htr in next 10 htr, (htr2 inc, 8 htr) 3 times, 1 htr in next 6 htr, (htr2inc, 8 htr) 3 times, 1 htr in next 2 htr, sl st in first htr, turn (78 sts).
  • Rows 8-17:  2 ch, 1 htr in same htr as sl st, 1 htr in each htr, sl st in first htr, turn.
  • Row 18 (dec):  2 ch, 1 htr in next 10 htr, (htr2tog, 8 htr) 3 times, 1 htr in next 6 htr, (htr2tog, 8 htr) 3 times, 1 htr in next 2 htr, sl st in first htr, turn (72 sts).
  • Row 19:  2 ch, 1 htr in each htr, sl st in first htr, turn.
  • Row 20 (dec):  2 ch, 1 htr in next 10 htr, (htr2tog, 7 htr) 3 times, 1 htr in next 5 htr, (htr2tog, 7 htr) 3 times, 1 htr in next 3 htr, sl st in first htr, turn (66 sts).
  • Row 21:  2 ch, 1 htr in each htr, sl st in first htr, turn.
  • Row 22 (dec): 2 ch, 1 htr in next 10 htr, *(htr2tog, 6 htr) 3 times, 1 htr in next 4 htr; rep from *, sl st in first htr, turn (60 sts).
  • Row 23: 2 ch, 1 htr in each htr, sl st in first htr, turn.
  • Row 24 (dec): 2 ch, 1 htr in next 10 htr, (htr2tog, 5 htr) 3 times, 1 htr in next 3 htr, (htr2tog, 5 htr) 3 times, 1 htr in next 5 htr, sl st in first htr, turn (54 sts).
  • Row 25: 2 ch, 1 htr in each htr, sl st in first htr, turn.
  • Row 26 (dec): 2 ch, 1 htr in next 10 htr, (htr2inc, 4 htr) 3 times, 1 htr in next 2 htr, (htr2inc, 4 htr) 3 times, 1 htr in next 6 htr, sl st in first htr, turn (48 sts).
  • Rows 27–29: 2 ch, 1 htr in each htr, sl st in first htr, turn.
  • Fasten off, leaving a long tail of yarn.

Eyes (make 2)

  • With 4mm hook and A, make a magic loop.
  • Round 1 (RS): 1 ch, 5 dc into loop. Join D in last dc (5 sts).
  • Round 2 (inc): With D, (dc2inc) 5 times. Close the loop by pulling tightly on the short end of the yarn (10 sts).
  • Round 3 (inc): (Dc2inc, 1 dc) 5 times (15 sts).
  • Continue with A.
  • Round 4 (inc): (Dc2inc, 2 dc) 5 times (20 sts).
  • Round 5: Working in back loop of each st only, 1 dc in next 8 dc, (dc2inc, 3 dc) 3 times (23 sts).
  • Round 6: Working in front loops of round 4, sl st in next 8 dc, 1 dc in next 12 dc, sl st in first sl st, turn.

Eyelid

  • Next (WS): Sl st in each of the next 12 dc to finish the upper eyelid, sl st in next sl st of previous round. Fasten off, leaving a long tail of A at the end.

Ears (make 2)

  • With 4mm hook and A, make a magic loop.
  • Round 1: 1 ch, 6 dc into loop (6 sts).
  • Round 2 (inc): (Dc2inc) 6 times. Close the loop by pulling tightly on the short end of the yarn (12 sts).
  • Round 3 (inc): (Dc2inc, 1 dc) 6 times (18 sts).
  • Round 4 (inc): (Dc2inc, 2 dc) 6 times (24 sts).
  • Round 5 (inc): (Dc2inc, 3 dc) 6 times (30 sts).
  • Rounds 6–8: 1 dc in each dc.
  • Round 9 (inc): (Dc2inc, 4 dc) 6 times (36 sts).
  • Rounds 10–17: 1 dc in each dc.
  • Round 18 (dec): (Dc2tog, 4 dc) 6 times (30 sts).
  • Rounds 19–20: 1 dc in each dc.
  • Sl st to the next st and fasten off, leaving a long tail of yarn at the end.

Nose

  • With 4mm hook and A, make a magic loop.
  • Round 1: 1 ch, 6 dc into loop (6 sts).
  • Round 2 (inc): (Dc2inc) 6 times. Close the loop by pulling tightly on the short end of the yarn (12 sts).
  • Round 3 (inc): (Dc2inc) 12 times (24 sts).
  • Round 4 (inc): (Dc2inc, 1 dc) 12 times (36 sts).
  • Round 5: 1 dc in each dc.
  • Round 6: Skip next 6 dc, sl st in next 6 dc, skip next 6 dc, sl st in next 18 dc. Fasten off, leaving a long tail of yarn at the end.

Making up

Join body and lining

  • Place body and lining with WS together. With body facing up and 4mm hook, join A with a sl st to first of the 122 dc at top of body and lining at the same time to join.
  • Next: Working in each dc of both body and lining at the same time, 1 dc in same st as sl st, 1 dc in next 121 dc, *(dc2inc, 5 dc) 5 times around paw*, 1 dc in next 120 dc; rep from * to *, 1 dc in next 44 dc, 2 dc in next 1-ch sp, 1 dc in next 4 dc, 2 dc in next 1-ch sp, 1 dc in next 44 dc; rep from * to *, 1 dc in next 120 dc, rep from * to *, sl st in first st and fasten off.
  • With C, embroider five straight stitches on each paw for the claws.

Head

  • Stuff the head to within 5 rows from the neck edge. Align the stitches at beginning and end of each row in the centre of the underside of the head. Sew the open edges together to form a straight seam. Use the tail of yarn left after fastening off to sew the head in place, stitching both sides to the body and lining.

Nose and mouth

  • Insert a small amount of stuffing inside the nose. Sew the nose in place at the end of the snout, stitching all around the outer edges. Embroider a fly stitch with A for the mouth.

Eyes

  • Insert a tiny amount of stuffing into the eyeballs. Sew an eye to each side of the face with the length of yarn left after fastening off, stitching all around the outer edges. Embroider one or two short stitches in each eye using E.

Ears

  • Stuff the ears lightly, keeping a flattened shape. Using the long length of yarn left after fastening off, sew the 15 stitches on each side of the lower edge together to form a straight seam on each ear. Curve the lower edges of each ear and sew in place, stitching all around the edges to attach them securely.
  • Weave in all the yarn ends.

Giveaway

After reading my review of Crocheted Animal Rugs by Vanessa Mooncie and trying out the Black Bear crochet rug pattern, you are probably ready to get your hands on this book! You can buy it now on Amazon or from independent booksellers, or enter the giveaway below by 11:59 p.m. Eastern on Tuesday, February 8, 2022 for your chance to win my review copy. While my copy of the book was provided by GMC Publications Ltd, the giveaway is organized by Underground Crafter. Enter using any of the options on the Rafflecopter widget below. One winner will be chosen from the entries at random to win my review copy of the book. Winner will be contacted approximately 1 week after the entries close. Winner will have 3 days to claim the prize. If winner does not respond within 3 days, prize will be awarded to an alternate. By entering this giveaway, you are agreeing to share your contact information with Rafflecopter and/or Underground Crafter. You can read the Rafflecopter Privacy Policy here and the Underground Crafter Privacy Policy here to understand how this information is used. This giveaway is open worldwide, except where prohibited by law. Good luck!

a Rafflecopter giveaway

1 thought on “Crocheted Animal Rugs by Vanessa Mooncie”

Leave a Comment

Subscribe to the newsletter to get my secrets and access to the subscriber vault!

5 Secrets for Improving Your Crochet Skills