

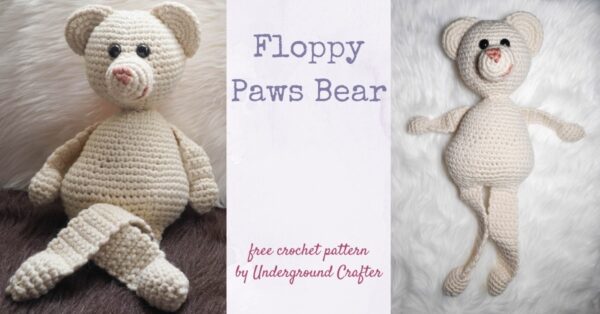
I’m kicking off the 2023 Softie Crochet Along with CAL Central Crochet with the adorable crochet bear pattern for the Floppy Paws Bear. My version is an off-white, polar bear style, but you can choose any colors you’d like for your version.
This post contains affiliate links. I may receive compensation (at no added cost to you) if you make a purchase using these links. Supplies for this pattern was generously provided by Fairfield World and Lion Brand.
Recently, I had the opportunity to try out a new-to-me yarn, Lion Brand Hue + Me. This is a bulky (#5/chunky) weight acrylic and wool blend yarn in beautiful colors. It was much softer than I expected, and an idea for a softie started bubbling in my mind.

I decided that it was the perfect yarn for a cuddly crochet bear pattern which would be perfect for kicking off the sixth annual Softie Crochet Along with CAL Central Crochet.

I wanted to make a big and huggable bear, but I also recognize that those are a bit less portable for kiddos on the go. So I made the limbs unstuffed, so the Floppy Paws Bear is easy to carry on an adventure, even though it is about 19″/48.5 cm tall.

Scroll down for the free pattern for the Floppy Paws Bear This is the first pattern in the 2023 Softie Crochet Along with CAL Central Crochet.
To join the 2023 Softie Crochet Along:
- Sign up for Crochet Along updates and the Underground Crafter newsletter to get regular updates, including an update as each CAL pattern is released. When you sign up, you’ll also get access to my subscriber vault which includes exclusive free PDF patterns, a coupon code for your choice of any crochet or knitting pattern or ebook from my Ravelry shop, and coupon codes from other indie designers and crafts businesses.
- You can join in by crocheting the patterns as you have time.
- Share your progress and post pictures of your finished projects. Tag your projects and posts #CALCentralCrochet on all social media.
- If you’d like to chat with other crocheters, join the CAL Central Facebook group or visit this thread in the CAL Central Ravelry group.
- By the end of the CAL, you’ll have up to 15 awesome softies to cuddle with!
- Use this button below on your Ravelry project pages or elsewhere on social media. Right click (on desktop) or tap and hold (on mobile) to save.

If you make your own Floppy Paws Bear, I’d love to see it! Share your progress and questions by tagging me on Facebook as @Underground Crafter on on Instagram as @ucrafter. You can also share a picture in the Underground Crafters Facebook group. Sign up for my weekly newsletter and get a coupon code for your choice of one of my premium patterns and private access to my vault of subscriber goodies. Plus, you’ll never miss one of my free patterns again!
Add the Floppy Paws Bear to your favorites or queue, or buy the ad-free PDF on Ravelry.

Floppy Paws Bear
Crochet Bear Pattern by Underground Crafter


This cuddly crochet bear pattern works up quickly in a bulky yarn. At 19” (48.5 cm) tall with an ample belly and stretchy, unstuffed limbs, the Floppy Paws Bear can be packed as a companion to bring along on adventures.This is the first pattern in the sixth annual Softie Crochet Along with CAL Central Crochet.
Finished Size
- Approximately 19” (48.5 cm) tall from tip of Ears to bottom of Back Paws after assembly and stuffing.
Materials
- Lion Brand Hue + Me yarn (80% acrylic/20% wool, 4.4 oz/125 g, 137 yd/125 m) – 2 skeins in 098AS Salt (CA) and 1 skein in 102AF Bellini (CB), or approximately 205 yd (187.5 m) in CA and 5 yd (3.5 m) in CB in any bulky weight acrylic and wool blend yarn.
- US Size H-8/5 mm crochet hook, or size needed to get gauge.
- Locking stitch markers.
- Yarn needle.
- I used the Ctcwsh ergonomic crochet hook set with stitch markers and yarn needles for my version.
- Fairfield Poly-Fil Premium Polyester Fiber Fill – 12 oz. bag.
- 15 mm black safety eyes – 1 pair.
Gauge
- Through Rnd 7 in pattern for Head = 4” (10 cm) diameter. Exact gauge is not critical for this pattern. Stitches should be tight so that fiber filling doesn’t show through.
Abbreviations Used in This Pattern
- CA – Color A
- CB – Color B
- ch – chain
- FL – front loop only
- invdec – invisible decrease – Insert hook in front loop only of each of next 2 sts, yo and draw up a loop, yo and draw through 2 loops. Planet June has a great invisible decrease tutorial here.
- pm# – place stitch marker number
- rep – repeat
- Rnd(s) – Round(s)
- sc – single crochet
- sl st – slip stitch
- st(s) – stitch(es)
- yo – yarn over
- [] Repeat instructions between brackets as indicated.
Pattern Notes
- Crochet over the yarn tails as you work. A helpful video tutorial demonstrating how to do this is available below.
- If you can’t see the video above demonstrating how to crochet over your yarn tails, click HERE to watch it on Facebook.
- Oombawka Design has a helpful video tutorial for starting with the magic adjustable ring here.
- A helpful tutorial for seaming with the whipstitch is available here.
- Cutesy Crafts has a helpful video tutorial for the embroidery satin stitch on YouTube and embedded below.

Pattern Instructions
Head
- With CA, start with magic adjustable ring (see Pattern Notes).
- Rnd 1: (Right Side) Ch 1, 6 sc in ring, pull yarn tightly to close ring, pm#1 in last st to mark position. Move marker up each Rnd. (6 sts)
- Rnd 2: 2 sc in each st around. (12 sts)
- Rnd 3: [2 sc in next st, sc in next st] around. (18 sts)
- Rnd 4: [2 sc in next st, sc in next 2 sts] around. (24 sts)
- Rnd 5: [2 sc in next st, sc in next 3 sts] around. (30 sts)
- Rnd 6: [2 sc in next st, sc in next 4 sts] around. (36 sts)
- Rnd 7: [2 sc in next st, sc in next 5 sts] around. (42 sts)
- Rnd 8: Sc in each st around.
- Rnds 9-10: Rep Rnd 8 twice, pm#2 on Rnd 10 to mark row for safety eye placement.
- Rnds 11-16: Rep Rnd 8, 6 times, pm#3 on Rnd 16 to mark row for Muzzle placement.
- Rnd 17: [Invdec, sc in next 5 sts] around. (36 sts)
- Rnd 18: [Invdec, sc in next 4 sts] around. (30 sts)
- Rnd 19: [Invdec, sc in next 3 sts] around. (24 sts)
- Rnd 20: [Invdec, sc in next 2 sts] around. (18 sts)
- Rnd 21: [Invdec, sc in next st] around. (12 sts)
- Fasten off CA with long yarn tail (approximately 18”/46 cm) for seaming. Remove marker#1.
Torso
- Starting at Neck, with CA, ch 13.
- Set Up Row: Turn, skip 1 ch, sc in next 12 ch, pm#1 in last st to mark position and begin working in the Round. Move marker up each Rnd. (12 sts)
- Rnd 1: (Right Side) [2 sc in next st, sc in next st] around. (18 sts)
- Rnd 2: [2 sc in next st, sc in next 2 sts] around. (24 sts)
- Rnd 3: [2 sc in next st, sc in next 3 sts] around. (30 sts)
- Rnd 4: [2 sc in next st, sc in next 4 sts] around, pm#4 on Rnd 4 to mark placement for Front Limbs. (36 sts)
- Rnd 5: Sc in each st around.
- Rnds 6-11: Rep Rnd 5, 6 times.
- Rnd 12: [2 sc in next st, sc in next 5 sts] around. (42 sts)
- Rnd 13: [2 sc in next st, sc in next 6 sts] around. (48 sts)
- Rnds 14-17: Rep Rnd 5, 4 times.
- Rnd 18: [Invdec, sc in next 6 sts] around. (42 sts)
- Rnd 19: [Invdec, sc in next 5 sts] around. (36 sts)
- Rnd 20: [Invdec, sc in next 4 sts] around. (30 sts)
- Rnd 21: [Invdec, sc in next 3 sts] around. (24 sts)
Begin Shaping for Lower Limbs and Back Paws
- Rnd 22: Sc in next 6 sts, skip 12 sts, sc in next 6 st, pm#1 in loop of last stitch (to avoid unraveling) and remove crochet hook. Do not fasten off. (12 sts)

- Stuff Torso thoroughly. With yarn needle and yarn tail from start of Torso, sew Set Up Row closed and weave in yarn tail. Remove marker#1 and return it to the last st in Rnd 22. Insert crochet hook and continue to Lower Limb 1. Move marker up each Rnd.

Lower Limb 1
- Rnd 1: Sc in each st around Rnd 22. (12 sts)
- Rnd 2: Rep Rnd 1 once.
- Rnd 3: Press sides of Limb together so that there are 6 sts lined up on each side. Ch 1, join with a single crochet seam (see video below).
- If you can’t see the video above demonstrating how to join with a single crochet seam, click HERE to watch it on Instagram.
- Remover marker#1 and begin working in Rows. (6 sts)
- Row 4: Turn, ch 1, sc in first st and in next 5 sts. (6 sts)
- Rows 5-28: Rep Row 1, 24 times.
Shape Back Paw 1
- Row 29: Turn, ch 1, scFL in first st and in next 5 sts, turn to the other side of the same row, scFL in unworked loops, pm#1 in last st and begin working in the Round. Move marker up each Rnd. (12 sts)

- Rnd 30: Sc in each st around. (12 sts)
- Rnds 31-34: Rep Rnd 30, 4 times.
- Rnd 35: [Invdec, sc in next st] around. (8 sts)
- Fasten off CA with long yarn tail (approximately 18”/46 cm) for seaming. Remove marker#1.
- Stuff Paw thoroughly.

- Thread yarn needle with CA from end of Paw. With yarn needle, whipstitch (see Pattern Notes) Paw closed. Weave in yarn tail.
Lower Limb 2
- Join CA with sl st to next unworked stitch on Rnd 22 of Torso (next to Lower Limb 1). Ch 1, sc in same st and in next 11 unworked sts around, pm#1 in last st and begin working in the Round. Move marker up each Rnd. (12 sts)
- Rep instructions as for Lower Limb 1 through Back Paw.
Ears (Make 2)
- With CA, start with magic adjustable ring (see Pattern Notes).
- Rnd 1: (Right Side) Ch 1, 6 sc in ring, pull yarn tightly to close ring, pm#1 in last st to mark position. Move marker up each Rnd. (6 sts)
- Rnd 2: 2 sc in each st around. (12 sts)
- Rnd 3: [2 sc in next st, sc in next st] around. (18 sts)
- Rnd 4: [2 sc in next st, sc in next 2 sts] around. (24 sts)
- Rnd 5: Sc in each st around.
- Fasten off CA with long yarn tail (approximately 18”/46 cm) for seaming. Remove marker#1.
- With yarn needle, weave in any remaining yarn tail from magic ring on Wrong Side of Ear.
- Fold Ear across diameter, thread yarn needle with CA from end of Ear, seam curved edge with whipstitch seam (see Pattern Notes).

- Do not weave in yarn tail. Set Ears aside for final assembly.
Muzzle
- With CA, start with magic adjustable ring (see Pattern Notes).
- Rnd 1: (Right Side) Ch 1, 6 sc in ring, pull yarn tightly to close ring, pm#1 in last st to mark position. Move marker up each Rnd. (6 sts)
- Rnd 2: 2 sc in each st around. (12 sts)
- Rnd 3: [2 sc in next st, sc in next st] around. (18 sts)
- Rnd 4: Sc in each st around.
- Rnds 5-6: Rep Rnd 4, twice.
- Fasten off CA with long yarn tail (approximately 18”/46 cm) for seaming. Remove marker#1.
Upper Limbs (Make 2)
- Starting with long yarn tail (approximately 12”/30.5 cm) for seaming, with CA, ch 5.
- Row 1: Turn, skip 1 ch, sc in next 4 ch. (5 sts)
- Row 2: Turn, ch 1, sc in first 4 sts.
- Rows 3-13: Rep Row 2, 11 times.
Shape Front Paw
- Row 14: Turn, ch 1, scFL in first st and in next 3 sts, turn to the other side of the same row, scFL in unworked loops, pm#1 in last st and begin working in the Round. Move marker up each Rnd. (8 sts)
- Rnd 15: [2 sc in next st, sc in next 3 sts] around. (10 sts)
- Rnd 16: [2 sc in next st, sc in next 4 sts] around. (12 sts)
- Rnd 17: Sc in each st around.
- Rnd 18: [Invdec, sc in next 2 sts] around. (9 sts)
- Rnd 19: [Invdec, sc in next st] around. (6 sts)
- Fasten off CA with long yarn tail (approximately 18”/46 cm) for seaming. Remove marker#1. Stuff Paw thoroughly. Thread yarn needle with CA from end of Paw. With yarn needle, whipstitch (see Pattern Notes) Paw closed. Weave in yarn tail at end of Paw.

Attach Upper Limbs to Torso
- Position first Upper Limb at Rnd 4 (marker#4) of Torso. Align each stitch on Upper Limb to a different Rnd (Rnds 4-7) as shown in the photos below. Thread yarn needle with CA from start of Upper Limb. Whipstitch (see Pattern Notes) Upper Limb to Torso. Weave in ends. Repeat for second Upper Limb.

Embellish Face and Assemble Head

- Thread yarn needle with CB. On front of Muzzle, use the embroidery satin stitch (see Pattern Notes) to embellish a triangular Nose. Use the embroidery back stitch (see Pattern Notes) to embellish a smile or partial smile. Weave in yarn tail of CB on inside of Muzzle. Stuff Muzzle firmly. Position Muzzle on with bottom of Muzzle at Rnd 16 (marker#3) of Head and top of Muzzle at Rnd 8 (marker#2) of Head. Thread yarn needle with CA from end of Muzzle. Whipstitch (see Pattern Notes) Muzzle to Head. Weave in yarn tail on inside of Muzzle.

- Position safety eyes at sides of or above Muzzle (at Rnd 8/marker#2). When satisfied with positions, secure by attaching washers firmly inside of Head.

- Stuff Head firmly.

- Position Ears with flat (folded) edges touching the Head so that bottom of each Ear is at same Rnd of safety eyes. Use locking stitch markers to “pin” Ears in place. Thread yarn needle with CA from Ear and whipstitch (see Pattern Notes) to Head. Weave in yarn tails on inside of Head.

- To finish your Floppy Paws Bear, align stitches on Head to stitches on Torso. When you are comfortable with position, thread yarn needle with CA from Head. Whipstitch (see Pattern Notes) to join. With yarn needle, weave in ends.
