

Naomi from How To Heat Press is back with the last in a series of guest posts to help you explore your Cricut! Today, she’ll share a great tip for locking designs in place in Cricut Design Space. You can use the skills from this tutorial to make your own customized projects.
This post contains affiliate links. I may receive compensation (at no added cost to you) if you make a purchase using these links. Photos in this post are © How To Heat Press and are used with permission.
About How To Heat Press
How To Heat Press was started by Naomi and Dan in 2016. They’ve been using heat press and cutting machines for years, and they love all the wonderful projects you can create with these machines. How To Heat Press provides information about heat press and cutting machines (with a focus on Cricut machines), heat press and Cricut tips and tutorials, and t-shirt business tutorials.
Show your support by following Naomi on Website | Facebook | Instagram | Pinterest | Twitter
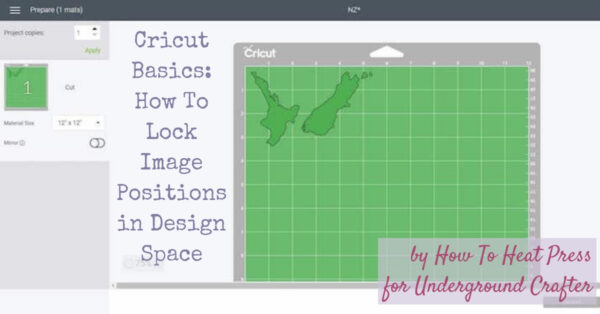
Cricut Basics: How To Lock Image Positions in Design Space
Tutorial by How To Heat Press

How do you lock the image position on the mat in Cricut Design Space?
That’s what we will take a look at in this really easy Cricut Design Space tutorial for you.
First I’ll explain how to use the attach feature in Design Space to keep the placement of a design. I’ll also explain how to change the position of your design on the cutting mat, and show you a couple of different ways to do this.
How To Use Cricut Attach
The attach tool in Design Space is like a glue that sticks multiple components of a design or text together. This allows them to be cut in the exact same configuration as shown on the canvas.

Here is an example of how you would use the attach feature in Cricut Design Space (and it works the same for both Cricut Maker and Cricut Explore Air 2 machines).
I’ve uploaded this image into Design Space. You can see on the right hand side in the layers panel, that there are 4 pieces included in this design.

The following screenshot is the mat preview when I go to cut out this design.
You can see that the placement of the design has changed. By default, Design Space has rearranged the parts of the design to save space on the cutting mat.
Unless you use the attach tool to hold the placement of your design, Design Space will always rearrange your designs.

So, in order to keep the placement of my design as it is shown on the canvas, I will need to select all the parts/layers in my design and click ‘attach’.
The attach tool is located at the bottom right of the canvas, alongside the Cricut slice, flatten, contour, and weld tools.
By attaching the design, this will hold the placement of the design, and then it will be cut exactly as displayed on the canvas.

Now, when viewing the mat preview again, my design has stayed in the same configuration as was shown on the canvas!

Although the design placement is the locked into position, Design Space still puts the design in the top left corner of the cutting mat by default.
This will be fine most of the time, but sometimes you want to be able to lock something in a specific position on a mat.
How can you change the position of the design on the cutting mat?
How to Lock The Position On The Mat
To change the position of your design on the cutting mat, all you need to do is select your design and manually drag it to change its position.
Wherever you drag the design on the mat, the position will be locked in and your Cricut will cut it out in that exact position on your mat.

You also have the option to rotate your design. Your Cricut will cut out your design exactly as is shown in the mat preview.

If your design is selected, you will notice there are three dots in the top left corner of the box. This gives you more options:
- You can hide your design completely, so that it will not be cut out (this is if you are cutting multiple designs at once and want to delete something without going all the way back to the canvas)
- You can move a design to another mat, so that it will be cut out in a different color (this is if cutting multiple designs in different colors)
- You can create a new mat to add your design to (this is if you would like to cut it out in a new color than the mats you already have)

In the mat preview you are not able to resize your image, you are only able to change its position on the mat.
How To Edit the Cutting Position of a Design on the Mat
If you click ‘continue’ after the mat preview, you will be brought to this screen below where you a ready to connect your machine and cut out your design. However, you once again have the option to edit your mat and manually change the position of your design.

Just like before, you can click to select your design, and manually drag it anywhere around the mat.
Wherever you move the design, its position will be locked into place and your Cricut will cut it out in the exact position as shown in the preview below.

When editing your mat, you are once again not able to resize your image, only change the position in which it will be cut on the mat.
And that’s all there is to it!
It’s very simple indeed, but another one of those things we all need to know when using Cricut Design Space.
Here are some other Cricut related posts on Underground Crafter:
- All about the Cricut BrightPad
- Cricut Iron-On sweatshirt project
- Customizing a pencil case with adhesive vinyl
Thank you for stopping by!
This was extremely helpful, thank you!
ThANKS,THIS ANSWERS ALOT !!!
I’ve been fighting this, I had NO idea I could move the image in the “Make It” screen. Thank you!
thank you
Perfect! Thanks you!
Thank you. This has been most helpful
This page saved my entire project, thank you so much!
This is all good until you need to know exactly where the image is placed as other cuts on other layers need to line up perfectly. By manually moving it you don’t know exactly where to place it.
I agree…what is the point lining everything up in Design space (i.e if cutting a pattern in a particular part of an A3 design for instance) only to find you are manually eyeballing things when you get to the printing stage? Very frustrating
The “drag it” method is a doable (though coarse) method of moving a design on the mat in the Make-It view — thanks for the tip! However I find it frustrating that though you can place elements with 0.001″ precision in the Design Space, you are left with a *much* lower precision drag method to put it back to where you wanted it initially. What I’d LOVE to see in a future Cricut software update is a button with two choices when you go from Design-Space to Make-It view: (1) allow Cricut to rearrange for optimal use of materials; and (2) maintain all dimensions, placements, locations, etc. as originally made in Design Space. This feature becomes important when trying to make precise cuts (and drawings) relative to the edges of a greeting card where you want even borders — or on a piece of veneer where you want precise control of spacing between design elements and medium edges.
I am in total agreement! Using the original Cricut, I was able to place multiple designs on the 12 x 12 mat, lay down different colors of paper and cut all designs and layers without having to reload the mat for different layers. Design Space was a much friendlier design option to use.
It’s extremely frustrating. You take forever positioning things perfectly in design space only to have them lumped into one corner of the mat. They really need to have an option for using design space layout when drawing or cutting.
Totally agree!! Especially when cutting images that need to line up exactly with other layers. It is so frustrating. I need them perfectly lined up and by manually moving them there is no way I will get it in the exact position.
YES! I’m actually pretty upset this is not already a feature. I have just spent HOURS precisely lining up a very large project only to find out it won’t cut how I’ve placed it and now I have to drag all the pieces back into place again! This needs to be fixed.
Yes! I’m so frustrated! I need my images cut exactly they they are on the mat. Geez!!!
I so agree with Tom W!! Everyone who makes cards or any custom projects would be ecstatic to have these features (again?). I’m sure both were available on the original Cricuts that only used cartridges.
The current space saving feature doesn’t save much space, either.
Thank you both for the information. I will now stop searching for a fix and get back to making.
Totally agree! This is a must have.
I have been using the pens to draw on custom playing cards for a game project. 7 sheets of 9 cards per sheet. I created a layout template as a guide and attached all pen text and graphics to the sheet against the graphics. When I lay down the cards, in the positions indicated on my mat, the output still cheats the design to the right. I changed the guides to a cut layer and cut out the template, removed the card spots and placed my cards in the template. I turned the visibility of the template off and ran it. It ignored the placement and marked outside of the precut template.
When I regain my patience, I will attempt changing the template from cut to guide between runs and see if that will preserve the position better, or make it a draw and run it without a pen so it. does not mark the cards.
So frigging frustrating!
After wasting 60 or 70 cards on trial and error steps, wasting money on pens and card blanks I am totally frustrated and thinking I will just have to move my design to some other method of production.
Why can’t Cricut just fix this issue.
If you want to lock the position on the mat from the designer with precise positioning, just add a very small (1px x 1px) circle in the top left corner of your design, then anchor it to the rest of your design. Cricut will be forced to keep that tiny circle in relation to the rest of your cut, which forces it to keep the position you specified instead of using its material optimizer. You will not see the small circle on your piece after the cut is complete, and you won’t have to keep moving your design every time you cut it.
Thanks Nick, that really helped me out! I move the circle in from the top and left by 3mm in CDS to allow for the small margin that my Joy Xtra allows. That way I can cut an A4 design precisely from the top left corner of my cutting mat.