

It’s that time of the year when I’m looking for last-minute crafts and gift ideas for winter holiday gifts. In today’s tutorial, I’m sharing a no-sew, easy peasy way to make reusable handmade ornaments and gift tags using several VELCRO® Brand products. These ornaments and gift tags double as gift wrap. I’m including links to three crochet patterns for handmade ornaments along with four ideas for personalizing these tags, so grab some felt and let’s get ready to make something fun!

This post contains affiliate links. I may receive compensation (at no added cost to you) if you make a purchase using these links. Materials for this post were generously provided by Velcro Companies, Beacon Adhesives, Cricut, and Yarnspirations. Camera generously provided by B&H Photo Video and Pro Audio.
If you follow me on Instagram, you may remember seeing this box during the summer.

As a VELCRO® Brand Ambassador, I got this special box to commemorate the 50th anniversary of the moon landing. Velcro Companies is one of the few companies who can say they were there since they are the original inventors of hook and loop fasteners.

As much as I love to use VELCRO® Brand hook and loop fasteners for crafts projects, it wasn’t until I opened this box that I got an idea that I filed away in my mind for holiday use.

I thought it would be fun to customize gift wrap with felt ornaments and gift tags using VELCRO® Brand hook and loop fasteners, so naturally, I was thrilled when they reached out to see if I’d be interested in participating in the 12 Days of Christmas Event this year. They sent along this fun package of goodies to play with and I think you’ll love what I came up with.

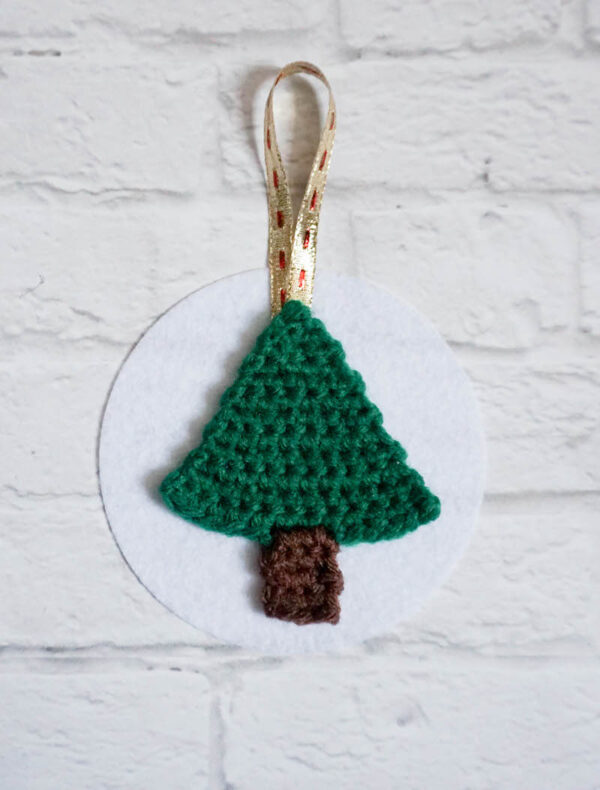
Of course, I had to throw crochet in there somewhere because it’s me! This is a quick project that you can make in literally minutes. (If you crochet any of the three ornament patterns that I’ve linked up, it will take a little bit longer.) It will take you longer to read this tutorial than to make your tags, but remember to allow for adequate drying time before putting your ornaments on the tree.
How To Make Reusable Handmade Ornaments and Gift Tags
No-Sew, Last-Minute Gift Idea Tutorial by Underground Crafter

I love adding a handmade touch to my gifts. In this tutorial, I’ll share how to use felt and VELCRO® Brand Sticky Back for Fabrics Ovals to make ornaments that do double duty as gift tags. I’ll also share ideas for personalizing these gift tags if you aren’t pressed for time.
Tools
- To cut your felt backing, you’ll need a Cricut Maker or Explore (with Cricut Design Space, Cricut Fine Point Blade, and FabricGrip or StandardGrip Mat). Alternatively, watch this video by DaveHax that shares 5 ways to make perfect circles without a compass. Use one of these methods with a fabric pencil and scissors.
- A pair of sharp scissors for cutting the VELCRO® Brand ONE-WRAP® Roll.
Materials
- Cricut Felt – I used several sheets from the Carousel Sampler.
- Ribbon – you’ll need approximately 10″/25.5 cm for each ornament.
- Beacon Fabri-Tac glue.
- VELCRO® Brand Sticky Back for Fabrics Ovals in your choice of color – you’ll need a pair of Ovals for each ornament or gift tag.
- VELCRO® Brand ONE-WRAP® Ties – you’ll need one Tie for each small, unusually shaped gift.
- VELCRO® Brand ONE-WRAP® Roll – you’ll cut the length you need for each gift, so a single roll can wrap many gifts.

Instructions
Make Your Ornaments and Felt Shapes
- Start by making your ornaments and felt shapes.
- Get the free crochet pattern for the Eastern Star Ornament here.


- If using a Cricut, search for images in Design Space and cut your Cricut Felt following the instructions.

- I cut several different shapes including stars and trees.

- Remember that your circles need to be larger than your shapes or your crochet ornaments!
- You can cut your felt circles on the Cricut, too, or use one of these tips for making perfect circles without a compass to outline a circle on your felt with a fabric pencil to cut out with scissors.
Assemble Your Ornaments
- Use your Fabri-Tac glue to assemble each ornament.
- Start by creating an ornament hanger loop with your ribbon.

- Position your ornament hanger loop on your felt backing circle.

- When you’re satisfied with the position, use the Fabri-tac to glue the ribbon down.
- I glued the loop ends together, and then glued the ends to the felt circle.

- Next, add glue to the back of your crochet or felt ornament shape.

- Position this piece securely, roughly centered, on your felt circle.

- Set aside the completed ornament and let the glue dry, following package instructions.
- Repeat these steps for each ornament. For the Star Ornament, I first glued the ribbon directly onto the crochet fabric since it was lacy and I didn’t want ribbon showing through.

- And, for the Sweater Ornament, I applied extra glue because it is double layered and heavier.

- I also made a plain gift tag using felt pieces with no ribbon. This is great for gift giving all year round!
- Once your ornaments are dry, you’re ready for the next step.

Turn Your Ornaments and Tags into Gift Wrap
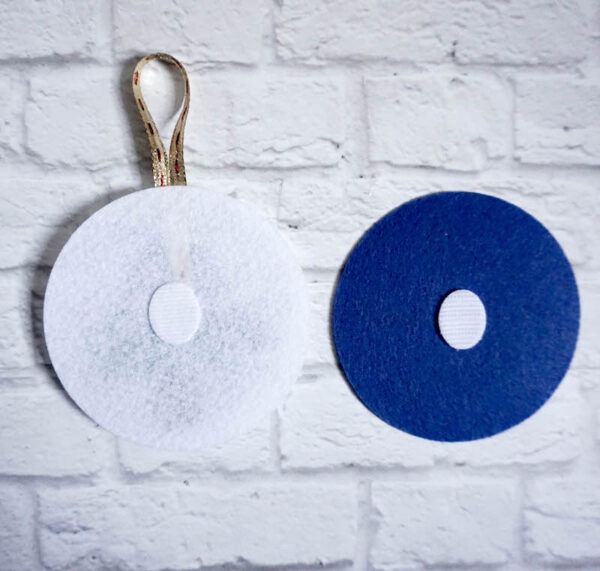
- To make these ornaments and tags into gift wrap accessories, you’ll need to know the difference between the hook and loop sides.
- The scratchy, rough side (at right in the picture below) is the hook side. The softer, less textured side (at left in the picture below) is the loop side.

- In general, you’ll want to place the loop side on the back of your ornaments so that they don’t stick or scratch to other items on your tree.
- For gift tags, it may be easier to put the hook side on the back of your tag to then attach to the loop side at the top of VELCRO® Brand ONE-WRAP® Ties and Rolls.
- Peel a VELCRO® Brand Sticky Back for Fabrics Oval off the sheet and attach the loop side to the back of your ornament.

- For larger ornaments, you’ll want to use two Sticky Back for Fabric Ovals…

- …but for smaller ornaments and tags, one Oval in the center will work.
- IMPORTANT: Don’t do this next step until your gift is already wrapped and ready!
- Now, stick a matching Oval face down on top of the Oval that’s already attached to your ornament.

- Press the ornament firmly down onto your gift card or wrap. The adhesive on the back of the attached Oval will affix it to your gift card.

- Here are a few more wrapping ideas.

- If you have two gifts, cut a piece of VELCRO® Brand ONE-WRAP® Rolls to the length you need to wrap the gifts together.


- Follow the same process to attach a gift tag, but you’ll want to place the hook side on the back of the tag so it attaches to the loop side on the VELCRO® Brand ONE-WRAP® Rolls.

- Now you won’t have to worry about your gifts separating.

- If you have a small, unusually shaped gift (like fabric or a handmade gift), use a VELCRO® Brand ONE-WRAP® Tie in your choice of color.

- Then, attach the ornament or gift tag as shown above.

- How cute is that?

- Now the recipients just need to separate the hook from the loop side and they have a cute gift tag or ornament to keep.

- If you aren’t truly making last-minute gifts, you can personalize the ornaments or tags. Here are a few ideas for adding letters, initials, or monograms.
- Use fabric paint.
- Use adhesive felt letters.
- Use iron-on or heat transfer vinyl if you have a cutting machine.
- Use fabric ink and stamps to add fun decorations.

Enjoy!